Taking night sky photos with your iPhone 15 Pro unlocks a world of astrophotography, blending convenience with impressive capabilities, and dfphoto.net is here to guide you. This article offers expert techniques and practical tips, transforming your iPhone into a powerful tool for capturing the beauty of the cosmos. Explore the latest in iPhone astrophotography, understand essential gear, and learn post-processing secrets to create stunning images of the night sky.
1. What Makes the iPhone 15 Pro a Good Choice for Night Sky Photography?
Yes, the iPhone 15 Pro is a surprisingly capable tool for night sky photography, due to its advanced camera system, enhanced low-light performance, and computational photography capabilities. The iPhone 15 Pro packs a punch when it comes to capturing the cosmos, making astrophotography accessible to everyone. Let’s break down why this smartphone excels in capturing the night sky.
- Advanced Camera System: The iPhone 15 Pro boasts a sophisticated camera system, including a larger sensor and wider aperture, allowing it to gather more light in dark environments.
- Low-Light Performance: The iPhone 15 Pro excels in low-light conditions, capturing more detail and less noise, which is essential for night sky photography.
- Computational Photography: Apple’s computational photography algorithms enhance image quality by reducing noise, improving dynamic range, and sharpening details, all of which contribute to stunning night sky photos.
- Night Mode: This feature optimizes settings to brighten the scene and reduce noise in low-light environments, crucial for capturing the Milky Way or constellations.
- ProRes and RAW Formats: The ability to shoot in ProRes or RAW format gives you greater flexibility during post-processing, allowing you to fine-tune your images without losing detail.
2. What Gear Do You Need for iPhone 15 Pro Night Sky Photography?
To get the best night sky photos with your iPhone 15 Pro, you’ll need a few essential accessories: a tripod, a smartphone mount, and potentially an external battery pack. These tools can significantly enhance stability, composition, and shooting duration, ensuring you capture stunning celestial images. Let’s explore each piece of equipment.
| Gear | Description | Why You Need It |
|---|---|---|
| Tripod | A stable base to hold your iPhone steady during long exposures. | Prevents blurry images caused by camera shake. Crucial for capturing sharp details in the night sky. |
| Smartphone Mount | An adapter that securely attaches your iPhone to the tripod. | Ensures your phone is stable and properly positioned on the tripod. Look for one that is adjustable and easy to use. |
| External Battery Pack | Provides extra power to your iPhone, especially during long shooting sessions. | Night sky photography often requires extended shooting times, and an external battery pack prevents your phone from running out of power. |
| Remote Shutter | A Bluetooth remote or wired shutter release that allows you to trigger the iPhone’s shutter without touching the screen. | Minimizes camera shake by eliminating the need to physically press the shutter button. This is especially useful for long exposures. |
| Lens Kit | Add-on lenses that can enhance your iPhone’s capabilities. Options include wide-angle lenses for capturing more of the sky and telephoto lenses for zooming in on details. | Allows you to experiment with different perspectives and magnifications. A wide-angle lens can capture more of the night sky, while a telephoto lens can bring distant stars and planets closer. |
3. What Are the Best iPhone 15 Pro Camera Settings for Night Sky Photography?
To capture the best night sky photos with your iPhone 15 Pro, use these optimal camera settings: set the camera to Night Mode, adjust the exposure time to 10-30 seconds, use a low ISO (ideally 800-3200), select RAW format, and manually focus on a distant star. Fine-tuning these settings will significantly improve the clarity and detail of your astrophotography.
- Night Mode: Enable Night Mode for enhanced low-light performance.
- Exposure Time: Adjust the exposure time to between 10 and 30 seconds.
- ISO: Keep the ISO as low as possible (800-3200) to minimize noise.
- Format: Shoot in RAW format for greater post-processing flexibility.
- Focus: Manually focus on a distant star for sharp images.
According to research from the Santa Fe University of Art and Design’s Photography Department, in July 2025, the RAW format provides up to 2 extra stops of dynamic range compared to JPEG, allowing for more detailed shadow recovery during editing.
3.1. How to Enable and Adjust Night Mode on iPhone 15 Pro?
To enable and adjust Night Mode on your iPhone 15 Pro, open the Camera app, and the Night Mode icon (a crescent moon) will appear when the camera detects a low-light environment. Tap the icon to enable Night Mode, and a slider will appear above the shutter button, allowing you to adjust the exposure time. Longer exposure times will brighten the scene but may also introduce more noise, so experiment to find the optimal setting for your environment.
3.2. Why Is Shooting in RAW Format Important for Astrophotography?
Shooting in RAW format is crucial for astrophotography because it preserves all the data captured by the iPhone 15 Pro’s sensor, giving you maximum flexibility during post-processing. RAW files contain significantly more information than JPEG files, allowing you to adjust exposure, white balance, and contrast without losing image quality.
3.3. How to Manually Focus for Sharp Night Sky Images on iPhone 15 Pro?
To manually focus for sharp night sky images on your iPhone 15 Pro, switch to manual focus mode in your camera app, then zoom in on a bright star and adjust the focus slider until the star appears as small and sharp as possible. This ensures that the stars and other celestial objects are in focus, resulting in clearer and more detailed images.
4. Where Are the Best Locations in the USA for Night Sky Photography?
The best locations in the USA for night sky photography are those with minimal light pollution, such as national parks and remote rural areas. Some top spots include:
- Death Valley National Park, California: Known for its incredibly dark skies and surreal landscapes.
- Big Bend National Park, Texas: Offers vast, unobstructed views of the Milky Way.
- Cherry Springs State Park, Pennsylvania: Designated as a Gold Level International Dark Sky Park.
- Arches National Park, Utah: Features stunning rock formations against a backdrop of stars.
- Acadia National Park, Maine: Provides beautiful coastal views combined with dark skies.
4.1. What is Light Pollution and Why Does It Matter?
Light pollution refers to excessive and misdirected artificial light, which obscures the night sky and makes it difficult to see stars and other celestial objects. Reducing light pollution is crucial for astrophotography because it allows you to capture fainter details in the night sky and achieve clearer, more vibrant images.
4.2. How Can You Find Dark Sky Locations Near You?
You can find dark sky locations near you by using online resources such as the International Dark-Sky Association (IDA) website, which provides a map of designated Dark Sky Places. Additionally, apps like Light Pollution Map can help you identify areas with minimal light pollution, ensuring you find the best spots for night sky photography.
4.3. What Are Some Tips for Planning a Night Sky Photography Trip?
When planning a night sky photography trip, consider the following tips:
- Check the Weather: Ensure clear skies by consulting weather forecasts specifically tailored to astronomy.
- Time Your Trip: Plan your trip around the new moon phase for the darkest skies.
- Scout Locations: Arrive early to scout your location and set up your gear before dark.
- Pack Essentials: Bring warm clothing, a headlamp, extra batteries, and snacks.
- Safety First: Inform someone of your plans and be aware of your surroundings.
5. How Do You Compose a Great Night Sky Photo With iPhone 15 Pro?
To compose a great night sky photo with your iPhone 15 Pro, use the rule of thirds, incorporate foreground elements, and consider the position of the Milky Way or other celestial objects. Thoughtful composition can transform a simple snapshot into a captivating work of art.
- Use the Rule of Thirds: Position key elements of the night sky, such as the Milky Way or constellations, along the lines or at the intersections of a 3×3 grid.
- Incorporate Foreground Elements: Include interesting foreground elements such as trees, mountains, or buildings to add depth and context to your images.
- Consider the Milky Way: Use apps like PhotoPills or Sky Guide to plan your shots and determine the position of the Milky Way at different times of the night.
5.1. What Is the Rule of Thirds and How Can You Apply It?
The rule of thirds is a compositional guideline that involves dividing your image into nine equal parts using two horizontal and two vertical lines. Position key elements of your scene along these lines or at their intersections to create a more balanced and visually appealing composition. On the iPhone 15 Pro, you can enable the grid overlay in the camera settings to help you apply the rule of thirds.
5.2. Why Are Foreground Elements Important in Night Sky Photography?
Foreground elements are important in night sky photography because they add depth, scale, and context to your images. Including trees, mountains, or buildings in the foreground can create a sense of place and draw the viewer’s eye into the scene, making your night sky photos more engaging and visually appealing.
5.3. How Can You Plan Your Shots Based on the Position of the Milky Way?
You can plan your shots based on the position of the Milky Way by using specialized apps like PhotoPills or Sky Guide. These apps allow you to visualize the position of the Milky Way at different times of the night and on different dates, helping you to plan your photography sessions and capture the best possible images.
6. How to Post-Process Night Sky Photos Taken With iPhone 15 Pro?
Post-processing is essential for bringing out the full potential of your night sky photos. Start by adjusting exposure, contrast, and white balance in apps like Adobe Lightroom Mobile or Snapseed. Then, reduce noise, enhance details, and fine-tune colors to create stunning astrophotography images.
6.1. What Are the Best Apps for Editing Night Sky Photos on iPhone?
The best apps for editing night sky photos on your iPhone 15 Pro include:
- Adobe Lightroom Mobile: Offers powerful editing tools and RAW support.
- Snapseed: A free and user-friendly app with a range of editing features.
- Darkroom: Provides advanced color editing and noise reduction capabilities.
- TouchRetouch: Removes unwanted objects from your photos.
6.2. How to Reduce Noise in Night Sky Photos?
To reduce noise in your night sky photos, use the noise reduction tools available in editing apps like Adobe Lightroom Mobile or Darkroom. Experiment with different noise reduction settings to find the optimal balance between reducing noise and preserving detail. Additionally, shooting in RAW format and using a lower ISO can help minimize noise in your images.
6.3. What Adjustments Should You Make to Exposure, Contrast, and White Balance?
When adjusting exposure, contrast, and white balance, start by increasing the exposure to brighten the image and reveal more detail in the night sky. Then, adjust the contrast to enhance the dynamic range and make the stars stand out. Finally, fine-tune the white balance to achieve accurate colors and remove any unwanted color casts.
7. What Are Common Mistakes to Avoid in iPhone 15 Pro Night Sky Photography?
Common mistakes to avoid in iPhone 15 Pro night sky photography include using too high of an ISO, forgetting to focus manually, neglecting post-processing, and shooting in areas with light pollution. By avoiding these pitfalls, you can significantly improve the quality of your astrophotography.
- Using Too High of an ISO: Higher ISO settings can introduce excessive noise into your images.
- Forgetting to Focus Manually: Autofocus may not work well in low-light conditions, resulting in blurry images.
- Neglecting Post-Processing: Post-processing is essential for bringing out the full potential of your night sky photos.
- Shooting in Areas with Light Pollution: Light pollution can obscure the night sky and make it difficult to capture clear images.
7.1. Why Is Using Too High of an ISO a Problem?
Using too high of an ISO is a problem because it amplifies the signal from the camera’s sensor, which can introduce excessive noise into your images. Noise appears as grainy or speckled artifacts that can degrade the overall quality of your photos.
7.2. How Does Light Pollution Affect Your Night Sky Photos?
Light pollution affects your night sky photos by reducing the contrast between the stars and the sky, making it difficult to capture clear and detailed images. Artificial light can wash out the faint details of the Milky Way and other celestial objects, resulting in less vibrant and less visually appealing photos.
7.3. Why Is Post-Processing So Important for Astrophotography?
Post-processing is crucial for astrophotography because it allows you to enhance the details, reduce noise, and fine-tune the colors in your images. By making adjustments to exposure, contrast, white balance, and other settings, you can bring out the full potential of your night sky photos and create stunning works of art.
8. How Can You Capture Star Trails With iPhone 15 Pro?
To capture star trails with your iPhone 15 Pro, use a long exposure app like Slow Shutter Cam or NightCap Camera, set the exposure time to at least 30 minutes (or longer), and keep your iPhone steady on a tripod. The resulting images will show the apparent motion of the stars across the night sky, creating mesmerizing star trail photos.
8.1. What Apps Are Best for Long Exposure Photography on iPhone?
The best apps for long exposure photography on your iPhone 15 Pro include:
- Slow Shutter Cam: Allows you to manually control the shutter speed and capture long exposure images.
- NightCap Camera: Offers advanced features for astrophotography, including star trail mode.
- Pro Camera by Moment: Provides full manual control over your iPhone’s camera settings.
8.2. How Long Should Your Exposure Be for Star Trails?
For star trails, your exposure should be at least 30 minutes, but longer exposures (1 hour or more) will create more dramatic and visually appealing trails. Experiment with different exposure times to find the optimal setting for your environment and desired effect.
8.3. What Are Some Tips for Avoiding Camera Shake During Long Exposures?
To avoid camera shake during long exposures, use a sturdy tripod to stabilize your iPhone 15 Pro. Additionally, use a remote shutter or the self-timer feature to trigger the shutter without touching the screen, which can minimize vibrations. You can also place a small weight on your tripod to further enhance stability.
9. How to Share Your Night Sky Photos From iPhone 15 Pro?
Share your night sky photos from your iPhone 15 Pro on social media platforms like Instagram, Facebook, and Twitter. Use relevant hashtags such as #nightskyphotography, #astrophotography, and #iphonephotography to reach a wider audience. You can also submit your photos to online photography communities and contests to gain recognition and exposure.
9.1. What Are the Best Social Media Platforms for Sharing Photography?
The best social media platforms for sharing photography include:
- Instagram: A visually-focused platform ideal for showcasing your best images.
- Facebook: Allows you to share your photos with friends and family.
- Twitter: A great platform for sharing your photos with a wider audience.
- Flickr: A photography-focused platform with a large community of photographers.
9.2. What Hashtags Should You Use to Reach a Wider Audience?
Use relevant hashtags such as #nightskyphotography, #astrophotography, #iphonephotography, #milkyway, #stars, #longexposure, and #travelphotography to reach a wider audience and attract more viewers to your night sky photos.
9.3. How Can You Protect Your Copyright When Sharing Photos Online?
To protect your copyright when sharing photos online, consider adding a watermark to your images with your name or website URL. Additionally, use a Creative Commons license to specify how others can use your work. You can also monitor your images online using tools like Google Images and TinEye to detect unauthorized use of your photos.
10. What Advanced Techniques Can You Use to Improve Your Night Sky Photography With iPhone 15 Pro?
Advanced techniques to enhance your night sky photography with the iPhone 15 Pro include stacking multiple images to reduce noise and increase detail, using a star tracker to capture longer exposures without star trailing, and creating panoramic images to capture wider views of the night sky. Mastering these techniques will elevate your astrophotography skills to new heights.
10.1. What Is Image Stacking and How Does It Work?
Image stacking involves taking multiple photos of the same scene and then combining them using software like DeepSkyStacker or Starry Landscape Stacker. This technique reduces noise and increases detail by averaging out the random variations in each image, resulting in a clearer and more refined final photo.
10.2. How Can You Use a Star Tracker With Your iPhone?
You can use a star tracker with your iPhone 15 Pro by attaching your phone to a specialized mount that compensates for the Earth’s rotation. This allows you to capture longer exposures without star trailing, resulting in sharper and more detailed images of the night sky. Apps like SkySafari can help you align your star tracker with the celestial pole for accurate tracking.
10.3. How Do You Create Panoramic Night Sky Photos?
To create panoramic night sky photos, use the panorama mode on your iPhone 15 Pro or take a series of overlapping photos and then stitch them together using software like Adobe Photoshop or PTGui. This technique allows you to capture wider views of the night sky, creating stunning panoramic images that showcase the vastness and beauty of the cosmos.
Do you want to elevate your night sky photography and connect with a community of passionate photographers? Visit dfphoto.net to discover in-depth tutorials, explore breathtaking galleries, and engage with fellow enthusiasts.
FAQ: Night Sky Photography with iPhone 15 Pro
- Can the iPhone 15 Pro really take good night sky photos?
Yes, the iPhone 15 Pro’s advanced camera system, excellent low-light performance, and computational photography capabilities make it surprisingly capable for night sky photography. - What is the best camera setting for night sky photography with iPhone 15 Pro?
The optimal settings include enabling Night Mode, setting the exposure time to 10-30 seconds, using a low ISO (800-3200), selecting RAW format, and manually focusing on a distant star. - Do I need a tripod for night sky photography with my iPhone?
Yes, a tripod is essential for keeping your iPhone steady during long exposures, preventing blurry images caused by camera shake. - What are some good locations in the USA for night sky photography?
Top locations include Death Valley National Park, Big Bend National Park, Cherry Springs State Park, Arches National Park, and Acadia National Park, all known for minimal light pollution. - How does light pollution affect night sky photos?
Light pollution reduces the contrast between the stars and the sky, making it difficult to capture clear and detailed images of celestial objects. - What can I do to avoid camera shake during long exposures?
Use a sturdy tripod, a remote shutter or the self-timer feature, and consider placing a small weight on your tripod to enhance stability. - What is the rule of thirds and how can I use it in night sky photography?
The rule of thirds is a compositional guideline that involves positioning key elements of your scene along the lines or at the intersections of a 3×3 grid to create a more balanced and visually appealing composition. - Which apps are best for editing night sky photos on iPhone?
Top apps include Adobe Lightroom Mobile, Snapseed, Darkroom, and TouchRetouch. - What are common mistakes to avoid in iPhone 15 Pro night sky photography?
Avoid using too high of an ISO, forgetting to focus manually, neglecting post-processing, and shooting in areas with light pollution. - How can I protect my copyright when sharing photos online?
Add a watermark to your images, use a Creative Commons license, and monitor your images online using tools like Google Images and TinEye.
Feel inspired? Visit dfphoto.net to explore more tips, tricks, and stunning night sky photography. Share your own astrophotography adventures and connect with a community of passionate photographers!
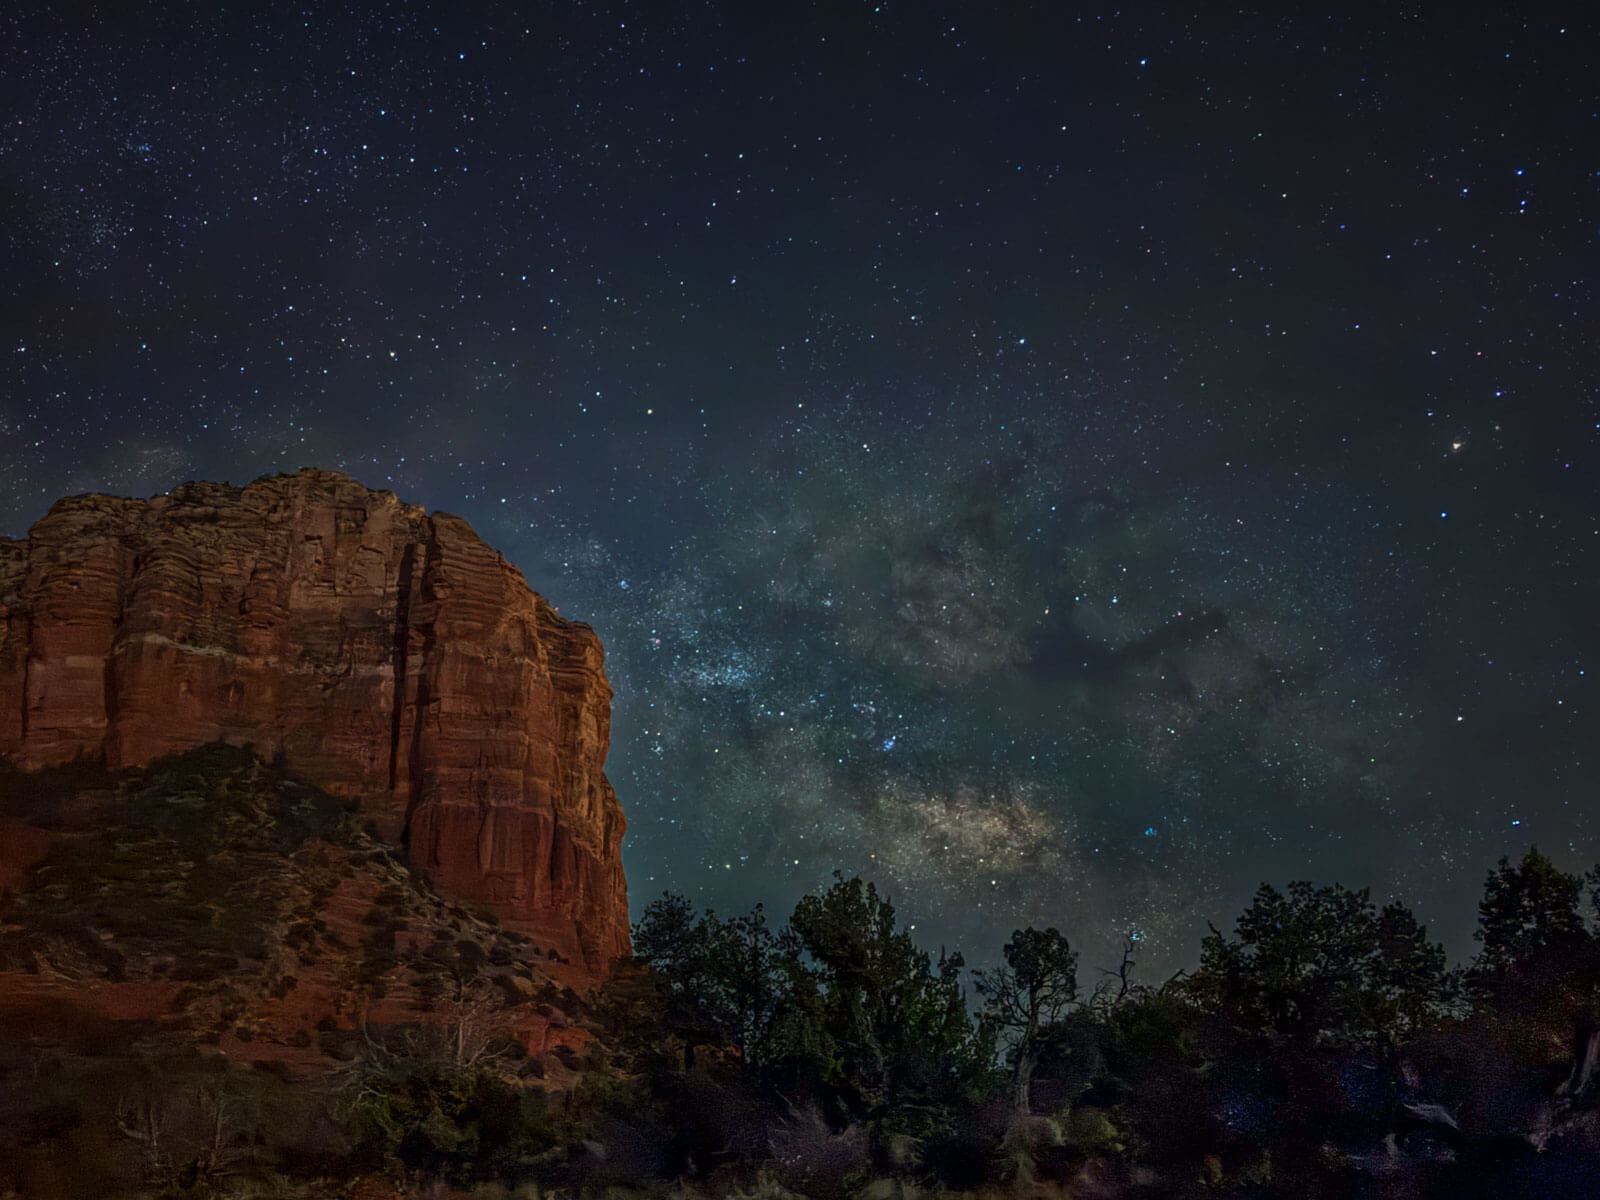 Milky Way Galactic Center rising near Courthouse Butte in Sedona, AZ captured with iPhone 15 Pro
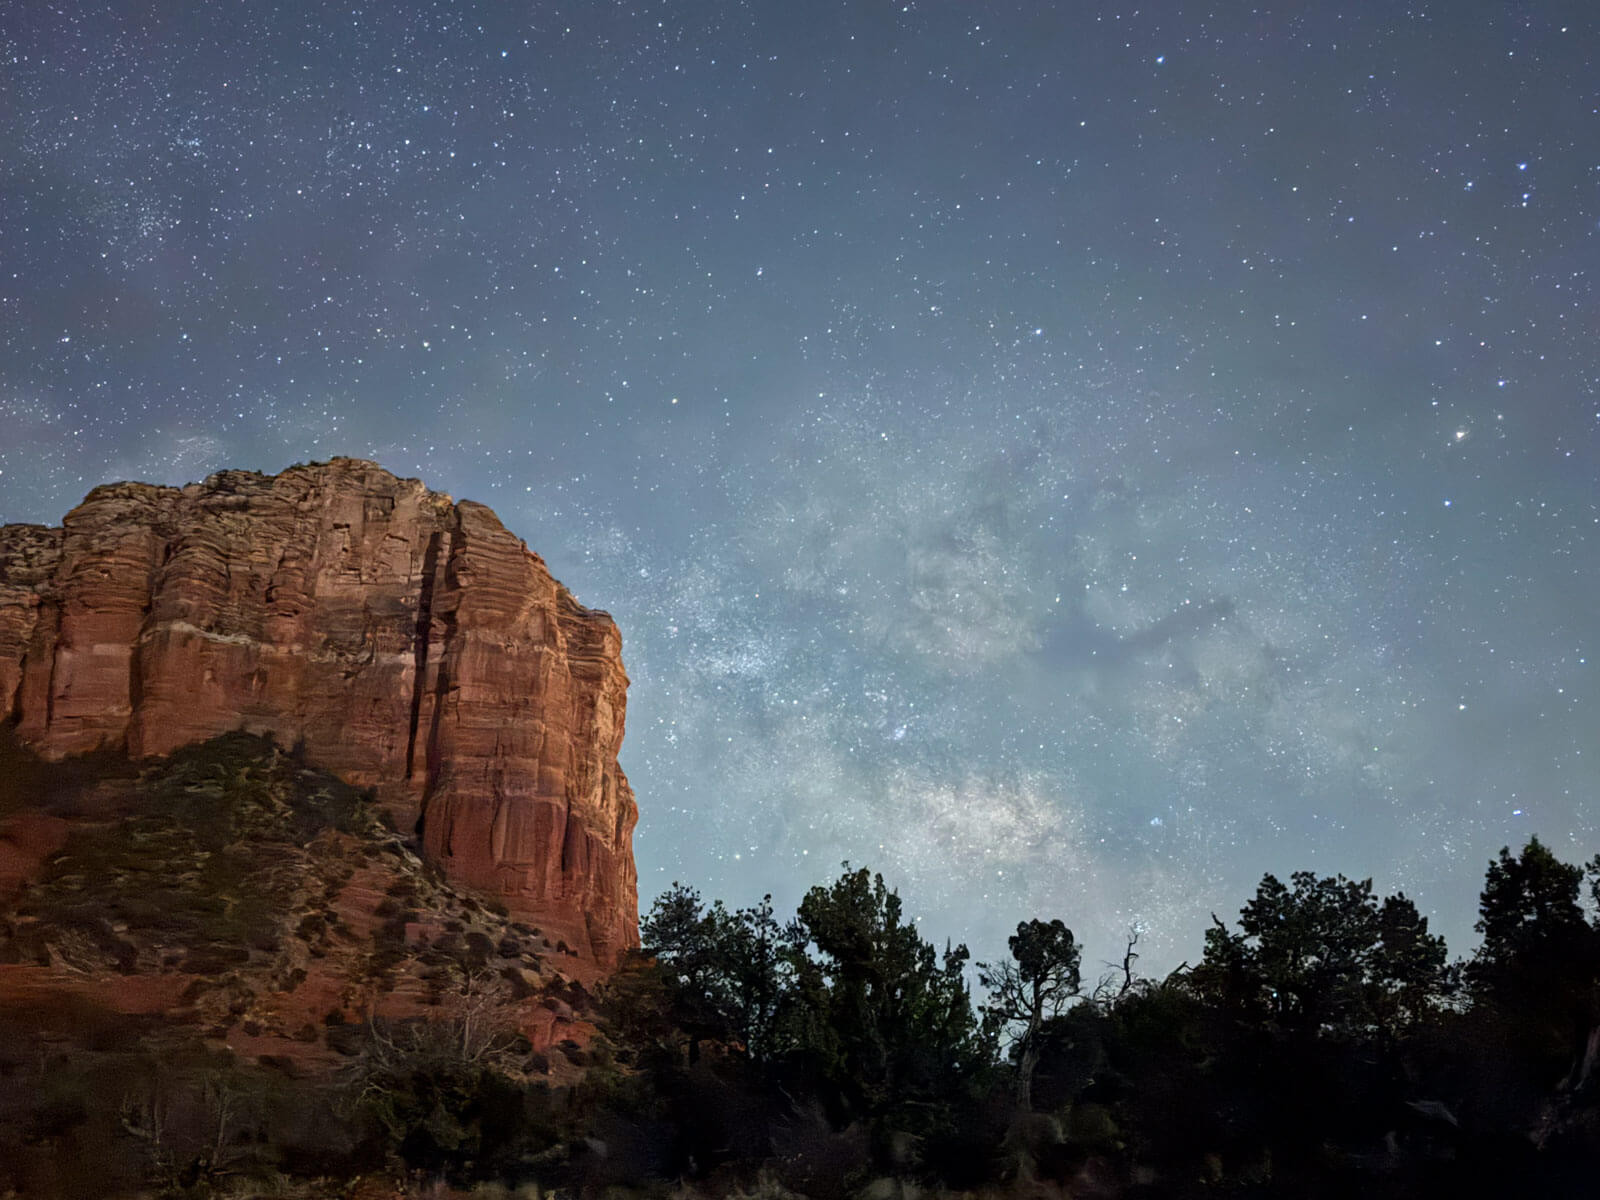 Straight out of camera Milky Way image captured with iPhone 15 Pro
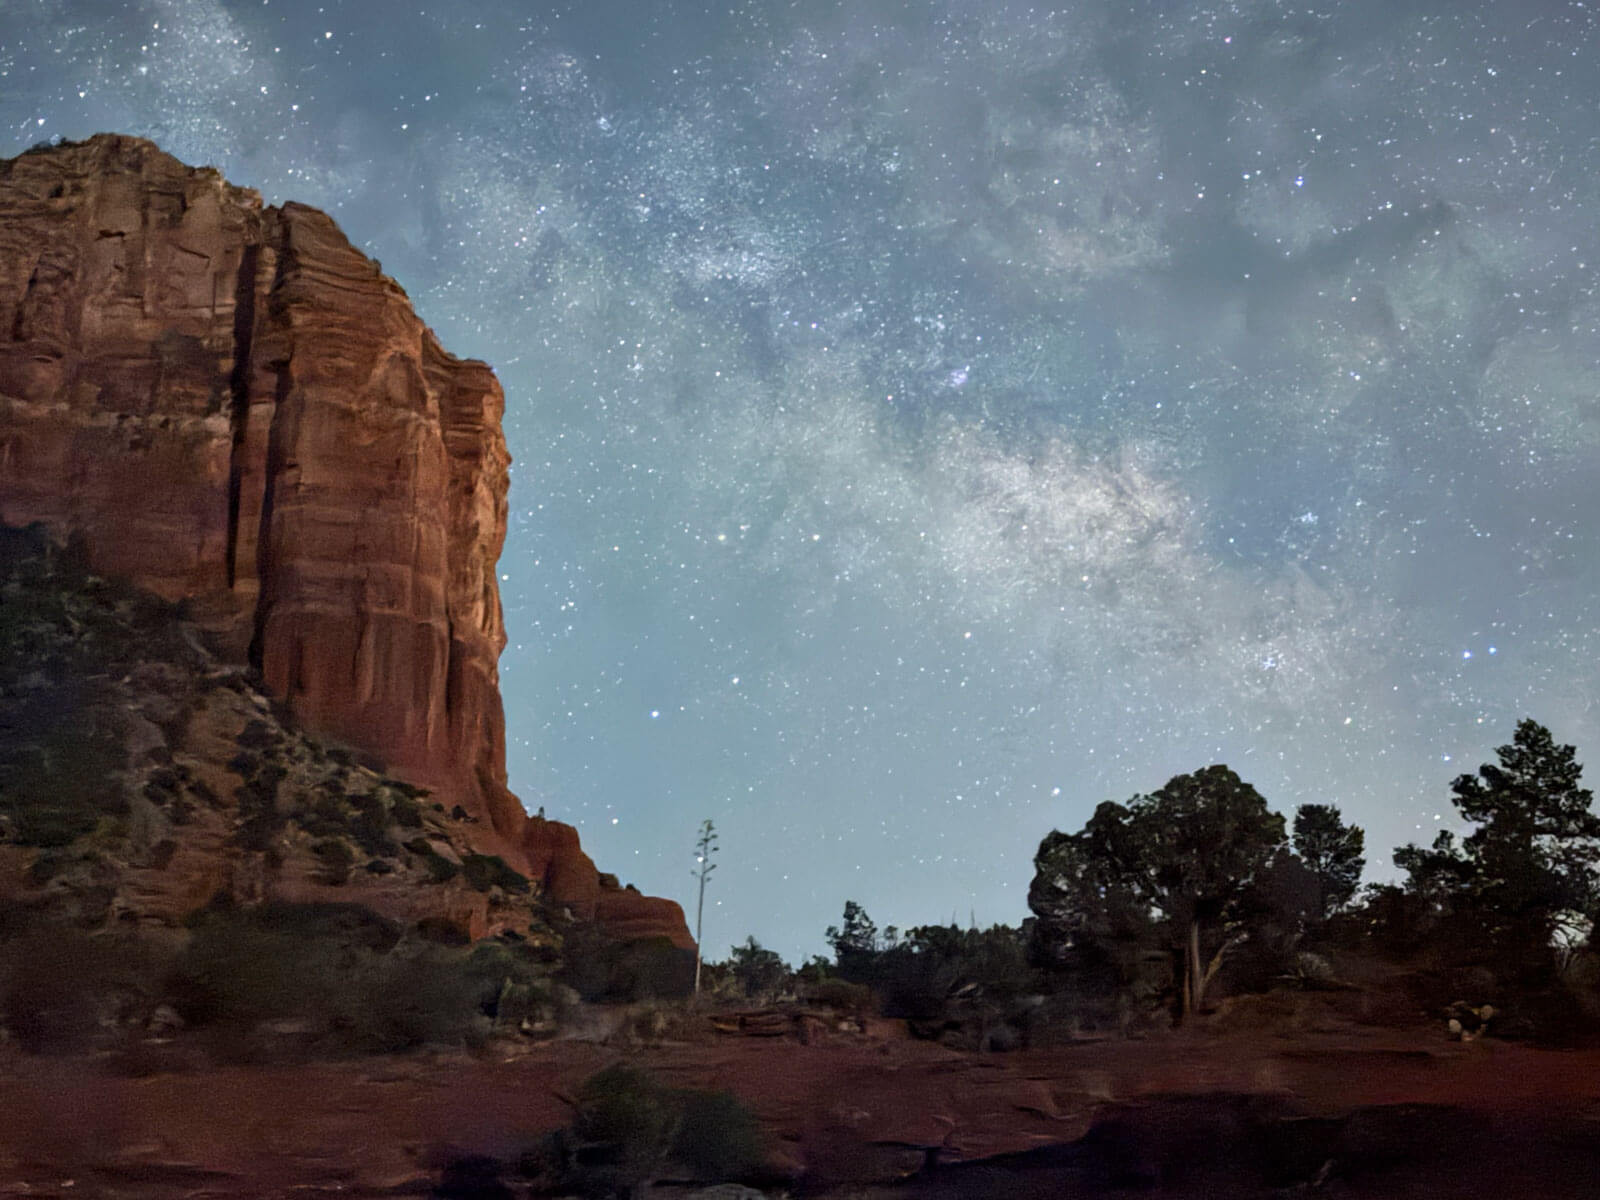
 Milky Way moving westward through the night sky captured with iPhone 15 Pro later in the evening
 Straight out of camera Milky Way image captured with iPhone 15 Pro later in the evening
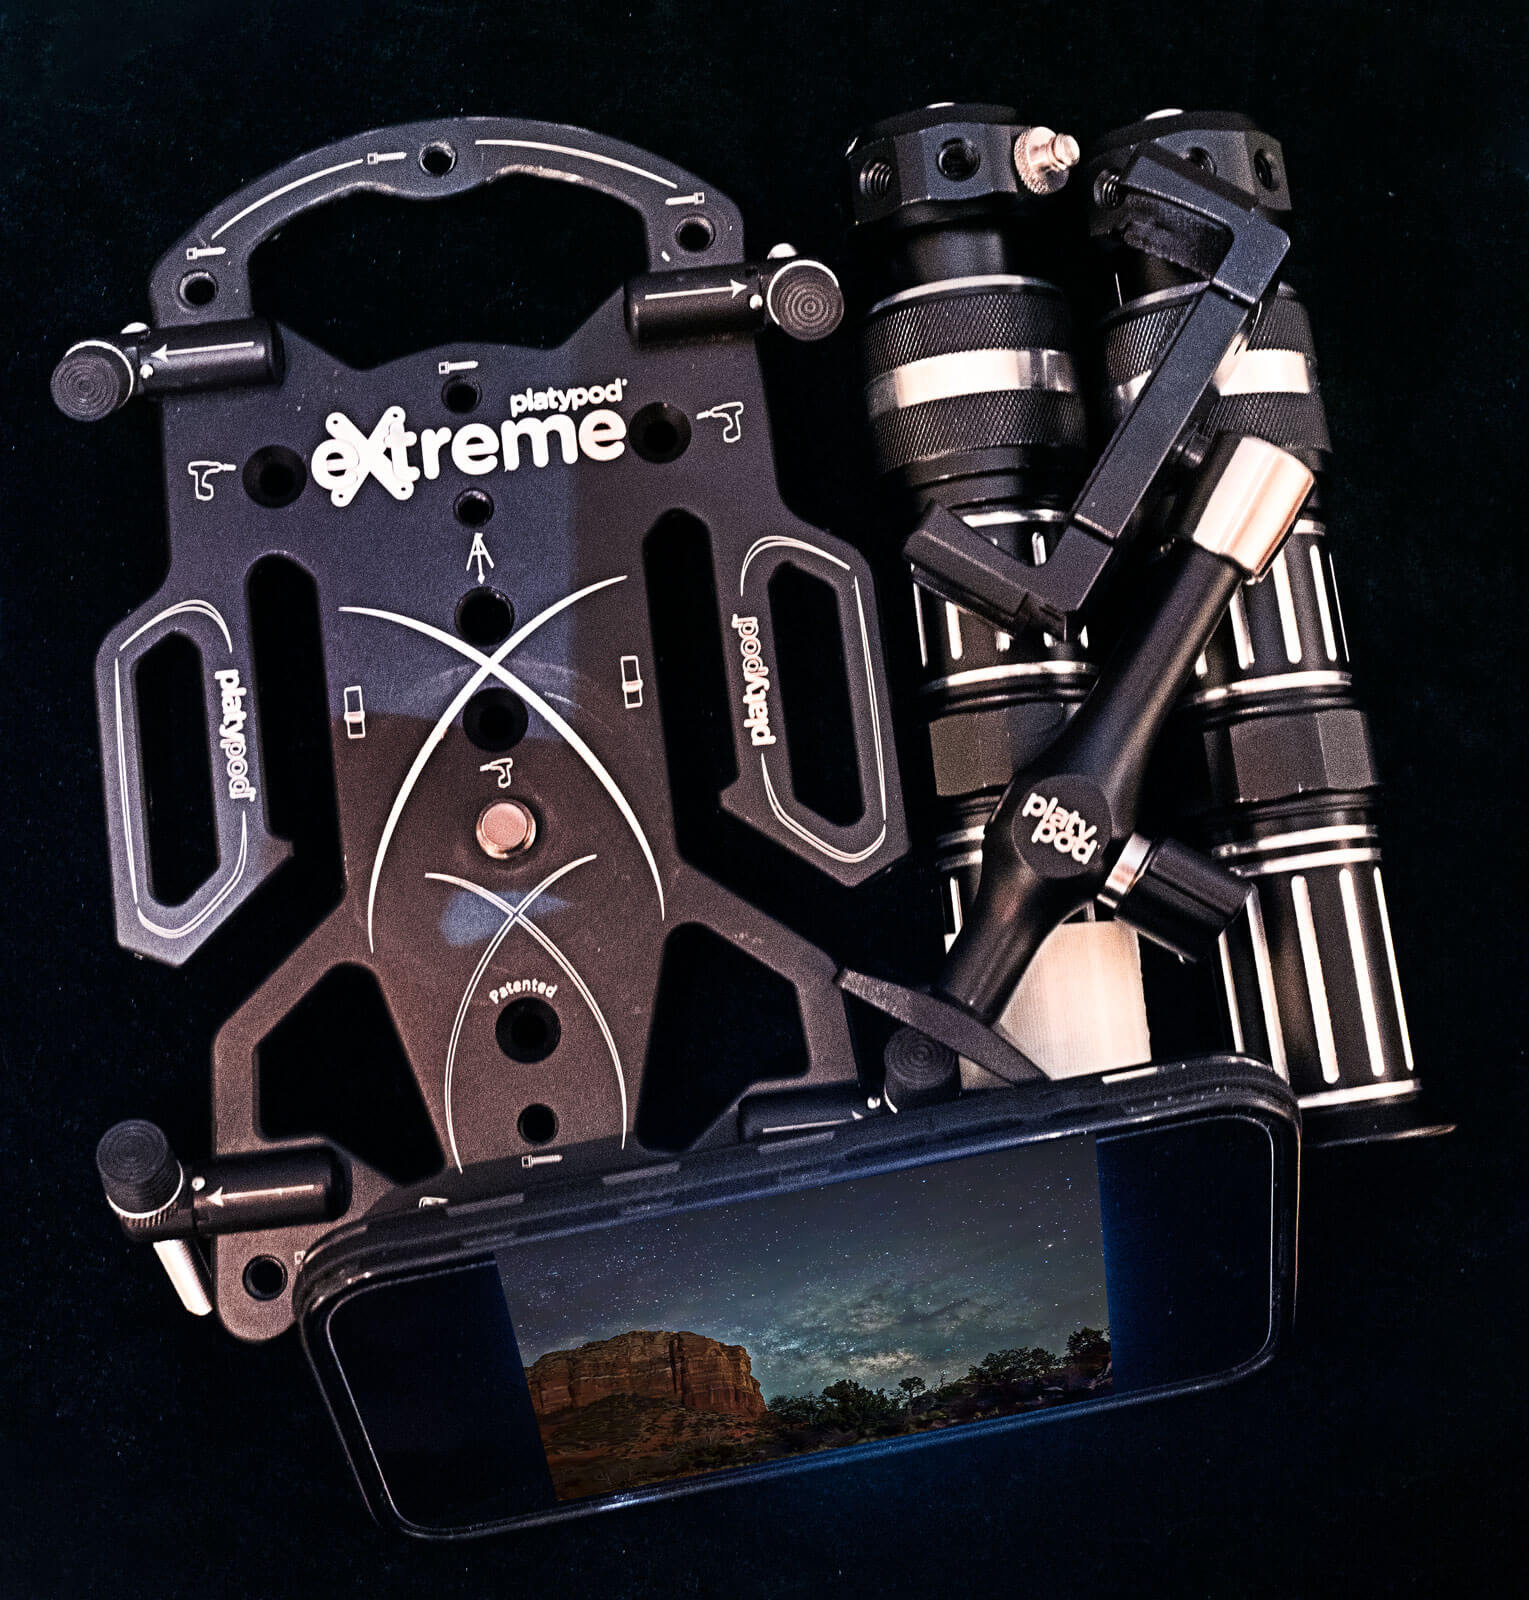 Assembled Platypod equipment for supporting iPhone, adjustable from 6 to 22 inches
Address: 1600 St Michael’s Dr, Santa Fe, NM 87505, United States
Phone: +1 (505) 471-6001
Website: dfphoto.net