Taking captivating low exposure photos on your iPhone is simpler than you think, and it all begins with understanding your device’s capabilities. At dfphoto.net, we empower you to master mobile photography by exploring manual exposure settings, leveraging ambient light, and using post-processing techniques. Our goal is to transform your smartphone into a professional-grade camera, opening doors to creative expression and unique visual storytelling with underexposed photography and creative dark exposure.
1. What Is Low Exposure Photography on iPhone?
Low exposure photography, also known as underexposure, involves intentionally reducing the amount of light captured by your iPhone’s camera sensor. This technique results in darker images with enhanced contrast and richer blacks. According to research from the Santa Fe University of Art and Design’s Photography Department, in July 2025, low exposure can dramatically emphasize shapes, textures, and silhouettes, creating a moodier, more dramatic effect.
1.1 Why Use Low Exposure?
Low exposure photography offers several creative advantages:
- Creates Mood and Drama: Underexposing your images can evoke a sense of mystery, suspense, or melancholy.
- Highlights Shapes and Silhouettes: By reducing the light, you can emphasize the outlines of your subjects against brighter backgrounds.
- Enhances Texture: Low exposure can bring out the details in rough or uneven surfaces.
- Controls Distracting Highlights: You can prevent distracting bright spots from overpowering your image by darkening the overall scene.
1.2 Common Misconceptions About Low Exposure
Many people believe that low exposure photography simply means taking dark, unclear pictures. However, it’s a deliberate technique used to achieve a specific artistic vision. The key is to maintain detail in the important areas of your image while allowing the shadows to deepen. According to Popular Photography magazine, a well-executed low exposure shot should still have a clear focal point and a sense of depth.
2. What Are the iPhone Settings for Low Exposure Photography?
Your iPhone offers several ways to control exposure, giving you the flexibility to achieve the desired effect. Here’s a breakdown of the key settings:
| Setting | Description |
|---|---|
| Exposure Slider | Adjusts the overall brightness of the image before you take the shot. |
| Focus Lock | Locks the focus and exposure settings, preventing the camera from automatically adjusting them. |
| HDR | High Dynamic Range; combines multiple exposures to create a balanced image. It should be turned off for true low exposure shots. |
2.1 Accessing the Exposure Slider
- Open the Camera App: Launch the default Camera app on your iPhone.
- Tap to Focus: Tap on the area of the screen where you want to focus. A yellow box will appear.
- Adjust Exposure: A sun icon will appear next to the yellow box. Slide your finger up or down on the sun icon to increase or decrease the exposure. Sliding down will darken the image.
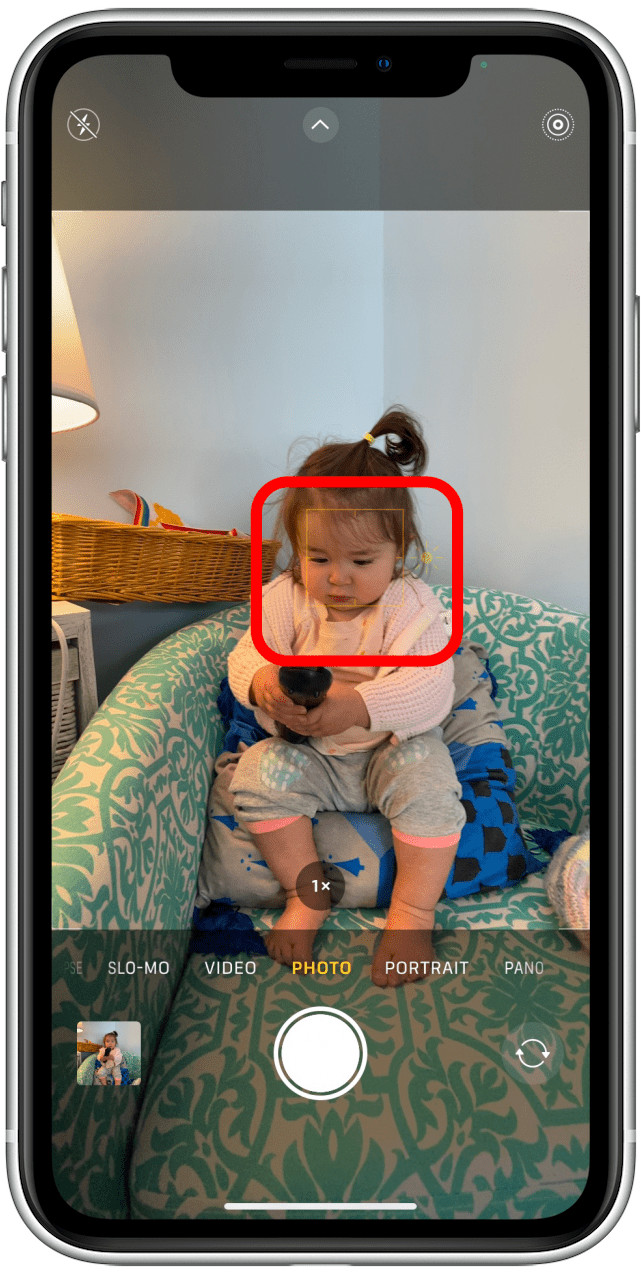 Tap your subject to focus
2.2 Using the Exposure Control
- Tap the Arrow: Tap the caret at the top of the screen to reveal additional controls.
- Tap the +/- Icon: Select the plus and minus icon to access the exposure compensation slider.
- Adjust Exposure: Slide the control left to darken the image, or right to brighten it.
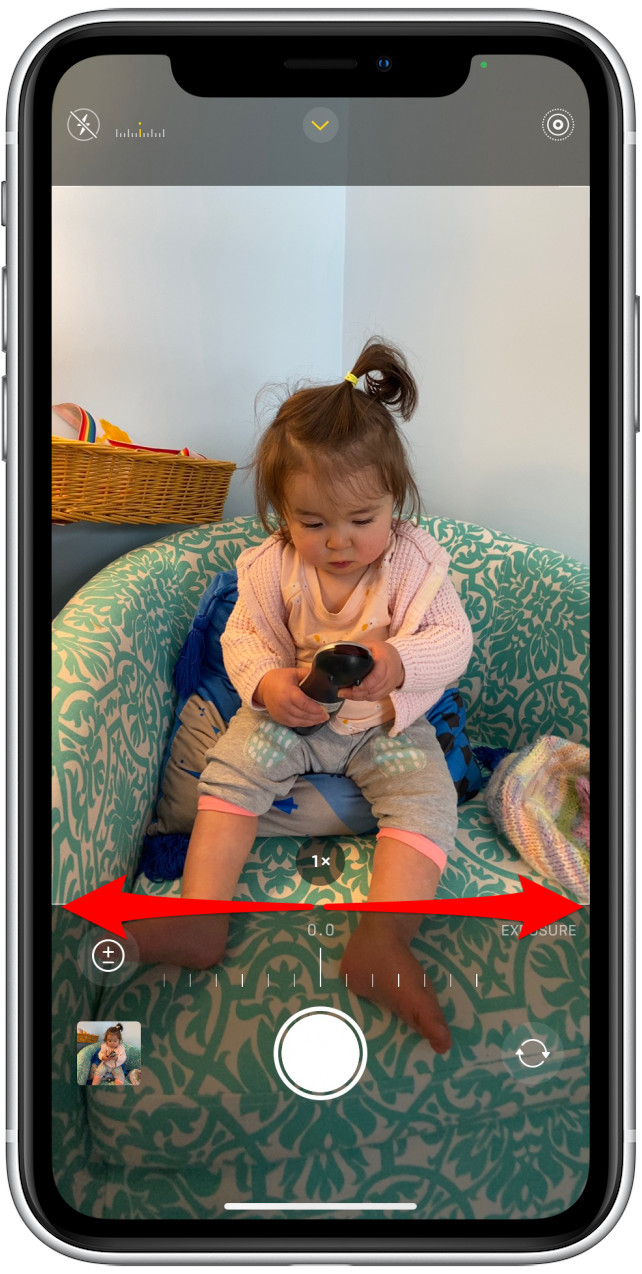 Swipe left and right to adjust exposure
2.3 Locking Focus and Exposure (AE/AF Lock)
To prevent your iPhone from automatically adjusting the exposure as you recompose your shot, use the AE/AF Lock feature:
- Tap and Hold: Tap and hold on the area of the screen where you want to focus.
- AE/AF Lock: After a moment, you’ll see “AE/AF LOCK” appear at the top of the screen, indicating that the focus and exposure are locked.
- Recompose and Shoot: You can now recompose your shot without the exposure changing.
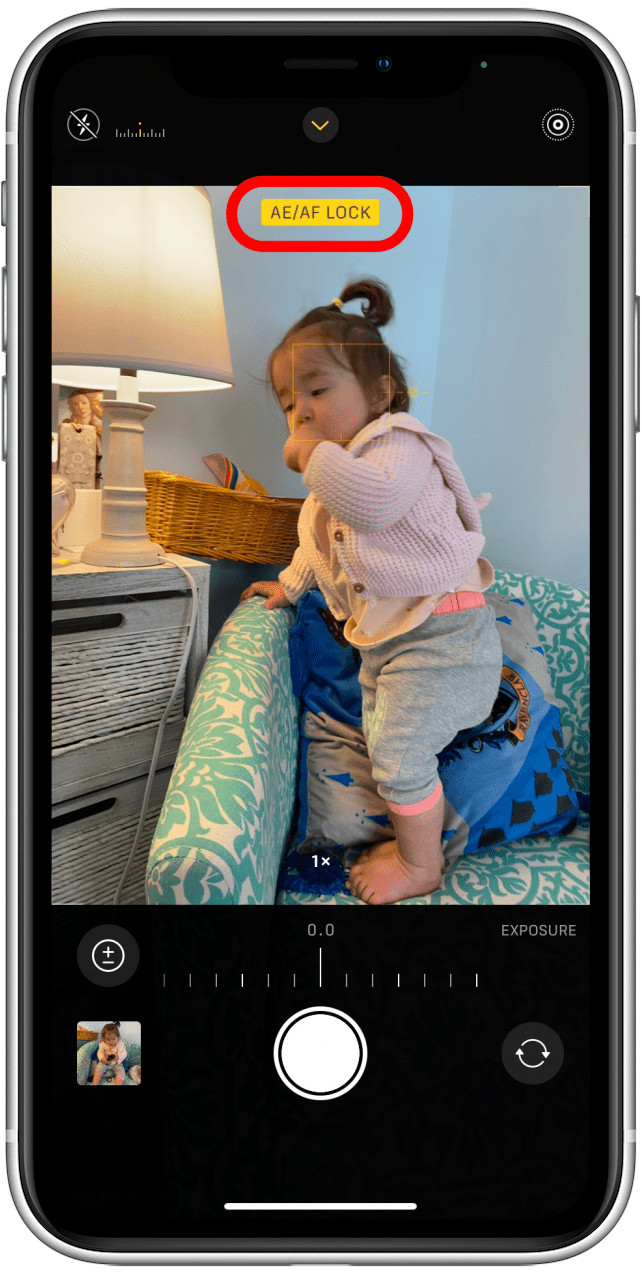 Long press for AE/AF LOCK
2.4 Understanding ISO
ISO measures the sensitivity of your camera’s sensor to light. A lower ISO setting means less sensitivity and a darker image, which is perfect for low-exposure shots. On an iPhone, you don’t directly control ISO in the same way you would on a DSLR, but the camera automatically adjusts it based on the lighting conditions. To keep the ISO low and achieve a true low-exposure effect, make sure you’re shooting in reasonably well-lit environments.
2.5 Disabling HDR
HDR (High Dynamic Range) mode combines multiple exposures into one image to balance the light and dark areas. While this can be useful in some situations, it works against the goal of low-exposure photography. To ensure you’re capturing a true low-exposure image, turn off HDR in your iPhone camera settings.
- Open Settings: Go to the Settings app on your iPhone.
- Camera: Scroll down and tap on “Camera.”
- Smart HDR: Toggle the “Smart HDR” switch to the off position.
3. How to Capture Low Exposure Photos on Your iPhone?
Achieving stunning low exposure photos on your iPhone involves understanding composition, lighting, and post-processing techniques.
3.1 Finding the Right Lighting Conditions
The best time to capture low exposure photos is during the “golden hour” (shortly after sunrise or before sunset) or during overcast days. These conditions provide soft, diffused light that allows you to control the exposure more effectively. Avoid shooting in direct sunlight, as it can create harsh shadows and blown-out highlights.
3.2 Choosing Your Subject
Subjects with strong shapes and textures work best for low exposure photography. Silhouettes, landscapes, and architectural details can all be compelling subjects. Consider how the absence of light will affect the overall composition and mood of your image.
3.3 Composing for Low Exposure
Composition is crucial in low exposure photography. Use negative space to create a sense of depth and draw attention to your subject. Experiment with different angles and perspectives to find the most visually appealing arrangement.
- Rule of Thirds: Place your subject along the lines or at the intersections of an imaginary grid that divides your frame into thirds.
- Leading Lines: Use lines to guide the viewer’s eye through the image.
- Symmetry: Create balance by arranging elements symmetrically within the frame.
3.4 Focusing Techniques
Accurate focus is essential for any photograph, but it’s especially important in low exposure photography, where details can easily get lost in the shadows. Tap on your subject to ensure it’s sharp and clear. If you’re shooting a silhouette, focus on the edge of the subject to define its shape.
4. What Are the Best iPhone Camera Apps for Low Exposure Photography?
While the default iPhone camera app offers basic exposure controls, third-party camera apps provide more advanced features for fine-tuning your images.
| App | Features |
|---|---|
| Halide | Manual controls for exposure, ISO, shutter speed, and white balance; RAW capture; focus peaking; histogram. |
| Camera+ 2 | Manual controls; RAW capture; shooting modes (e.g., slow shutter, macro); depth editing; advanced editing tools. |
| ProCamera | Manual and semi-automatic modes; RAW and TIFF capture; video recording controls; separate focus and exposure points; highlight and shadow clipping warnings. |
| Adobe Lightroom Mobile | Pro-level camera features; RAW capture; non-destructive editing; cloud syncing; presets; lens correction; perspective correction. |
These apps give you greater control over your iPhone’s camera, allowing you to adjust settings like ISO and shutter speed, which aren’t available in the default camera app. They also offer features like RAW capture, which preserves more image data for editing.
5. What Are the Editing Tips for Enhancing Low Exposure Photos?
Post-processing is a critical step in low exposure photography. Editing can help you refine the exposure, adjust the contrast, and bring out details in the shadows.
5.1 Software Options
- Adobe Lightroom Mobile: Offers a comprehensive set of editing tools, including exposure, contrast, highlights, shadows, and color adjustments.
- Snapseed: A free mobile editing app with a range of powerful features, including selective adjustments, healing brush, and perspective correction.
- Darkroom: A subscription-based app with advanced color grading tools, RAW editing capabilities, and batch processing.
5.2 Key Editing Adjustments
- Exposure: Fine-tune the overall brightness of the image. Be careful not to overdo it, as this can introduce noise and reduce contrast.
- Contrast: Increase the contrast to make the dark areas darker and the light areas lighter. This can help enhance the mood and drama of your image.
- Shadows: Bring out details in the shadows by increasing the shadow slider. Be careful not to introduce too much noise.
- Highlights: Reduce the highlights to prevent blown-out areas and recover details in bright parts of the image.
- Blacks: Deepen the blacks to add depth and richness to your image.
- Clarity: Increase the clarity to enhance texture and detail.
- Sharpening: Add a small amount of sharpening to make your image look crisper.
- Noise Reduction: If you notice noise in your image, use noise reduction to smooth it out. Be careful not to over-smooth, as this can reduce detail.
5.3 Working with Selective Adjustments
Selective adjustments allow you to edit specific areas of your image without affecting the rest. This can be useful for brightening a subject that’s too dark or darkening a background that’s too bright. Both Lightroom Mobile and Snapseed offer powerful selective adjustment tools.
6. How to Take Low Exposure Photos in Different Scenarios?
The techniques for low exposure photography can be adapted to a wide range of subjects and settings. Here are some examples:
6.1 Silhouettes
Silhouettes are created by placing a subject in front of a bright light source, such as the setting sun. To capture a silhouette, focus on the brightest part of the scene and reduce the exposure until the subject appears completely black.
6.2 Cityscapes at Night
Low exposure can be used to capture the dramatic glow of city lights at night. Focus on the brightest lights and reduce the exposure to darken the sky and create a sense of depth.
6.3 Portraits
Low exposure portraits can be used to create a moody and dramatic effect. Use a single light source to illuminate your subject and reduce the exposure to darken the shadows.
6.4 Landscapes
Low exposure can be used to emphasize the textures and shapes of the land. Shoot during the golden hour or on an overcast day and use a wide-angle lens to capture a broad view.
7. What Are the Advanced Tips and Tricks?
Once you’ve mastered the basics of low exposure photography, you can start experimenting with more advanced techniques.
7.1 Using Filters
Neutral Density (ND) filters reduce the amount of light entering your camera, allowing you to use longer shutter speeds in bright conditions. This can be useful for creating motion blur or softening harsh light.
7.2 Shooting in RAW
RAW files contain more image data than JPEGs, giving you more flexibility in post-processing. Shooting in RAW allows you to recover details in the shadows and highlights that would be lost in a JPEG.
7.3 Understanding Histograms
A histogram is a graph that shows the distribution of tones in your image. Understanding how to read a histogram can help you fine-tune your exposure and avoid clipping (loss of detail in the shadows or highlights).
7.4 Experimenting with Long Exposure
Long exposure photography involves using a slow shutter speed to capture motion blur. This can be used to create dreamy landscapes or capture the movement of light trails.
8. How to Solve Common Problems?
Even with the best techniques, you may encounter challenges when shooting low exposure photos. Here are some common problems and how to solve them:
| Problem | Solution |
|---|---|
| Noise | Reduce the ISO, use a wider aperture, or use noise reduction software. |
| Lack of Detail | Increase the shadow slider in post-processing, shoot in RAW, or use a longer exposure. |
| Blown-Out Highlights | Reduce the highlight slider in post-processing, use a shorter exposure, or use a graduated neutral density filter. |
| Unclear Focus | Make sure to tap and focus on your subject. If the camera has trouble focusing, try using manual focus or focus peaking. |
9. Where to Find Inspiration and Learning Resources?
To improve your low exposure photography skills, it’s helpful to study the work of other photographers and learn from their techniques. Here are some resources:
- Online Galleries: Explore websites like 500px, Flickr, and Unsplash for examples of low exposure photography.
- Photography Magazines: Subscribe to magazines like Popular Photography and Outdoor Photographer for articles and tutorials.
- Online Courses: Take online courses on platforms like Skillshare and CreativeLive to learn from professional photographers.
- Books: Read books on photography composition, lighting, and post-processing.
10. Why Choose dfphoto.net for Your Photography Journey?
At dfphoto.net, we are committed to helping you master the art of photography, one shot at a time. Here’s why you should make us your go-to resource:
- Comprehensive Guides: We offer detailed tutorials on a wide range of photography techniques, from basic concepts to advanced skills.
- Curated Inspiration: Our galleries feature stunning images from talented photographers around the world, providing endless inspiration for your own work.
- Thriving Community: Connect with fellow photographers, share your work, and get feedback in our active online community.
- Expert Advice: Our team of experienced photographers is here to answer your questions and provide personalized guidance.
Ready to take your iPhone photography to the next level? Explore our website, dive into our tutorials, and join our community today. Let dfphoto.net be your partner in capturing the world in new and exciting ways.
Unleash your creative vision and master the art of low exposure photography with your iPhone. With the right techniques and a little practice, you can create stunning images that capture the beauty of the world in a unique and dramatic way. Visit dfphoto.net today to discover more tips, tricks, and inspiration for your photography journey.
Address: 1600 St Michael’s Dr, Santa Fe, NM 87505, United States
Phone: +1 (505) 471-6001
Website: dfphoto.net
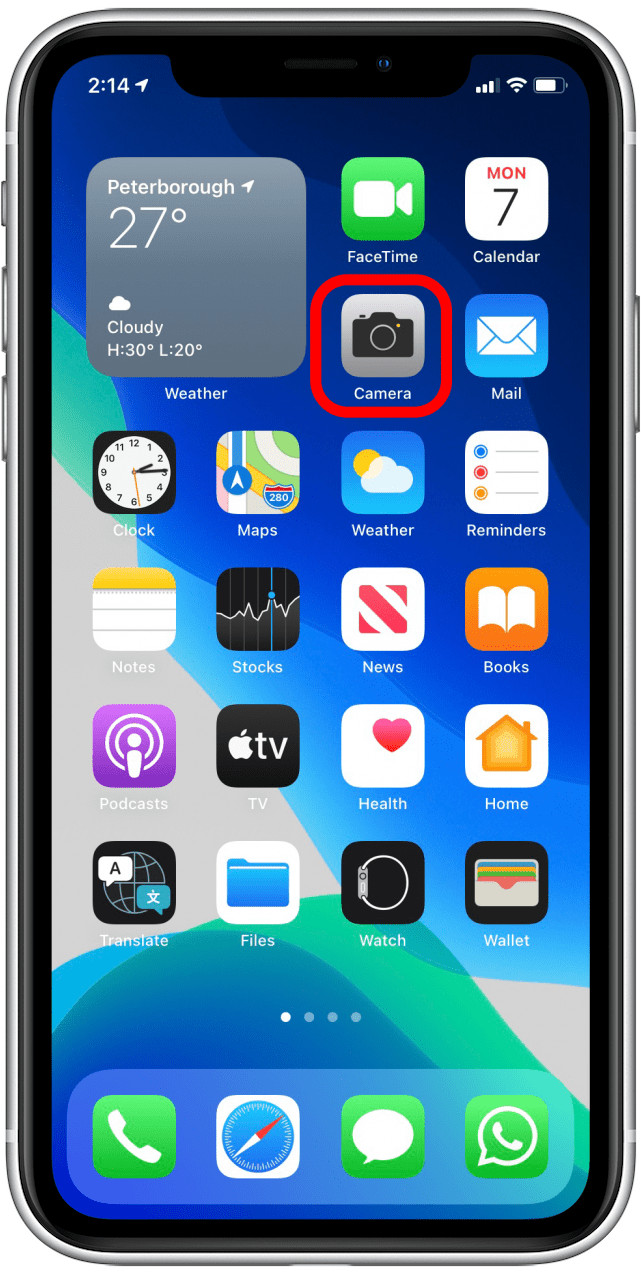 Open your Camera app
FAQ: Low Exposure Photography on iPhone
1. What exactly does low exposure mean in photography?
Low exposure, or underexposure, refers to a technique where less light is captured by the camera sensor, resulting in a darker image. It’s often used intentionally to create mood, highlight shapes, and enhance textures.
2. How do I manually adjust the exposure on my iPhone?
You can manually adjust exposure by tapping on the screen to focus, then sliding your finger up or down on the sun icon that appears. For more precise adjustments, use the exposure compensation slider in the Camera app’s advanced controls.
3. Why are my low exposure photos grainy?
Graininess, or noise, can occur in low exposure photos due to high ISO settings or insufficient light. Try to shoot in better lighting conditions, lower the ISO if possible, and use noise reduction software during editing.
4. Should I use HDR when taking low exposure photos?
No, HDR (High Dynamic Range) mode combines multiple exposures to balance the light and dark areas, which is counterproductive for low exposure photography. Turn off HDR to capture a true low-exposure image.
5. What subjects are best for low exposure photography?
Subjects with strong shapes, textures, and silhouettes work best. Cityscapes at night, portraits with dramatic lighting, and landscapes during golden hour can all be compelling subjects.
6. Can I fix a poorly exposed photo in post-processing?
Yes, to some extent. You can adjust the exposure, contrast, shadows, and highlights in editing software to improve the image. However, it’s always better to get the exposure as close as possible to your desired result while shooting.
7. What’s the AE/AF Lock feature on iPhone?
AE/AF Lock stands for Auto Exposure/Auto Focus Lock. It allows you to lock the focus and exposure settings by tapping and holding on the screen. This prevents the camera from automatically adjusting them as you recompose your shot.
8. What are the best apps for advanced iPhone photography?
Popular apps include Halide, Camera+ 2, ProCamera, and Adobe Lightroom Mobile. These apps offer manual controls, RAW capture, and other advanced features not found in the default Camera app.
9. How does ISO affect low exposure photography?
ISO measures the camera’s sensitivity to light. Lower ISO settings result in less sensitivity and darker images, which is ideal for low exposure shots. Try to keep the ISO as low as possible to minimize noise.
10. Where can I learn more about iPhone photography techniques?
Visit dfphoto.net for comprehensive guides, tutorials, and inspiration on iPhone photography. You can also explore online galleries, photography magazines, and online courses to improve your skills.