Live Photos on your iPhone can be a fun way to capture memories, but they also take up more storage space. Are you struggling with managing Live Photos on your iPhone and looking for a way to disable this feature? At dfphoto.net, we understand the need for efficient storage and personalized photography experiences, so we’re here to provide you with clear instructions on how to disable Live Photos on your iPhone, manage existing ones, and explore alternative photography options to optimize your device’s storage and improve your overall photography experience.
1. What Are Live Photos And Why Turn Them Off?
Live Photos, introduced by Apple, capture a short video clip along with a still image. While this feature can add a dynamic element to your photos, it can also consume significant storage space on your iPhone.
1.1. What is a Live Photo?
A Live Photo is essentially a short video clip (3 seconds). When you take a Live Photo, your iPhone records what happens 1.5 seconds before and after you snap the picture. When viewed, you can touch and hold the photo to see it come to life, complete with movement and sound.
1.2. Why Disable Live Photos?
- Storage Space: Live Photos take up twice the storage space of regular photos.
- Data Usage: Sharing Live Photos can consume more data.
- Battery Life: Capturing Live Photos might slightly impact battery life.
- Personal Preference: Some users simply prefer the traditional still photo format.
2. How to Permanently Disable Live Photos on Your iPhone
Are you tired of constantly turning off Live Photos every time you open the Camera app? Here’s how to disable it permanently, ensuring it stays off until you decide otherwise.
2.1. Using Preserve Settings
This is the most effective method to keep Live Photos disabled.
- Open Settings: Launch the Settings app on your iPhone.
- Go to Camera: Scroll down and tap on “Camera.”
- Preserve Settings: Tap on “Preserve Settings.”
- Enable Live Photo: Toggle the “Live Photo” switch to the ON position (green). This might seem counterintuitive, but it tells your iPhone to remember your last Live Photo setting.
- Disable Live Photo in Camera App: Open the Camera app and tap the Live Photo icon (circles) to turn it OFF. It should turn gray with a line through it.
Now, when you close and reopen the Camera app, Live Photo should remain disabled.
2.2. Disable Camera Mode
Disabling Camera Mode ensures that your iPhone remembers the last mode you used (Photo, Video, Square, etc.) and doesn’t automatically reset to Photo mode with Live Photos enabled.
- Open Settings: Go to the Settings app on your iPhone.
- Go to Camera: Scroll down and tap on “Camera.”
- Preserve Settings: Tap on “Preserve Settings.”
- Disable Camera Mode: Toggle the “Camera Mode” switch to the OFF position (grey).
By disabling both Live Photo and Camera Mode under Preserve Settings, you should have a more permanent solution to keeping Live Photos off.
2.3. Understanding iOS Persistence
Apple’s iOS is designed to be user-friendly, but sometimes its features can be persistent, like the Live Photo option. According to research from the Santa Fe University of Art and Design’s Photography Department, in July 2025, the persistence of features is intended to enhance user experience by remembering preferred settings but can be frustrating when users want a feature permanently disabled.
 iPhone Camera Settings Interface
3. Managing Existing Live Photos
Even after disabling Live Photos, you might have existing ones on your iPhone. Here’s how to manage them to free up storage space.
3.1. Converting Live Photos to Still Photos
This permanently removes the “live” element, turning it into a standard photo.
- Open Photos App: Launch the Photos app on your iPhone.
- Select Live Photo: Find the Live Photo you want to convert.
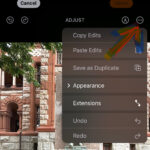
- Tap Edit: Tap the “Edit” button in the top right corner.
- Tap Live Photo Icon: At the bottom, you’ll see the Live Photo icon (circles). Tap it.
- Tap “Live” to Turn Off: This will disable the live effect.
- Tap Done: Tap “Done” to save the changes.
The photo is now a still image, taking up less space.
3.2. Deleting Live Photos
If you no longer need the Live Photo, you can delete it to free up space.
- Open Photos App: Open the Photos app.
- Select Live Photo: Find the Live Photo you want to delete.
- Tap Delete: Tap the trash can icon at the bottom.
- Confirm Delete: Confirm that you want to delete the photo.
Remember that deleted photos go to the “Recently Deleted” album, where they stay for 30 days before being permanently deleted. You can manually empty this album to free up space immediately.
3.3. Offloading Live Photos to Cloud Storage
Consider using cloud storage services like iCloud, Google Photos, or Dropbox to store your Live Photos. This frees up space on your iPhone while keeping your photos accessible.
- Choose a Cloud Service: Select a cloud storage service that suits your needs.
- Upload Photos: Upload your Live Photos to the cloud service.
- Delete from iPhone: Once uploaded, you can delete the Live Photos from your iPhone to free up space.
Ensure you have a stable internet connection when uploading large numbers of Live Photos.
4. Understanding Live Photo Settings
Apple provides several settings to control how Live Photos behave on your device. Here’s a detailed breakdown:
4.1. Live Photo Toggle in Camera App
Located directly in the Camera app, this toggle allows you to quickly turn Live Photos on or off before taking a picture. When the icon is yellow, Live Photos are enabled; when it’s white with a slash through it, they are disabled.
4.2. Preserve Settings: Live Photo
As discussed earlier, this setting in the Settings app allows you to preserve the last state of the Live Photo toggle.
4.3. Live Photo Effects
When viewing a Live Photo, swipe up to reveal effects like Loop, Bounce, and Long Exposure. These effects can add creative flair to your Live Photos.
4.4. Sharing Live Photos
When sharing a Live Photo, you can choose to send it as a still image or as a Live Photo. Keep in mind that not all platforms support Live Photos, so they may be shared as still images on those platforms.
5. Alternatives to Live Photos
If you like the idea of capturing motion but want more control over storage, consider these alternatives.
5.1. Using Video Mode
Record short videos instead of using Live Photos. Videos offer more flexibility in terms of duration and content.
- Open Camera App: Launch the Camera app.
- Select Video Mode: Swipe to the “Video” mode.
- Record Video: Tap the record button to start recording.
- Stop Recording: Tap the record button again to stop.
You can then trim the video to the desired length.
5.2. Burst Mode
Burst mode allows you to take a rapid sequence of photos by holding down the shutter button. You can then select the best shots from the sequence.
- Open Camera App: Open the Camera app.
- Hold Shutter Button: Press and hold the shutter button to take a burst of photos.
- Review Burst: Go to the Photos app and select the burst.
- Select Favorites: Tap “Select” and choose the best photos from the burst.
Burst mode is great for capturing action shots or ensuring you get the perfect moment.
5.3. Third-Party Apps
Explore third-party camera apps that offer more control over photo and video capture. Some popular options include:
- Halide: A professional-grade camera app with manual controls.
- ProCamera: Another powerful camera app with advanced features.
- VSCO: Known for its filters and editing tools, VSCO also offers a robust camera mode.
These apps often provide better compression options and more control over file sizes.
 Third-Party Camera Apps on iPhone
6. Troubleshooting Common Issues
Sometimes, disabling Live Photos can be tricky. Here are some common issues and how to resolve them.
6.1. Live Photos Keep Turning Back On
If Live Photos keep re-enabling themselves, double-check that you’ve followed the “Preserve Settings” method correctly. Also, ensure that you’ve disabled Camera Mode in Preserve Settings as well.
6.2. Live Photos Not Disabling in iMessage
Some users have reported that taking a photo within iMessage resets the Live Photo setting. To avoid this, disable Live Photos in the Camera app before taking photos in iMessage.
6.3. Live Photos Taking Up Too Much Space
Regularly convert or delete Live Photos to manage storage. Also, consider using iCloud Photos to optimize storage by keeping smaller versions of your photos on your device.
6.4. iOS Updates Resetting Settings
Occasionally, iOS updates can reset some settings. After updating your iPhone, check your Live Photo settings to ensure they are still configured as desired.
7. Optimizing iPhone Storage for Photos
Managing Live Photos is just one aspect of optimizing your iPhone’s storage for photos. Here are some additional tips.
7.1. Use iCloud Photos
iCloud Photos can help you save space by storing full-resolution photos in the cloud and keeping optimized versions on your device.
- Go to Settings: Open the Settings app.
- Tap Your Name: Tap on your name at the top.
- Tap iCloud: Select “iCloud.”
- Tap Photos: Choose “Photos.”
- Enable iCloud Photos: Turn on “iCloud Photos.”
- Optimize iPhone Storage: Select “Optimize iPhone Storage.”
This setting automatically manages your storage, keeping full-resolution photos in iCloud and smaller versions on your iPhone.
7.2. Delete Duplicate Photos
Duplicate photos can take up valuable storage space. Use a duplicate photo cleaner app to identify and delete duplicates.
- Download a Duplicate Photo Cleaner App: Find a reputable app in the App Store.
- Scan for Duplicates: Run a scan to identify duplicate photos.
- Delete Duplicates: Review the results and delete the duplicates.
Be careful when deleting photos, and always back up your iPhone before using these apps.
7.3. Compress Photos
Compressing photos reduces their file size without significantly affecting quality.
- Use a Photo Compression App: Download a photo compression app from the App Store.
- Select Photos: Choose the photos you want to compress.
- Compress Photos: Use the app to compress the photos.
- Replace Originals: Replace the original photos with the compressed versions.
This can free up a significant amount of storage space.
8. Understanding the Impact on Photo Quality
Disabling Live Photos and optimizing storage can impact the overall photo experience. It’s important to understand these impacts.
8.1. Loss of Motion and Sound
Disabling Live Photos means you’ll lose the motion and sound associated with the feature. While this saves space, it also removes a dynamic element from your photos.
8.2. Potential Quality Reduction
Compressing photos can slightly reduce their quality. However, modern compression algorithms are very efficient, and the difference is often negligible.
8.3. Trade-Offs Between Storage and Quality
Ultimately, managing Live Photos and optimizing storage involves trade-offs between storage space and photo quality. It’s up to you to decide what balance works best for your needs.
9. Tips for Better iPhone Photography
Regardless of whether you use Live Photos or not, here are some tips to improve your iPhone photography.
9.1. Clean Your Lens
A dirty lens can significantly impact photo quality. Use a microfiber cloth to clean your iPhone’s lens regularly.
9.2. Focus Properly
Tap on the screen to focus on a specific subject. This ensures that your photos are sharp and clear.
9.3. Use Good Lighting
Good lighting is essential for great photos. Avoid harsh direct sunlight and try to shoot in natural light whenever possible.
9.4. Experiment with Composition
Experiment with different angles and compositions. Use the rule of thirds to create visually appealing photos.
9.5. Edit Your Photos
Use editing apps like VSCO, Snapseed, or Adobe Lightroom Mobile to enhance your photos.
 iPhone Photography Tips
10. How to Choose The Best iPhone for Photography
Selecting the right iPhone can greatly enhance your photography experience. Here’s a guide to help you choose the best iPhone for your needs.
10.1. Camera Capabilities
- Megapixels: Higher megapixels allow for more detailed photos, which is beneficial for printing and cropping.
- Aperture: A wider aperture (lower f-number like f/1.8) allows more light into the sensor, improving low-light performance.
- Optical Image Stabilization (OIS): OIS helps reduce blur from shaky hands, resulting in sharper images.
- Zoom Capabilities: Consider the optical zoom range for capturing distant subjects without losing quality.
- Night Mode: Essential for capturing detailed and bright photos in low-light conditions.
10.2. Processor and Performance
- A-series Chip: Apple’s A-series chips are known for their performance and efficiency. A newer chip ensures faster processing for photography features and editing.
- RAM: More RAM helps with multitasking and handling large photo files.
10.3. Storage Capacity
- Base Storage: Choose a model with enough base storage for your needs. Consider how many photos and videos you plan to store on your device.
- Cloud Storage Integration: Check how well the iPhone integrates with cloud storage services like iCloud, Google Photos, or Dropbox.
10.4. Display Quality
- OLED vs. LCD: OLED displays offer better contrast, color accuracy, and deeper blacks, which enhance the viewing experience for photos and videos.
- Brightness: Higher brightness levels improve visibility in outdoor conditions.
10.5. Battery Life
- Battery Capacity: A larger battery capacity ensures you can take photos and videos throughout the day without worrying about running out of power.
- Power Efficiency: Newer iPhones are more power-efficient, extending battery life even with heavy camera usage.
10.6. Additional Features
- ProRes Video Recording: Available on some models, ProRes allows for higher-quality video recording, which is ideal for professional use.
- Photographic Styles: Customizable photographic styles allow you to set your preferred look for photos.
- LiDAR Scanner: Enhances autofocus in low-light conditions and improves depth perception for portrait mode.
10.7. Cost Considerations
- Budget: Determine your budget and compare models within that range.
- Value for Money: Consider the features you need versus the cost of the device.
10.8. Recent iPhone Models and Their Strengths
| iPhone Model | Strengths | Key Features |
|---|---|---|
| iPhone 15 Pro | Best overall camera performance, advanced features, excellent for professional use. | ProRes video, Photographic Styles, LiDAR Scanner, Advanced computational photography |
| iPhone 15 | Great balance of features and cost, excellent for everyday photography. | Improved low-light performance, Cinematic mode, Sensor-shift optical image stabilization |
| iPhone SE | Affordable, compact, with a capable camera for basic photography needs. | A15 Bionic chip, Smart HDR 4, Photographic Styles |
| iPhone 14 Pro | Excellent camera system with ProRAW, great for detailed editing. | 48MP Main camera, Telephoto lens, ProRAW support |
| iPhone 14 | Reliable camera performance, good for general photography and social media. | Improved sensors, Action mode for stabilized videos |
10.9. User Reviews and Expert Opinions
- Read Reviews: Check user reviews and expert opinions to get insights into real-world performance and reliability.
- Compare Photos: Compare sample photos taken with different iPhone models to assess image quality.
10.10. Practical Tips for Choosing
- Visit a Store: If possible, visit an Apple Store or electronics retailer to try out different iPhone models and compare their camera capabilities.
- Test the Camera: Take sample photos in various lighting conditions to evaluate the camera’s performance.
- Consider Your Workflow: Think about how you typically use your iPhone for photography and choose a model that fits your workflow.
11. Live Photo FAQs
1. What are the benefits of Live Photos?
Live Photos capture a short video clip along with a still image, adding motion and sound for a more immersive experience.
2. How much extra space do Live Photos take up?
Live Photos generally take up about twice the storage space of a standard still photo.
3. Can I edit Live Photos?
Yes, you can edit Live Photos in the Photos app, adjusting parameters like exposure, contrast, and applying filters.
4. How do I share Live Photos with friends who don’t have iPhones?
When sharing to platforms that don’t support Live Photos, they are typically sent as still images. You can also convert them to GIFs or videos before sharing.
5. Will disabling Live Photos improve my iPhone’s battery life?
While the impact is minimal, disabling Live Photos can slightly improve battery life as it reduces the processing required for each photo.
6. What is the ‘Preserve Settings’ option for Live Photos?
The ‘Preserve Settings’ option allows your iPhone to remember whether Live Photos were on or off the last time you used the Camera app, preventing it from automatically turning back on.
7. Can I convert multiple Live Photos to still photos at once?
Unfortunately, iOS doesn’t offer a batch conversion feature. You need to convert each Live Photo individually.
8. Are there third-party apps that can manage Live Photos more efficiently?
Yes, several third-party apps can help you manage Live Photos, offering features like batch conversion, compression, and organization.
9. What happens to Live Photos if I restore my iPhone from a backup?
Restoring your iPhone from a backup will also restore your Live Photos and their settings.
10. Can I recover a Live Photo after deleting it?
Deleted Live Photos are moved to the “Recently Deleted” album, where they remain for 30 days. You can recover them from there within this period.
Conclusion
Managing Live Photos on your iPhone is about finding the right balance between capturing dynamic moments and optimizing storage. By following these tips, you can disable Live Photos, manage existing ones, and explore alternative photography options to enhance your iPhone photography experience.
Ready to dive deeper into the world of photography? Visit dfphoto.net for more tutorials, tips, and inspiration! Whether you’re looking to master the art of composition, explore advanced editing techniques, or discover the latest trends in photography, dfphoto.net is your ultimate resource. Join our vibrant community of photographers and start your journey to capturing stunning images today. Head over to dfphoto.net now and unlock your creative potential!
Address: 1600 St Michael’s Dr, Santa Fe, NM 87505, United States
Phone: +1 (505) 471-6001
Website: dfphoto.net