Live Photos bring your still images to life, capturing moments with motion and sound. At dfphoto.net, we’re passionate about helping you master this dynamic photography technique, unlocking creative visual storytelling, and mastering iPhone photography tips. Dive in to discover how to take, edit, and share Live Photos that stand out.
1. What Exactly Is A Live Photo And Why Should I Use It?
A Live Photo is more than just a picture; it’s a brief, moving snapshot that captures 1.5 seconds before and after you hit the shutter button. The appeal of live photos lies in their ability to add depth and emotion to your memories.
According to Popular Photography, the added dimension of movement and sound in a live photo provides a more complete and engaging representation of a moment compared to a traditional still image. Think of a child blowing out birthday candles, the wind rustling through leaves, or a musician hitting the final chord of a song. These moments come alive in ways a static image simply can’t capture.
2. How Do I Take A Live Photo On My iPhone?
Taking a Live Photo is as simple as snapping a regular photo, but here’s a detailed breakdown to ensure you capture the best possible shot:
-
Open the Camera App: Launch the Camera app on your iPhone.
-
Ensure Photo Mode Is Selected: Swipe to select “Photo” mode if it’s not already active.
-
Activate Live Photos: Look for the Live Photo icon (a circle with concentric circles inside) at the top of the screen. If it has a line through it, tap it to turn Live Photos on. When activated, the icon will turn yellow.
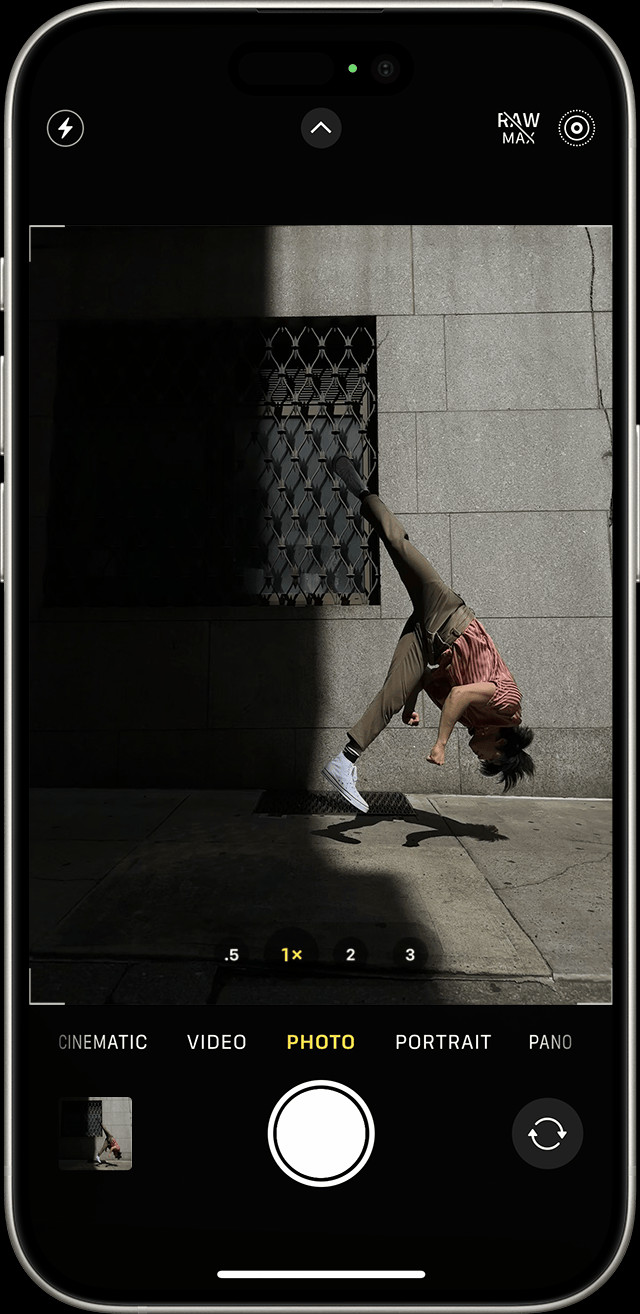 iPhone camera app with Live Photo feature enabled
 -
Hold Your iPhone Steady: Stability is vital. Keep your device as still as possible before, during, and after pressing the shutter button to minimize blur.
-
Tap the Shutter Button: Press the white circle to take your Live Photo.
3. Where Can I Find My Live Photos After Taking Them?
Finding your Live Photos is easy! Here’s how:
-
Open the Photos App: Launch the Photos app on your iPhone.
-
Go to the Albums Tab: Tap the “Albums” tab at the bottom of the screen.
-
Scroll to Media Types: Scroll down until you find the “Media Types” section.
-
Tap Live Photos: Select “Live Photos” to view all your Live Photos in one place.
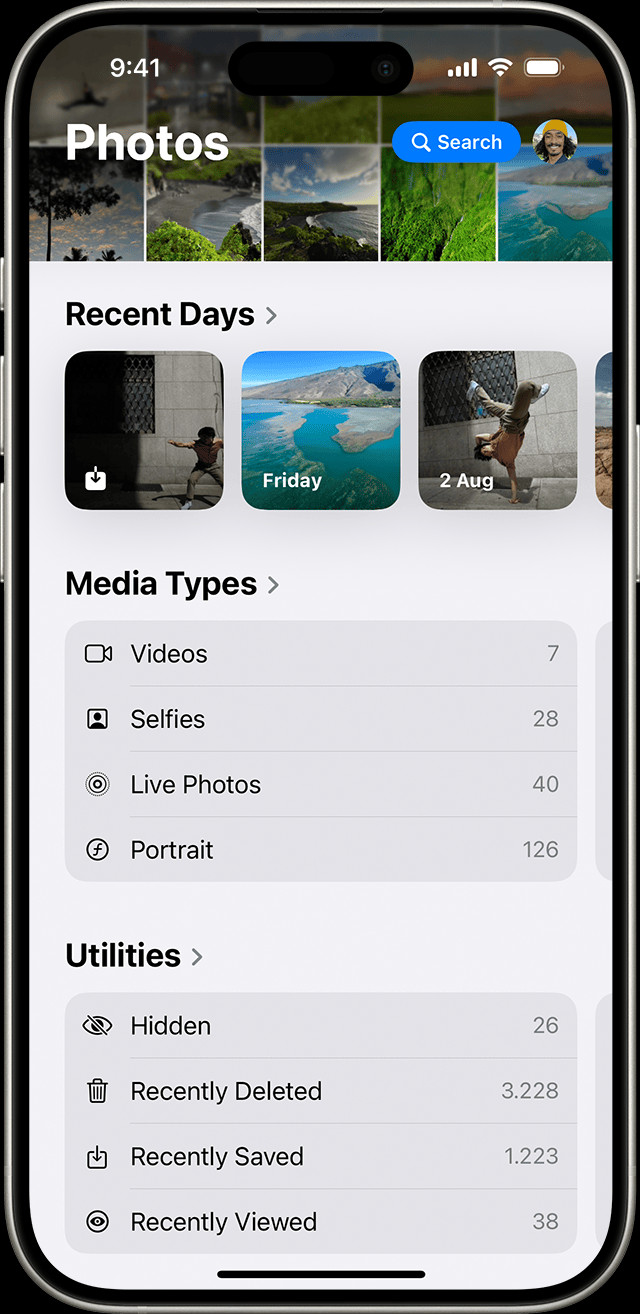 Finding Live Photos in the iPhone Photos app
4. How Do I View And Play A Live Photo?
Once you’ve found your Live Photos, here’s how to bring them to life:
- Open a Live Photo: Tap on the Live Photo you wish to view.
- Press and Hold: Firmly press and hold anywhere on the photo. The image will animate, playing the short video clip with sound.
5. Can I Change The Key Photo Of A Live Photo?
Yes, you absolutely can! Sometimes the automatically selected key photo isn’t the best representation of the moment. Here’s how to change it:
- Open the Live Photo: Navigate to the Live Photo you want to edit and tap to open it.
- Tap Edit: Select the “Edit” button in the upper-right corner of the screen.
- Tap the Live Photos Icon: At the bottom of the screen, you’ll see the Live Photos icon (the same circle with concentric circles). Tap it.
- Move the Slider: A filmstrip will appear below the photo. Drag the slider left or right to browse through the individual frames of the Live Photo.
- Make Key Photo: Once you’ve found the perfect frame, release your finger and tap “Make Key Photo.”
- Tap Done: Tap “Done” in the bottom-right corner to save your changes.
6. What Fun Effects Can I Add To My Live Photos?
Live Photos offer several fun and creative effects to enhance your images:
- Open the Live Photo: Select the Live Photo you want to jazz up.
- Swipe Up: Swipe up on the photo to reveal the effects menu.
- Choose Your Effect: You’ll see three options:
- Loop: This turns your Live Photo into a repeating video loop.
- Bounce: This plays your Live Photo forward and then in reverse, creating a fun back-and-forth effect.
- Long Exposure: This simulates a long exposure effect, blurring motion and creating a dreamy look. This is great for capturing light trails, smoothing water, or creating artistic blurs.
6.1. Loop Effect
The Loop effect transforms your Live Photo into a seamless, repeating video. It’s great for capturing repetitive motions like ocean waves or a spinning carousel. Select an image or browse the “For You” tab in the Photos app for Live Photos that would make great loops.
6.2. Bounce Effect
Bounce makes your Live Photo rock back and forth, playing it forward and then instantly in reverse. This effect is ideal for playful moments, like a dog catching a ball or a child jumping on a trampoline.
6.3. Long Exposure Effect
Long Exposure captures the elements of time and movement, creating effects previously achievable only with a DSLR camera. According to the Santa Fe University of Art and Design’s Photography Department, in July 2025, this effect transforms fireworks into streaks of light across the night sky and waterfalls into magical blurs.
7. How Can I Edit My Live Photos For Better Results?
Beyond the fun effects, Live Photos can be edited just like regular photos, allowing you to adjust exposure, contrast, color, and more. Here’s how:
- Open the Live Photo: Select the Live Photo you wish to edit.
- Tap Edit: Select the “Edit” button.
- Adjust Settings: Use the editing tools to adjust settings like exposure, brightness, contrast, highlights, shadows, saturation, and more.
- Apply Filters: Add a filter to change the overall look and feel of your Live Photo.
- Tap Done: Tap “Done” to save your edits.
8. How Do I Share My Live Photos With Others?
Sharing Live Photos is similar to sharing regular photos, but there are a few things to keep in mind to ensure your recipients can view them in all their animated glory:
- Open the Live Photo: Select the Live Photo you want to share.
- Tap the Share Button: Tap the “Share” button (the square with an arrow pointing upward).
- Choose Your Sharing Method: Select how you want to share your Live Photo (e.g., Messages, Mail, social media).
- Share as Live Photo: Make sure the Live Photo is shared as a Live Photo and not a still image. In some sharing options, you may need to tap “Live” in the upper-left corner of the photo to ensure it’s shared as a Live Photo.
Keep in mind that when you share via Mail, the Live Photo is sent as a still image.
When you receive a Live Photo on your iPhone or iPad via Messages, tap the photo to open it, then firmly press and hold to see it come to life. If you’re using Messages on your Mac, double-click the Live Photo to open it. The Live Photo plays through once. To play it again, click the LIVE button in the bottom-left corner of the photo.
9. How Do I Turn Off Live Photos If I Don’t Want To Use The Feature?
While Live Photos can be fantastic, there may be times when you prefer to take still images. Here’s how to turn Live Photos off:
- In the Camera App: In the Camera app, tap the Live Photos button to turn off Live Photos. A slash through the Live Photos button means that the feature is off.
The Camera app turns Live Photos on again automatically. To keep Live Photos off permanently, follow these steps:
- Go to Settings.
- Tap Camera > Preserve Settings.
- Make sure that the switch next to Live Photo is turned on.
10. What Devices Support Live Photos?
Live Photos are supported on a range of Apple devices:
- iPhone 6s and later
- iPad (5th generation) and later
- iPad Air (3rd generation) and later
- iPad mini (5th generation) and later
- iPad Pro models from 2016 or later
11. Are There Any Tips For Taking Better Live Photos?
Absolutely! Here are some tips to help you capture stunning Live Photos:
- Keep it Steady: As mentioned earlier, stability is key. Use a tripod or prop your iPhone against a stable surface to minimize camera shake.
- Anticipate the Moment: Because Live Photos capture 1.5 seconds before and after you press the shutter, try to anticipate the peak of the action.
- Consider Your Composition: Pay attention to your composition as you would with a regular photo. Use the rule of thirds, leading lines, and other composition techniques to create visually appealing images.
- Experiment with Effects: Don’t be afraid to experiment with the Loop, Bounce, and Long Exposure effects to see how they can enhance your Live Photos.
- Edit with Care: Use the editing tools to fine-tune your Live Photos, but avoid over-editing, which can make them look unnatural.
12. Can I Convert A Live Photo To A Still Photo Or A Video?
Yes, you can convert a Live Photo to a still photo or a video. To convert a Live Photo to a still photo, simply share it as a still image.
To turn a Live Photo into a video on your iPhone, you can use third-party apps.
13. How Do Live Photos Impact Storage Space On My iPhone?
Live Photos take up more storage space than regular photos because they include a short video clip. If you’re concerned about storage, you can manage Live Photos by:
- Turning Off Live Photos: Disable Live Photos when you don’t need them.
- Deleting Unnecessary Live Photos: Review your Live Photos and delete any that you don’t want to keep.
- Converting to Still Photos: Convert Live Photos to still photos to save space.
- Using iCloud Photo Library: Store your Live Photos in iCloud Photo Library to free up space on your device.
14. How Can I Use Live Photos Creatively?
Live Photos offer a range of creative possibilities:
- Capture Action: Use Live Photos to capture sports, performances, and other action-packed events.
- Create GIFs: Turn your Live Photos into GIFs to share on social media.
- Tell Stories: Use Live Photos to tell stories with motion and sound.
- Create Art: Experiment with the Long Exposure effect to create artistic and abstract images.
- Preserve Memories: Capture special moments with Live Photos to preserve them in a more engaging way.
15. What Are Some Common Problems With Live Photos And How Can I Fix Them?
Here are some common issues and their solutions:
- Blurry Images: Ensure your iPhone is stable when taking Live Photos.
- Poor Lighting: Use good lighting to capture clear and vibrant Live Photos.
- Uninteresting Motion: Choose moments with interesting motion to make your Live Photos more engaging.
- Too Much Noise: Avoid taking Live Photos in noisy environments.
- Storage Issues: Manage your Live Photos to prevent storage problems.
16. What Are The Ethical Considerations When Taking Live Photos Of People?
When taking Live Photos of people, it’s important to be mindful of their privacy and consent:
- Ask for Permission: Always ask for permission before taking Live Photos of people, especially if you plan to share them publicly.
- Respect Privacy: Avoid taking Live Photos of people in private or sensitive situations.
- Be Transparent: Let people know that you’re taking a Live Photo and explain how it works.
- Obtain Consent: If you plan to use Live Photos of people for commercial purposes, obtain their written consent.
17. How Can I Optimize My Live Photos For Social Media?
To optimize your Live Photos for social media:
- Trim the Clip: Use the editing tools to trim the Live Photo to the most interesting part.
- Choose a Good Key Photo: Select a key photo that is clear, well-composed, and visually appealing.
- Add Effects: Use the Loop, Bounce, or Long Exposure effects to enhance your Live Photos.
- Use Hashtags: Add relevant hashtags to your Live Photos to make them more discoverable.
- Share on Platforms that Support Live Photos: Share your Live Photos on platforms that support the Live Photo format, such as Facebook and Instagram.
18. How Does Shooting In Low Light Impact The Quality Of Live Photos?
Shooting Live Photos in low light can be challenging, but there are ways to improve the results:
- Use a Tripod: A tripod can help stabilize your iPhone and reduce blur in low light.
- Increase Brightness: Increase the brightness of your iPhone screen to help you see the scene better.
- Adjust Exposure: Use the exposure compensation control to brighten the image.
- Use Night Mode: If your iPhone has Night mode, use it to capture more light in low-light situations.
- Edit the Live Photo: Use the editing tools to brighten the image, reduce noise, and improve color.
19. Are There Third-Party Apps That Enhance Live Photo Capabilities?
Yes, there are many third-party apps that offer additional features and capabilities for Live Photos:
- Motion Stills (Google): This app lets you create looping GIFs and videos from your Live Photos.
- Lively (ImgPlay): Lively converts Live Photos into GIFs and videos and allows you to add text, stickers, and filters.
- intoLive: This app turns Live Photos into animated wallpapers for your iPhone.
- Echograph: Echograph lets you create cinemagraphs by selectively animating parts of your Live Photos.
- Live Studio: Live Studio provides advanced editing tools for Live Photos, including the ability to adjust speed, add effects, and create loops.
20. How Do I Ensure My Live Photos Are Backed Up And Stored Safely?
To ensure your Live Photos are backed up and stored safely:
- Use iCloud Photo Library: iCloud Photo Library automatically backs up your photos and videos to iCloud, so you can access them on all your devices.
- Back Up to a Computer: Connect your iPhone to your computer and back up your photos and videos to a hard drive or other storage device.
- Use a Third-Party Backup Service: Use a third-party backup service like Google Photos or Dropbox to back up your Live Photos.
- Store in Multiple Locations: Store your Live Photos in multiple locations to protect them from data loss.
Live Photos are a fantastic way to capture and share memories in a more dynamic and engaging way. With the tips and techniques outlined above, you can take, edit, and share Live Photos that will impress your friends and family. And for even more inspiration and resources, be sure to visit dfphoto.net!
We at dfphoto.net encourage you to explore, experiment, and discover the unique possibilities that Live Photos offer. Our platform is dedicated to providing the resources and inspiration you need to master this dynamic photography technique. Join our community of passionate photographers and unlock new levels of visual storytelling. Explore our articles, tutorials, and stunning photo galleries, and connect with fellow enthusiasts to share your creations and learn from others.
Ready to take your Live Photo skills to the next level? Visit dfphoto.net today and discover a world of creative possibilities!
Address: 1600 St Michael’s Dr, Santa Fe, NM 87505, United States
Phone: +1 (505) 471-6001
Website: dfphoto.net
FAQ About Taking Live Photos
1. What is the difference between a Live Photo and a regular photo?
A Live Photo captures a short video clip of 1.5 seconds before and after the photo is taken, adding motion and sound, whereas a regular photo is a static image.
2. How much storage space do Live Photos take up?
Live Photos take up more storage space than regular photos due to the additional video clip.
3. Can I turn off Live Photos?
Yes, you can turn off Live Photos in the Camera app or permanently in the Settings app.
4. How do I share Live Photos with Android users?
You can share Live Photos with Android users as a video or GIF.
5. Can I edit Live Photos?
Yes, you can edit Live Photos using the built-in editing tools in the Photos app or third-party apps.
6. How do I change the key photo of a Live Photo?
You can change the key photo by editing the Live Photo and selecting a new frame as the key photo.
7. Can I convert a Live Photo to a still photo?
Yes, you can convert a Live Photo to a still photo by sharing it as a still image.
8. What are some creative ways to use Live Photos?
You can use Live Photos to capture action, create GIFs, tell stories, create art, and preserve memories.
9. How do I take better Live Photos in low light?
Use a tripod, increase brightness, adjust exposure, use Night mode, and edit the Live Photo.
10. What are some ethical considerations when taking Live Photos of people?
Ask for permission, respect privacy, be transparent, and obtain consent.