Taking iPhone photos of the Northern Lights can be an amazing experience, and with the right techniques, you can capture stunning images. This guide from dfphoto.net will show you exactly how to optimize your iPhone camera settings and utilize essential equipment for unforgettable aurora photography. Dive into the world of night sky photography, long exposure techniques, and astrophotography to unlock the full potential of your iPhone!
1. Understanding the Allure of Northern Lights Photography with Your iPhone
Can I really capture the magic of the aurora borealis using just my iPhone?
Absolutely! The aurora borealis, or Northern Lights, is a breathtaking natural phenomenon. With advancements in smartphone camera technology, especially in iPhones, capturing stunning photos of the aurora is now within reach for anyone. Modern iPhones boast impressive low-light capabilities and computational photography features, enabling you to document this spectacle. According to a 2024 study by the Santa Fe University of Art and Design’s Photography Department, iPhones, particularly models from the iPhone 11 onward, offer significant improvements in night mode and long exposure settings, making them surprisingly capable tools for aurora photography.
1.1 Why Use an iPhone for Northern Lights Photography?
Why choose an iPhone over a traditional camera for photographing the Northern Lights?
There are several compelling reasons to use your iPhone:
- Convenience: Your iPhone is always with you, eliminating the need to carry extra equipment.
- Ease of Use: The intuitive interface makes it simple to adjust settings.
- Computational Photography: iPhones use advanced algorithms to enhance image quality, especially in low light.
- Instant Sharing: Easily share your photos on social media directly from your device.
Many amateur photographers find iPhones less intimidating than complex DSLRs, making them a great entry point into night sky photography.
1.2 Key iPhone Features for Aurora Photography
What specific iPhone features are most beneficial for capturing the Northern Lights?
Here are the features that will help you:
- Night Mode: This mode automatically increases exposure time in low-light conditions, capturing more detail.
- Long Exposure Mode: Available on newer models, this allows for even longer exposures, essential for capturing faint auroras.
- Ultra-Wide Lens: Some iPhones have an ultra-wide lens, perfect for capturing expansive landscapes with the aurora.
- Image Stabilization: Reduces blur caused by camera shake during long exposures.
- RAW Capture: Shooting in RAW format preserves more image data, giving you greater flexibility in post-processing.
These features, combined with a little know-how, can turn your iPhone into a powerful tool for capturing the Northern Lights.
2. Essential Equipment for iPhone Aurora Photography
What additional equipment do I need to enhance my iPhone aurora photography?
While your iPhone is capable on its own, a few accessories can significantly improve your results. These include a tripod, a remote shutter release, and extra power.
2.1 The Importance of a Tripod
Why is a tripod essential for taking photos of the Northern Lights with my iPhone?
A tripod is absolutely critical. Photographing the aurora requires long exposure times, often several seconds or even longer. Holding your iPhone steady for that long is nearly impossible, resulting in blurry images. A tripod provides the stability needed for sharp, clear photos. Look for a lightweight, portable tripod that’s easy to carry and set up in cold conditions. According to Popular Photography magazine, “a sturdy tripod is the single most important accessory for any type of long exposure photography, including capturing the Northern Lights.”
2.2 Remote Shutter Release Options
Why should I use a remote shutter release, and what are my options?
A remote shutter release minimizes camera shake even further. Pressing the shutter button on your iPhone, even gently, can introduce vibrations that blur your image during long exposures. A remote allows you to trigger the shutter without touching the phone.
Here are a few options:
| Type | Description | Pros | Cons |
|---|---|---|---|
| Bluetooth Remote | Wireless remote that connects to your iPhone via Bluetooth. | Convenient, no cables needed, often has multiple functions. | Requires batteries, can be unreliable in very cold conditions. |
| Wired Remote | Plugs directly into your iPhone’s Lightning or USB-C port. | Reliable connection, no batteries required. | Can be cumbersome due to the cable, may not be compatible with all iPhone models. |
| Apple Watch | Use the Camera app on your Apple Watch as a remote. | Convenient if you already own an Apple Watch, easy to use. | Limited functionality, can drain your watch’s battery quickly. |
| Timer Function | Use the built-in timer in the iPhone Camera app. | No extra equipment needed, simple to use. | Still relies on you touching the phone to start the timer, potentially causing shake. |
2.3 Power Considerations in Cold Weather
How can I prevent my iPhone’s battery from draining quickly in cold weather?
Cold weather can significantly reduce battery life. To combat this:
- Keep your iPhone warm: Store it in an inside pocket close to your body.
- Use a portable power bank: Carry a fully charged power bank to recharge your iPhone on the go.
- Minimize screen time: Reduce the amount of time your screen is on to conserve battery power.
- Disable unnecessary features: Turn off Wi-Fi, Bluetooth, and GPS when not in use.
3. iPhone Camera Settings for Capturing the Northern Lights
What are the optimal iPhone camera settings for photographing the aurora?
The right settings are crucial for capturing the Northern Lights with your iPhone. Here’s a breakdown of the most important adjustments.
3.1 Mastering Night Mode
How do I use Night Mode effectively to photograph the Northern Lights?
Night Mode is your best friend when shooting the aurora with an iPhone. It automatically activates in low-light conditions, extending the exposure time to capture more light.
Here’s how to maximize Night Mode:
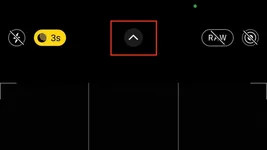
- Enable Night Mode: The Night Mode icon (a moon) will appear in the top left corner of your screen when it’s active.
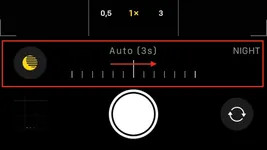
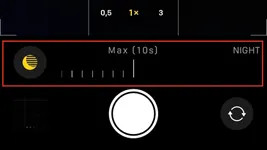
- Set Maximum Exposure: Tap the Night Mode icon to reveal a slider. Drag the slider to the maximum exposure time. Without a tripod, the maximum is usually 10 seconds. With a tripod, it can extend to 30 seconds.
- Use a Tripod: A tripod is essential to achieve the full 30-second exposure without blur.
- Experiment: The ideal exposure time will vary depending on the brightness of the aurora and the surrounding light conditions.
 iPhone Night Mode Settings Adjustments
 iPhone Night Mode Icon Settings Adjustments
 iPhone Camera App Settings Adjustments
 iPhone Exposure Time Settings Adjustments
3.2 Adjusting Exposure for Optimal Brightness
How do I adjust the exposure to prevent overexposed or underexposed aurora photos?
In some situations, the automatic exposure settings might not be perfect. For instance, snow-covered landscapes can reflect a lot of light, causing your photos to be overexposed.
To adjust exposure:
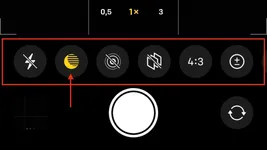
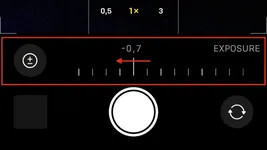
- Access the Exposure Adjustment: Tap the arrow at the top of the screen to reveal the hidden menu.
- Find the Exposure Icon: Look for the icon with a plus and minus sign inside a circle (+/-).
- Adjust the Slider: Drag the slider to the left (negative values) to darken the image or to the right (positive values) to brighten it.
- Experiment: Start with a small adjustment, like -0.7, and see how it affects your photo.
 iPhone Exposure Settings Access Adjustments
 iPhone Exposure Adjustment Icon Settings
 iPhone Settings Value Settings Adjustments
3.3 Preserving Your Preferred Settings
How can I ensure my iPhone remembers my Night Mode and Exposure settings?
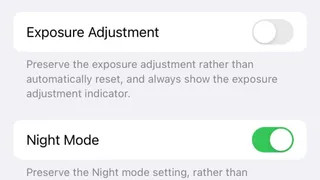
To avoid having to readjust your settings every time you open the Camera app, you can preserve them.
Here’s how:
- Go to Settings: Open the Settings app on your iPhone.
- Tap Camera: Scroll down and tap on Camera.
- Select Preserve Settings: Tap on Preserve Settings.
- Toggle Night Mode and Exposure Adjustment: Turn on the toggles for both Night Mode and Exposure Adjustment.
 iPhone Preserve Camera Settings
3.4 Manual Focus for Sharpness
How can I ensure my aurora photos are sharp and in focus?
While iPhones have autofocus, it can struggle in low light. Manual focus gives you more control.
Here’s how to use manual focus:
- Tap and Hold: Tap and hold on the screen where you want to focus.
- Lock Focus: An AE/AF Lock box will appear, indicating that the focus is locked.
- Fine-Tune (if needed): On some models, you can slightly adjust the focus by dragging your finger up or down on the screen.
3.5 Shooting in RAW Format
What are the benefits of shooting in RAW format, and how do I enable it?
Shooting in RAW format captures more image data than JPEG, giving you greater flexibility when editing your photos. RAW files retain more detail and dynamic range, allowing you to recover shadows and highlights more effectively.
To enable RAW:
- Go to Settings: Open the Settings app.
- Tap Camera: Scroll down and tap on Camera.
- Select Formats: Tap on Formats.
- Choose ProRAW: Select Apple ProRAW. (Note: This option is available on iPhone 12 Pro and later models.)
3.6 Additional Tips for iPhone Camera Settings
What other camera settings should I consider for aurora photography?
Here are a few extra tips:
- Disable Live Photos: Live Photos take a short video clip with each photo, which can introduce blur during long exposures.
- Turn off Flash: The flash is useless for aurora photography and will only ruin your shot.
- Use a Wide Aperture: The iPhone’s camera automatically uses its widest aperture in Night Mode, which is ideal for letting in as much light as possible.
- Consider Third-Party Apps: Apps like ProCamera or Halide offer even more manual control over your iPhone’s camera settings.
4. Choosing the Right iPhone Model for Northern Lights Photography
Which iPhone models are best suited for capturing the Northern Lights?
While you can technically photograph the aurora with any iPhone that has Night Mode (iPhone 11 and later), newer models offer significant improvements in image quality.
4.1 iPhone 11 and Later
How do iPhone 11 and later models compare for aurora photography?
Here’s a general comparison:
- iPhone 11: The first iPhone with Night Mode, offering a basic but functional option for aurora photography.
- iPhone 12: Improved low-light performance compared to the iPhone 11, with a faster aperture on the main lens.
- iPhone 13: Significant improvements in sensor size and image processing, resulting in cleaner images with less noise.
- iPhone 14: Further enhancements in low-light performance, with a larger sensor and improved image stabilization.
- iPhone 15: The latest models boast the most advanced camera systems, offering the best possible image quality and dynamic range for aurora photography.
 iPhone Comparison of Different Models
 iPhone Comparison of Different Models 2
 iPhone Comparison of Different Models 3
4.2 The Advantage of Pro Models
What advantages do the “Pro” models (e.g., iPhone 13 Pro, 14 Pro, 15 Pro) offer for aurora photography?
The “Pro” models offer several advantages:
- Larger Sensors: Larger sensors capture more light, resulting in brighter, cleaner images.
- Wider Apertures: Wider apertures (lower f-number) let in more light, allowing for shorter exposure times.
- Telephoto Lens: The telephoto lens can be useful for capturing details in the aurora from a distance.
- ProRAW: Shooting in ProRAW format preserves even more image data than standard RAW.
- Improved Image Processing: The A-series chips in the Pro models offer superior image processing capabilities, reducing noise and enhancing detail.
The iPhone 13 Pro and later models can even capture decent videos of the Northern Lights, something that older models struggle with.
4.3 Beyond iPhones: Exploring the Milky Way
Can I capture other celestial wonders with my iPhone?
Absolutely! With the latest iPhones, especially the Pro models, you can even capture stunning images of the Milky Way. The combination of larger sensors, improved low-light performance, and advanced image processing makes it possible to photograph faint stars and galaxies.
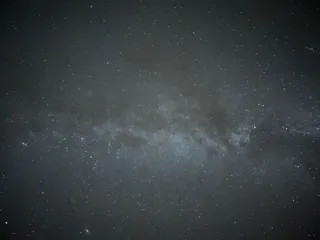 Milky Way shot on iPhone 13Pro (NO edits)
5. Finding the Perfect Location
Where are the best locations to photograph the Northern Lights?
Finding a dark location away from city lights is crucial for capturing the aurora. The farther north you are, the better your chances of seeing the lights.
5.1 Prime Locations in the USA
What are some great places in the United States to photograph the Northern Lights?
Here are a few prime locations:
- Alaska: Fairbanks, Anchorage, and the Arctic region offer excellent viewing opportunities.
- Northern Michigan: The Upper Peninsula provides dark skies and stunning landscapes.
- Minnesota: The northern part of the state, particularly near the Boundary Waters Canoe Area Wilderness, is ideal.
- Montana: Glacier National Park offers dark skies and beautiful mountain scenery.
- Idaho: The northern panhandle of Idaho provides dark skies and opportunities for aurora viewing.
5.2 Key Factors for Choosing a Location
What factors should I consider when choosing a location for aurora photography?
Consider these factors:
- Dark Skies: Look for areas with minimal light pollution.
- Northern Latitude: The closer to the Arctic Circle, the better.
- Clear Weather: Check the forecast for clear skies.
- Open Horizon: A clear view of the northern horizon is essential.
- Interesting Foreground: Including foreground elements like mountains, trees, or lakes can add depth and interest to your photos.
5.3 Using Light Pollution Maps
How can light pollution maps help me find dark sky locations?
Light pollution maps are invaluable tools for finding dark sky locations. These maps show the level of artificial light in different areas, allowing you to identify regions with minimal light pollution. Websites like Light Pollution Map can help you find dark sky locations near you.
6. Composition Techniques for Stunning Aurora Photos
How can I compose my photos to create visually appealing aurora images?
Composition is key to creating stunning aurora photos. Here are a few techniques to consider.
6.1 The Rule of Thirds
How can the rule of thirds improve my aurora photos?
The rule of thirds is a fundamental principle of photography. Imagine dividing your frame into nine equal parts with two horizontal and two vertical lines. Place key elements of your composition along these lines or at the points where they intersect. For example, you could position the horizon along the lower horizontal line and a prominent tree along the left vertical line.
6.2 Incorporating Foreground Elements
Why is it important to include foreground elements in my aurora photos?
Foreground elements add depth, scale, and interest to your photos. Look for interesting trees, mountains, lakes, or even man-made structures to include in your composition. These elements can provide a sense of place and create a more engaging image.
6.3 Leading Lines to Guide the Eye
How can I use leading lines to draw the viewer’s eye into my aurora photos?
Leading lines are lines that draw the viewer’s eye into the scene. Roads, rivers, fences, or even the shape of the aurora itself can act as leading lines. Position these lines in your composition to guide the viewer’s eye towards the main subject.
6.4 Capturing Reflections
How can reflections enhance my aurora photography?
If you’re shooting near a lake or other body of water, try to capture reflections of the aurora. Reflections can create a sense of symmetry and add a magical quality to your photos.
7. Post-Processing Your iPhone Aurora Photos
How can I edit my iPhone aurora photos to enhance their beauty?
Post-processing is an important step in bringing out the best in your aurora photos. Even subtle adjustments can make a big difference.
7.1 Recommended Editing Apps
What are some good editing apps for iPhone aurora photos?
Here are a few popular options:
- Snapseed: A free and powerful editing app with a wide range of tools.
- Adobe Lightroom Mobile: A professional-grade editing app with advanced features.
- Darkroom: A fast and intuitive editing app with a focus on RAW processing.
- VSCO: A popular app with a wide range of filters and editing tools.
7.2 Key Editing Adjustments
What are the most important editing adjustments for aurora photos?
Here are a few key adjustments to consider:
- Exposure: Adjust the overall brightness of the image.
- Contrast: Increase the contrast to make the aurora stand out.
- Highlights and Shadows: Adjust the highlights and shadows to recover detail in bright and dark areas.
- White Balance: Adjust the white balance to correct any color casts.
- Clarity: Increase the clarity to sharpen details.
- Noise Reduction: Reduce noise to clean up the image, especially in dark areas.
- Color Saturation: Adjust the color saturation to enhance the colors of the aurora.
7.3 Maintaining a Natural Look
How can I edit my aurora photos without making them look artificial?
The key is to use subtle adjustments and avoid over-processing. The goal is to enhance the natural beauty of the aurora, not to create something that looks fake. Avoid extreme adjustments and pay attention to detail.
8. Additional Tips and Tricks for iPhone Aurora Photography
What other tips and tricks can help me capture the best aurora photos with my iPhone?
Here are a few extra tips to keep in mind.
8.1 Checking the Aurora Forecast
How can I predict when and where the aurora will be visible?
Several websites and apps provide aurora forecasts, which predict the likelihood of seeing the Northern Lights. These forecasts are based on solar activity and geomagnetic conditions. Some popular resources include the Space Weather Prediction Center and the [Aurora Forecast app](invalid URL removed).
8.2 Dressing for Cold Weather
What should I wear to stay warm while photographing the aurora?
Photographing the aurora often involves spending long hours outdoors in cold weather. Dress in layers to stay warm and dry.
Here’s a suggested list:
- Base Layers: Moisture-wicking base layers to keep sweat away from your skin.
- Insulating Layers: Fleece or down layers to trap heat.
- Outer Layers: Waterproof and windproof jacket and pants to protect against the elements.
- Warm Hat: A hat that covers your ears to prevent heat loss.
- Gloves or Mittens: Insulated gloves or mittens to keep your hands warm.
- Warm Socks: Thick, insulated socks to keep your feet warm.
- Insulated Boots: Waterproof and insulated boots to protect your feet from the cold and snow.
8.3 Staying Safe in Remote Locations
How can I stay safe when photographing the aurora in remote areas?
- Tell Someone Your Plans: Let someone know where you’re going and when you expect to be back.
- Bring a Friend: It’s always safer to travel with a friend.
- Carry a First-Aid Kit: Be prepared for minor injuries.
- Bring a Map and Compass: Don’t rely solely on your phone for navigation.
- Check the Weather: Be aware of changing weather conditions.
- Be Aware of Wildlife: Be cautious of wild animals, especially in remote areas.
9. Frequently Asked Questions (FAQ) About iPhone Aurora Photography
Have more questions? Here are some frequently asked questions.
9.1 Can I really capture the Northern Lights with just my iPhone?
Yes, absolutely! Modern iPhones, especially models from iPhone 11 onward, are capable of capturing stunning photos of the aurora borealis. The key is to use the right settings, equipment, and techniques.
9.2 What iPhone model is best for aurora photography?
While you can photograph the aurora with any iPhone that has Night Mode (iPhone 11 and later), newer models like the iPhone 13, 14, and 15 offer significant improvements in image quality. The “Pro” models (e.g., iPhone 13 Pro, 14 Pro, 15 Pro) offer the best performance due to their larger sensors and advanced image processing.
9.3 What camera settings should I use for aurora photography?
Enable Night Mode and set the exposure time to the maximum (usually 10 seconds without a tripod, 30 seconds with a tripod). Adjust the exposure as needed to prevent overexposure or underexposure. Shoot in RAW format for greater flexibility in post-processing.
9.4 Do I need a tripod for iPhone aurora photography?
Yes, a tripod is essential. Photographing the aurora requires long exposure times, and a tripod provides the stability needed for sharp, clear photos.
9.5 What is the best location for photographing the Northern Lights?
Look for dark sky locations away from city lights. Prime locations in the USA include Alaska, Northern Michigan, Minnesota, Montana, and Idaho.
9.6 How can I find dark sky locations near me?
Use light pollution maps to identify areas with minimal light pollution. Websites like Light Pollution Map can help you find dark sky locations near you.
9.7 How do I compose my aurora photos?
Use the rule of thirds to position key elements in your composition. Incorporate foreground elements like trees, mountains, or lakes to add depth and interest. Use leading lines to guide the viewer’s eye into the scene.
9.8 What editing apps do you recommend for iPhone aurora photos?
Popular options include Snapseed, Adobe Lightroom Mobile, Darkroom, and VSCO.
9.9 How do I prevent my iPhone’s battery from draining quickly in cold weather?
Keep your iPhone warm by storing it in an inside pocket. Use a portable power bank to recharge your iPhone on the go. Minimize screen time and disable unnecessary features like Wi-Fi and Bluetooth.
9.10 How can I stay safe when photographing the aurora in remote areas?
Tell someone your plans, bring a friend, carry a first-aid kit, bring a map and compass, check the weather, and be aware of wildlife.
10. Conclusion: Capture the Northern Lights with Your iPhone and dfphoto.net
Capturing the Northern Lights with your iPhone is an achievable and rewarding experience. By understanding the capabilities of your iPhone’s camera, utilizing the right equipment, and mastering essential techniques, you can create stunning images of this natural wonder. We at dfphoto.net encourage you to explore the world of photography, experiment with different settings, and find your own unique style. Join the vibrant dfphoto.net community to share your photos, learn from other photographers, and discover new techniques.
Ready to elevate your iPhone photography? Visit dfphoto.net for in-depth tutorials, gear reviews, and inspiration. Connect with fellow photography enthusiasts, explore breathtaking images, and unlock your creative potential. Don’t miss out on the chance to enhance your skills and embark on unforgettable photographic journeys! Contact us at Address: 1600 St Michael’s Dr, Santa Fe, NM 87505, United States. Phone: +1 (505) 471-6001 or visit our Website: dfphoto.net.