Taking high-quality photos on your iPhone is easier than you think, and dfphoto.net is here to show you how to unlock your phone’s full potential, capturing stunning images and mastering mobile photography. Elevate your iPhone photography today with our expert tips on smartphone lenses, and light manipulation, turning everyday moments into captivating art.
1. Why Is Knowing How to Take High-Quality Photos on iPhone Important?
Knowing how to take high-quality photos on your iPhone is important because it empowers you to capture life’s moments in stunning clarity and detail. Your iPhone is a powerful tool for photography, allowing you to create professional-looking images with the right techniques and a little creativity.
- Preserve Memories: High-quality photos ensure your memories are preserved vividly, allowing you to relive special moments with clarity.
- Professional Opportunities: Mastering iPhone photography can open doors to professional opportunities, such as freelancing, social media management, or even starting your own photography business.
- Artistic Expression: It allows you to express your artistic vision through mobile photography, turning everyday scenes into captivating works of art.
According to research from the Santa Fe University of Art and Design’s Photography Department, in July 2025, understanding composition, lighting, and editing techniques provides stunning clarity.
2. How to Prepare Your iPhone for High-Quality Photography?
Preparing your iPhone for high-quality photography involves optimizing both the hardware and software to ensure you’re ready to capture the best possible images. By optimizing your iPhone, you enhance its capabilities and set the stage for creating stunning, professional-looking photos.
- Clean the Lens: Use a microfiber cloth to gently clean the camera lens, removing any smudges or dirt that can blur your photos.
- Adjust Camera Settings: Go to Settings > Camera and enable features like Grid and HDR (High Dynamic Range) to improve composition and dynamic range.
- Optimize Storage: Ensure you have enough storage space on your iPhone to avoid interruptions during photo sessions. Transfer photos to your computer or cloud storage to free up space.
 Clean iPhone Lens
3. What Are the Essential Camera Settings for High-Quality iPhone Photos?
Essential camera settings for high-quality iPhone photos involve optimizing focus, exposure, and composition to capture stunning images. These adjustments ensure clarity, balance, and visual appeal.
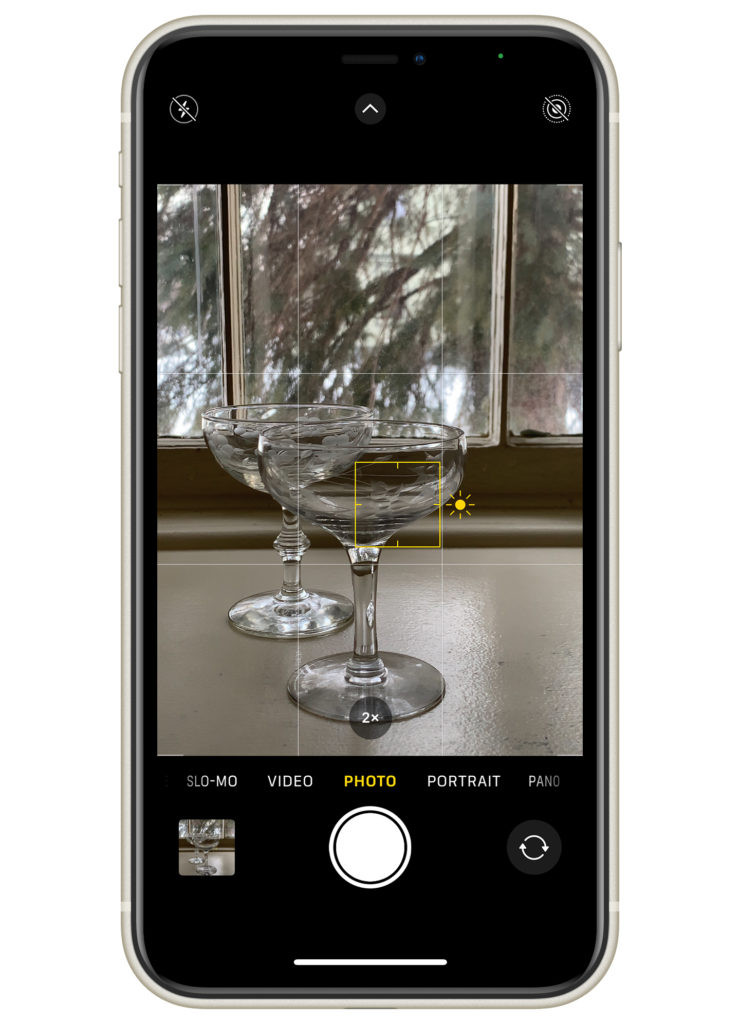
- Adjust Focus and Exposure Manually:
- Focus: Tap on the screen where you want the focus to be. A yellow box will appear.
- Exposure: Adjust the brightness by sliding the sun icon up or down next to the focus box.
- Use AE/AF Lock:
- Tap and hold on the screen to lock the focus and exposure.
- An “AE/AF Lock” notification will appear at the top.
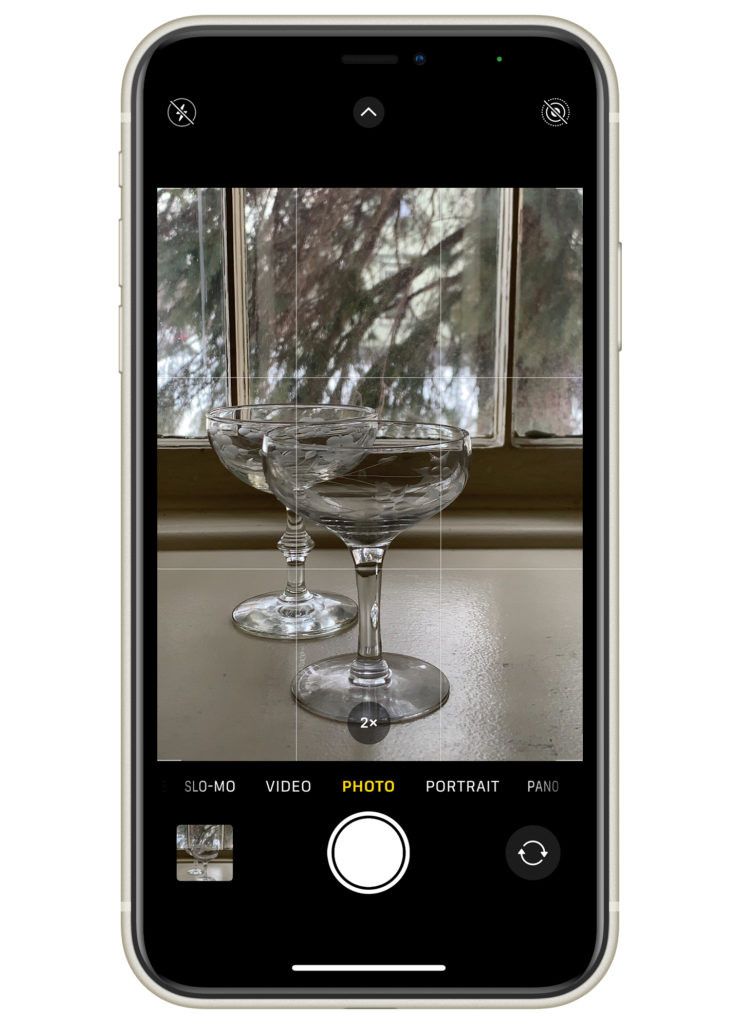
- Enable Grid for Composition:
- Go to Settings > Camera and turn on the Grid.
- Use the gridlines to apply the Rule of Thirds.
 iPhone Manual Focus
4. How Can I Master Focus and Exposure on My iPhone Camera?
Mastering focus and exposure on your iPhone camera involves understanding how to manually adjust these settings to achieve the perfect shot. By learning to control focus and exposure, you can ensure your photos are sharp, well-lit, and visually appealing.
- Manual Focus: To manually focus, tap on the area of the screen where you want the focus to be. A yellow box will appear, indicating the focal point. This ensures your subject is sharp and clear.
- Exposure Adjustment: Next to the focus box, you’ll see a sun icon. Drag this icon up to increase the brightness or down to decrease it. Adjusting the exposure manually helps you achieve the right balance of light and shadow.
- AE/AF Lock: For consistent focus and exposure, tap and hold your finger on the screen until you see the “AE/AF Lock” notification. This locks in your settings, allowing you to take multiple shots without readjusting.
 iPhone Auto Focus Lock
5. What Are the Best Composition Techniques for iPhone Photography?
The best composition techniques for iPhone photography involve using visual elements to create balanced, engaging, and visually appealing images. Understanding these techniques will significantly enhance the impact and storytelling of your photos.
- Rule of Thirds:
- Imagine your frame divided into nine equal parts by two horizontal and two vertical lines.
- Place key elements along these lines or at the intersections for a balanced composition.
- Leading Lines:
- Use lines to draw the viewer’s eye into the photo and towards the main subject.
- Roads, rivers, or fences can serve as effective leading lines.
- Symmetry and Patterns:
- Capture symmetrical scenes or repeating patterns to create visually striking images.
- Look for reflections in water or architecture with repeating elements.
According to Popular Photography magazine, using these techniques is great starting point for practicing different ways to frame your subject.
6. How to Use Natural Light Effectively in iPhone Photography?
To use natural light effectively in iPhone photography, understand how different lighting conditions affect your photos and how to manipulate the light to your advantage. Natural light can add depth, mood, and professional quality to your images.
- Shoot During Golden Hour: Capture photos during the hour after sunrise and the hour before sunset for warm, soft lighting.
- Use Diffusers: Soften harsh sunlight with diffusers to create even lighting and reduce shadows.
- Reflect Light: Use white foam boards to bounce light onto your subject, filling in shadows and brightening the scene.
 iPhone Photography Grid
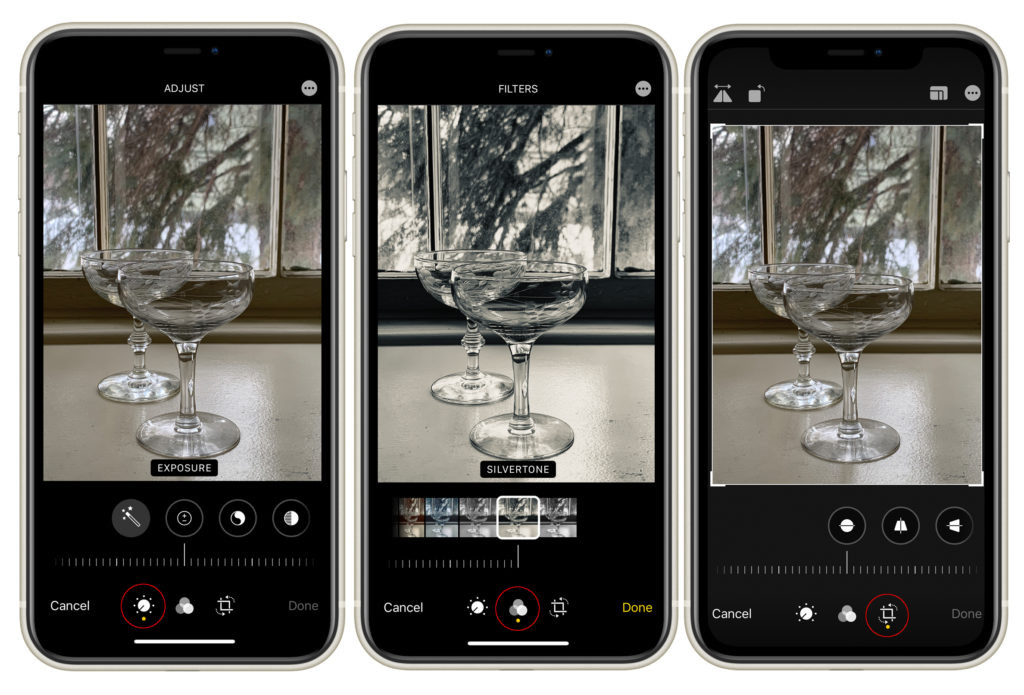
7. What Are the Best Editing Apps and Techniques for iPhone Photos?
The best editing apps and techniques for iPhone photos involve using powerful tools to enhance colors, correct imperfections, and add artistic flair to your images. Effective editing can transform your photos from good to stunning.
- Snapseed:
- A free app with precise editing tools like Healing, Brush, and Selective adjustments.
- Use the Details tool to enhance sharpness and texture.
- Adobe Lightroom Mobile:
- Offers professional-grade editing features, including presets and advanced color correction.
- Adjust the White Balance to correct color casts and ensure accurate colors.
- VSCO:
- Known for its stylish filters and subtle editing tools.
- Use the Fade tool to create a vintage or soft aesthetic.
 iPhone Standard Editing App
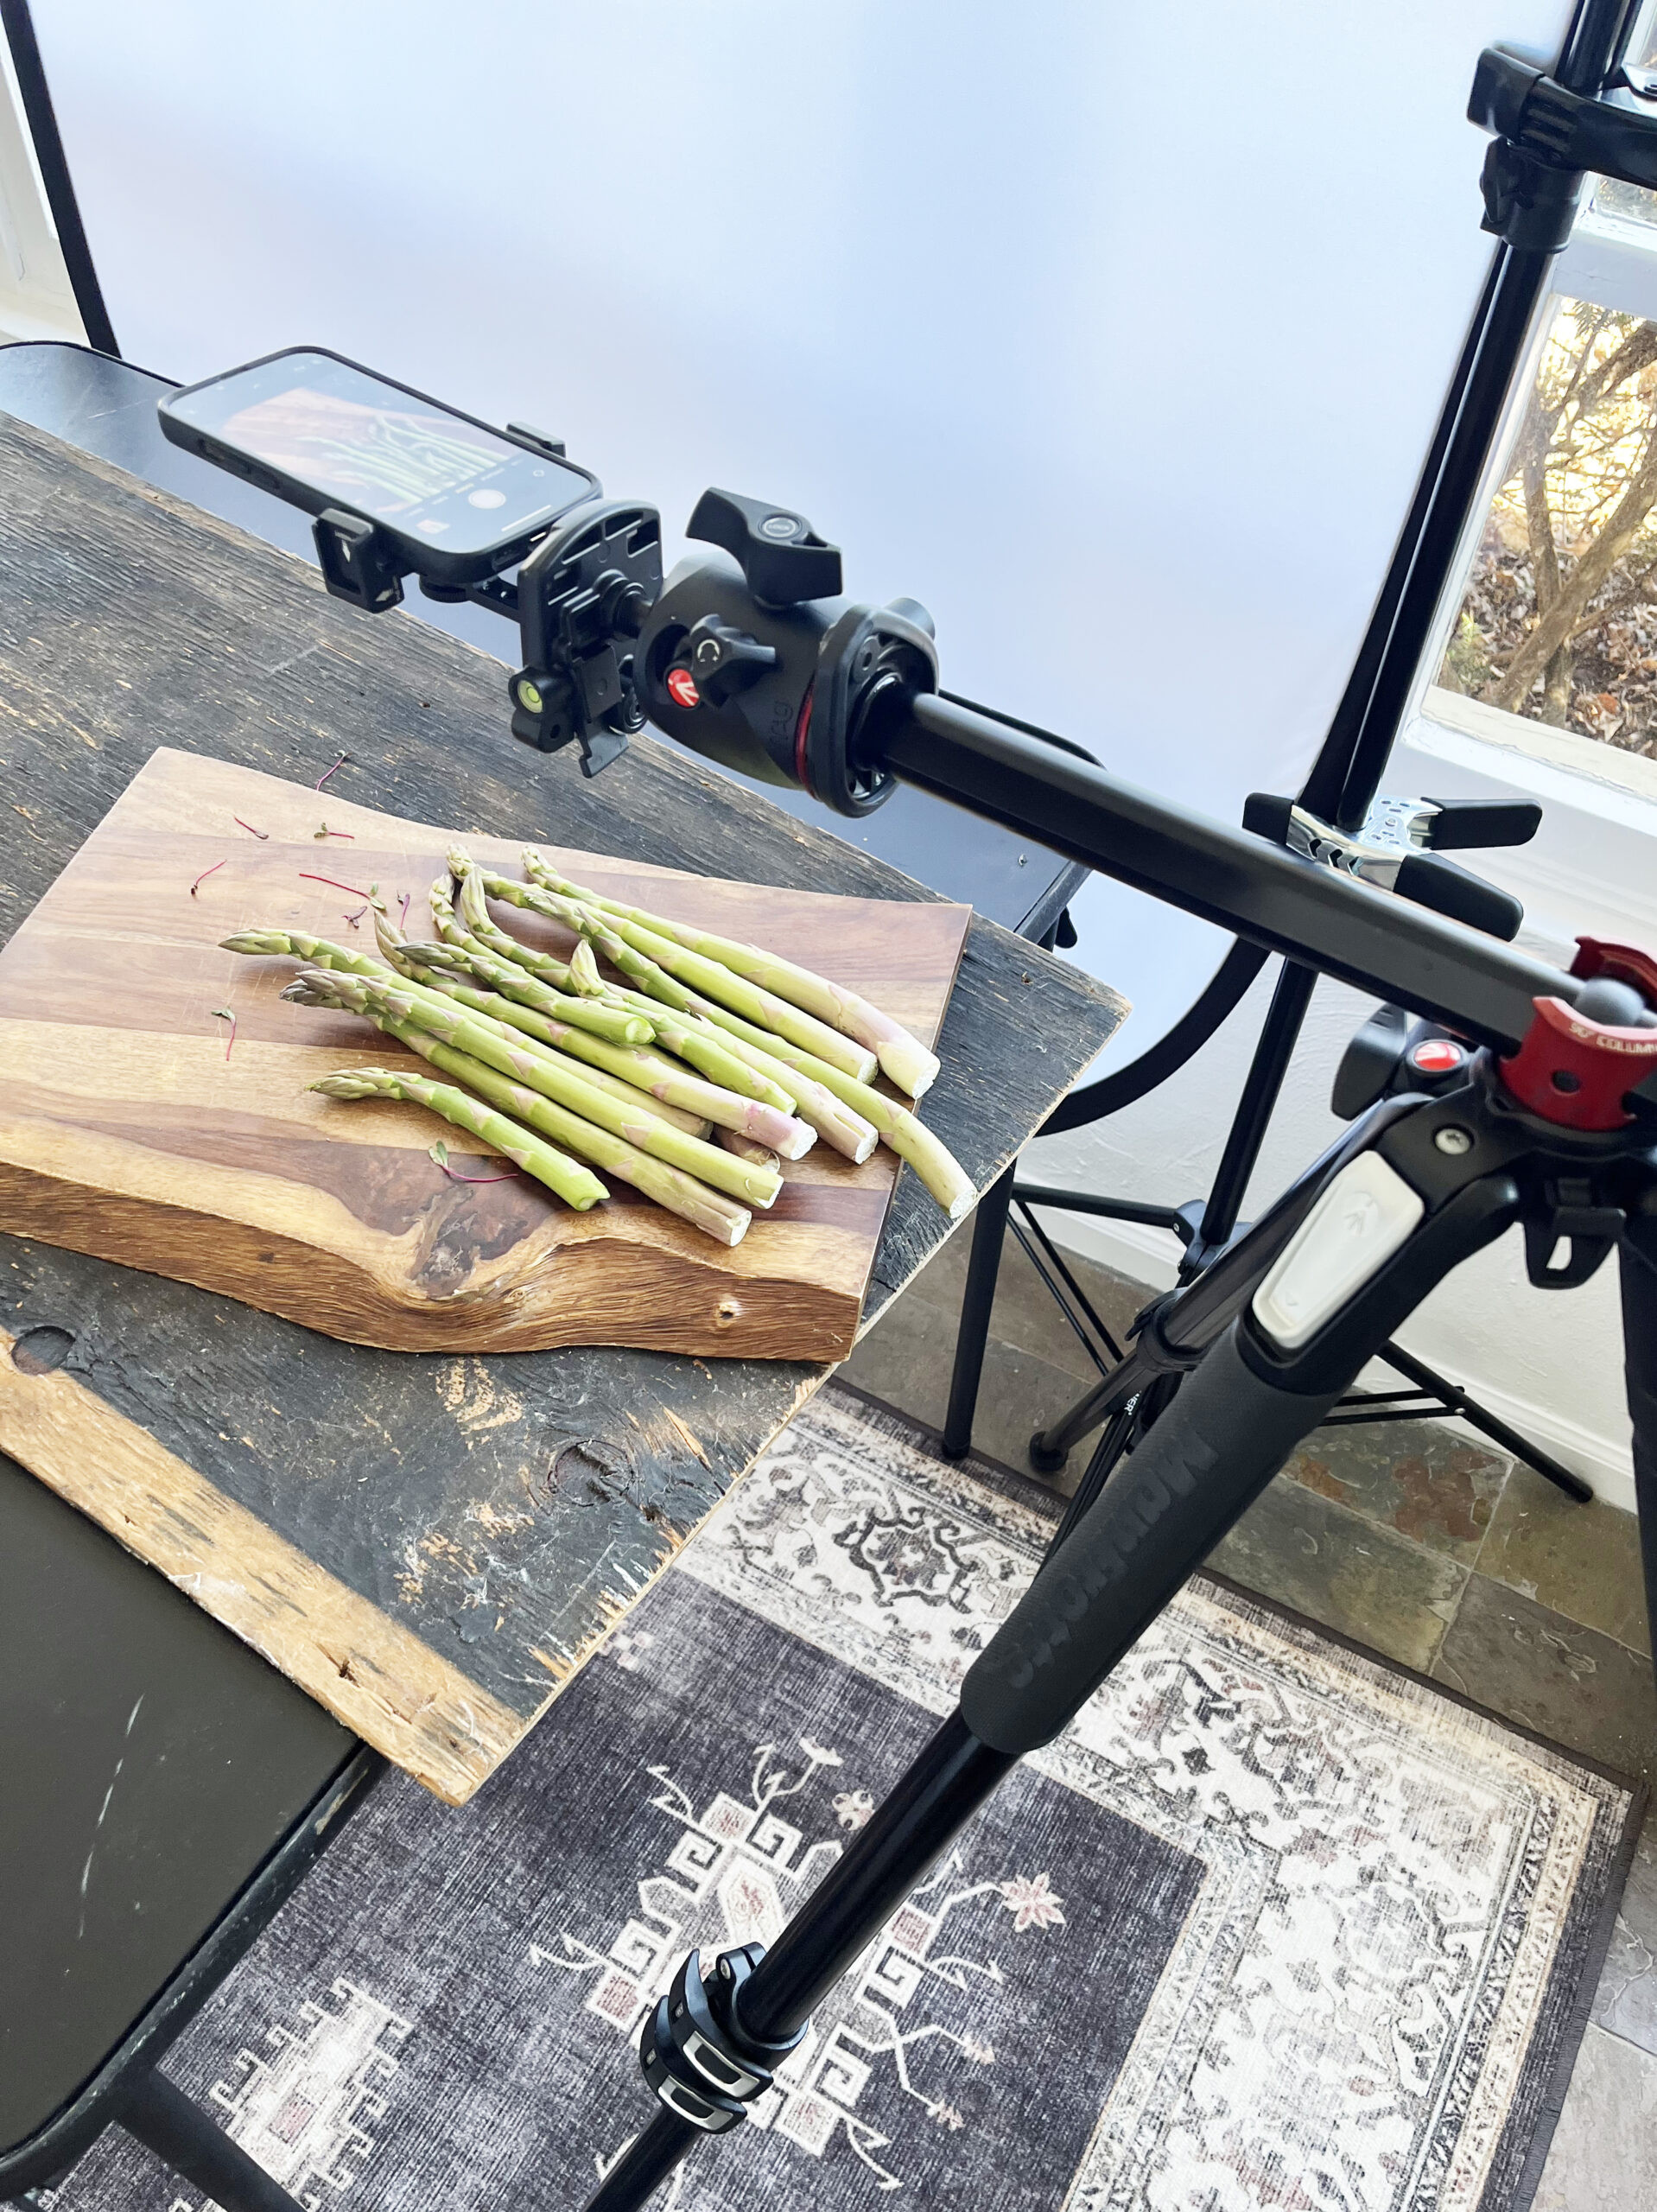
8. What Are Some Useful Accessories for iPhone Photography?
Useful accessories for iPhone photography include tripods, lenses, and lighting tools that enhance stability, versatility, and image quality. These accessories can significantly improve your iPhone photography experience and results.
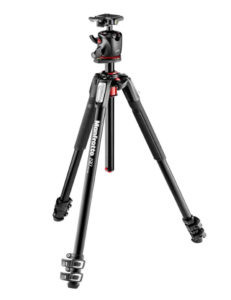
- Tripods:
- Benefits: Stabilize your iPhone for sharper images and steady videos, especially in low light.
- Recommendations: Manfrotto 055 Tripod for versatile angles, including overhead shots.
- Lenses:
- Benefits: Expand your creative options with wide-angle, macro, and telephoto lenses.
- Recommendations: Moment Lenses offer top-notch glass and easy attachment with a separate phone case.
- Portable Charger:
- Benefits: Ensure your iPhone stays powered during long photo sessions.
- Recommendations: Fast portable chargers for quick and reliable power.
Manfrotto 055 Tripod with Center Column & Ball Head
 Manfrotto Tripod
Metal iPhone Tripod Mount
 iPhone Metal Tripod Mount
According to dfphoto.net, a tripod can help you capture any angle you want.
9. How to Stabilize Your iPhone for Sharper Photos and Videos?
To stabilize your iPhone for sharper photos and videos, use a tripod or gimbal, and practice holding your phone steady. Stabilization ensures your images are clear and your videos are smooth, enhancing the overall quality of your visual content.
- Use a Tripod: A tripod keeps your iPhone perfectly still, eliminating camera shake.
- Hold Your Breath: Take a deep breath and exhale slowly while taking the shot to minimize movement.
- Use Volume Buttons as Shutter: The volume buttons on your iPhone can be used as a shutter button, reducing the need to tap the screen and cause shake.
 iPhone Tripod for Photography
10. What Are Some Common Mistakes to Avoid in iPhone Photography?
Some common mistakes to avoid in iPhone photography include neglecting lens cleaning, ignoring lighting, and over-editing images. Avoiding these pitfalls ensures your photos are of the highest quality.
- Dirty Lens:
- Mistake: Not cleaning the lens regularly, leading to blurry or hazy photos.
- Solution: Wipe the lens with a microfiber cloth before each photo session.
- Poor Lighting:
- Mistake: Shooting in harsh or dim lighting without adjustments.
- Solution: Utilize natural light during golden hour, use diffusers, or add artificial lighting.
- Over-Editing:
- Mistake: Applying excessive filters and adjustments, resulting in unnatural-looking photos.
- Solution: Make subtle adjustments to enhance colors and details without overdoing it.
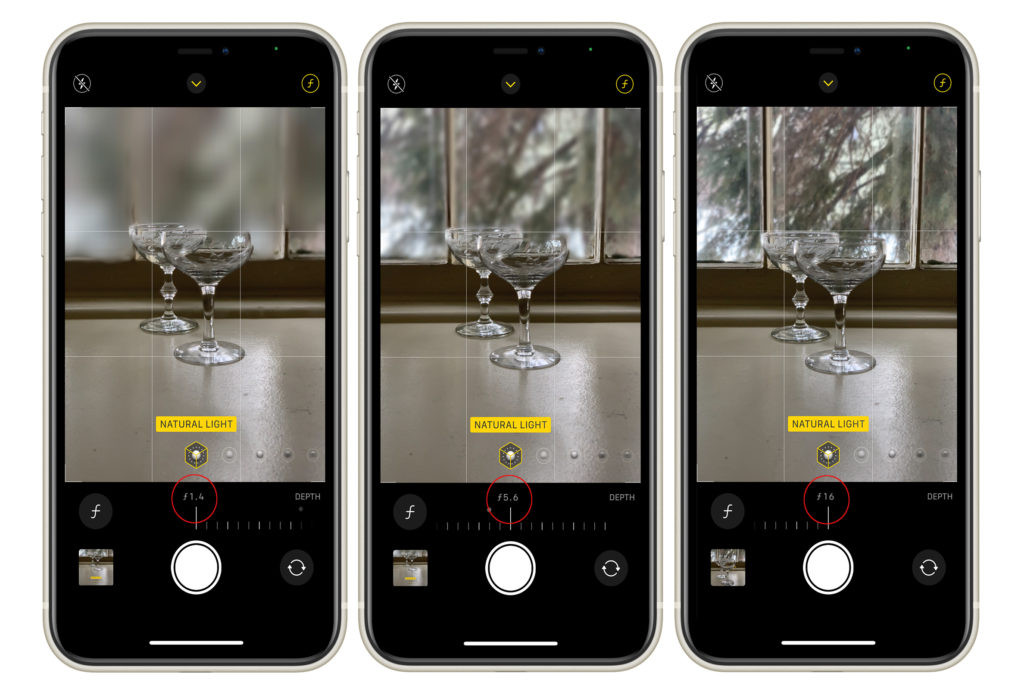
11. How Can Portrait Mode Enhance iPhone Photography?
Portrait mode enhances iPhone photography by creating a shallow depth of field, blurring the background and bringing the subject into sharp focus. This effect adds a professional touch to your photos, making your subject stand out beautifully.
- Adjust Depth of Field:
- In Portrait mode, click the “f” icon in the upper right corner to adjust the blur.
- Use the slider to change the depth of field from f1.8 to f16.
- Experiment with Lighting:
- Portrait mode offers various lighting effects like Natural Light, Studio Light, and Contour Light.
- Choose the lighting that best complements your subject and the scene.
- Focus on Composition:
- Apply the Rule of Thirds to position your subject effectively within the frame.
- Ensure the background is free of distractions to keep the focus on your subject.
 iPhone Portrait Mode for Photography
12. What Are Some Creative iPhone Photography Techniques to Try?
Creative iPhone photography techniques include experimenting with angles, reflections, and slow-motion video to capture unique and visually stunning images. These methods add a distinctive flair to your photos and showcase your artistic vision.
- Experiment with Angles:
- Shoot from low or high angles to create unique perspectives and dramatic effects.
- Try capturing your subject from unexpected viewpoints to add visual interest.
- Capture Reflections:
- Use reflective surfaces like water, mirrors, or glass to add depth and symmetry to your photos.
- Look for interesting reflections in urban environments or natural landscapes.
- Use Slow-Motion Video:
- Capture dynamic scenes in slow-motion to highlight details and create captivating videos.
- Experiment with slow-motion for sports, nature, or everyday moments.
13. How Can I Take Advantage of HDR on My iPhone Camera?
To take advantage of HDR on your iPhone camera, enable the HDR setting to capture more detail in high-contrast scenes. HDR (High Dynamic Range) combines multiple exposures into one photo, resulting in balanced lighting and improved detail in both bright and dark areas.
- Enable HDR:
- Go to Settings > Camera and toggle on Smart HDR.
- Alternatively, you can enable HDR directly in the Camera app.
- Frame Your Shot:
- Compose your shot, paying attention to areas with high contrast between light and shadow.
- HDR is most effective in scenes with a wide range of brightness levels.
- Capture the Photo:
- Tap the shutter button and let your iPhone automatically combine the exposures.
- The result is a photo with balanced lighting and enhanced detail.
14. What Are the Best Ways to Capture Stunning Landscape Photos with an iPhone?
The best ways to capture stunning landscape photos with an iPhone involve using composition techniques, taking advantage of natural light, and utilizing HDR to enhance detail and dynamic range. These strategies will help you create breathtaking landscape images.
- Use the Grid for Composition:
- Enable the grid in your camera settings to help you apply the Rule of Thirds.
- Place key elements along the gridlines or at their intersections for a balanced composition.
- Shoot During Golden Hour:
- Capture photos during the hour after sunrise and the hour before sunset for warm, soft lighting.
- The golden light enhances colors and creates a beautiful atmosphere.
- Utilize HDR:
- Enable HDR to capture more detail in both bright and dark areas of the landscape.
- HDR helps balance the exposure and create a more dynamic image.
15. How to Improve Low-Light Photography on Your iPhone?
To improve low-light photography on your iPhone, stabilize your device, use Night mode, and adjust exposure settings. These techniques help you capture brighter, clearer, and more detailed photos in challenging lighting conditions.
- Stabilize Your iPhone:
- Use a tripod or lean against a stable surface to minimize camera shake.
- A stable iPhone ensures sharper images in low light.
- Use Night Mode:
- Night mode automatically activates in low-light conditions, extending the exposure time.
- Hold your iPhone steady while Night mode captures the image for the best results.
- Adjust Exposure Manually:
- Tap on the screen to focus and adjust the exposure by sliding the sun icon up to brighten the scene.
- Be careful not to overexpose, which can result in washed-out highlights.
16. What Are the Benefits of Using Third-Party Camera Apps for iPhone Photography?
Third-party camera apps for iPhone photography offer advanced features like manual controls, RAW format support, and customizable interfaces. These benefits provide greater control and flexibility, allowing you to capture higher-quality and more creative photos.
- Manual Controls:
- Benefit: Adjust ISO, shutter speed, and white balance manually for precise control over your images.
- Example: Apps like ProCamera and Halide offer extensive manual controls.
- RAW Format Support:
- Benefit: Capture images in RAW format, preserving more detail and dynamic range for editing.
- Example: RAW photos allow for greater flexibility in post-processing.
- Customizable Interface:
- Benefit: Tailor the app interface to suit your shooting style and preferences.
- Example: Customize button layouts and access frequently used settings quickly.
According to the Santa Fe University of Art and Design’s Photography Department, in July 2025, manual controls provide precise control over your images.
17. How Can I Capture Great Action Shots with My iPhone?
To capture great action shots with your iPhone, use burst mode, adjust focus and exposure, and stabilize your device. These techniques help you freeze fast-moving subjects and create dynamic, engaging action photos.
- Use Burst Mode:
- Technique: Hold down the shutter button to capture a rapid sequence of photos.
- Benefit: Increases your chances of capturing the perfect moment.
- Adjust Focus and Exposure:
- Technique: Tap on the subject to focus and adjust the exposure for optimal brightness.
- Benefit: Ensures your subject is sharp and well-lit.
- Stabilize Your Device:
- Technique: Use a tripod or brace your iPhone against a stable surface.
- Benefit: Reduces camera shake and produces clearer images.
18. What Are the Best Techniques for Taking Photos of Food with an iPhone?
The best techniques for taking photos of food with an iPhone include using natural light, composing the shot carefully, and editing to enhance colors and details. These tips help you create mouth-watering food photos that are visually appealing and engaging.
- Use Natural Light:
- Technique: Position your food near a window to take advantage of soft, natural light.
- Benefit: Enhances colors and textures without harsh shadows.
- Compose the Shot Carefully:
- Technique: Apply the Rule of Thirds, use leading lines, and experiment with different angles.
- Benefit: Creates a balanced and visually appealing composition.
- Edit to Enhance Colors and Details:
- Technique: Use editing apps like Snapseed or Lightroom Mobile to adjust brightness, contrast, and saturation.
- Benefit: Makes your food photos look more appetizing and professional.
Mastering iPhone Food Photography
 iPhone Food Photography Course
19. How to Create Stunning Black and White Photos on Your iPhone?
To create stunning black and white photos on your iPhone, use the built-in filters or third-party apps to convert your images and adjust contrast and tones. These techniques allow you to produce timeless and artistic black and white photographs.
- Use Built-In Filters:
- Technique: Open your photo in the Photos app, tap Edit, and select the B&W filter.
- Benefit: Provides a quick and easy way to convert your photos to black and white.
- Adjust Contrast and Tones:
- Technique: Use editing tools in the Photos app or third-party apps to adjust contrast, brightness, and shadows.
- Benefit: Enhances the details and creates a more dramatic effect.
- Use Third-Party Apps:
- Technique: Apps like Snapseed and VSCO offer advanced black and white editing tools.
- Benefit: Provides more control over the conversion and tonal adjustments.
20. What Are the Ethical Considerations in iPhone Photography?
Ethical considerations in iPhone photography include respecting privacy, obtaining consent, and representing subjects and scenes accurately. Adhering to these principles ensures your photography is responsible and respectful.
- Respect Privacy:
- Consideration: Avoid taking photos of people in private situations without their knowledge.
- Guideline: Be mindful of others’ privacy and avoid intrusive photography.
- Obtain Consent:
- Consideration: Ask for permission before taking photos of individuals, especially for commercial purposes.
- Guideline: Respect people’s right to control their image.
- Represent Accurately:
- Consideration: Avoid manipulating images to misrepresent subjects or scenes.
- Guideline: Strive for honest and authentic representation in your photography.
21. How Can I Back Up and Organize My iPhone Photos?
To back up and organize your iPhone photos, use iCloud Photos, Google Photos, or other cloud storage services, and create albums and folders to categorize your images. These practices ensure your photos are safe, accessible, and easy to manage.
- Use iCloud Photos:
- Technique: Enable iCloud Photos in your iPhone settings to automatically back up your photos to the cloud.
- Benefit: Provides seamless backup and syncing across all your Apple devices.
- Use Google Photos:
- Technique: Download the Google Photos app and enable backup and sync.
- Benefit: Offers free storage and powerful organizational tools.
- Create Albums and Folders:
- Technique: Organize your photos into albums and folders based on events, dates, or themes.
- Benefit: Makes it easier to find and manage your photos.
22. What Are Some Advanced Techniques for iPhone Videography?
Advanced techniques for iPhone videography include using external microphones, stabilizers, and advanced editing software to create professional-quality videos. These methods enhance audio, stability, and visual appeal.
- Use External Microphones:
- Technique: Connect an external microphone to your iPhone for improved audio quality.
- Benefit: Captures clearer and more professional sound.
- Use Stabilizers:
- Technique: Use a gimbal or tripod to stabilize your iPhone and reduce camera shake.
- Benefit: Creates smoother and more professional-looking videos.
- Use Advanced Editing Software:
- Technique: Edit your videos with apps like LumaFusion or iMovie for advanced editing features.
- Benefit: Allows for more precise control over your video’s look and feel.
23. How Can I Share My iPhone Photos on Social Media Effectively?
To share your iPhone photos on social media effectively, optimize your images, use relevant hashtags, and engage with your audience. These strategies help you increase visibility, engagement, and impact on social media platforms.
- Optimize Your Images:
- Technique: Resize your photos to fit the recommended dimensions for each social media platform.
- Benefit: Ensures your photos look their best and load quickly.
- Use Relevant Hashtags:
- Technique: Add relevant hashtags to your posts to increase visibility.
- Benefit: Helps people discover your photos based on their interests.
- Engage with Your Audience:
- Technique: Respond to comments, ask questions, and participate in discussions.
- Benefit: Builds a community around your photography and increases engagement.
24. What Are Some Resources for Learning More About iPhone Photography?
Resources for learning more about iPhone photography include online courses, photography blogs, and workshops. These resources offer valuable information, tips, and techniques to enhance your skills and creativity.
- Online Courses:
- Resource: Platforms like Skillshare and Udemy offer courses on iPhone photography.
- Benefit: Provides structured learning with expert guidance.
- Photography Blogs:
- Resource: Websites like dfphoto.net and dpmag.com offer tips, tutorials, and inspiration.
- Benefit: Provides up-to-date information and creative ideas.
- Workshops:
- Resource: Local photography clubs and schools offer workshops on iPhone photography.
- Benefit: Provides hands-on learning and personalized feedback.
25. How Does dfphoto.net Help You Improve Your iPhone Photography Skills?
Dfphoto.net helps you improve your iPhone photography skills by providing a wealth of resources, including detailed tutorials, stunning photo collections, and a vibrant community for sharing and learning. Explore dfphoto.net to discover new techniques, find inspiration, and connect with fellow photographers.
- Extensive Tutorials: Access in-depth guides on iPhone photography techniques, from basic settings to advanced editing.
- Inspiring Photo Collections: View curated collections of stunning iPhone photos to spark your creativity and vision.
- Community Engagement: Join a supportive community of photographers to share your work, receive feedback, and learn from others.
Visit dfphoto.net today to unlock your iPhone’s full potential and elevate your photography to new heights.
Ready to take your iPhone photography to the next level? Explore dfphoto.net for comprehensive tutorials, inspiring images, and a supportive community. Contact us at Address: 1600 St Michael’s Dr, Santa Fe, NM 87505, United States or call +1 (505) 471-6001. Visit our website dfphoto.net to discover more and start creating stunning photos today!
FAQ
-
What makes iPhone photography different from using a professional camera?
iPhone photography relies on computational processing and smaller sensors, while professional cameras offer larger sensors and manual controls for greater flexibility.
-
How can I improve the focus on my iPhone photos?
Tap on the screen to set the focus point, and use the AE/AF lock feature to maintain focus while recomposing your shot.
-
What is the best way to handle harsh sunlight in iPhone photography?
Use diffusers to soften the light, or shoot during the golden hours (early morning and late afternoon) for softer, warmer light.
-
Can I use external lenses with my iPhone?
Yes, you can use external lenses such as wide-angle or macro lenses to expand your creative options.
-
How do I reduce noise in low-light iPhone photos?
Use Night mode or third-party apps that offer noise reduction features, and stabilize your iPhone to avoid blurry images.
-
What is the best editing app for iPhone photography?
Popular choices include Snapseed, Adobe Lightroom Mobile, and VSCO, each offering a range of editing tools and filters.
-
How can I stabilize my iPhone for video recording?
Use a gimbal or tripod to stabilize your iPhone and reduce camera shake for smoother videos.
-
What are the best composition techniques for iPhone photography?
Apply the Rule of Thirds, use leading lines, and experiment with different angles to create balanced and visually appealing compositions.
-
How do I back up my iPhone photos?
Use iCloud Photos, Google Photos, or other cloud storage services to back up your photos and keep them safe.
-
What are some ethical considerations to keep in mind when taking photos with my iPhone?
Respect privacy, obtain consent when photographing individuals, and represent subjects and scenes accurately in your photos.