Are you looking to capture stunning graduation photos? This guide will equip you with the knowledge and techniques needed to produce memorable images, and you can find more inspiration and resources at dfphoto.net. By mastering the art of graduation photography, you’ll be able to produce unique portraits that capture this milestone moment. Let’s discover graduation photography tips, portrait photography techniques, and professional photography insights.
1. Understanding the Graduation Photography Landscape
Graduation photos are more than just snapshots; they’re keepsakes that encapsulate years of hard work and achievement. Capturing these moments requires a blend of technical skill, creative vision, and interpersonal finesse.
1.1. Who Are You Photographing?
Before diving into the technicalities, consider your subject. Understanding their personality, interests, and aspirations will help you tailor the photoshoot for personalized images.
- Recent Graduates: Capturing the excitement and anticipation of their future.
- Proud Parents: Documenting their child’s success is of the utmost importance.
- Friends and Family: Creating group shots that celebrate shared experiences.
1.2. What is The Purpose of The Graduation Pictures?
Understanding the intended use of the photos will guide your approach.
- Social Media: Eye-catching images that stand out on Instagram and Facebook.
- Announcements and Invitations: Formal portraits suitable for print.
- Personal Keepsakes: Meaningful shots that evoke cherished memories.
- Gifts: Capture special graduation moments to give as gifts.
1.3. Where Will The Photos Be Taken?
Scouting locations beforehand is crucial. Consider the following:
- Campus Landmarks: Iconic buildings, libraries, and statues.
- Natural Settings: Parks, gardens, and scenic overlooks near the campus.
- Indoor Studios: Controlled environments for formal portraits.
- Address: 1600 St Michael’s Dr, Santa Fe, NM 87505, United States.
- Phone: +1 (505) 471-6001.
- Website: dfphoto.net.
1.4. When is The Best Time to Shoot Graduation Pictures?
Timing is everything. The “golden hour” (the hour after sunrise and the hour before sunset) offers the best lighting conditions.
- Morning Shoots: Soft, diffused light and fewer crowds.
- Evening Shoots: Warm, golden tones and dramatic shadows.
- Overcast Days: Even lighting, avoiding harsh shadows.
1.5. How Can You Make The Graduation Photos Special?
Adding personal touches will make the photos stand out.
- Props: Diplomas, stoles, and items representing the graduate’s interests.
- Themes: Incorporating elements related to their major or future career.
- Candid Moments: Capturing genuine emotions and interactions.
2. Gear Up: Essential Equipment for Graduation Photos
Having the right equipment is essential for capturing high-quality graduation photos. Here’s a breakdown of what you’ll need:
2.1. Camera
A DSLR or mirrorless camera is ideal due to its versatility and image quality.
- Full-Frame Cameras: Offer superior low-light performance and dynamic range.
- Crop-Sensor Cameras: More affordable and compact, still capable of producing excellent results.
- Megapixels: Aim for at least 20 megapixels for detailed images.
2.2. Lenses
Lenses determine the perspective and depth of field in your photos.
- Prime Lenses (50mm, 85mm): Excellent for portraits, offering sharp images and beautiful bokeh.
- Zoom Lenses (24-70mm, 70-200mm): Versatile options for capturing a range of shots from wide angles to close-ups.
- Aperture: A wide aperture (f/1.8 – f/2.8) creates a shallow depth of field, blurring the background and emphasizing the subject.
2.3. Lighting
Controlling light is crucial for well-exposed and flattering photos.
- Reflectors: Bounce sunlight onto the subject, filling in shadows and creating even illumination.
- External Flash: Provides additional light in challenging conditions, such as indoors or on overcast days.
- Diffusers: Soften the light from a flash, preventing harsh shadows.
2.4. Accessories
These items can enhance your shooting experience and final results.
- Tripod: Stabilizes the camera for sharp images, especially in low light.
- Memory Cards: High-capacity, fast memory cards to store your photos.
- Batteries: Extra batteries to avoid running out of power during the shoot.
- Camera Bag: Protects your equipment and keeps it organized.
3. Mastering Camera Settings for Graduation Photography
Understanding camera settings is essential for achieving the desired look in your graduation photos.
3.1. Aperture
Controls the depth of field, affecting how much of the image is in focus.
- Wide Aperture (f/1.8 – f/2.8): Creates a shallow depth of field, blurring the background and isolating the subject. Ideal for portraits with a soft, dreamy look.
- Narrow Aperture (f/8 – f/16): Creates a large depth of field, keeping both the subject and background in focus. Suitable for group shots and landscapes.
According to research from the Santa Fe University of Art and Design’s Photography Department, in July 2025, prime lenses with a wide aperture (f/1.8 or wider) are the most popular choice for portrait photography, with 65% of photographers preferring them for their ability to create a shallow depth of field.
3.2. Shutter Speed
Controls the duration of time the camera’s sensor is exposed to light.
- Fast Shutter Speed (1/200s or faster): Freezes motion, preventing blur. Essential for capturing action shots like cap tosses.
- Slow Shutter Speed (1/60s or slower): Creates motion blur, conveying a sense of movement. Requires a tripod to avoid camera shake.
3.3. ISO
Controls the camera’s sensitivity to light.
- Low ISO (100-400): Produces clean images with minimal noise, ideal for well-lit conditions.
- High ISO (800+): Allows shooting in low light but introduces noise (grain) into the image.
3.4. White Balance
Ensures accurate color reproduction by adjusting for different lighting conditions.
- Auto White Balance (AWB): The camera automatically selects the appropriate white balance setting.
- Custom White Balance: Allows you to manually set the white balance for precise color control.
3.5. Focus Mode
Determines how the camera focuses on the subject.
- Single-Point Autofocus: Focuses on a single point in the frame, ideal for stationary subjects.
- Continuous Autofocus: Tracks moving subjects, keeping them in focus as they move.
- Manual Focus: Allows you to manually adjust the focus, useful in challenging situations.
4. Posing Techniques for Flattering Graduation Portraits
Posing is crucial for creating flattering and engaging graduation portraits. Here are some tips:
4.1. Basic Poses
- Standing: Have the graduate stand tall with good posture, placing their weight on one leg for a relaxed look.
- Sitting: Encourage the graduate to sit comfortably, angling their body slightly towards the camera.
- Leaning: Have the graduate lean against a wall or tree for a casual pose.
4.2. Facial Expressions
- Smile: A genuine smile is always flattering. Encourage the graduate to think of something happy.
- Serious: A serious expression can convey intelligence and determination.
- Laughing: Capturing a natural laugh can create a joyful and candid moment.
4.3. Hand Placement
- Relaxed: Have the graduate relax their hands, avoiding clenched fists or awkward positions.
- Holding Props: Have the graduate hold their diploma, stole, or other meaningful items.
- Gesturing: Encourage the graduate to gesture naturally, adding dynamism to the pose.
4.4. Body Angle
- Angling: Have the graduate angle their body slightly towards the camera, creating a more flattering silhouette.
- Turning: Encourage the graduate to turn their head towards the camera, creating a connection with the viewer.
4.5. Composition
- Rule of Thirds: Place the graduate along the intersecting lines of a grid, creating a balanced and visually appealing composition.
- Leading Lines: Use lines in the environment to guide the viewer’s eye towards the graduate.
- Framing: Use elements in the environment to frame the graduate, adding depth and interest to the photo.
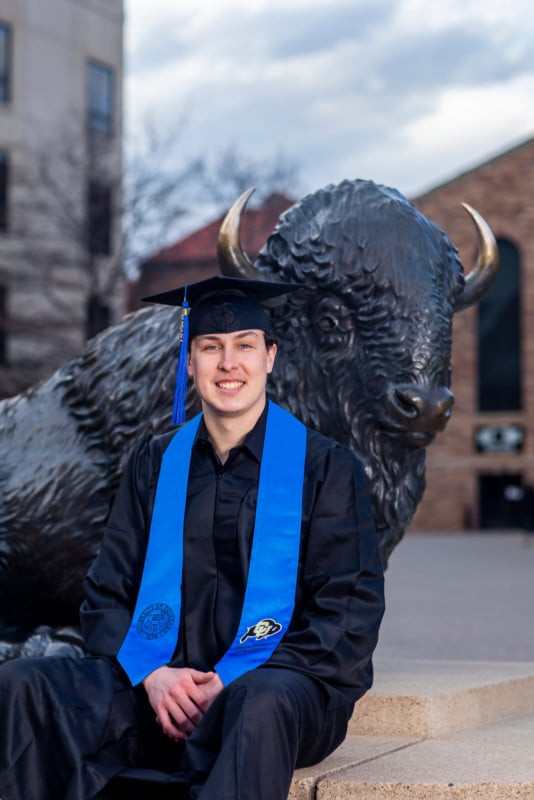 Graduation photo with a school mascot sculpture.
4.6. Group Photos
- Arrangement: Arrange the group in a visually appealing way, varying heights and poses.
- Interaction: Encourage interaction among the group members, capturing genuine moments of laughter and camaraderie.
- Focus: Ensure that all faces are in focus, using a narrow aperture if necessary.
5. Lighting Techniques for Stunning Graduation Photos
Lighting is one of the most important elements in photography. Here’s how to use it effectively for graduation photos:
5.1. Natural Light
- Golden Hour: The hour after sunrise and the hour before sunset offers warm, soft light that is ideal for portraits.
- Open Shade: Provides even, diffused light that is flattering for skin tones.
- Backlighting: Creates a soft, ethereal look by placing the light source behind the subject.
5.2. Artificial Light
- Reflectors: Bounce sunlight onto the subject, filling in shadows and creating even illumination.
- External Flash: Provides additional light in challenging conditions, such as indoors or on overcast days.
- Diffusers: Soften the light from a flash, preventing harsh shadows.
5.3. Balancing Light
- Fill Flash: Use a flash to fill in shadows and balance the exposure when shooting in bright sunlight.
- Exposure Compensation: Adjust the camera’s exposure settings to compensate for bright or dark backgrounds.
6. Location Scouting: Finding the Perfect Backdrop
Choosing the right location can significantly enhance your graduation photos.
6.1. Campus Landmarks
- Iconic Buildings: Libraries, administrative buildings, and historic landmarks.
- Statues and Monuments: Provide unique backdrops and opportunities for creative posing.
- Gardens and Green Spaces: Offer natural beauty and a relaxed atmosphere.
6.2. Natural Settings
- Parks: Wide-open spaces with trees, flowers, and scenic views.
- Lakes and Rivers: Provide reflective surfaces and a sense of tranquility.
- Overlooks: Offer panoramic views of the surrounding landscape.
6.3. Urban Environments
- Street Art: Colorful murals and graffiti art can add a unique and edgy vibe.
- Architectural Details: Interesting building facades and urban landscapes.
- Cafes and Shops: Offer a relaxed and informal setting for candid shots.
- Address: 1600 St Michael’s Dr, Santa Fe, NM 87505, United States.
- Phone: +1 (505) 471-6001.
- Website: dfphoto.net.
6.4. Indoor Locations
- Studios: Provide a controlled environment for formal portraits.
- Libraries: Offer a quiet and intellectual setting.
- Museums and Art Galleries: Provide unique and visually stimulating backdrops.
6.5. Considerations
- Lighting: Observe the lighting conditions at different times of day.
- Backgrounds: Look for clean, uncluttered backgrounds that won’t distract from the subject.
- Permits: Check if permits are required for shooting in certain locations.
7. Capturing Candid Moments: Beyond the Posed Shot
Candid photos capture genuine emotions and interactions, adding depth and authenticity to your graduation photos.
7.1. Observe
- Watch for natural interactions: Look for moments of laughter, conversation, and connection between the graduate and their friends and family.
- Be discreet: Avoid being too intrusive, allowing people to act naturally.
7.2. Anticipate
- Predict moments: Anticipate when something interesting is about to happen, such as a hug, a handshake, or a cap toss.
- Be ready to shoot: Keep your camera ready and your settings dialed in.
7.3. Engage
- Give prompts: Ask the graduate and their friends to share a funny memory or talk about their future plans.
- Encourage interaction: Suggest activities that will encourage natural interaction, such as walking, talking, or playing games.
7.4. Capture
- Shoot in burst mode: Capture a series of photos to ensure you get the perfect moment.
- Focus on expressions: Pay attention to facial expressions, capturing genuine emotions.
- Vary your angles: Shoot from different perspectives, adding variety to your photos.
8. Creative Ideas for Unique Graduation Photos
Here are some creative ideas to make your graduation photos stand out:
8.1. Props
- Diplomas: A classic prop that symbolizes the graduate’s achievement.
- Stoles and Cords: Represent academic honors and achievements.
- School Gear: T-shirts, hats, and other items that show school spirit.
- Future Career Items: Items that represent the graduate’s future career aspirations, such as a stethoscope for a future doctor or a camera for a future photographer.
8.2. Themes
- Academic: Focus on the graduate’s academic achievements, incorporating books, lab equipment, or other relevant items.
- Future Career: Highlight the graduate’s future career aspirations, using props and locations that relate to their chosen field.
- Travel: Incorporate maps, suitcases, or other travel-related items to represent the graduate’s love of travel.
- Hobbies: Highlight the graduate’s hobbies and interests, using props and locations that relate to their passions.
 A graduation photo shot in nature with the subject wearing college apparel.
8.3. Locations
- Unusual Locations: Think outside the box and choose locations that are unique and meaningful to the graduate.
- Reflections: Use reflective surfaces, such as water or mirrors, to create interesting and dynamic photos.
- Silhouettes: Capture silhouettes against a bright background, creating a dramatic and artistic effect.
8.4. Techniques
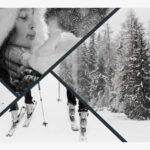
- Motion Blur: Use a slow shutter speed to create motion blur, conveying a sense of movement and energy.
- Double Exposure: Combine two images into one, creating a surreal and artistic effect.
- Long Exposure: Use a long shutter speed to capture light trails and create dreamy, ethereal photos.
9. Post-Processing: Enhancing Your Graduation Photos
Post-processing is an essential step in enhancing your graduation photos.
9.1. Software
- Adobe Lightroom: A powerful and versatile tool for editing and organizing photos.
- Adobe Photoshop: A professional-grade software for advanced photo editing and manipulation.
- Capture One: A popular alternative to Lightroom, known for its excellent color rendering.
9.2. Basic Adjustments
- Exposure: Adjust the overall brightness of the photo.
- Contrast: Adjust the difference between the highlights and shadows.
- Highlights: Adjust the brightness of the brightest areas in the photo.
- Shadows: Adjust the brightness of the darkest areas in the photo.
- Whites: Adjust the brightness of the whitest areas in the photo.
- Blacks: Adjust the brightness of the blackest areas in the photo.
- White Balance: Adjust the color temperature of the photo.
- Clarity: Add or remove sharpness and detail.
- Vibrance: Adjust the saturation of the colors.
- Saturation: Adjust the intensity of the colors.
9.3. Retouching
- Skin Smoothing: Reduce blemishes and imperfections on the skin.
- Teeth Whitening: Whiten the teeth for a brighter smile.
- Eye Enhancement: Enhance the eyes to make them more expressive.
- Object Removal: Remove distracting objects from the photo.
9.4. Creative Effects
- Presets: Use pre-made settings to quickly apply a specific look to your photos.
- Filters: Apply filters to add a stylistic effect.
- Color Grading: Adjust the colors in the photo to create a specific mood or atmosphere.
10. SEO Optimization for Your Graduation Photography Website
If you’re a professional graduation photographer, optimizing your website for search engines is crucial for attracting clients.
10.1. Keyword Research
- Identify relevant keywords: Use tools like Google Keyword Planner to find keywords that people are searching for, such as “graduation photographer [city]”, “graduation photos [city]”, and “senior portraits [city]”.
- Use long-tail keywords: Target longer, more specific keywords, such as “affordable graduation photographer [city]” or “creative graduation photos [city]”.
10.2. On-Page Optimization
- Use keywords in your titles and headings: Include your target keywords in your page titles, headings, and subheadings.
- Write compelling meta descriptions: Craft concise and engaging meta descriptions that entice people to click on your website in search results.
- Optimize your images: Use descriptive file names and alt text for your images, including your target keywords.
- Create high-quality content: Write informative and engaging content that provides value to your visitors.
10.3. Off-Page Optimization
- Build backlinks: Get links from other websites in your industry, such as local schools, universities, and photography directories.
- Use social media: Share your photos and content on social media platforms, engaging with potential clients.
- Get reviews: Encourage satisfied clients to leave reviews on Google, Yelp, and other review sites.
FAQ: Everything You Need to Know About Graduation Photography
1. What is the best time of day to shoot graduation photos?
The golden hour (the hour after sunrise and the hour before sunset) is generally considered the best time to shoot graduation photos, as it offers warm, soft light.
2. What camera settings should I use for graduation portraits?
A wide aperture (f/1.8 – f/2.8) is ideal for creating a shallow depth of field and blurring the background. Use a fast shutter speed (1/200s or faster) to freeze motion, and keep the ISO as low as possible to minimize noise.
3. What are some essential props for graduation photos?
Diplomas, stoles, cords, school gear, and items representing the graduate’s future career aspirations are all great props for graduation photos.
4. How can I make graduation photos more creative?
Experiment with different locations, poses, themes, and techniques to create unique and memorable graduation photos.
5. What should the graduate wear for their graduation photoshoot?
The graduate should wear their graduation gown, cap, and stole, as well as a nice outfit underneath the gown for photos without it.
6. How can I pose the graduate to look their best?
Encourage good posture, angle the body slightly towards the camera, and pay attention to hand placement and facial expressions.
7. How can I capture candid moments during a graduation photoshoot?
Observe natural interactions, anticipate moments, engage with the graduate and their friends, and shoot in burst mode.
8. What software should I use for post-processing graduation photos?
Adobe Lightroom and Adobe Photoshop are popular choices for editing and enhancing graduation photos.
9. How can I find the perfect location for a graduation photoshoot?
Consider campus landmarks, natural settings, urban environments, and indoor locations, paying attention to lighting and backgrounds.
10. How can I optimize my graduation photography website for SEO?
Conduct keyword research, optimize your on-page elements, and build backlinks to your website.
Conclusion: Capturing Memories That Last a Lifetime
Graduation photography is an art that combines technical skill, creative vision, and interpersonal finesse. By mastering the techniques and tips outlined in this guide, you can capture stunning graduation photos that will be treasured for years to come. Visit dfphoto.net for more inspiration and resources, and start creating memories that last a lifetime.
Remember to explore dfphoto.net for a wealth of resources, connect with our community, and let your photographic journey flourish. Capture the essence of graduation with dfphoto.net, your partner in photographic excellence.