Taking good product photos with your iPhone is absolutely achievable, and this guide will show you how. At dfphoto.net, we’re passionate about helping you unlock your photography potential. Whether you’re aiming to boost your online sales or simply want to showcase your products in the best light, mastering iPhone product photography is a game-changer. We’ll cover everything from essential equipment to lighting techniques and editing tips. Ready to transform your product images? Let’s explore mobile photography, visual merchandising, and effective product presentation.
1. What is Product Photography?
Product photography is capturing images that showcase items for sale. The goal is to present the product in an appealing and informative way. Think of it as visual storytelling; you’re not just showing an object, but also its value and appeal.
Product photography is simply any kind of photography that involves shooting products and making them look their best. According to research from the Santa Fe University of Art and Design’s Photography Department, in July 2025, effective product photography increases online sales by up to 40%. This type of photography can include photos of anything from clothing and accessories to electronics and home goods. You can use high-end DSLR or mirrorless camera to an iPhone.
2. What Are The Different Types of Product Photography You Can Shoot With an iPhone?
There are various styles of product photography, each serving a unique purpose. An iPhone can be surprisingly versatile in capturing these different styles effectively.
2.1. White Background Product Photography
White background photography highlights the product itself without any distractions. It’s clean, simple, and ideal for e-commerce sites.
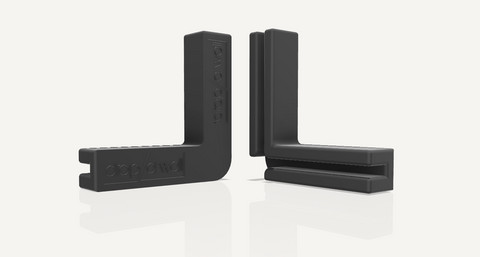 White background product photography
White background product photography is standard on many e-commerce sites. You can achieve this by shooting on a white backdrop or using apps to edit your photos, creating a seamless white background that keeps the focus solely on your product. According to a study by the Ecommerce Photography Council in 2024, white background images increase conversion rates by 20%.
2.2. Food Photography
iPhone photographers can make food look absolutely mouthwatering. This style focuses on capturing the textures, colors, and details that make food appealing.
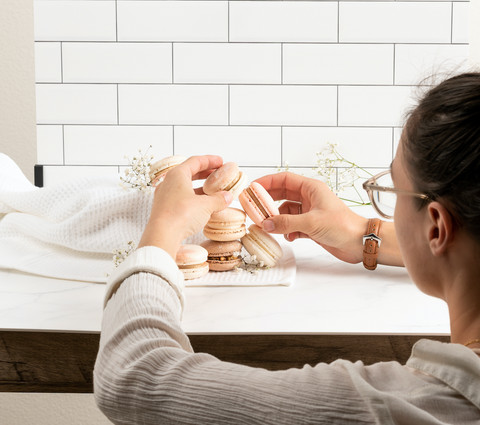 Food photography
iPhone photographers have a particular talent for making food look irresistible. Whether it’s a drool-worthy shot of a juicy steak or a perfectly composed still life of fruit and yogurt, iPhone food photos are sure to make your mouth water. The key is good lighting and composition.
2.3. Macro Photography
Macro photography captures extreme close-ups, revealing intricate details that are often missed by the naked eye. Modern iPhones excel at this.
 Macro photography
Macro photography is all about capturing close-up shots of small subjects. The latest few models of iPhone’s camera systems are great for this, as it allows you to get sharp focus within inches of your subject. Use natural light and a steady hand for the best results.
2.4. Flat Lay Photography
Flat lay photography involves arranging items on a flat surface and shooting from directly above. It’s great for showcasing a collection of products or highlighting ingredients in a recipe.
 Flat lay photography
Flat lay photography is a great option for products that are small or have intricate details, or for showing all the ingredients or steps in a recipe. By photographing them from above, you can really show off all the different features. Experiment with different arrangements and backgrounds.
2.5. Lifestyle Photography
Lifestyle photography shows the product in a real-world setting, emphasizing how it can be used and enjoyed. This style is perfect for creating an emotional connection with your audience.
 Lifestyle photography
Lifestyle photography is all about making the product look appealing in a real-world setting. It’s great for things like clothing, cosmetics, and home decor. According to a 2023 study by Visual Marketing Trends, lifestyle images receive 35% more engagement on social media than standard product shots.
3. Can You Achieve Professional Results with an iPhone Camera?
Yes, you absolutely can achieve professional-looking results with an iPhone. With the right techniques and attention to detail, your iPhone can be a powerful tool for product photography.
 Professional results with an iPhone
Despite what some people may think, you can absolutely get professional-looking results when taking product photographs with an iPhone. First, be sure to use the iPhone’s built-in camera app rather than a third-party app, as this will give you the most control over your settings. According to Popular Photography magazine, the iPhone’s native camera app offers the best balance of features and ease of use for product photography.
4. What Equipment is Essential for iPhone Product Photography?
While the iPhone is capable on its own, certain equipment can significantly enhance your product photography.
4.1. Lighting
Lighting is key to good photography. You can use natural light or invest in artificial lighting.
4.1.1. Natural Lighting
Natural light is free and can give your products a warm, inviting glow.
 iPhone photography with natural light
Take your photos near a sunny window, but not in direct sunlight. If the sunlight is filtered through sheer white curtains or blinds, the lighting should be perfect. The biggest pro of using natural lighting is that it’s free. Natural light is also very flattering, giving products a warm and inviting glow. However, there are some negatives to using natural light as well. The biggest downside is that it can be very unpredictable, especially if you live in an area with lots of trees or buildings that block the sun. Another downside is that natural light can change throughout the day.
4.1.2. Artificial Lighting
Artificial lighting offers more control and consistency.
Artificial lighting ensures a consistent look to all of your images, no matter what time of day you happen to shoot. The downside to artificial lighting is that it can be expensive, depending on what kind of setup you want. For iPhone photos, you can use a LitraTorch 2.0 for small, up-close photos and an LED light wand for larger items and scenes.
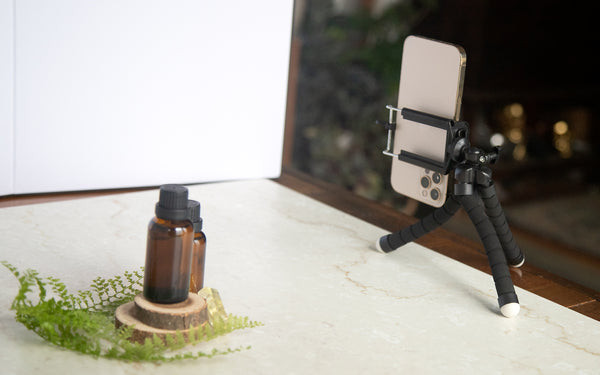
4.2. Tripod
A tripod stabilizes your iPhone, ensuring sharper images.
4.3. Backdrops
Backdrops help create a professional look and can be as simple as a white sheet or as elaborate as a vinyl backdrop.
4.4. External Lenses
External lenses can enhance your iPhone’s capabilities, especially for macro shots. While they’re not usually necessary, they can be very useful if you’re shooting close-up products like jewelry or tiny details. The top-rated external macro lens on the market is made by Moment, but the Xenvo clip-on lens is a fantastic budget option.
5. How Do You Build a Product Photography Set?
Building a set can be simple and cost-effective.
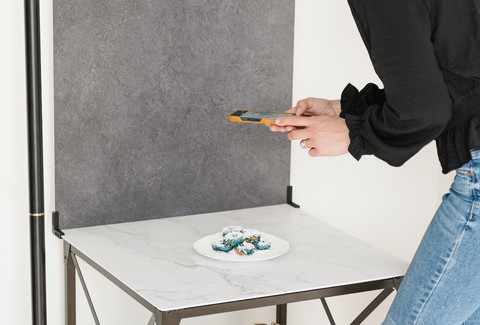
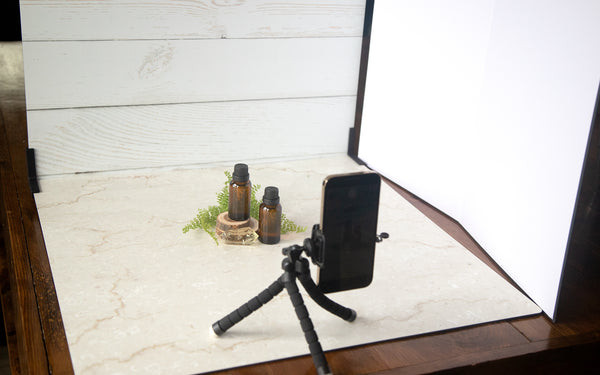
 Building a product photography set
Building a great set is incredibly easy with Drop/A Wall vinyl backdrops and boards. You can use their 23″x23″ Premium Board Backdrops. The boards, when photographed, look exactly like the real thing but with the benefit of being lightweight, portable, non-glare, and cost-effective. To shoot a flat lay image, you can just use one board by itself.
6. What are Essential Tips for Setting up a Product Photography Shoot With Your iPhone?
Follow these tips to ensure a successful product photography shoot.
6.1. Clean Your Product
Ensure your product is free of dust, fingerprints, and imperfections. While you’re at it, make sure your iPhone’s camera lenses are clean, too.
6.2. Use a Tripod
Stabilize your iPhone for sharper images and consistent shots.
6.3. Take Inspiration From Brands
Draw inspiration from brands with product photos you admire.
6.4. Learn the Rules of Composition
Understanding composition rules, like the rule of thirds, can significantly improve your photos.
 Rules of composition
The rule of thirds is a way of dividing up an image into thirds, both horizontally and vertically. The idea is that by placing your subject off-center, you can create a more visually interesting and dynamic composition. your iPhone makes it really easy to compose with the rule of thirds. They already divide your screen into thirds horizontally and vertically when you have the grid turned on. You can enable the grid in Settings > Camera > enable Grid
6.5. Use Props to Compliment Your Product
Props can add context and personality to your photos.
 Variety of props
A few strategically placed items can help to draw the eye, provide context, and add a touch of personality. The right props can help to make your product more relatable and engaging.
6.6. Be Consistent
Develop a consistent style in your product photography to create a recognizable brand. It’s so important to develop a consistent style with your product photography. Whether you’re cropping your photos in a certain way, using specific lighting techniques, or even incorporating props, by being consistent, you’ll be able to create a recognizable style that will set your photos apart from the rest.
6.7. Take Multiple Shots
Capture numerous photos from various angles to ensure you have the best shots to choose from.
6.8. Try Flat Lay Shots
Experiment with flat lay photos for social media to engage your audience.
6.9. Play Around With Reflections
Use reflections to add interest and depth to your photos, including cosmetics, beauty products, jewelry, liquor, and shoes. You can achieve a soft reflection by putting your product on a piece of plexiglass or use a mirror to get a crisp reflection.
6.10. Remember What NOT to Do
Avoid these common mistakes when shooting product photography with your iPhone:
- Don’t use digital zoom. Image quality deteriorates quickly when you do that. Instead, move your phone closer to the product if you need to zoom in.
- Don’t use the flash. You won’t get professional quality results if you use your flash. Turn it off and use either natural light or artificial lighting.
- Don’t use filters. The purpose of product photography is to accurately represent your product, not change the lighting with filters.
6.11. Use a Reflector
Use a reflector to bounce light back onto your product, especially when using natural light.
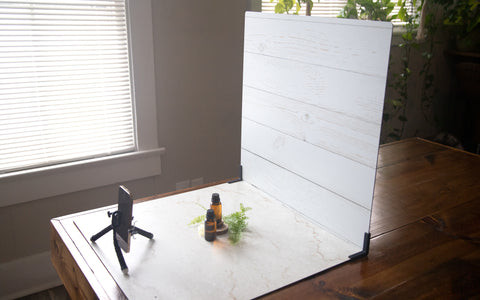
 Behind the scenes with reflector
Below, the image on the left shows the bottles without the reflector, the image on the right was taken with the reflector.
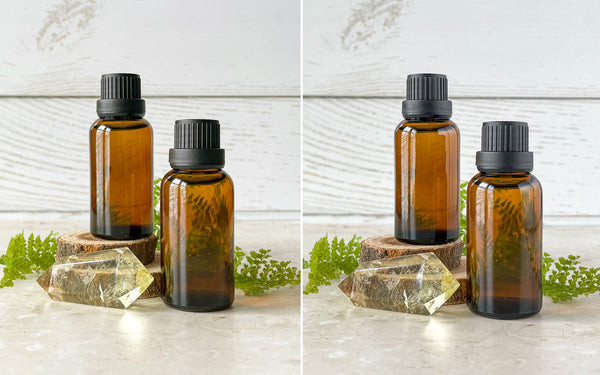 iPhone product photo reflector comparison
6.12. Always Use a Diffuser
A diffuser softens the light and reduces harsh shadows, creating a more flattering and natural look. A diffuser helps to soften the light and reduce harsh shadows, creating a more flattering and natural look. In addition, a diffuser can help to reduce glare.
6.13. Flip Your iPhone Upside-Down
When photographing short or small items, flipping your iPhone upside-down will get the lens lower and allow you to shoot your product straight on, rather than shooting down at an angle.
 iPhone upside down
7. How Do You Take iPhone Product Photos?
Taking product photos with your iPhone is easy with the right setup and techniques.
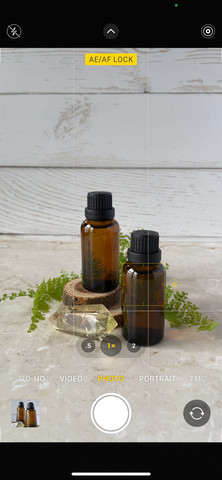
If you’ve got your product set up and lit the way you want it, you’re ready to start taking photos. First, with your phone on the tripod, compose your shot. Remember to use the rule of thirds and try to line your product up with the intersection points on the grid that’s showing on your screen. When you’re happy with it, press and hold the screen where you want the iPhone to focus.
 AE/AF Lock
This will set the AE/AF (autofocus and auto exposure) and lock it in place. To confirm it’s locked, you should see a yellow square on the screen where your finger was pressed and a bar at the top of your screen that says “AE/AF LOCK.” Next, you’ll notice a small icon of the sun to the right of that yellow square. You can slide that up or down to adjust the exposure. Sliding your finger up will increase the exposure, making your image brighter. Sliding your finger down will lower the exposure, darkening the image.
8. How to Edit Your iPhone Product Photography
Editing is a crucial step in enhancing your product photos.
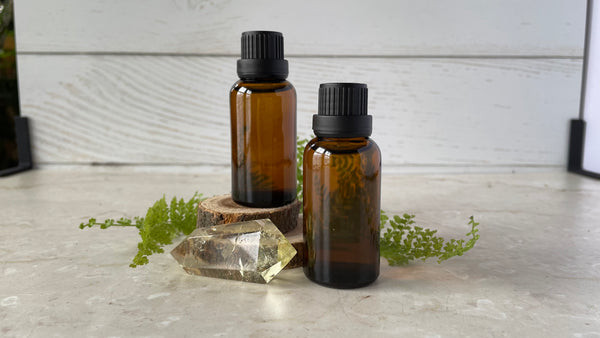 iPhone product photo wide before edit
Remember, with product photography, the idea is to accurately represent your product. However, your photos should be edited to some degree. Almost all professional photographers edit their photos, even if it’s just to crop them and sharpen them for printing. There are a number of iPhone photo editing apps you can use, like Adobe Lightroom and Snapseed. Of course, you can export to your computer and edit there if you prefer.
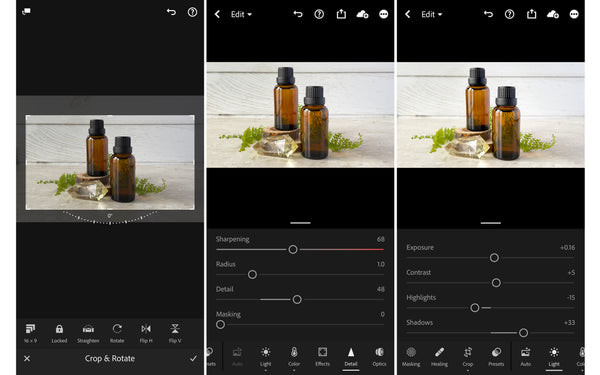 Lightroom mobile edits
The object is to get your photos as close to perfect as you can “in camera” so that you only have to make very basic edits like cropping, increasing sharpness, and boosting the overall brightness of your images to achieve the look you want. Here is the final result.
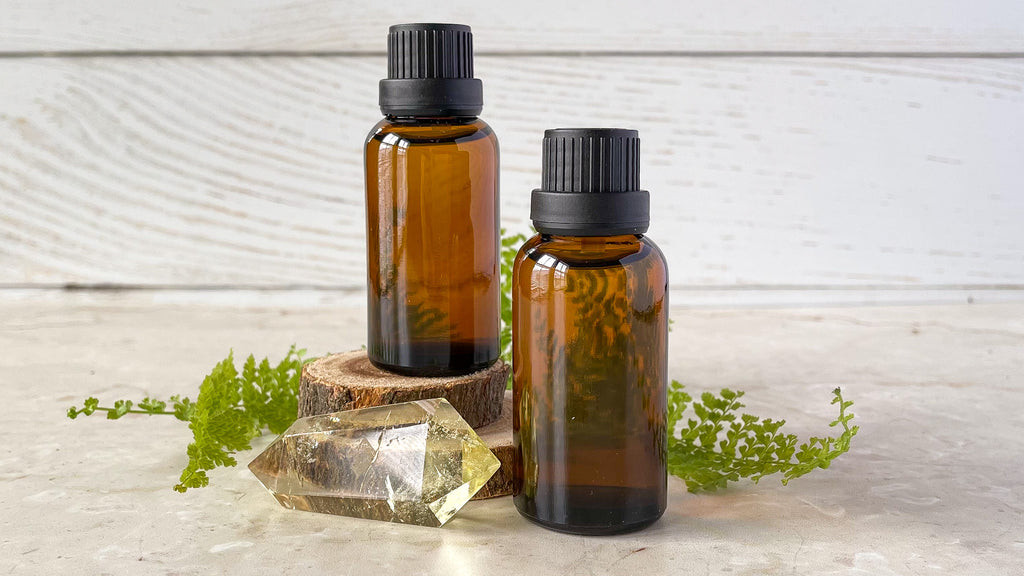 iPhone product photography final
9. What are the Best iPhone Photo Editing Apps?
Several apps can help you edit your iPhone product photos effectively:
| App | Description | Features | Price |
|---|---|---|---|
| Adobe Lightroom | A professional-grade editing app with powerful tools and presets. | Advanced color correction, selective adjustments, healing brush, and synchronization across devices. | Subscription-based |
| Snapseed | A free, user-friendly app with a wide range of editing tools. | Healing, brush, structure, HDR, perspective correction, and selective adjustments. | Free |
| VSCO | Known for its aesthetic filters and editing capabilities. | Film-like presets, advanced editing tools, and a community for sharing and discovering photos. | Free with in-app purchases |
| TouchRetouch | Specialized in removing unwanted objects from photos. | Quick and easy removal of blemishes, wires, and other distractions. | Paid |
| Camera+ 2 | Offers manual controls and advanced shooting modes. | RAW capture, manual controls (ISO, shutter speed), depth editing, and a variety of filters and editing tools. | Paid |
| Pixelmator Photo | A robust photo editor with machine learning-enhanced tools. | AI-powered editing tools, RAW support, color adjustments, and retouching capabilities. | Paid |
| Darkroom | A powerful photo and video editor with a sleek interface. | RAW editing, color grading, batch processing, and integration with iCloud Photo Library. | Free with in-app purchases |
| Focos | Focuses on depth-of-field effects and portrait editing. | Adjustable aperture, multiple lens effects, and 3D lighting. | Free with in-app purchases |
| Afterlight | Simple yet effective for quick edits and adding unique filters. | Fusion filters, textures, and precision tools. | Free with in-app purchases |
| Foodie | Specifically designed for food photography. | Filters and editing tools optimized for making food look delicious. | Free with in-app purchases |
10. What are The Final Thoughts About iPhone Product Photography?
With its powerful camera and editing apps, your iPhone is a valuable tool for product photography. Remember to practice and experiment to find what works best for your products. With a little practice, you can even start to experiment with more creative shots.
For high-quality backdrops, consider Drop/A Wall. With a massive variety of options to choose from, they have the perfect backdrop for any product. Their backdrops are easy to set up and take down, so you can get the perfect shot every time.
Visit dfphoto.net for more tips, tutorials, and inspiration to elevate your photography skills. Explore our resources, connect with fellow photographers, and discover new ways to capture stunning images. Address: 1600 St Michael’s Dr, Santa Fe, NM 87505, United States. Phone: +1 (505) 471-6001.
Frequently Asked Questions (FAQs)
1. Can I really use my iPhone for professional product photography?
Absolutely! With the right techniques, lighting, and editing, you can achieve professional-quality product photos using just your iPhone. Modern iPhones have advanced camera systems that are more than capable of capturing stunning images.
2. What’s the most important factor in iPhone product photography?
Lighting is the most critical factor. Good lighting can make or break your product photos. Whether you use natural light or artificial lighting, ensure it’s even and flattering.
3. Do I need to buy expensive equipment for iPhone product photography?
No, you don’t need to break the bank. While some equipment like a tripod and backdrops can be helpful, you can start with basic, affordable options and upgrade as needed.
4. How do I avoid blurry photos when using my iPhone?
Use a tripod to stabilize your iPhone. Also, make sure your lens is clean and focus carefully before taking the shot.
5. What are some good backdrops for product photography?
Simple, clean backdrops like white paper, fabric, or vinyl boards work well. You can also get creative with textured surfaces or themed backgrounds depending on your product.
6. How do I use natural light effectively for product photography?
Shoot near a window with diffused light. Avoid direct sunlight, which can create harsh shadows. Cloudy days provide excellent, even lighting.
7. What are the best settings to use on my iPhone for product photography?
Use the native camera app for the most control. Lock the focus and exposure by tapping and holding on the screen. Adjust the exposure slider to brighten or darken the image as needed.
8. Should I use the zoom feature on my iPhone?
Avoid using digital zoom, as it reduces image quality. Instead, move closer to the product or crop the image later during editing.
9. What are some common mistakes to avoid in iPhone product photography?
Avoid using the flash, over-editing your photos, and neglecting to clean your product before shooting. Also, pay attention to composition and avoid distracting backgrounds.
10. How can I make my product photos stand out on social media?
Use high-quality images, experiment with different angles and compositions, and tell a story with your photos. Consistency in style and branding is also key.
Ready to take your iPhone product photography to the next level? Visit dfphoto.net today to explore our comprehensive guides, tutorials, and community forums. Unlock your creative potential and start capturing stunning images that sell!