Back in 2010, when Instagram first appeared, smartphone cameras weren’t what they are today. Remember those early Instagram shots? Often blurry and pixelated on modern screens! Fast forward to now, and your Instagram feed is likely a vibrant mix of professional-looking photos and snapshots straight from smartphones. The good news is, phone cameras have gotten so advanced, you can capture amazing images on the go, and many viewers won’t even know they weren’t taken by a pro.
If you’re aiming to improve your Instagram game and capture more compelling photos, you’ve come to the right place. For small businesses and individuals alike, hiring a professional photographer isn’t always feasible. But understanding a few core photography principles can make a huge difference. Master these tips, and you’ll be well on your way to boosting your Instagram engagement and creating a feed that truly shines.
Essential Tips for Stunning Instagram Photos
This guide offers practical advice for taking great photos for Instagram using just your smartphone. Once you’ve nailed these basics, you can explore more advanced techniques. Consider delving into phone-model-specific guides or in-depth courses on platforms like Coursera, Skillshare and Udemy for a deeper dive. You can also find numerous resources listing free photography lessons online.
1. Master the Art of Light
Light is arguably the most critical element in photography. Too much light, and your subject gets washed out and loses detail. Too little light, and your photo becomes dark and unengaging. For effective Instagram brand photography, understanding how light behaves in your usual shooting locations is key.
Think about a coffee shop, for example. Observe how natural light enters throughout the day.
- Which windows offer the best, softest light?
- Does the midday sun create harsh shadows or overexposure?
- Where are the artificial light sources, and do they create unflattering spots?
Golden hour (early morning and late afternoon) generally provides the most flattering, soft light. The midday sun, on the other hand, can be harsh and cause blown-out highlights. Knowing your space’s light patterns allows you to plan your photoshoots for optimal conditions.
Alt text: Cafe interior bathed in soft, diffused light through sheer curtains, showcasing pastries on a table.
Smartphone cameras are powerful, but they benefit from a little patience. Spend a few moments tapping on different areas of your screen to see how focus and light interact. Use the brightness slider to fine-tune the exposure and get the perfect balance of light and shadow.
Pro Tip: Experiment with photographing the same subject, from the same angle, at different times of the day. This exercise will build your understanding of available light. You might discover that the best light for your food photos, for instance, is hours before lunchtime service. Get creative with simple photography hacks. Need to soften harsh shadows? Use a white foam board or even a white sheet to bounce light back onto your subject, acting as a makeshift reflector.
2. Layer Up for Visual Depth and Interest
While minimalism has its place, adding layers can dramatically enhance your Instagram photos. This involves incorporating different textures and creating a sense of foreground and background. Your main subject remains the focal point, but layers draw the viewer in and add visual storytelling.
Alt text: Layered composition with coffee in focus, blurred glass foreground, and floral background for visual depth.
In the example above, a strategically placed empty glass subtly blurs part of the image, guiding your eye first to the coffee and then to the background elements of the vase.
Many smartphones now offer portrait mode, which simplifies creating depth of field. If you’re dealing with busy backgrounds, using portrait mode to blur the background and emphasize your subject can be particularly effective.
Alt text: Portrait mode photo of ice cream cone in focus against a blurred background, highlighting the subject.
Pro Tip: Instead of always shooting straight on, try framing your subject with elements in the foreground. Hold a leaf to the side of your lens, shoot through foliage, or position yourself behind a structure to create a layered effect. Shooting through a window, incorporating reflections, can also add an artistic touch. Experiment with tapping on your phone screen to shift focal points and see how it transforms your images.
3. Capture Action with Burst Mode
Shooting events or any moving subject? Burst mode is your secret weapon. Instead of snapping just one or two photos, use burst mode to capture a rapid sequence of images. Why is this important? When photographing people in motion or capturing fleeting moments, you’re likely to catch some awkward expressions, blinks, or in-between actions.
Burst mode gives you a multitude of frames to choose from later, increasing your chances of capturing that perfect, decisive moment.
Set up your shot with good composition and lighting, then hold down the shutter button to activate burst mode. Review the series afterward and select the best image.
Alt text: Burst mode sequence of latte art pouring, showcasing action capture in photography.
The example above illustrates capturing various stages of latte art pouring using burst mode. This eliminates the pressure of getting the perfect shot in a single attempt. You can review the burst and select the frame that best captures the fluidity and artistry of the pour.
Pro Tip: Don’t be discouraged by the sheer number of shots you might take in burst mode before finding “the one.” Even seasoned professional event photographers often deliver only a small percentage of the total images captured. It’s about quantity leading to quality when capturing action.
4. Master Composition with Rule of Thirds & White Space
The rule of thirds is a fundamental composition guideline in photography. Imagine dividing your frame into a 3×3 grid with equally spaced vertical and horizontal lines. The points where these lines intersect are considered visually strong points in your composition. Placing your subject at or near these intersections, instead of directly in the center, often creates a more balanced and engaging image.
Alt text: Rule of thirds composition with croissants placed at grid intersection points, enhancing visual balance.
In the photo above, the croissants are positioned along the lower right intersection, adhering to the rule of thirds for a more visually appealing composition.
For certain photos, isolating your subject is the goal. Combining the rule of thirds with generous white space (negative space) can create a powerful and minimalist effect. White space draws attention to your subject and provides visual breathing room.
Pro Tip: Many smartphone cameras offer the option to overlay a rule of thirds grid on your screen while you’re shooting. Enable this feature to help you visualize the grid and position your subjects accurately as you compose your shots.
5. Play with Angles for Dynamic Perspectives
We’ve discussed gridlines for composition, but they’re also invaluable for achieving precise angles.
For perfectly aligned overhead shots or interior photos, use the gridlines to ensure your photo elements are parallel. This means aligning tables, walls, or other lines in your scene with the gridlines on your camera screen.
Alt text: Overhead photo of coffee cup aligned with gridlines, demonstrating perfect vertical alignment and composition.
In the example above, the edges of the coffee cup are meticulously aligned with the vertical gridlines, creating a clean, straight-down perspective that draws the viewer directly to the subject.
While perfect alignment is useful, don’t be afraid to break the rules and experiment with angles! Before taking a shot, take a moment to examine your scene from different viewpoints. Sometimes, a straight-on shot is the least interesting option. If you choose a non-parallel angle, make it deliberate and noticeable. Slightly off-kilter angles can look unintentional and distracting.
Alt text: Angled top-down shot of Fenty beauty products, highlighting colors and packaging details.
In this Fenty product shot, a deliberate top angle is used to showcase the variety of colors and packaging. A side shot might have hidden some products, while a straight top-down shot could have missed the packaging details. The angle chosen provides the most comprehensive view.
Pro Tip: Some smartphone cameras feature a crosshair that appears specifically for overhead shots. Use this crosshair to guarantee perfect alignment when shooting directly from above, especially for flat lay compositions.
Analyze Your Top-Performing Instagram Photos
Before you start snapping away with these new tips, take a step back and analyze your existing Instagram performance. It’s crucial to understand what kind of photos resonate most with your audience. Investing time in creating “good” photos is only effective if they align with what your followers actually engage with.
To gain insights, consider two key data sources: your own past posts and your competitors’ or industry leaders’ content.
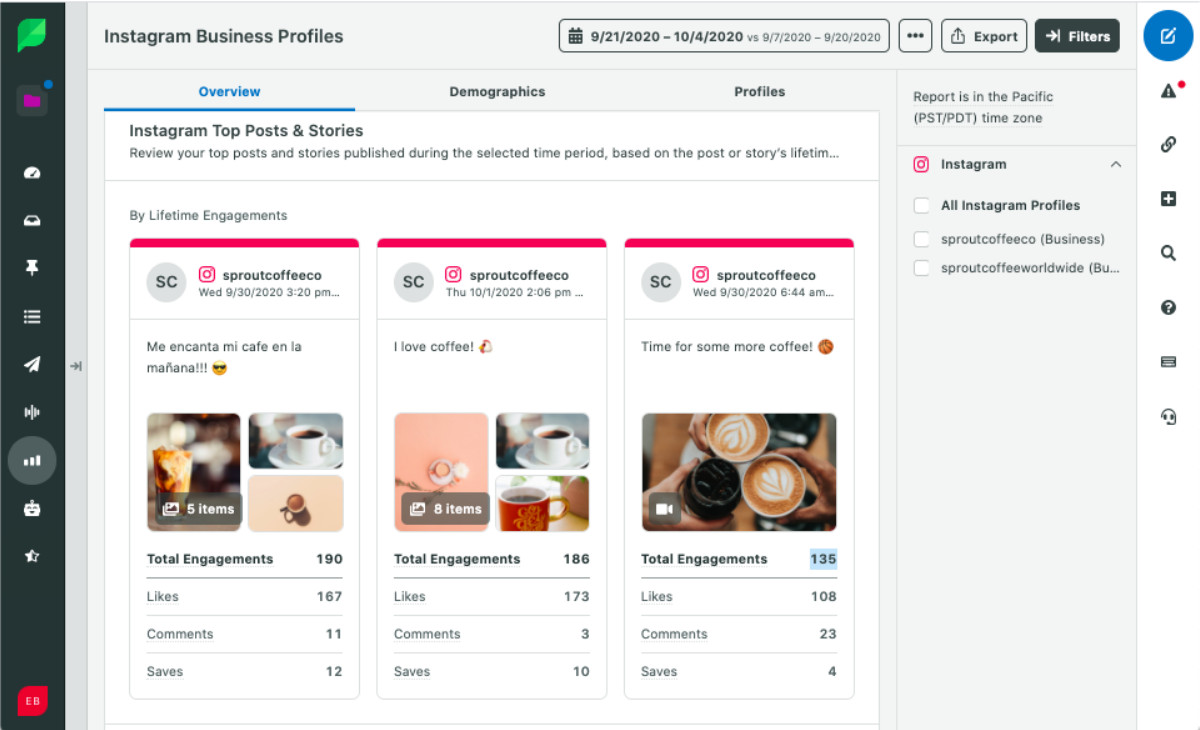 Sprout Social Instagram top posts report showing engagement metrics.
Utilize Instagram analytics tools, like Sprout Social’s Instagram report, or Instagram Insights directly, to identify your most engaging posts. Look for patterns and similarities. Do your top posts feature people? Are they predominantly shot in natural light? Do they share a particular style, like symmetry or minimalism? Analyzing these high-performing photos will give you a clearer understanding of what your audience connects with.
Document your observations by writing down image notes and saving screenshots of your best-performing photos. This collection can become part of your brand identity guide, ensuring visual consistency on your Instagram. A cohesive visual identity helps you stand out in the crowded Instagram landscape.
Next, broaden your perspective by examining what your competitors and other successful accounts in your industry are doing. Conduct a competitor analysis. What types of photos are they publishing and getting high engagement on? Are there differences compared to your current content?
Don’t limit yourself solely to photos. Consider incorporating graphics, text overlays, and even behind-the-scenes screenshots to add a more casual and varied element to your account.
After implementing some of these photography tips, revisit your Instagram analytics. Monitor if your top-performing post types have shifted, and if you’re observing an overall increase in engagement since incorporating the new techniques.
The world of photography is constantly evolving, so here’s a final piece of advice: actively follow inspiring brands and photographers whose work you admire. Diversify your Instagram feed to avoid seeing only the same types of posts, which might inadvertently lead you to create similar, derivative content. Resist the urge to follow the herd. Instead, forge your own unique path and visual brand identity. Now, go out there and capture some amazing new photos!
