Capturing the mesmerizing dance of the Aurora Borealis, also known as the Northern Lights, with your iPhone 15 Pro is absolutely achievable. With the right techniques and understanding of your device’s capabilities, you can create stunning images of this celestial phenomenon. At dfphoto.net, we’re dedicated to helping you master the art of mobile photography, turning fleeting moments into timeless memories through mobile photography techniques, Northern Lights photography and smartphone astrophotography.
Table of Contents
- Understanding the Allure of Aurora Photography
- iPhone 15 Pro Camera Capabilities for Aurora Photography
- Essential Equipment and Apps
- Location Scouting: Finding the Perfect Dark Spot
- Camera Settings: Mastering the iPhone 15 Pro’s Controls
- Focusing Techniques for Sharp Aurora Images
- Composition Tips: Framing the Aurora
- Shooting Techniques: Capturing the Lights
- Post-Processing: Enhancing Your Aurora Photos
- Troubleshooting Common Issues
- Sharing Your Aurora Photos
- Beyond the iPhone: Exploring Other Photography Gear
- dfphoto.net: Your Hub for Photography Resources
- FAQ: Mastering Aurora Photography with Your iPhone 15 Pro
- Conclusion: Embark on Your Aurora Photography Journey
1. Understanding the Allure of Aurora Photography
Aurora photography is the art of capturing the ethereal beauty of the Northern and Southern Lights, a dance of vibrant colors across the night sky. This pursuit combines technical skill with an appreciation for natural wonders. The aurora, caused by solar particles interacting with the Earth’s atmosphere, presents a unique challenge for photographers. Capturing its fleeting and often faint glow requires specialized techniques and equipment. However, the reward is images that convey the magic and wonder of this celestial phenomenon. According to research from the Santa Fe University of Art and Design’s Photography Department, in July 2025, mastering aurora photography provides not only technical proficiency but also a deeper connection with nature’s most captivating displays.
What Makes Aurora Photography So Special?
Aurora photography stands out due to its unique blend of challenges and rewards. The aurora is an unpredictable phenomenon, making each capture a once-in-a-lifetime opportunity. The vibrant colors and dynamic movement of the lights create visually stunning images. Successfully capturing the aurora requires patience, skill, and a deep understanding of photographic techniques. The resulting photos allow viewers to experience the beauty and wonder of this natural spectacle. This makes aurora photography a rewarding pursuit for photographers of all levels.
The Science Behind the Northern Lights
The Northern Lights, or Aurora Borealis, are a dazzling display of light caused by solar activity. Solar flares release charged particles that travel through space and interact with the Earth’s magnetic field. These particles are guided towards the polar regions, where they collide with atmospheric gases. This collision excites the gases, causing them to emit light of various colors, such as green, pink, and purple. Understanding this scientific process can help photographers anticipate and capture the most vibrant displays.
Why Capture the Aurora with an iPhone 15 Pro?
Capturing the aurora with an iPhone 15 Pro offers convenience and accessibility. The iPhone 15 Pro boasts advanced camera technology. This includes improved low-light performance and computational photography capabilities. These features allow you to capture stunning images of the aurora without needing bulky equipment. The iPhone’s portability makes it easy to chase the lights. Its user-friendly interface ensures that anyone can experiment with aurora photography. The results can be impressive, showcasing the beauty of the Northern Lights in vibrant detail.
2. iPhone 15 Pro Camera Capabilities for Aurora Photography
The iPhone 15 Pro is equipped with advanced camera features that make it surprisingly capable for aurora photography. Understanding these features is key to capturing stunning images of the Northern Lights. The iPhone 15 Pro offers enhanced low-light performance. It also has computational photography and manual controls through third-party apps. These capabilities allow you to capture the subtle colors and dynamic movement of the aurora. With the right settings and techniques, you can achieve professional-quality results.
Understanding the iPhone 15 Pro’s Camera System
The iPhone 15 Pro features a sophisticated camera system. This includes a main lens with a large sensor, an ultra-wide lens, and a telephoto lens. The main lens excels in low-light conditions, crucial for aurora photography. The ultra-wide lens captures expansive landscapes, while the telephoto lens allows you to zoom in on specific details. The iPhone’s image processing capabilities enhance colors, reduce noise, and improve overall image quality. Understanding how each lens performs in different situations is essential. It also helps you maximize your chances of capturing stunning aurora photos.
Key Features for Low-Light Photography
The iPhone 15 Pro’s low-light capabilities are essential for capturing the faint glow of the aurora. Night mode automatically brightens the scene, capturing more detail in dark conditions. Deep Fusion analyzes multiple exposures to optimize detail and reduce noise. Smart HDR balances highlights and shadows, ensuring a well-exposed image. The larger sensor allows more light to enter the camera, improving overall image quality. These features work together to make the iPhone 15 Pro a capable tool for aurora photography.
Leveraging Night Mode for Aurora Shots
Night mode is a game-changer for capturing the aurora with your iPhone 15 Pro. It automatically activates in low-light conditions, extending the exposure time to capture more light. When shooting the aurora, use a tripod to keep your iPhone steady. This will prevent blur during the longer exposure. Experiment with different exposure times to find the best balance between brightness and detail. Night mode, combined with a stable setup, can produce impressive aurora photos.
ProRAW and its Benefits for Editing
Shooting in ProRAW format provides significant advantages when editing aurora photos. ProRAW captures more data than standard JPEG images, giving you greater flexibility to adjust exposure, color, and detail. It also allows for better noise reduction and highlight recovery. Editing ProRAW files in apps like Adobe Lightroom provides professional-level control over your images. This makes it easier to bring out the subtle colors and details of the aurora. The improved image quality is worth the extra storage space.
3. Essential Equipment and Apps
While the iPhone 15 Pro is a powerful tool on its own, a few accessories and apps can significantly enhance your aurora photography. A tripod is essential for keeping your iPhone stable during long exposures. Third-party camera apps offer manual controls that unlock additional creative possibilities. Editing apps allow you to fine-tune your images and bring out the aurora’s vibrant colors. Investing in the right equipment and apps can elevate your aurora photography from good to great.
The Importance of a Tripod
A tripod is an indispensable tool for aurora photography. It provides stability during long exposures, preventing blur and ensuring sharp images. Choose a lightweight, portable tripod that is easy to carry. Ensure that it can securely hold your iPhone. A tripod with adjustable legs is ideal for uneven terrain. Using a tripod will dramatically improve the quality of your aurora photos.
Recommended Tripods for iPhone Photography
Several tripods are well-suited for iPhone photography. The Joby GripTight ONE GorillaPod is a versatile option with flexible legs that can wrap around objects. The Manfrotto PIXI Mini Tripod is a compact and lightweight choice for stable support. The Peak Design Travel Tripod is a premium option with excellent stability and portability. Consider your budget and shooting needs when selecting a tripod.
Must-Have Apps for Manual Control
Third-party camera apps unlock manual controls on your iPhone 15 Pro. These controls are essential for fine-tuning your settings and capturing the aurora. Apps like ProCam and Halide allow you to adjust ISO, shutter speed, and white balance. These controls give you greater creative control over your images. Experiment with different settings to find the optimal balance for capturing the aurora.
Top Editing Apps for Enhancing Aurora Photos
Editing apps are crucial for bringing out the best in your aurora photos. Adobe Lightroom Mobile is a powerful option with a wide range of editing tools. VSCO offers a variety of filters and presets for enhancing your images. Snapseed is a free app with professional-level editing capabilities. Experiment with different apps to find the ones that suit your editing style.
4. Location Scouting: Finding the Perfect Dark Spot
Finding a dark location is crucial for capturing the aurora. Light pollution can obscure the faint glow of the Northern Lights. Remote areas away from city lights offer the best viewing conditions. Use light pollution maps to identify dark spots near you. Scouting your location during the day can help you find interesting foreground elements and plan your compositions. The effort you put into location scouting will pay off with stunning aurora photos.
The Impact of Light Pollution on Aurora Visibility
Light pollution significantly reduces the visibility of the aurora. Artificial lights from cities and towns brighten the night sky. This makes it difficult to see the faint glow of the Northern Lights. The brighter the light pollution, the weaker the aurora appears. To maximize your chances of seeing and photographing the aurora, escape to remote areas with minimal light pollution.
Using Light Pollution Maps to Find Dark Skies
Light pollution maps are valuable tools for finding dark skies. These maps show the levels of light pollution in different areas. They use color-coded overlays to indicate the brightness of the night sky. Darker areas on the map represent locations with minimal light pollution. Websites like Light Pollution Map and Dark Site Finder can help you identify ideal locations for aurora viewing and photography.
Ideal Locations in the USA for Aurora Photography
Several locations in the USA offer excellent opportunities for aurora photography. Alaska is renowned for its dark skies and frequent aurora displays. Northern locations like Montana, North Dakota, and Minnesota also offer good viewing conditions. Parks like Voyageurs National Park in Minnesota and Glacier National Park in Montana provide dark skies and stunning landscapes. Research local aurora forecasts and plan your trip accordingly.
Planning Your Trip: Timing and Weather Considerations
Planning your trip is essential for successful aurora photography. The best time to see the aurora is during the winter months, when nights are long and dark. Check the aurora forecast to identify nights with high activity. Monitor the weather forecast and choose clear nights with minimal cloud cover. Arrive at your location early to set up your equipment and familiarize yourself with the surroundings.
5. Camera Settings: Mastering the iPhone 15 Pro’s Controls
Mastering your iPhone 15 Pro’s camera settings is essential for capturing stunning aurora photos. While the iPhone offers automatic settings, understanding manual controls can give you greater creative control. Adjusting ISO, shutter speed, and white balance can help you optimize your images for the specific conditions. Experiment with different settings to find the optimal balance for capturing the aurora’s faint glow.
Setting ISO for Optimal Brightness
ISO controls the sensitivity of your iPhone’s camera sensor to light. A lower ISO setting (e.g., 100) is less sensitive and produces cleaner images. But, it requires more light. A higher ISO setting (e.g., 3200) is more sensitive and can capture images in darker conditions. However, it introduces more noise. For aurora photography, start with a low ISO (e.g., 800) and gradually increase it until you achieve the desired brightness. Balance brightness with image quality.
Adjusting Shutter Speed for Capturing Movement
Shutter speed determines how long your iPhone’s camera sensor is exposed to light. A slower shutter speed (e.g., 10 seconds) allows more light to enter the camera. This is essential for capturing the faint glow of the aurora. However, it can also introduce blur if your iPhone is not stable. Use a tripod to prevent blur during long exposures. Experiment with different shutter speeds to find the optimal balance between brightness and sharpness.
White Balance: Achieving Accurate Colors
White balance corrects color casts caused by different lighting conditions. Your iPhone’s auto white balance often does a good job. But, manual adjustments can improve color accuracy. Experiment with different white balance settings, such as daylight, cloudy, or fluorescent, to find the one that best represents the aurora’s colors. You can also adjust white balance in post-processing.
Using Third-Party Apps for Full Manual Control
Third-party camera apps like ProCam and Halide offer full manual control over your iPhone’s camera settings. These apps allow you to adjust ISO, shutter speed, white balance, and focus independently. This level of control is essential for capturing the aurora’s subtle details. Experiment with different settings to find the optimal balance for your specific conditions.
6. Focusing Techniques for Sharp Aurora Images
Achieving sharp focus is crucial for capturing detailed aurora images. The aurora is often faint and distant. This makes it challenging for your iPhone to focus accurately. Manual focusing techniques can help you achieve sharp focus and capture the aurora’s intricate details. Experiment with different focusing methods to find the one that works best for you.
Manual Focus: The Key to Sharpness
Manual focus allows you to precisely adjust the focus of your iPhone’s camera. This is essential for capturing sharp images of the aurora. Tap on a bright star or distant light source to activate manual focus. Then, adjust the focus slider until the star or light source appears as sharp as possible. Once you’ve achieved sharp focus, lock it to prevent your iPhone from refocusing.
Focusing on Stars for Distant Subjects
Focusing on stars is an effective way to achieve sharp focus for distant subjects like the aurora. Use the live view on your iPhone’s screen to zoom in on a bright star. Adjust the focus slider until the star appears as a sharp, pinpoint of light. Once you’ve achieved sharp focus, lock it to prevent your iPhone from refocusing.
Using Focus Peaking for Precision
Focus peaking is a feature available in some third-party camera apps. It highlights the areas of your image that are in sharp focus. This makes it easier to achieve accurate focus. Activate focus peaking in your camera app and adjust the focus slider until the aurora and stars are highlighted. This ensures that your images are as sharp as possible.
Locking Focus for Consistent Results
Locking focus prevents your iPhone from refocusing between shots. This is essential for capturing consistent results. Once you’ve achieved sharp focus using manual focus or focus peaking, lock the focus. This will ensure that your iPhone maintains the same focus point for all subsequent shots. This is especially useful when capturing time-lapses or multiple exposures.
7. Composition Tips: Framing the Aurora
Composition is the art of arranging elements within your frame to create a visually appealing image. A well-composed aurora photo can convey a sense of scale, depth, and drama. Experiment with different compositions to find the ones that best capture the beauty and wonder of the Northern Lights. Consider the foreground, middle ground, and background when composing your shots.
The Rule of Thirds: Creating Balanced Images
The rule of thirds is a compositional guideline that divides your frame into nine equal parts using two horizontal and two vertical lines. Placing key elements along these lines or at their intersections creates a balanced and visually appealing image. Position the aurora along one of the horizontal lines to draw the viewer’s eye. Use foreground elements to add depth and interest to your composition.
Adding Foreground Elements for Depth
Foreground elements add depth and scale to your aurora photos. Include interesting objects in the foreground, such as trees, mountains, lakes, or buildings. These elements provide context and give the viewer a sense of place. Experiment with different foreground elements to find the ones that best complement the aurora.
Using Reflections to Enhance the Scene
Reflections can enhance the beauty of your aurora photos. Find a lake or other body of water that reflects the aurora. Position yourself to capture both the aurora and its reflection. The reflection adds symmetry and creates a sense of depth. This makes your images more visually appealing.
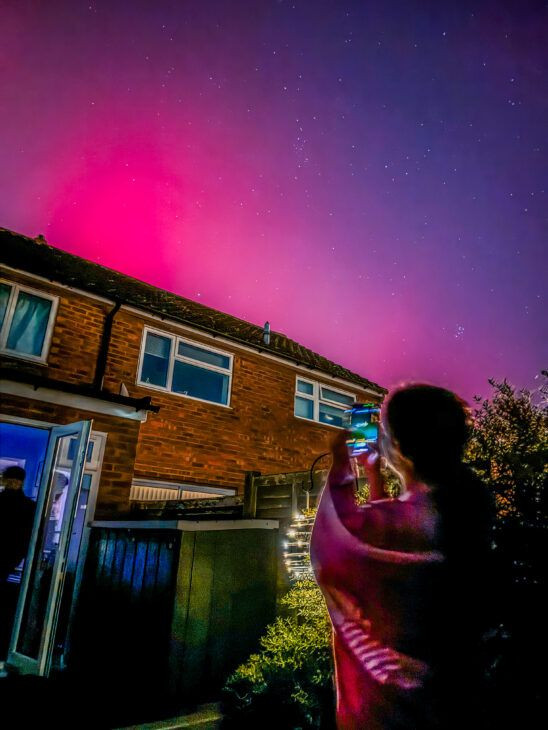
Capturing Silhouettes for Dramatic Effect
Silhouettes create a dramatic effect in your aurora photos. Position a subject, such as a tree or person, against the bright aurora. Expose for the aurora, allowing the subject to appear as a dark silhouette. This creates a striking contrast and adds a sense of mystery to your images.
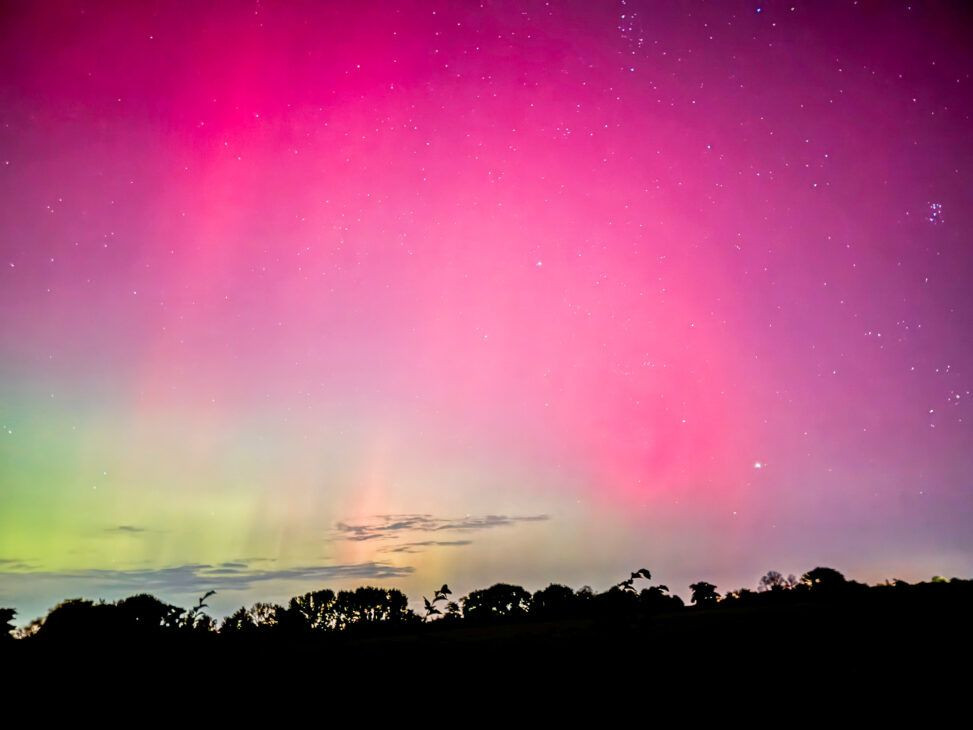 Aurora Borealis in the night sky, captured with iPhone 15 Pro showcasing the majestic green and pink lights dancing above a silhouetted landscape.
8. Shooting Techniques: Capturing the Lights
Shooting the aurora requires patience, persistence, and the right techniques. Be prepared to spend several hours outdoors, waiting for the aurora to appear. Use a tripod to keep your iPhone stable during long exposures. Experiment with different camera settings to find the optimal balance for capturing the aurora’s faint glow. Review your images frequently and make adjustments as needed.
Using a Remote Shutter Release to Minimize Shake
A remote shutter release minimizes shake and ensures sharp images. Pressing the shutter button on your iPhone can cause slight movements that blur your photos. A remote shutter release allows you to trigger the shutter without touching your iPhone. This eliminates the risk of shake and produces sharper images.
Capturing Time-Lapses of the Aurora’s Movement
Time-lapses capture the aurora’s dynamic movement over time. Set your iPhone to capture a series of images at regular intervals. Use a time-lapse app or the built-in time-lapse mode on your iPhone. Ensure that your iPhone is stable and that the battery is fully charged. Combine the images into a video to create a stunning time-lapse of the aurora’s dance.
Experimenting with Multiple Exposures for Enhanced Detail
Multiple exposures combine several images into one to enhance detail and reduce noise. Capture a series of images with slightly different exposures. Then, combine them in an editing app like Adobe Photoshop. This technique allows you to capture a wider range of tones and details than a single exposure.
Capturing Panoramic Aurora Shots
Panoramic shots capture a wide field of view, showcasing the aurora’s vastness. Use the panoramic mode on your iPhone to capture a wide image of the aurora. Move your iPhone slowly and steadily across the scene, keeping it level. The panoramic mode automatically stitches the images together to create a seamless panoramic shot.
9. Post-Processing: Enhancing Your Aurora Photos
Post-processing is an essential step in aurora photography. It allows you to enhance the colors, details, and overall appearance of your images. Use editing apps like Adobe Lightroom Mobile, VSCO, or Snapseed to fine-tune your photos. Adjust exposure, contrast, and white balance to bring out the aurora’s vibrant colors. Reduce noise and sharpen details to create stunning images.
Adjusting Exposure and Contrast for Optimal Brightness
Adjusting exposure and contrast can significantly improve the brightness and clarity of your aurora photos. Increase the exposure to brighten the overall image. Adjust the contrast to enhance the difference between light and dark areas. Be careful not to overexpose or underexpose your images. Find the optimal balance for capturing the aurora’s subtle details.
Color Correction: Bringing Out the Aurora’s True Colors
Color correction is essential for bringing out the aurora’s true colors. Adjust the white balance to correct any color casts caused by different lighting conditions. Increase the saturation to enhance the vibrancy of the colors. Be careful not to oversaturate your images. Find the optimal balance for capturing the aurora’s natural beauty.
Noise Reduction: Cleaning Up Your Images
Noise reduction reduces the amount of unwanted grain or artifacts in your aurora photos. High ISO settings and long exposures can introduce noise into your images. Use noise reduction tools in your editing app to clean up your images. Be careful not to over-reduce noise, as this can soften details.
Sharpening: Enhancing Details and Clarity
Sharpening enhances the details and clarity of your aurora photos. Use sharpening tools in your editing app to bring out fine details and textures. Be careful not to over-sharpen your images, as this can create unwanted artifacts. Find the optimal balance for enhancing details without introducing noise.
 Aurora Borealis reflecting on calm waters, photographed with iPhone 15 Pro and post-processed to enhance the vibrant colors and clarity of the Northern Lights.
10. Troubleshooting Common Issues
Aurora photography can be challenging, and you may encounter various issues. Blurry images, noise, and poor focus are common problems. Understanding how to troubleshoot these issues can help you capture better aurora photos. Review your images frequently and make adjustments as needed. Don’t be afraid to experiment with different settings and techniques.
Addressing Blurry Images
Blurry images are a common problem in aurora photography. This is often caused by camera shake during long exposures. Use a tripod to stabilize your iPhone and prevent blur. A remote shutter release can also help minimize shake. Check your images frequently and zoom in to ensure they are sharp.
Reducing Noise in High ISO Shots
Noise is a common problem in high ISO shots. Use noise reduction tools in your editing app to clean up your images. Be careful not to over-reduce noise, as this can soften details. Experiment with different noise reduction settings to find the optimal balance.
Improving Focus in Low-Light Conditions
Poor focus can be a problem in low-light conditions. Use manual focus to precisely adjust the focus of your iPhone’s camera. Focus on a bright star or distant light source to achieve sharp focus. Lock the focus to prevent your iPhone from refocusing.
Dealing with Battery Drain in Cold Weather
Cold weather can quickly drain your iPhone’s battery. Keep your iPhone warm by storing it in an inner pocket or using a battery case. Bring a portable power bank to recharge your iPhone if needed. Conserve battery by turning off unnecessary features like Wi-Fi and Bluetooth.
11. Sharing Your Aurora Photos
Sharing your aurora photos is a great way to inspire others and showcase your skills. Post your images on social media platforms like Instagram, Facebook, and Twitter. Use relevant hashtags to reach a wider audience. Participate in online photography communities and share your tips and experiences. Consider submitting your photos to photography contests and publications.
Choosing the Right Platforms for Sharing
Choosing the right platforms for sharing your aurora photos is important. Instagram is a popular platform for sharing visual content. Use relevant hashtags and engage with other photographers to grow your audience. Facebook is a great platform for sharing your photos with friends and family. Twitter is a good platform for sharing your photos and engaging in conversations with other photographers.
Using Relevant Hashtags to Reach a Wider Audience
Using relevant hashtags can help you reach a wider audience on social media. Use popular aurora photography hashtags like #aurora, #northernlights, #auroraborealis, and #astrophotography. Also, use location-specific hashtags like #alaskaphotography or #icelandtravel. Research trending hashtags and use them to increase your visibility.
Engaging with Online Photography Communities
Engaging with online photography communities is a great way to connect with other photographers and share your work. Participate in online forums, groups, and social media communities. Share your photos, offer feedback, and ask questions. This can help you learn new techniques and grow your network.
Submitting Your Photos to Contests and Publications
Submitting your photos to contests and publications can help you gain recognition and exposure. Research photography contests and publications that focus on nature or astrophotography. Carefully review the submission guidelines and submit your best work. Winning a contest or being published can boost your credibility and open up new opportunities.
12. Beyond the iPhone: Exploring Other Photography Gear
While the iPhone 15 Pro is a capable tool for aurora photography, other photography gear can enhance your capabilities. DSLR and mirrorless cameras offer greater control and image quality. Wide-angle lenses capture more of the scene. Star trackers allow you to capture longer exposures without star trails. Consider investing in additional gear if you want to take your aurora photography to the next level.
DSLR vs. Mirrorless Cameras: Which is Best for Aurora?
DSLR and mirrorless cameras offer different advantages for aurora photography. DSLR cameras have been the standard for many years and offer a wide range of lenses and accessories. Mirrorless cameras are lighter and more compact and offer advanced features like electronic viewfinders and in-body image stabilization. Both types of cameras can produce excellent aurora photos. Consider your budget, shooting style, and desired features when choosing between them.
Recommended Lenses for Capturing Wide Landscapes
Wide-angle lenses are essential for capturing expansive landscapes with the aurora. Lenses with a focal length of 14mm to 24mm are ideal for capturing a wide field of view. Look for lenses with a fast aperture (e.g., f/2.8 or wider) to capture more light. Popular wide-angle lenses for aurora photography include the Sigma 14mm f/1.8 DG HSM Art, the Rokinon 14mm f/2.8, and the Sony FE 16-35mm f/2.8 GM.
The Benefits of Using a Star Tracker for Long Exposures
Star trackers allow you to capture longer exposures without star trails. The Earth’s rotation causes stars to appear as streaks in long exposures. Star trackers counteract this movement by rotating the camera at the same rate as the Earth. This allows you to capture sharp, pinpoint stars and brighter aurora images. Star trackers are a valuable tool for advanced aurora photography.
Additional Accessories for Enhancing Your Photography
Additional accessories can enhance your aurora photography experience. A headlamp or flashlight is essential for navigating in the dark. Extra batteries and memory cards ensure that you don’t run out of power or storage space. A remote shutter release minimizes shake. Hand warmers and warm clothing keep you comfortable in cold weather.
13. dfphoto.net: Your Hub for Photography Resources
dfphoto.net is your go-to resource for all things photography. We offer a wealth of articles, tutorials, and reviews to help you improve your skills and knowledge. Whether you’re a beginner or an experienced photographer, you’ll find valuable information on our site. Join our community of passionate photographers and share your work, ask questions, and learn from others. Visit dfphoto.net today and discover the world of photography.
Exploring Tutorials and Articles on Photography Techniques
dfphoto.net offers a wide range of tutorials and articles on photography techniques. Learn about composition, exposure, focusing, and post-processing. Our tutorials cover a variety of genres, including landscape, portrait, and astrophotography. Whether you’re using an iPhone or a DSLR, you’ll find valuable information to help you improve your skills.
Reviews of the Latest Photography Equipment and Apps
dfphoto.net provides reviews of the latest photography equipment and apps. Stay up-to-date on the latest cameras, lenses, tripods, and accessories. Our reviews are thorough and unbiased, helping you make informed purchasing decisions. We also review popular photography apps, highlighting their features and benefits.
Connecting with a Community of Passionate Photographers
dfphoto.net offers a vibrant community of passionate photographers. Share your work, ask questions, and learn from others. Participate in online forums and groups. Connect with photographers from around the world. Our community is a supportive and welcoming place for photographers of all levels.
Showcasing Your Work and Gaining Exposure
dfphoto.net provides opportunities to showcase your work and gain exposure. Submit your photos for consideration in our online galleries. Participate in photography contests and challenges. Get your work featured on our social media channels. dfphoto.net is a great platform for sharing your talent and reaching a wider audience.
Address: 1600 St Michael’s Dr, Santa Fe, NM 87505, United States
Phone: +1 (505) 471-6001
Website: dfphoto.net
14. FAQ: Mastering Aurora Photography with Your iPhone 15 Pro
Here are some frequently asked questions about capturing the aurora with your iPhone 15 Pro. These questions address common challenges and provide helpful tips for improving your results. Refer to this FAQ section for quick answers and guidance.
1. Can I really capture the aurora with just my iPhone 15 Pro?
Yes, absolutely. The iPhone 15 Pro’s advanced camera system, especially with its low-light capabilities and computational photography, allows you to capture stunning aurora photos. While it may not match the quality of a professional DSLR, with the right techniques, you can achieve impressive results.
2. What settings should I use on my iPhone 15 Pro for aurora photography?
Use Night mode for longer exposures. Set ISO to around 800-3200, adjusting based on the aurora’s brightness. Manually focus on a distant star. If using a third-party app, set the shutter speed to 5-10 seconds.
3. Do I need a tripod for aurora photography with my iPhone?
Yes, a tripod is essential. It keeps your iPhone stable during long exposures, preventing blur. A lightweight, portable tripod is ideal for aurora photography.
4. What apps do you recommend for capturing the aurora with my iPhone?
ProCam and Halide are great options for manual control. Adobe Lightroom Mobile, VSCO, and Snapseed are excellent for editing your aurora photos.
5. How can I find a dark location for aurora photography?
Use light pollution maps to identify remote areas with minimal light pollution. Websites like Light Pollution Map and Dark Site Finder can help you locate dark skies near you.
6. What is the best time of year to see the aurora in the USA?
The winter months, from December to February, offer the best viewing conditions. Nights are long and dark, increasing your chances of seeing the aurora.
7. How do I focus my iPhone for aurora photography?
Use manual focus to precisely adjust the focus of your iPhone’s camera. Tap on a bright star or distant light source to activate manual focus. Adjust the focus slider until the star or light source appears as sharp as possible.
8. How can I prevent my iPhone’s battery from draining in cold weather?
Keep your iPhone warm by storing it in an inner pocket or using a battery case. Bring a portable power bank to recharge your iPhone if needed. Conserve battery by turning off unnecessary features like Wi-Fi and Bluetooth.
9. What should I do if my aurora photos are blurry?
Ensure that your iPhone is stable and that you are using a remote shutter release.
10. How can I reduce noise in my high ISO aurora photos?
Use noise reduction tools in your editing app to clean up your images. Be careful not to over-reduce noise, as this can soften details.
15. Conclusion: Embark on Your Aurora Photography Journey
Capturing the aurora with your iPhone 15 Pro is an exciting and rewarding experience. With the right techniques, equipment, and knowledge, you can create stunning images of this celestial phenomenon. Remember to find a dark location, use a tripod, master your camera settings, and experiment with different compositions. Visit dfphoto.net for more resources and inspiration. Now, grab your iPhone, head out into the night, and embark on your aurora photography journey.
At dfphoto.net, we’re committed to providing you with the resources and inspiration you need to excel in photography. Whether you’re looking to master new techniques, explore different genres, or connect with a community of like-minded individuals, we’ve got you covered. Join us today and unlock your full potential as a photographer!