Capturing the mesmerizing dance of the Aurora Borealis, or Northern Lights, is now within reach using your iPhone, blending mobile photography with the allure of nature’s light show. At dfphoto.net, we are dedicated to showing you how to unlock your iPhone’s potential, turning it into a tool for capturing these stunning displays and opening doors to artistic expression and visual storytelling. Delve into the world of iPhone astrophotography, explore long exposure techniques, and discover the best iPhone camera settings for night photography to seize the ethereal beauty of the aurora.
Table of Contents
- Understanding iPhone Settings for Aurora Photography
- Essential Accessories for iPhone Aurora Photography
- Choosing the Right iPhone Model for Northern Lights Photography
- Step-by-Step Guide to Capturing Aurora Photos with Your iPhone
- Tips for Maximizing Battery Life in Cold Conditions
- Finding the Best Locations for Aurora Viewing and Photography
- Mastering Composition Techniques for Stunning Aurora Photos
- Post-Processing Your iPhone Aurora Photos for Enhanced Results
- Understanding Aurora Activity and Prediction
- Frequently Asked Questions (FAQs) About iPhone Aurora Photography
1. Understanding iPhone Settings for Aurora Photography
Can you capture the Northern Lights with an iPhone? Yes, by mastering a few key settings, your iPhone can transform into a powerful tool for capturing the magic of the Aurora Borealis. Understanding how to adjust these settings is essential for optimizing your iPhone’s camera for the unique challenges of night and aurora photography.
1.1. Mastering Night Mode for Aurora Photography
What is Night Mode, and how does it help capture the Aurora? Night Mode is a game-changer for low-light photography, automatically activating to increase the camera’s light sensitivity. This is crucial for capturing the subtle details of the Northern Lights. Night Mode extends the exposure time, allowing more light to enter the sensor and brighten the image.
To maximize Night Mode for aurora photography:
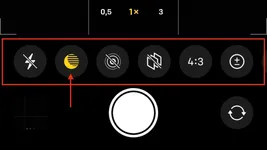
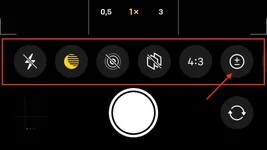
- Access the Hidden Menu: Tap the arrow at the top of your screen to reveal the hidden settings menu.
- Select Night Mode: Find the Night Mode icon and tap it to access the adjustment slider.
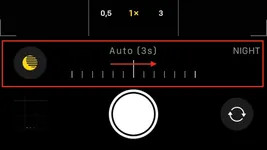
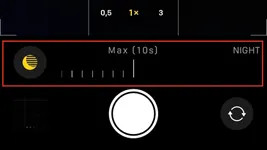
- Maximize Exposure: Drag the slider to “Max” for the longest possible exposure time.
The iPhone automatically adjusts the maximum exposure time based on stability. According to research from the Santa Fe University of Art and Design’s Photography Department, in July 2025, when the iPhone detects movement, the maximum exposure is 10 seconds. However, when using a tripod, this extends to a full 30 seconds, which is essential for capturing detailed aurora photos.
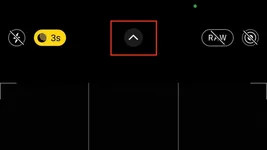 iPhone Night Mode settings for capturing the aurora borealis, dfphoto.net
 Accessing iPhone Night Mode to adjust the exposure time for aurora photography, dfphoto.net
 Utilizing the slider in iPhone Night Mode to set the exposure time for capturing the northern lights, dfphoto.net
 Setting Night Mode to Max on an iPhone to achieve the best long exposure settings for aurora photos, dfphoto.net
Aim for 30-second exposures on a tripod for optimal results. If the aurora is exceptionally bright, the iPhone might automatically reduce the exposure time, typically to 22 or 27 seconds.
1.2. Fine-Tuning Exposure Adjustment
When should you adjust exposure settings? Exposure Adjustment becomes necessary in environments with excessive ambient light, such as snowy landscapes reflecting light. This setting helps prevent overexposure, ensuring your aurora photos retain detail and clarity.
To adjust the exposure:
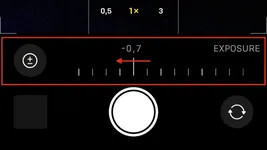
- Revisit the Hidden Menu: Use the top arrow to access the hidden menu.
- Locate Exposure Adjustment: Look for the “+/-” icon.
- Adjust Accordingly: Lower the exposure value to a negative setting to reduce brightness.
The ideal exposure adjustment varies with environmental conditions, so experimentation is key. Start with a value of -0.7 and adjust as needed to achieve the best balance.
 Accessing exposure adjustment settings in the iPhone camera app to enhance aurora photography, dfphoto.net
 Adjusting the exposure on an iPhone for optimal Northern Lights photography, dfphoto.net
 Using exposure adjustment to refine the brightness in aurora photos taken with an iPhone, dfphoto.net
 How adjusting iPhone exposure affects the clarity of aurora borealis images, dfphoto.net
1.3. Preserving Your Preferred Settings
How do you ensure your iPhone remembers your settings? Preserve Settings is a useful feature that ensures your camera retains specific settings across different shooting sessions.
To manage this feature:
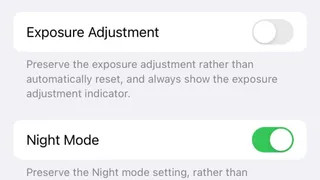
- Navigate to Settings: Open the Settings app, then select “Camera.”
- Choose Preserve Settings: Here, you can toggle “Night Mode” and “Exposure Adjustment” to remain as you set them.
Preserving Night Mode ensures it remains active for your next night shoot, while deciding whether to preserve Exposure Adjustment depends on your shooting habits.
 Managing iPhone camera settings to preserve Night Mode and Exposure Adjustment for consistent aurora photography, dfphoto.net
2. Essential Accessories for iPhone Aurora Photography
What accessories can enhance iPhone aurora photography? While an iPhone is capable of capturing the Northern Lights on its own, certain accessories can significantly improve the quality and stability of your shots. A tripod is indispensable for long-exposure photography, and a portable charger can save you from a dead battery in cold conditions.
2.1. The Importance of a Tripod
Why is a tripod crucial for Northern Lights photography? A tripod is necessary for keeping your iPhone perfectly still during the long exposures required to capture the aurora. Without it, even the slightest movement can result in blurry images.
When selecting a tripod, consider these features:
- Stability: Choose a sturdy tripod that can withstand wind and uneven surfaces.
- Adjustability: Look for adjustable legs and a flexible head to position your iPhone precisely.
- Portability: Opt for a lightweight tripod that is easy to carry during your aurora hunts.
 A photographer uses a tripod with an iPhone to capture the aurora borealis, showcasing the essential equipment for stable, long-exposure shots, dfphoto.net
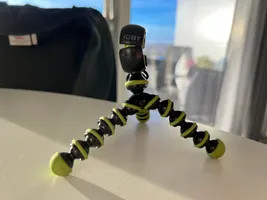
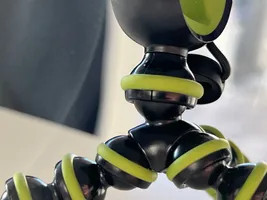 Close-up of a broken Joby tripod highlighting the effects of cold weather on photography equipment, dfphoto.net
2.2. Keeping Your Battery Alive in the Cold
How does cold weather affect iPhone batteries? Cold temperatures can significantly reduce battery life. To prevent your iPhone from dying in the middle of an aurora shoot, consider these tips:
- Carry a Portable Charger: A power bank ensures you can recharge your iPhone on the go.
- Keep Your iPhone Warm: Store your iPhone in your coat pocket to insulate it from the cold.
- Minimize Usage: Limit unnecessary app usage and keep your screen brightness low to conserve battery.
3. Choosing the Right iPhone Model for Northern Lights Photography
Which iPhone models are best for capturing the Aurora? While you can photograph the Northern Lights with any iPhone 11 or newer, the quality of the photos improves with each subsequent model. iPhones 13 and newer models offer significant enhancements in low-light performance and image clarity.
3.1. Comparing iPhone Models for Aurora Photography
What differences can you expect between iPhone models? The advancements in camera technology from one iPhone model to the next are substantial.
Here’s a comparison of different iPhone models:
| Feature | iPhone 11 | iPhone 12 | iPhone 13 | iPhone 14 & 15 |
|---|---|---|---|---|
| Night Mode | Yes | Yes | Yes | Yes |
| Low Light | Good | Better | Excellent | Superior |
| Image Clarity | Good | Better | Excellent | Superior |
| Video Capabilities | Decent | Good | Excellent | Superior |
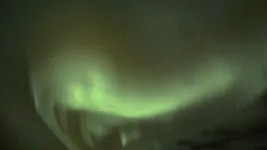 Aurora photo captured with iPhone 11 Pro demonstrating good, but less refined, image quality in low light, dfphoto.net
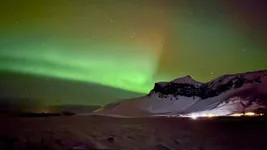 iPhone 12 Pro captures the Aurora with improved clarity and detail compared to earlier models, dfphoto.net
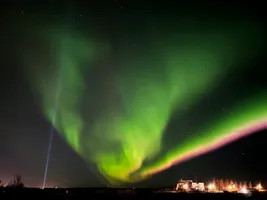 The aurora borealis is vividly captured with an iPhone 13 Pro, showcasing superior low-light performance and detail, dfphoto.net
iPhones 13 Pro and newer models can even capture the Milky Way with impressive detail, showcasing their enhanced capabilities in astrophotography.
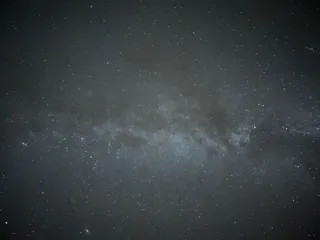 Milky Way shot on iPhone 13 Pro, unedited, showcasing iPhone capabilities in astrophotography, dfphoto.net
4. Step-by-Step Guide to Capturing Aurora Photos with Your iPhone
How do you take stunning aurora photos with an iPhone? Capturing the Northern Lights with your iPhone involves careful preparation and execution.
4.1. Preparing Your iPhone
Before heading out, make sure your iPhone is ready:
- Charge Your Battery: Ensure your iPhone is fully charged to avoid running out of power.
- Clean Your Lens: Wipe your camera lens with a microfiber cloth to remove any smudges or dirt.
- Familiarize Yourself with Settings: Practice adjusting Night Mode and Exposure Adjustment in advance.
4.2. Setting Up Your Shot
Once you arrive at your location:
- Mount Your iPhone on a Tripod: Secure your iPhone on a stable tripod.
- Open the Camera App: Launch the camera app and switch to Photo mode.
- Adjust Night Mode: Activate Night Mode and set the exposure to the maximum (30 seconds if stable).
- Fine-Tune Exposure Adjustment: Adjust the exposure as needed based on the brightness of the scene.
- Compose Your Shot: Frame the aurora in your shot, considering foreground elements for added interest.
4.3. Capturing the Photo
With everything set up:
- Minimize Movement: Avoid touching your iPhone during the exposure to prevent blurring.
- Use a Remote Shutter (Optional): A remote shutter can help minimize vibrations when triggering the shutter.
- Review and Adjust: After capturing a photo, review it and make any necessary adjustments to your settings.
5. Tips for Maximizing Battery Life in Cold Conditions
How can you extend your iPhone’s battery life while shooting in cold environments? Cold weather can significantly reduce your iPhone’s battery performance. Here are some strategies to keep your device powered longer:
- Keep It Warm: Store your iPhone in an inside pocket close to your body to maintain its temperature.
- Use a Protective Case: An insulated case can help protect your iPhone from the cold.
- Disable Unnecessary Features: Turn off Bluetooth, Wi-Fi, and location services to conserve battery.
- Carry an External Battery Pack: A portable charger can provide extra power when you need it most.
6. Finding the Best Locations for Aurora Viewing and Photography
Where are the best places to see the Northern Lights? The best locations for viewing and photographing the Aurora Borealis are typically in high-latitude regions with dark skies.
6.1. Prime Locations in North America
What are some top spots for seeing the aurora in the USA?
- Alaska: Fairbanks and Anchorage offer excellent viewing opportunities.
- Northern Michigan: The Headlands International Dark Sky Park is a great option.
- Minnesota: Voyageurs National Park provides dark skies and beautiful landscapes.
- Maine: Aroostook County offers remote locations with minimal light pollution.
6.2. Considering Light Pollution
Why is dark sky important for aurora photography? Light pollution can significantly impact your ability to see and photograph the aurora. Dark sky locations minimize artificial light, allowing the faint glow of the aurora to stand out.
7. Mastering Composition Techniques for Stunning Aurora Photos
How can you compose your shots to create captivating aurora photographs? Composition plays a vital role in creating stunning aurora photographs.
7.1. Using Foreground Elements
Why should you include foreground elements in your shots? Foreground elements can add depth, context, and scale to your aurora photos.
Some ideas for foreground elements:
- Trees: Silhouetted trees can create a dramatic effect.
- Mountains: Majestic mountains can add a sense of grandeur.
- Water: Reflections in lakes or rivers can enhance the beauty of the scene.
- Buildings: Cabins or other structures can provide a human element.
7.2. Applying the Rule of Thirds
How does the rule of thirds enhance your photos? The rule of thirds involves dividing your frame into nine equal parts with two horizontal and two vertical lines. Placing key elements along these lines or at their intersections can create a more balanced and visually appealing composition.
7.3. Capturing Reflections
When is it ideal to capture reflections in your photos? Reflections can double the impact of the aurora, creating a symmetrical and mesmerizing image. Look for calm bodies of water such as lakes, ponds, or rivers to capture these stunning reflections.
8. Post-Processing Your iPhone Aurora Photos for Enhanced Results
Can you improve aurora photos with post-processing? Post-processing can significantly enhance your iPhone aurora photos, bringing out details and colors that might be missed in the original shot.
8.1. Recommended Apps for Editing
What are the best apps for editing aurora photos on your iPhone? Several apps offer powerful editing tools for enhancing your aurora photos:
- Adobe Lightroom Mobile: Provides professional-grade editing features, including exposure adjustment, color correction, and noise reduction.
- Snapseed: A free app with a wide range of editing tools, including selective adjustments and filters.
- Darkroom: Offers non-destructive editing and advanced color controls.
8.2. Key Editing Adjustments
Which adjustments make the biggest difference in aurora photos?
- Exposure: Adjust the exposure to brighten or darken the image.
- Contrast: Increase contrast to enhance the definition between light and dark areas.
- Highlights and Shadows: Adjust highlights to recover details in bright areas and shadows to reveal details in dark areas.
- Color Correction: Fine-tune the white balance and color saturation to bring out the natural colors of the aurora.
- Noise Reduction: Reduce noise to improve image clarity, especially in long-exposure shots.
9. Understanding Aurora Activity and Prediction
How do you know when and where to look for the Aurora? Predicting aurora activity requires understanding the science behind the phenomenon and using available resources to forecast potential displays.
9.1. Factors Influencing Aurora Activity
What causes the Northern Lights? The Aurora Borealis is caused by charged particles from the sun interacting with the Earth’s magnetic field. Solar flares and coronal mass ejections (CMEs) can increase aurora activity.
9.2. Resources for Aurora Forecasting
Where can you find reliable aurora forecasts?
- SpaceWeatherLive: Provides real-time data and forecasts of aurora activity.
- NOAA Space Weather Prediction Center: Offers forecasts and alerts for geomagnetic activity.
- Aurora Forecast Apps: Several apps provide notifications and predictions based on your location.
10. Frequently Asked Questions (FAQs) About iPhone Aurora Photography
10.1. Can I really capture the Aurora with my iPhone?
Yes, modern iPhones with Night Mode capabilities can capture the Aurora Borealis with impressive results. The key is to use a tripod, adjust the camera settings properly, and find a location with dark skies.
10.2. What iPhone settings are most important for aurora photography?
The most important settings are Night Mode with the maximum exposure time (usually 30 seconds on a tripod) and adjusting the exposure to prevent over or underexposure.
10.3. Do I need a special app to photograph the Aurora with my iPhone?
No, you can use the native Camera app on your iPhone. However, third-party apps like Adobe Lightroom Mobile and Snapseed can enhance your editing capabilities.
10.4. Is a tripod really necessary for iPhone aurora photography?
Yes, a tripod is essential for keeping your iPhone stable during long exposures, which are required to capture the faint light of the aurora.
10.5. How can I prevent my iPhone battery from dying in the cold?
Keep your iPhone warm by storing it in your pocket, use a protective case, disable unnecessary features, and carry an external battery pack.
10.6. What is the best time of year to see the Northern Lights?
The best time to see the Northern Lights is during the winter months (September to April) when nights are long and dark.
10.7. How far north do I need to travel to see the Aurora?
The aurora is typically visible in high-latitude regions, such as Alaska, Canada, Iceland, Norway, and Finland.
10.8. What should I wear when photographing the Aurora?
Dress warmly in layers, including a hat, gloves, scarf, and insulated boots.
10.9. How can I find dark sky locations near me?
Use the Dark Sky Finder website or app to locate areas with minimal light pollution.
10.10. Can I photograph the Milky Way with my iPhone?
Yes, iPhones 13 Pro and newer models can capture the Milky Way with impressive detail, especially when using long-exposure settings and a tripod.
With these tips and tricks, you’re well-equipped to capture the magic of the Aurora Borealis with your iPhone. For more in-depth tutorials, stunning galleries, and a community of fellow photographers, visit dfphoto.net. Join us and unlock your creative potential, discover new techniques, and share your amazing aurora shots.
Ready to elevate your iPhone photography? Explore dfphoto.net today and start your journey to capturing breathtaking aurora photos. Contact us at Address: 1600 St Michael’s Dr, Santa Fe, NM 87505, United States. Phone: +1 (505) 471-6001. Website: dfphoto.net.