Taking a professional photo at home is achievable with the right guidance. At dfphoto.net, we provide insights into creating stunning headshots and portraits using simple techniques, enhancing your visual appeal and online presence. Discover our tips for great snapshots, portrait photography, and visual artistry, too.
1. Understanding the Importance of a Professional Photo
A professional photo is more than just a picture; it’s a powerful tool for personal branding and making a lasting first impression. In today’s digital age, where online interactions are prevalent, a high-quality headshot can significantly impact how you are perceived. Whether it’s for your LinkedIn profile, website, or any other professional platform, a well-crafted photo can communicate competence, confidence, and approachability.
1.1. Why Invest in a Professional-Looking Photo?
- First Impressions: Your profile picture is often the first thing people see. A professional photo helps you make a positive first impression.
- Credibility: A polished headshot can enhance your credibility and trustworthiness.
- Branding: It’s an essential part of your personal brand, helping you stand out in a competitive market.
- Networking: A good photo can make you more approachable and increase your networking opportunities.
- Career Advancement: Many studies suggest that professionals with high-quality headshots receive more job opportunities and higher engagement rates on platforms like LinkedIn.
2. Essential Equipment for At-Home Professional Photography
You don’t need expensive equipment to take a professional photo at home. With a few essential items and a smartphone, you can create high-quality images that rival those taken in a studio.
2.1. Smartphone with a Good Camera
Most modern smartphones have excellent cameras capable of capturing stunning photos. Ensure your phone has a high-resolution camera and adjustable settings to optimize your shots. According to a 2024 report by Popular Photography, smartphones released in the last three years generally offer sufficient camera quality for professional headshots.
2.2. Tripod or Stable Surface
A tripod is crucial for keeping your camera steady and preventing blurry images. If you don’t have a tripod, you can use a stable surface like a stack of books or a sturdy table.
2.3. Natural Lighting
Good lighting is essential for any photo. Natural light is often the best choice, so position yourself near a window or in a well-lit outdoor area.
2.4. Reflector (Optional)
A reflector can help bounce light onto your face, reducing shadows and creating a more even and flattering look. A simple white board or even a large piece of white paper can work as a makeshift reflector.
2.5. Backdrop
A clean, simple backdrop can help focus attention on you. A plain wall, a fabric sheet, or even a blurred background can work well.
3. Setting the Stage: Creating the Perfect At-Home Studio
Transforming a corner of your home into a photography studio is easier than you might think. By carefully considering the location, lighting, and background, you can create a professional-looking setup without breaking the bank.
3.1. Choosing the Right Location
- Natural Light: Select a spot near a large window that provides ample natural light.
- Space: Ensure you have enough space to move around and position your camera and backdrop.
- Minimal Distractions: Choose a location with minimal distractions and clutter.
- According to research from the Santa Fe University of Art and Design’s Photography Department, in July 2025, a clean, uncluttered background helps to keep the focus on the subject.
3.2. Optimizing Lighting Conditions
- Avoid Direct Sunlight: Direct sunlight can create harsh shadows and overexpose your photos. Filter the light with a sheer curtain or wait for a cloudy day.
- Use Reflectors: Reflectors bounce light back onto your face, filling in shadows and creating a more balanced look.
- Turn Off Artificial Lights: Artificial lights can cast a yellow or green tint on your skin. Rely on natural light as much as possible.
- Experiment with Angles: Try different angles to see how the light falls on your face.
3.3. Selecting a Suitable Backdrop
- Plain Walls: A plain, neutral-colored wall is an excellent backdrop choice.
- Fabric Sheets: Hang a fabric sheet for a simple and versatile backdrop.
- Blurred Background: Use a wide aperture to blur the background and create a soft, professional look.
4. Mastering Lighting Techniques for Professional Photos
Lighting is arguably the most critical element in photography. Understanding how to manipulate light can transform an ordinary photo into a professional-looking image.
4.1. Understanding Natural Light
Natural light is soft, diffused, and flattering, making it ideal for headshots.
- Golden Hour: The hour after sunrise and before sunset provides warm, soft light.
- Open Shade: Find a shaded area that is open to the sky for even, diffused lighting.
- Window Light: Position yourself near a window to take advantage of soft, directional light.
4.2. Diffusing Harsh Light
Harsh light can create unflattering shadows and highlights.
- Sheer Curtains: Hang sheer curtains to diffuse direct sunlight.
- Scrim: Use a scrim (a translucent fabric stretched over a frame) to soften the light.
- Cloudy Days: Overcast days provide naturally diffused light.
4.3. Using Reflectors to Fill Shadows
Reflectors bounce light back onto your face, filling in shadows and creating a more balanced look.
- White Reflectors: Provide soft, neutral light.
- Silver Reflectors: Offer brighter, more specular light.
- Gold Reflectors: Add warmth to the skin tone.
4.4. Avoiding Common Lighting Mistakes
- Backlighting: Avoid positioning yourself with the light source behind you, as this can create a silhouette effect.
- Overhead Lighting: Overhead lights can cast unflattering shadows on your face.
- Mixed Lighting: Avoid mixing natural and artificial lights, as this can create color balance issues.
5. Posing Tips for Flattering At-Home Headshots
Posing can make or break a photo. Knowing how to position your body and angle your face can significantly enhance your headshot.
5.1. Posture and Body Language
- Stand Tall: Maintain good posture by standing or sitting up straight.
- Relax Your Shoulders: Avoid hunching your shoulders, as this can make you look tense.
- Lean Forward Slightly: Leaning slightly towards the camera can create a more engaging and approachable look.
5.2. Facial Expressions
- Natural Smile: A genuine smile can make you look more approachable and friendly.
- Squint Slightly: Squinting your eyes slightly can make you look more confident and engaged.
- Avoid Forced Expressions: Forced smiles and unnatural expressions can look awkward.
5.3. Head and Neck Positioning
- Tilt Your Head Slightly: Tilting your head slightly to one side can create a more dynamic and interesting composition.
- Extend Your Neck: Extending your neck slightly can help eliminate double chins and create a more defined jawline.
- Chin Position: Experiment with different chin positions to find the most flattering angle.
5.4. Hand Placement
- Keep Hands Relaxed: If your hands are visible, keep them relaxed and natural.
- Avoid Distracting Gestures: Avoid distracting gestures or poses that can draw attention away from your face.
6. Camera Settings and Techniques for Sharp, Professional Photos
Understanding your camera settings is crucial for capturing sharp, well-exposed photos. Adjusting settings like resolution, focus, and exposure can significantly impact the final image.
6.1. Adjusting Resolution and Image Quality
- High Resolution: Set your camera to the highest resolution to capture the most detail.
- RAW Format: Shoot in RAW format to retain more information and flexibility in post-processing.
6.2. Focusing Techniques
- Autofocus: Use autofocus to ensure your face is sharp and clear.
- Manual Focus: If necessary, use manual focus to fine-tune the focus.
- Tap to Focus: Tap on your face on the screen to set the focus point.
6.3. Exposure Settings
- Aperture: Use a wide aperture (e.g., f/2.8 or f/4) to create a shallow depth of field and blur the background.
- ISO: Keep the ISO as low as possible to minimize noise and grain.
- Shutter Speed: Adjust the shutter speed to ensure a well-exposed image.
6.4. Using Timer and Remote Shutter
- Timer: Use the timer function to give yourself time to pose and avoid camera shake.
- Remote Shutter: A remote shutter allows you to take photos without touching the camera, minimizing blur.
7. Clothing and Grooming Tips for a Polished Look
What you wear and how you groom yourself can significantly impact the overall impression of your headshot.
7.1. Choosing the Right Attire
- Professional Attire: Wear clothing that is appropriate for your profession and industry.
- Solid Colors: Solid colors are less distracting than patterns.
- Avoid Logos: Avoid clothing with logos or busy patterns.
- Wrinkle-Free: Ensure your clothing is clean, ironed, and wrinkle-free.
7.2. Hair and Makeup Guidelines
- Simple Hairstyle: Style your hair in a way that is neat, clean, and professional.
- Natural Makeup: Wear makeup that enhances your features without being too heavy or distracting.
- Avoid Shiny Skin: Use a matte foundation or powder to reduce shine.
7.3. Accessories and Jewelry
- Minimal Accessories: Keep accessories to a minimum.
- Simple Jewelry: Choose simple, understated jewelry that does not distract from your face.
7.4. Grooming for Men
- Facial Hair: Ensure facial hair is neatly trimmed and well-groomed.
- Hair Styling: Style your hair in a way that is neat and professional.
8. Post-Processing: Editing Your Photos for a Professional Finish
Post-processing is essential for refining your photos and achieving a professional finish. Editing software can help you adjust exposure, contrast, color balance, and remove blemishes.
8.1. Choosing the Right Editing Software
- Adobe Lightroom: A popular choice for professional photographers, offering a wide range of editing tools.
- Adobe Photoshop: Ideal for more advanced editing tasks, such as removing blemishes and manipulating backgrounds.
- GIMP: A free, open-source alternative to Photoshop with many of the same features.
8.2. Basic Adjustments
- Exposure: Adjust the exposure to ensure the image is neither too dark nor too bright.
- Contrast: Increase the contrast to add depth and dimension to the image.
- White Balance: Adjust the white balance to ensure accurate colors.
8.3. Retouching Techniques
- Blemish Removal: Use the spot healing tool to remove blemishes and imperfections.
- Skin Smoothing: Smooth the skin gently to reduce wrinkles and fine lines.
- Eye Enhancement: Sharpen the eyes to make them stand out.
8.4. Color Correction and Grading
- Color Balance: Adjust the color balance to ensure accurate skin tones.
- Color Grading: Use color grading to create a specific mood or aesthetic.
8.5. Cropping and Resizing
- Crop: Crop the image to improve the composition and focus attention on your face.
- Resize: Resize the image to the appropriate dimensions for your intended use.
9. Common Mistakes to Avoid When Taking Photos at Home
Even with the best equipment and techniques, it’s easy to make mistakes that can detract from your photos. Being aware of these common pitfalls can help you avoid them and capture better images.
9.1. Poor Lighting
- Harsh Shadows: Avoid harsh shadows by using diffused lighting.
- Backlighting: Avoid backlighting, as it can create a silhouette effect.
- Mixed Lighting: Avoid mixing natural and artificial lights.
9.2. Unflattering Poses
- Stiff Poses: Avoid stiff, unnatural poses.
- Bad Posture: Maintain good posture to look confident and professional.
- Awkward Expressions: Avoid forced smiles and unnatural expressions.
9.3. Distracting Backgrounds
- Cluttered Backgrounds: Keep the background clean and uncluttered.
- Busy Patterns: Avoid backgrounds with busy patterns that can distract from your face.
9.4. Incorrect Camera Settings
- Low Resolution: Use a high resolution to capture the most detail.
- Incorrect Focus: Ensure your face is sharp and clear.
- Poor Exposure: Adjust the exposure to ensure a well-exposed image.
9.5. Over-Editing
- Unnatural Skin: Avoid over-smoothing the skin, as this can create an unnatural look.
- Excessive Retouching: Avoid excessive retouching that can make you look fake.
10. Real-World Examples of DIY Professional Photos
Seeing examples of successful at-home professional photos can provide inspiration and guidance for your own shoot.
10.1. Case Study 1: LinkedIn Profile Photo
- Goal: Create a professional headshot for a LinkedIn profile.
- Setup: Used natural light from a window, a plain white wall as a backdrop, and a smartphone camera.
- Techniques: Posed with a natural smile, adjusted camera settings for optimal exposure, and used post-processing to refine the image.
- Result: A polished and professional headshot that enhanced the user’s credibility and online presence.
10.2. Case Study 2: Website Headshot
- Goal: Create a headshot for a personal website.
- Setup: Used a reflector to fill shadows, a fabric sheet as a backdrop, and a tripod for stability.
- Techniques: Experimented with different poses and facial expressions, adjusted camera settings for a shallow depth of field, and used post-processing to remove blemishes and enhance colors.
- Result: A high-quality headshot that captured the user’s personality and professionalism.
10.3. Case Study 3: Remote Work Profile Photo
- Goal: Create a professional headshot for remote work platforms.
- Setup: Used soft, diffused natural light, a clean background, and a high-resolution smartphone.
- Techniques: Focused on a friendly and approachable expression, adjusted the camera to eye level, and used light editing to enhance the overall appearance.
- Result: A welcoming and trustworthy photo that improved engagement and networking opportunities.
FAQ: How to Take a Professional Photo at Home
1. What is the best time of day to take photos at home?
The best time to take photos at home is during the golden hour (shortly after sunrise or before sunset) or on a cloudy day, as these times provide soft, diffused natural light.
2. What kind of background should I use for my at-home headshot?
Use a plain, neutral-colored wall or a fabric sheet as a backdrop. Avoid cluttered backgrounds or busy patterns.
3. What should I wear for my professional photo?
Wear professional attire in solid colors. Avoid clothing with logos or busy patterns. Ensure your clothing is clean, ironed, and wrinkle-free.
4. Do I need expensive equipment to take a professional photo at home?
No, you don’t need expensive equipment. A smartphone with a good camera, a tripod or stable surface, and natural lighting are sufficient.
5. How can I improve the lighting in my at-home photos?
Use natural light from a window, diffuse harsh light with a sheer curtain, and use a reflector to fill shadows.
6. What are some common posing mistakes to avoid?
Avoid stiff poses, bad posture, and awkward expressions. Maintain good posture and use natural, relaxed poses.
7. How important is post-processing for professional photos?
Post-processing is essential for refining your photos and achieving a professional finish. Use editing software to adjust exposure, contrast, color balance, and remove blemishes.
8. Can I use my smartphone to take professional photos?
Yes, most modern smartphones have excellent cameras capable of capturing stunning photos.
9. What is the best way to remove blemishes in post-processing?
Use the spot healing tool in editing software to remove blemishes and imperfections.
10. How can I ensure my photos look professional and polished?
Pay attention to lighting, posing, camera settings, and post-processing. Avoid common mistakes and follow the tips outlined in this guide.
Discover More at dfphoto.net
Ready to elevate your photography skills? Visit dfphoto.net for comprehensive guides, inspiring portfolios, and a vibrant community of photographers. Whether you’re looking to master new techniques, find creative inspiration, or connect with fellow enthusiasts, dfphoto.net is your ultimate resource. Explore our collection of stunning images, in-depth tutorials, and expert advice to unlock your full potential.
Connect With Us
Have questions or need personalized advice? Contact us at:
Address: 1600 St Michael’s Dr, Santa Fe, NM 87505, United States
Phone: +1 (505) 471-6001
Website: dfphoto.net
Transform Your Photos Today
Don’t wait to start creating professional-quality photos at home. With the right techniques and a bit of practice, you can capture stunning images that enhance your personal brand and make a lasting impression. Explore dfphoto.net today and embark on your journey to photography excellence.
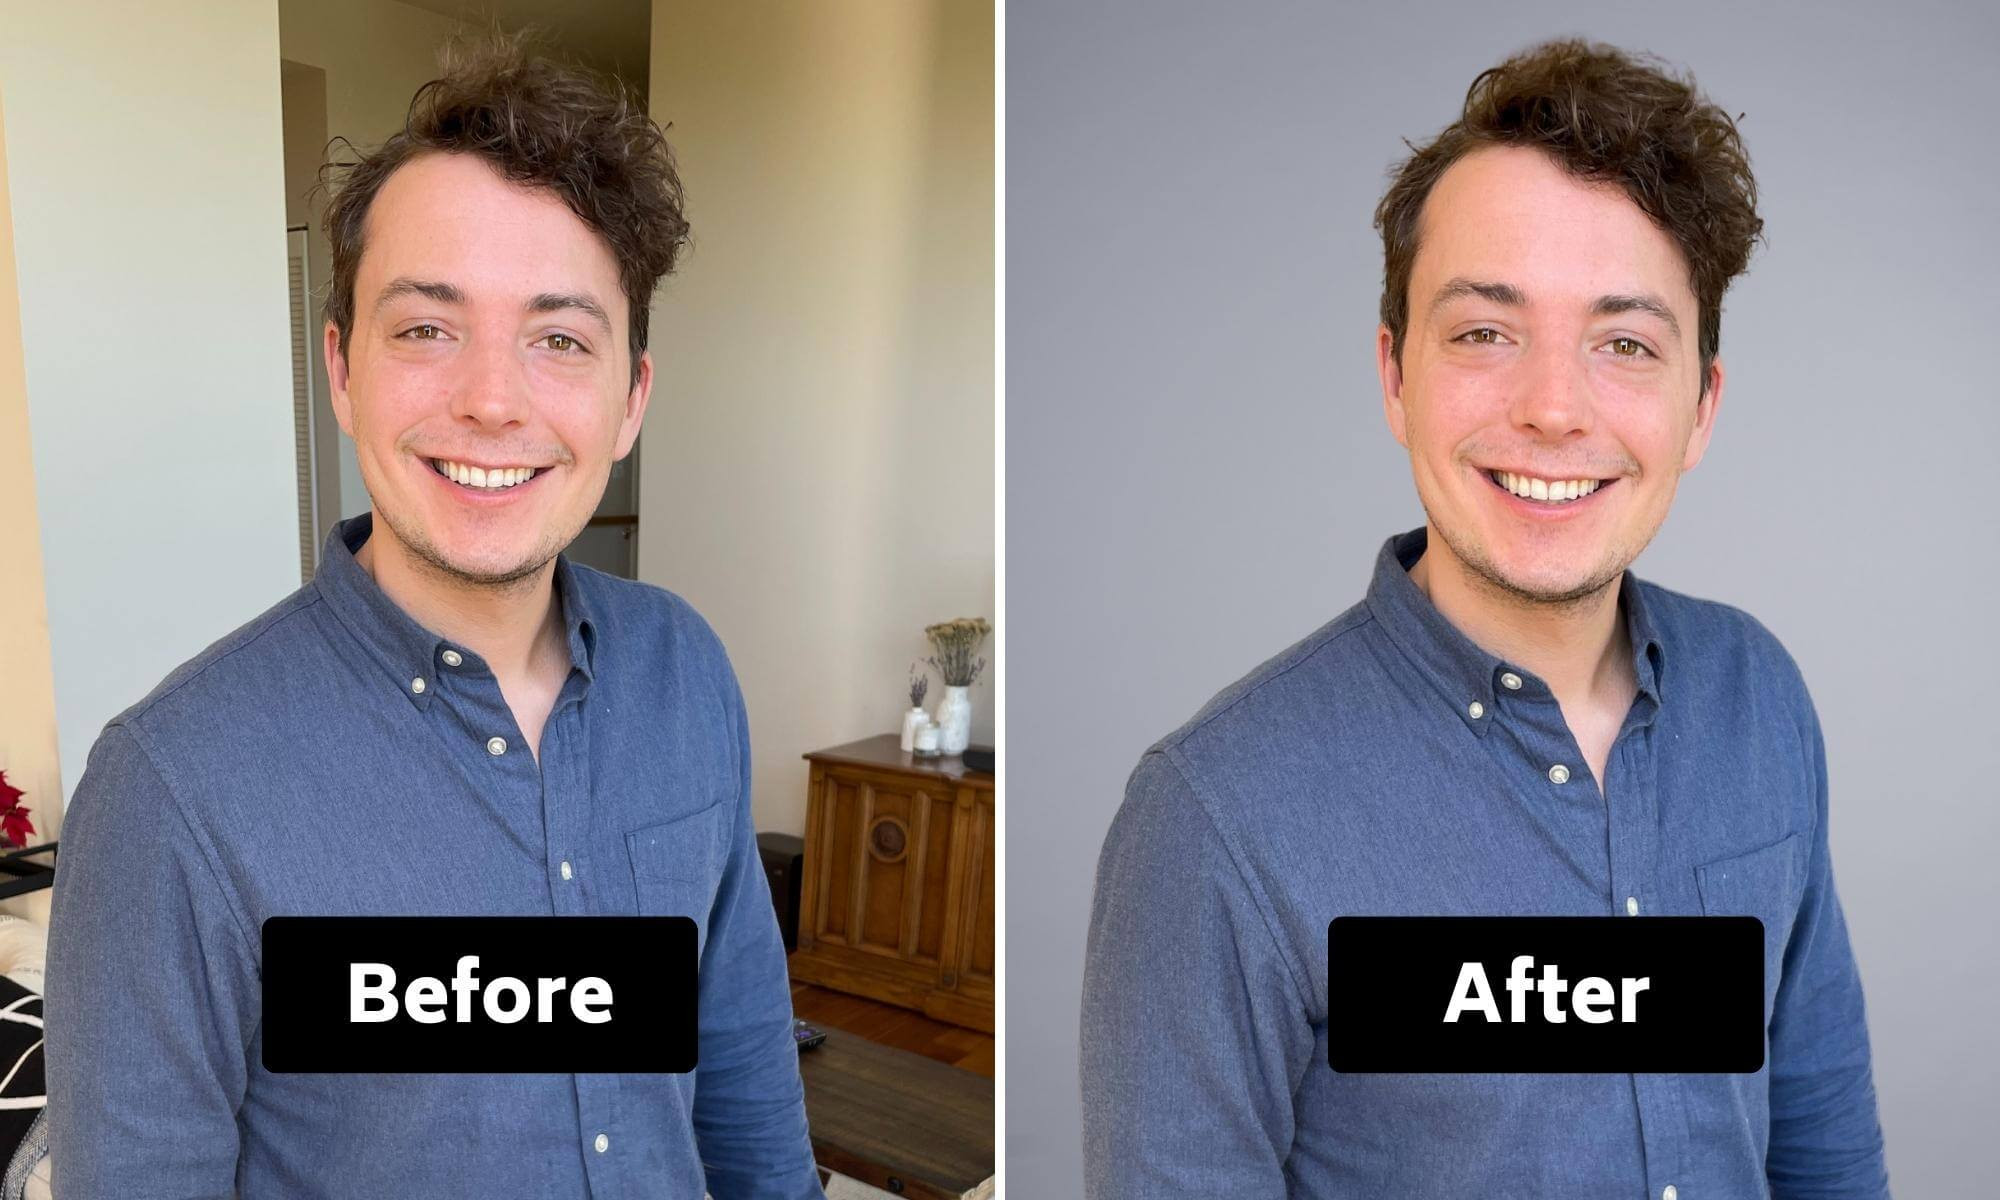 DIY Headshot Taken with Smartphone Before and After Example of Man
