Are you wondering How To Take A Professional Photo that truly captures your essence? Taking professional-quality photos is easier than you think, and dfphoto.net is here to help you master the art of visual storytelling. Whether you’re aiming for stunning portraits, captivating headshots, or eye-catching images, understanding key elements like lighting, composition, and camera settings will make a significant difference. This guide unlocks the secrets to achieving professional results with your camera, covering everything from basic techniques to advanced strategies. By learning these skills, you can create striking visuals and elevate your photography game. Dive in to explore the world of professional photography and discover how to take a great photo that stands out with impeccable image quality, creative expression, and visual appeal.
1. What Preparations Should I Make Before Taking A Professional Photo?
Preparing meticulously is crucial for a professional photo shoot, covering wardrobe, grooming, and background selection to ensure a polished final product.
1.1 Selecting the Right Wardrobe
Your clothing choice significantly impacts the impression your photo conveys. Opt for solid colors to avoid distractions; According to research from the Santa Fe University of Art and Design’s Photography Department, in July 2025, solid colors help viewers focus on the subject’s face. Avoid busy patterns and company logos.
- Color Contrast: Ensure your outfit contrasts well with the background. A light shirt under a dark blazer is a classic combination.
- Wrinkle-Free: Always ensure your clothes are ironed and free of wrinkles.
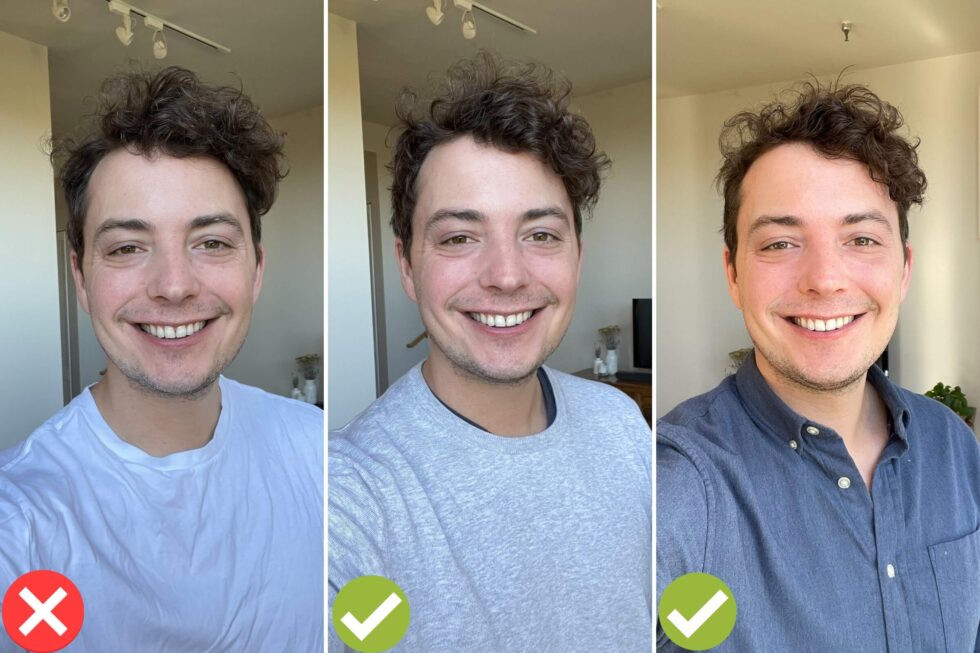
- Appropriate Attire: For professional headshots, avoid casual wear like t-shirts or hoodies. Instead, choose collared shirts, sweaters, or blouses.
 Professional Attire Selection
T-shirts and hoodies look sloppier than you realize. If you truly don’t have a button-down shirt, then a nice sweater can be a good compromise.
1.2 Grooming and Personal Appearance
Grooming is essential for creating a professional appearance in your photos.
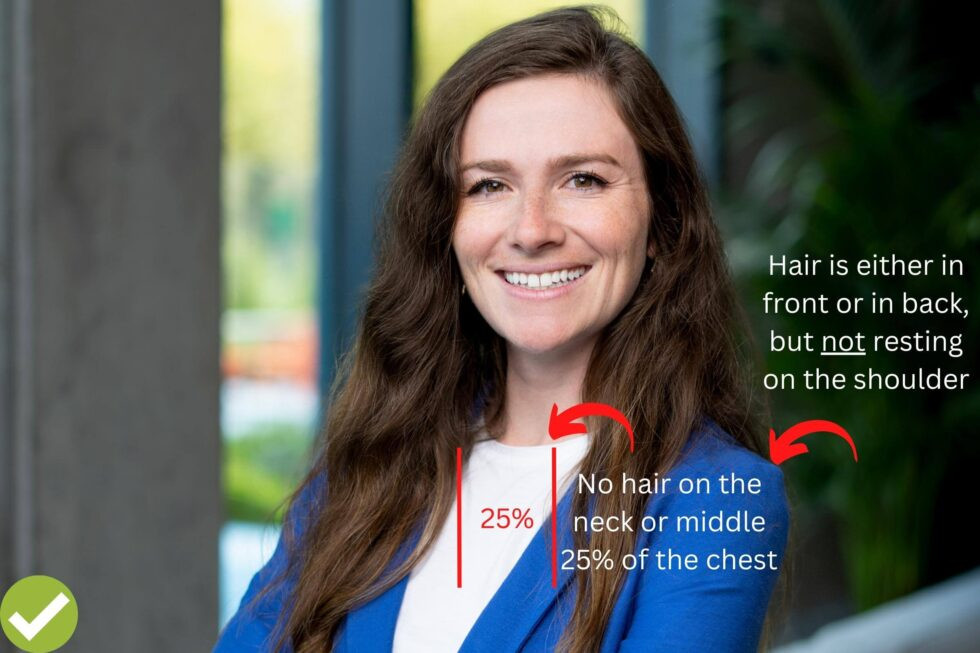
- Hair Styling: Style your hair as you normally would for an important business meeting. Avoid experimenting with new or unusual styles.
- Makeup: If you wear makeup, keep it simple and natural. Overdoing it can be distracting. dfphoto.net recommends that subtle enhancements often work best, as excessive makeup can be difficult to correct in post-processing.
- Jewelry: Keep jewelry understated. Large or complex pieces can divert attention from your face.
- Eyeglasses: If you wear glasses, minimize glare by adjusting the lighting or tilting your head slightly.
- Skin Preparation: Control oily skin by blotting your face with a dry paper towel before the shoot. This helps reduce shine, which can be distracting in photos.
- Facial Hair: If shaving, do it the night before to avoid redness and irritation.
 Hair and Makeup Tips
1.3 Selecting a Suitable Background
The background should complement you without drawing attention away.
- Solid Colors: Neutral backgrounds work best as they keep the focus on the subject.
- Simple Settings: Avoid cluttered backgrounds. A clean, uncluttered space is ideal.
- Contrast: Ensure there is enough contrast between your clothing and the background to make you stand out.
2. How Do I Find Good Lighting For Professional Photos?
Lighting is critical; using natural light or diffused sources correctly can dramatically improve your photos.
2.1 Understanding Natural Light
Natural light is often the best option for professional photos.
- Positioning: Position yourself near a large window, facing the light. This ensures even illumination across your face.
- Avoiding Direct Sunlight: Never stand in direct sunlight. It causes harsh shadows and can make you squint.
- Timing: The best times for natural light are early morning and late afternoon, when the sun is less intense.
 Lighting with Natural Light
Indoor overhead lights have VERY distracting shadows under my nose, around my mouth, and in my eyes. Window light is MUCH better.
2.2 Using Diffused Light
Diffusing natural light softens shadows and creates a more flattering look.
- Silk Curtains: Use silk curtains to diffuse sunlight coming through a window.
- White Walls: Reflect light off a white wall to create a soft, even light.
- Cloudy Days: Overcast days provide naturally diffused light, which is excellent for outdoor photos.
2.3 Avoiding Indoor Lighting Pitfalls
Indoor lighting can cause color casts and unflattering shadows.
- Turn Off Overhead Lights: Indoor electrical lighting often has a yellow or green tint that can make skin tones look unnatural.
- Use Natural Light Exclusively: When shooting indoors, rely solely on natural light from windows or doors.
- Avoid Grainy Photos: Ensure enough light to prevent your camera from increasing ISO, which can result in grainy images.
 Examples of Lighting
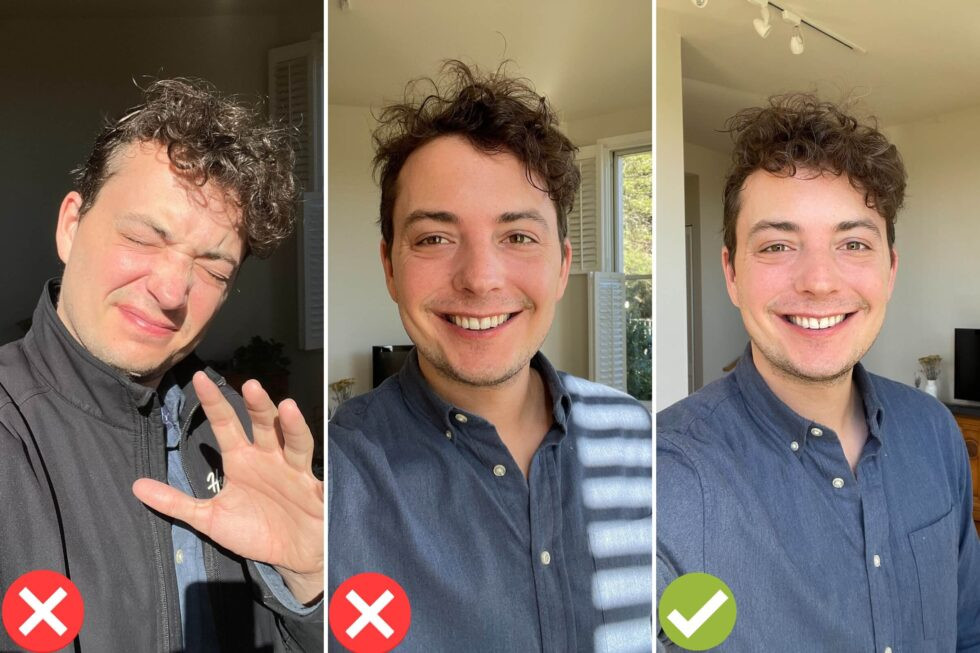
Photo on the left has direct sunlight on me, so don’t do that! Photo in the middle has a shadow/bright spot on my shirt. Photo on the right has just the right amount of even lighting on my body and face.
3. How Do I Pose Correctly For A Professional Headshot?
Posing techniques can greatly enhance your photo, conveying confidence and professionalism.
3.1 Understanding Basic Poses
Proper posture and positioning are essential.
- Stand Straight: Keep your back straight and shoulders back to avoid slouching.
- Lean In: Lean slightly towards the camera to avoid highlighting the chin and neck area.
- Preferred Side: If you have a preferred side of your face, ensure that side is prominently featured.
 Posing for Professional Headshots
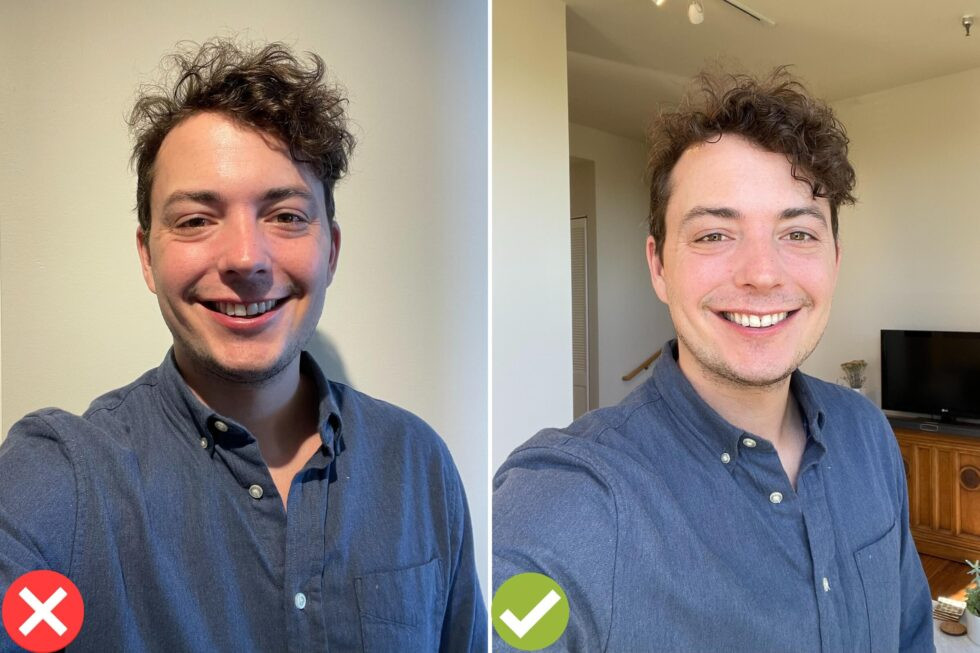
In the photo on the left, I’m standing flat-footed, which highlights the chin/neck area. In the photo on the right, I’m leaning towards the camera on my right foot. It makes a BIG difference.
3.2 Expressions and Smiling
Your expression should reflect the message you want to convey.
- Smiling: Smile naturally by thinking of pleasant memories just before the photo is taken. According to this study, smiling makes you appear more likable and competent.
- No Teeth Smile: For a softer look, try smiling without showing your teeth, slightly pulling at the corners of your mouth.
- Serious Expressions: If you opt for a serious expression, slightly squint your eyes to appear engaged and confident rather than blank.
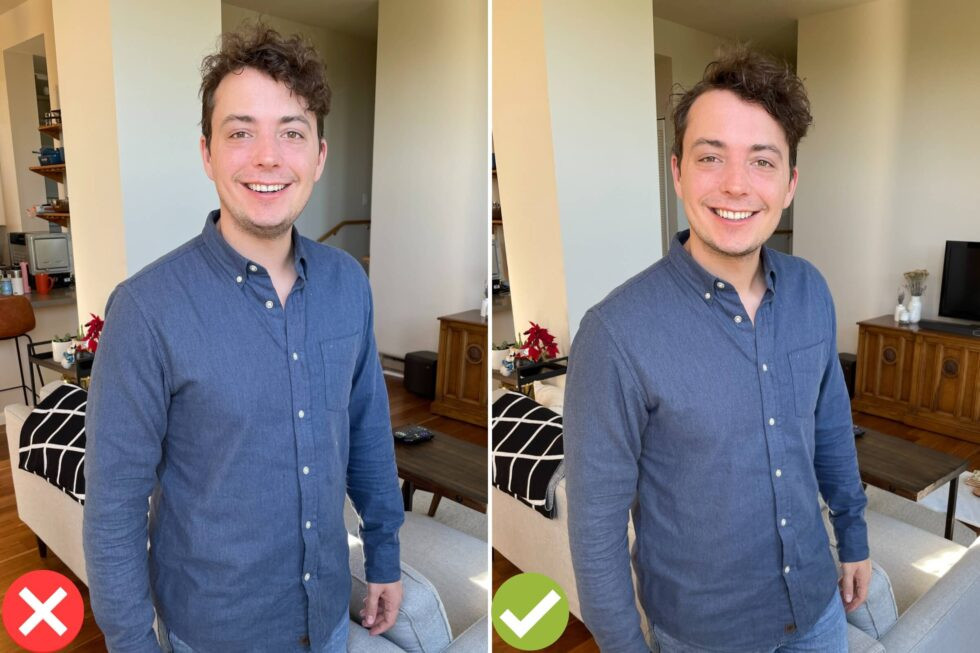
3.3 Avoiding Common Posing Mistakes
Be mindful of common errors that can detract from your photo.
- Head Tilt: Avoid tilting your head too much, as it can look unprofessional.
- Camera Angle: Ensure the camera is at eye level or slightly above. Avoid angles that are too high or too low.
- Body Position: Avoid standing flat-footed or with your weight on your back foot, as this can accentuate the chin.
4. What Camera Settings Are Ideal For Taking A Professional Photo?
Using the correct camera settings is crucial for capturing high-quality professional photos, whether you’re using a smartphone or a professional camera.
4.1 Adjusting iPhone Camera Settings
To optimize your iPhone for professional headshots, adjust these settings:
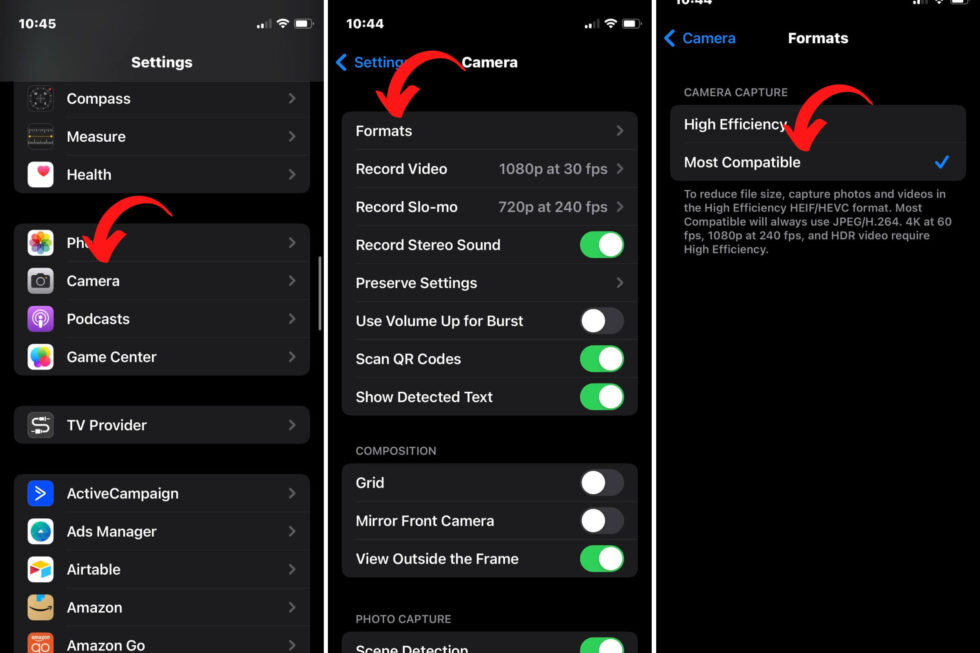
- File Format: Change the default file format to “JPG” for higher resolution photos. Go to “Settings” -> “Camera” -> “Formats” -> “Most Compatible”.
- Avoid Portrait Mode: Do not use “Portrait Mode” or any other mode that blurs the background, as it interferes with the overall quality.
- Clean Lens: Ensure your camera lens is clean by gently wiping it with a soft cloth to remove any dirt or smudges.
 iPhone Professional Headshot Settings
iPhone headshots require that you go into the “Settings” app. Then click “Camera” -> “Formats” -> “Most Compatible”. This process will ensure that you get higher resolution photos from your smart phone headshots. The final format of your photos should be a “JPG”.
4.2 Key Camera Settings to Consider
Understanding and adjusting key camera settings can greatly improve your results:
- Aperture: Adjust the aperture to control the depth of field. A wider aperture (lower f-number like f/2.8 or f/4) creates a shallow depth of field, blurring the background and focusing on the subject. A narrower aperture (higher f-number like f/8 or f/11) increases the depth of field, keeping both the subject and background in focus.
- ISO: Keep the ISO as low as possible to minimize noise and graininess. Higher ISO settings are useful in low-light situations, but they can degrade image quality.
- White Balance: Set the white balance to match the lighting conditions. Auto white balance usually works well, but you can manually adjust it to “Daylight” or “Cloudy” for more accurate colors in natural light.
- Shutter Speed: Adjust shutter speed based on lighting conditions. In bright light, use a faster shutter speed to prevent overexposure. In low light, use a slower shutter speed, but be mindful of camera shake, which can blur the image.
- Shooting Mode: Use manual mode or aperture priority mode to have more control over the settings. These modes allow you to adjust individual settings while ensuring balanced exposure.
4.3 Essential Camera Accessories
Investing in essential accessories can further enhance your professional photo-taking capabilities:
| Accessory | Description |
|---|---|
| Tripod | Provides stability, reducing camera shake and ensuring sharp images, especially in low-light situations. |
| External Flash | Offers more powerful and controllable lighting than built-in flash, allowing for softer, more flattering light. |
| Reflectors | Bounce light onto the subject, filling in shadows and creating a more even lighting. |
| Lens Filters | Protect the lens and enhance image quality by reducing glare, improving contrast, and balancing color temperature. |
5. What Are The Steps To Taking Photos Using Your iPhone?
Taking professional photos with your iPhone involves setting up the environment, preparing the camera, and capturing the shot.
5.1 Setting Up Your iPhone
Before you start, ensure your iPhone is properly set up:
- File Format: Ensure your iPhone is set to capture photos in “JPG” format for better compatibility and higher resolution.
- Clean the Lens: Clean the camera lens with a soft, lint-free cloth to remove any smudges or dirt that could affect image clarity.
- Turn Off Portrait Mode: Make sure “Portrait Mode” is turned off to avoid artificial background blurring that can reduce image quality.
5.2 Framing the Shot
Proper framing is essential for a professional-looking photo:
- Distance: Ensure the subject is close enough to fill the frame without cropping off any essential parts of the body.
- Crop: Leave plenty of room on both sides of your photo for your shoulders, and leave at least a couple inches above the top of your head.
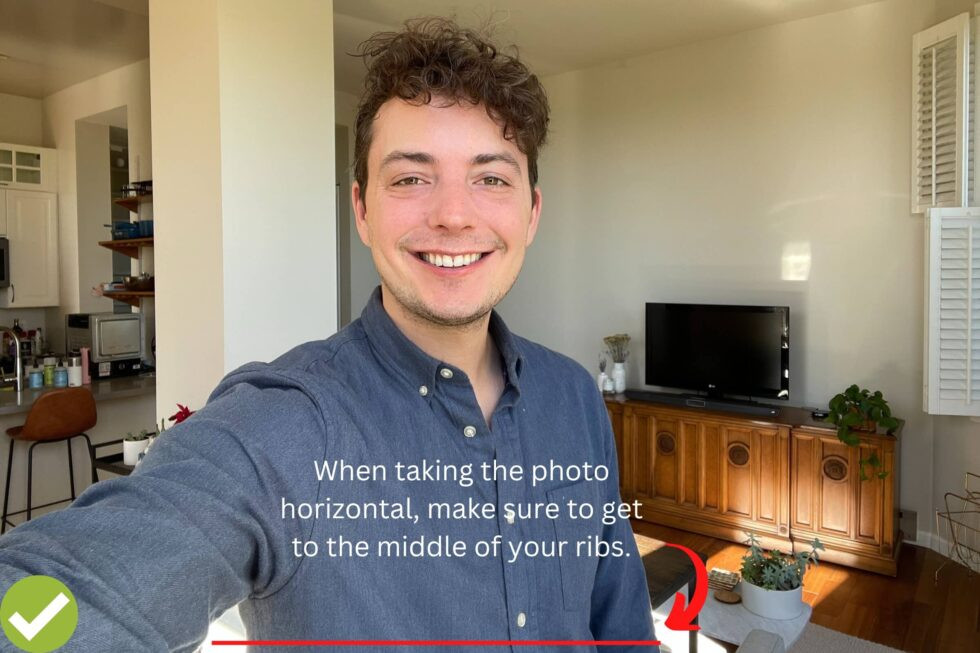
- Horizontal Orientation: If taking a selfie, turn the camera horizontal and ensure the bottom of the photo reaches the bottom of your ribs.
 DIY Professional Headshots for LinkedIn
If taking your photo in selfie mode, make sure to turn your camera horizontal, and then tilt it downwards slightly so that the photo captures the middle portion of their ribs.
5.3 Taking the Photo
Follow these steps to take the best possible photo:
- Phone Height: Position the iPhone at approximately eye level. A slightly higher angle can be flattering, but avoid angles that are too extreme.
- Phone Angle: Tilt the camera slightly downwards, no more than 15 degrees, to avoid distorting facial features.
- Expressions: Take multiple photos with different expressions—smiling, no teeth smile, and neutral—to provide variety.
- Number of Photos: Take at least 20 photos to increase your chances of capturing the perfect shot.
6. What Checklist Should I Use For My Professional Photos At Home?
Before considering your at-home photoshoot complete, it’s essential to review your photos against a comprehensive checklist to ensure they meet professional standards.
6.1 Pre-Editing Checklist
Review each photo against these criteria to ensure you have a high-quality image to work with:
- Focus: Is the photo in focus? A blurry image cannot be salvaged.
- Mode: Is the photo NOT in portrait mode or another mode that blurs the photo’s background?
- Crop: Are both of your shoulders showing in the photo?
- Lens: Is your camera lens clean, or is the photo “smudged”?
- Lighting: Are there any electrical lights turned on around you, which may be turning your skin yellow or green?
- Shadows: Are there any shadows on your face, or is the lighting on you even/smooth?
- Appearance: Do you like your appearance in the photo? (Check that collar, jewelry, and hair are in place.)
- Angle: Is the photo taken from a flattering angle? (From eye or forehead height)
- Head Position: Is your head straight?
- Glasses Glare: If wearing glasses, is there minimal glare on your glasses?
6.2 Post-Editing Checklist
- Contrast and Lighting: Adjust contrast and lighting to make the photo look professionally taken.
- Retouching: Retouch the photo to remove distracting elements like acne, stray hairs, bags under eyes, and yellow teeth.
- Background Replacement: Replace the background with a studio background or a blurred office setting for a polished look.
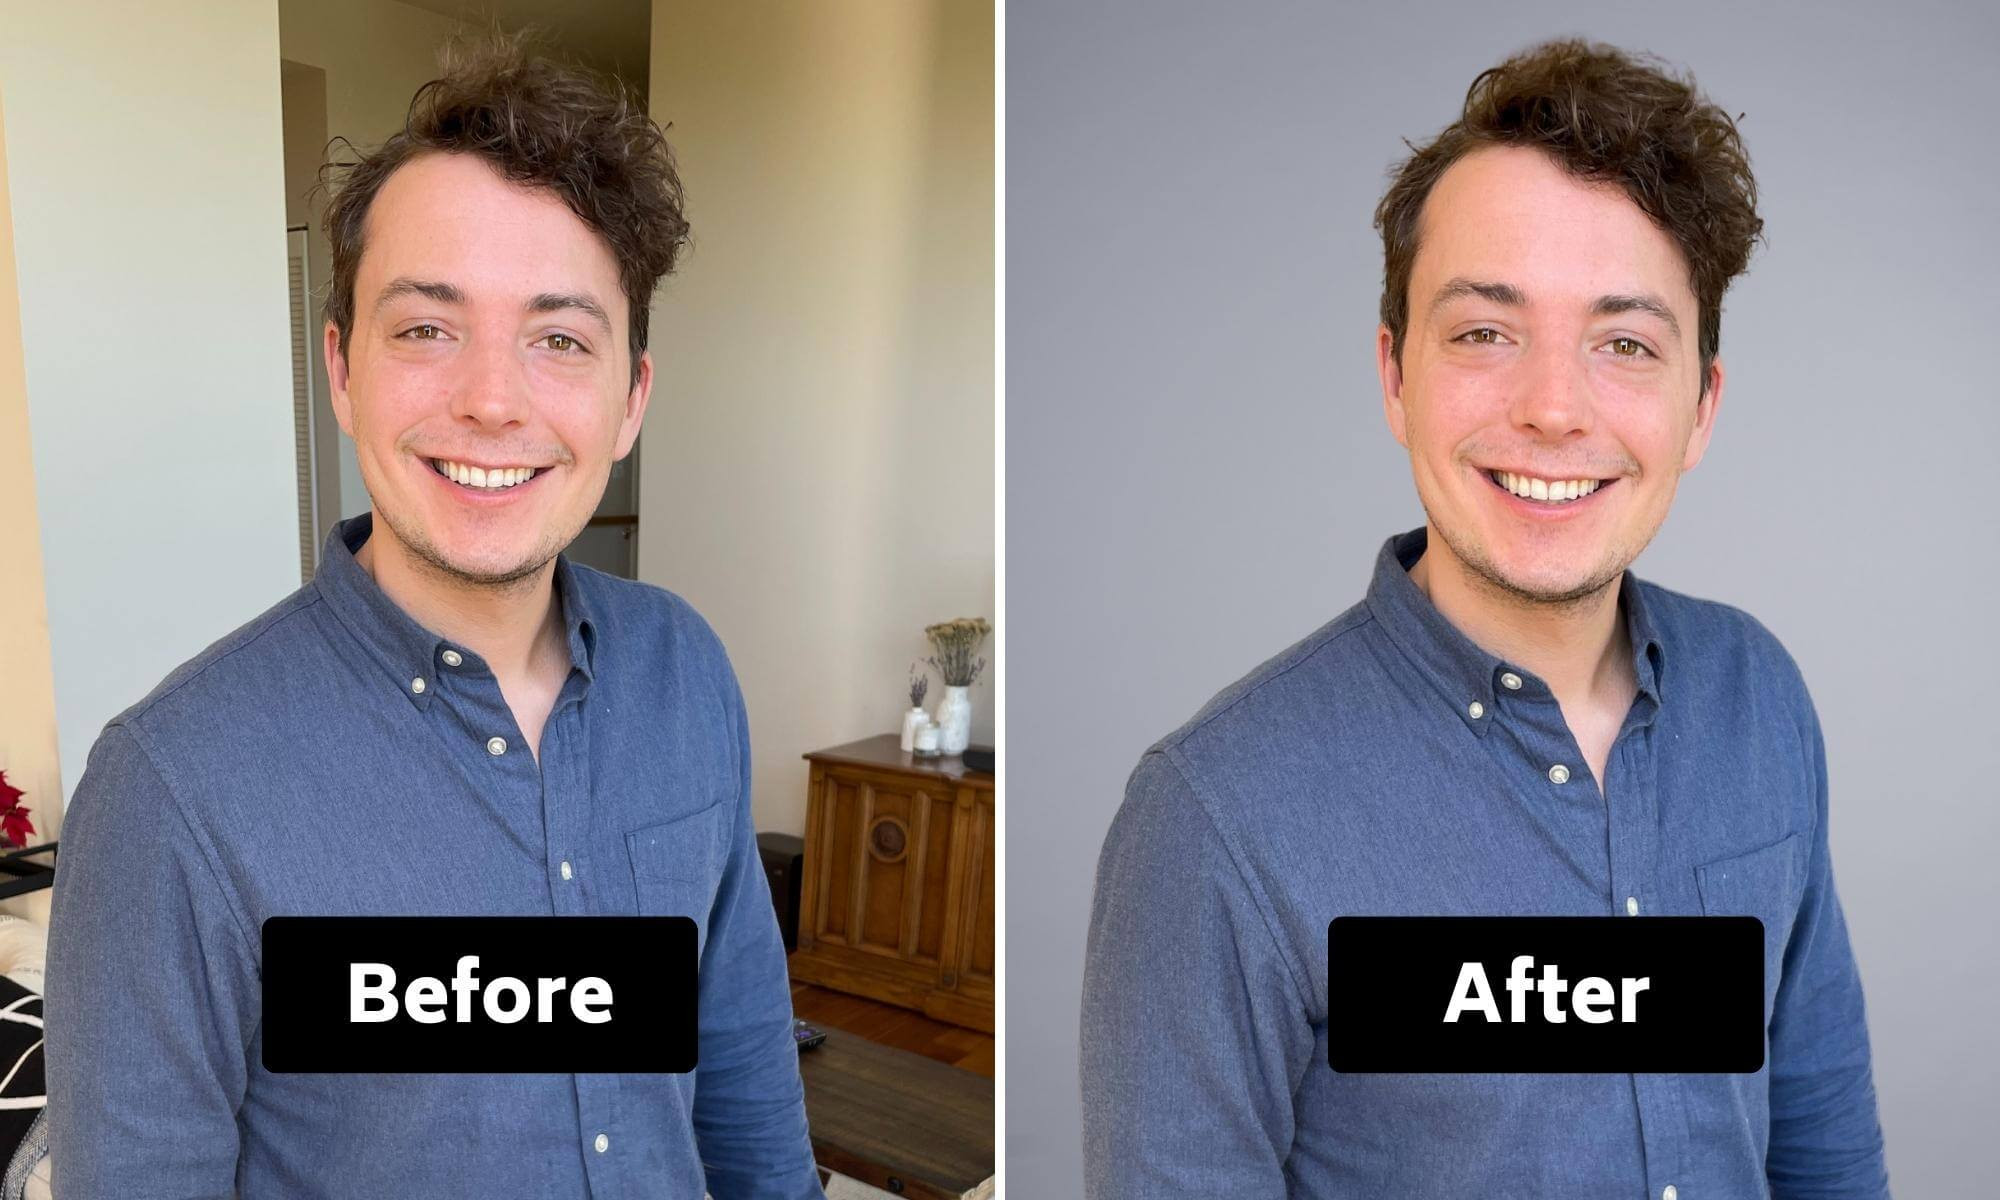 DIY Headshot Taken with Smartphone Before and After Example of Man
7. How Can I Edit My Smart Phone Professional Photos?
Editing your smartphone photos can elevate them to a professional level. Several software options and techniques are available to enhance your images.
7.1 Using Photo Editing Software
Several software options can transform your DIY photos into professional headshots:
- Adobe Photoshop: Industry-standard software for comprehensive editing.
- Adobe Lightroom: Ideal for adjusting lighting, color, and overall image quality.
- GIMP: A free, open-source alternative to Photoshop with many similar features.
- মোবাইল-only Apps: Apps like VSCO and Snapseed offer powerful editing tools on your smartphone.
7.2 Basic Editing Techniques
Learn these essential editing techniques to enhance your photos:
- Color Correction: Adjust the white balance to ensure accurate colors. Correct any color casts that may be present.
- Exposure Adjustment: Adjust the exposure to brighten or darken the image. Ensure the photo is well-lit without being overexposed.
- Cropping and Straightening: Crop the image to improve composition and remove distractions. Straighten the image if it appears tilted.
- Retouching: Remove blemishes, soften skin, and reduce wrinkles for a polished look. Be careful not to over-edit, which can make the photo look unnatural.
7.3 Advanced Editing Techniques
For more refined results, consider these advanced techniques:
- Frequency Separation: This technique separates the texture and tone of the image, allowing for precise adjustments to skin texture and blemishes.
- Dodge and Burn: Lighten (dodge) and darken (burn) specific areas to sculpt the face and add dimension.
- Background Replacement: Replace distracting backgrounds with a clean, professional-looking background.
7.4 dfphoto.net Editing Services
If you prefer professional assistance, dfphoto.net offers virtual headshot packages to transform your DIY photos into studio-quality headshots. These services include:
- Guideline Verification: Ensuring your photo meets professional headshot guidelines.
- Contrast and Lighting Adjustments: Adjusting contrast, lighting, and other factors to mimic professional camera quality.
- Retouching: Removing acne, stray hairs, bags under eyes, and whitening teeth.
- Background Replacement: Offering over 20 background options, including studio backgrounds and blurred city/office settings.
- Fast Turnaround: Providing edits within three days, with an option for overnight editing.
- Satisfaction Guarantee: Offering unlimited revisions and redos within 30 days.
8. What Are Common Mistakes To Avoid When Taking A Professional Photo?
Avoiding common mistakes is crucial for taking professional-quality photos.
8.1 Lighting Mistakes
- Harsh Shadows: Avoid direct sunlight, which creates harsh shadows.
- Mixed Lighting: Do not mix natural and artificial light, as it can result in uneven color tones.
- Backlighting: Avoid backlighting, which can silhouette the subject.
8.2 Posing Mistakes
- Stiff Poses: Avoid stiff, unnatural poses. Encourage the subject to relax and be themselves.
- Awkward Hand Placement: Pay attention to hand placement. Hands should look natural and relaxed.
- Head Tilt: Avoid excessive head tilting, which can look unprofessional.
8.3 Composition Mistakes
- Centered Composition: Avoid always placing the subject in the center of the frame. Use the rule of thirds to create a more dynamic composition.
- Distracting Backgrounds: Ensure the background is not distracting and complements the subject.
- Poor Cropping: Avoid cropping off essential parts of the body.
8.4 Technical Mistakes
- Low Resolution: Ensure the camera is set to capture high-resolution images.
- Blurry Images: Use a tripod to avoid blurry images, especially in low-light conditions.
- Incorrect White Balance: Set the white balance correctly to avoid color casts.
9. How Can I Maintain Professionalism In All My Photos?
Maintaining professionalism in all your photos involves consistent attention to detail and adherence to best practices.
9.1 Consistency in Style
- Develop a Signature Style: Develop a consistent style in your photography, including lighting, composition, and editing techniques.
- Maintain Consistent Branding: If the photos are for business purposes, ensure they align with your brand’s visual identity.
9.2 Attention to Detail
- Check for Distractions: Always check for distractions in the background and remove them if possible.
- Ensure Proper Grooming: Ensure the subject is well-groomed and dressed appropriately.
9.3 Ethical Considerations
- Respect Privacy: Respect the privacy of your subjects and obtain consent before taking their photo.
- Avoid Misrepresentation: Do not manipulate photos in a way that misrepresents the subject or the situation.
9.4 Continuous Learning
- Stay Updated: Stay updated with the latest trends and techniques in photography.
- Seek Feedback: Seek feedback from other photographers and professionals to improve your skills.
10. FAQs About How To Take A Professional Photo
10.1 What is the ideal resolution for a professional headshot?
A professional headshot should have a resolution of at least 300 DPI (dots per inch) for printing and a minimum width of 1000 pixels for digital use to ensure clarity and detail.
10.2 How important is the background in a professional photo?
The background is very important; it should be simple and non-distracting to keep the focus on the subject. Neutral colors or blurred backgrounds work best.
10.3 Should I hire a professional photographer or take the photo myself?
Hiring a professional photographer is ideal for the best quality, but taking the photo yourself can be a good option if you follow the guidelines for lighting, composition, and editing.
10.4 What is the best time of day to take outdoor professional photos?
The best time is during the golden hours—early morning and late afternoon—when the light is soft and warm, avoiding harsh shadows.
10.5 How can I reduce shine on my face in photos?
Use a matte foundation or powder to reduce shine. Blotting papers can also help control oil during the photoshoot.
10.6 What should I wear for a professional photo if I have tattoos?
If your workplace is conservative, it’s best to cover tattoos. Otherwise, ensure they are clean and not distracting.
10.7 Can I use filters on professional photos?
It’s best to avoid filters that drastically change the image. Subtle adjustments to color and tone are acceptable.
10.8 How many photos should I take during a professional photoshoot?
Take at least 20 photos to have a variety of options to choose from, ensuring you capture the perfect shot.
10.9 Is it better to smile or not smile in a professional headshot?
Smiling makes you appear more approachable and likable. However, a confident, neutral expression can also work well, depending on your profession and personal brand.
10.10 How can dfphoto.net help me improve my photography skills?
dfphoto.net offers a wealth of resources, including detailed tutorials, beautiful photo collections, and a vibrant photography community to help you learn and grow.
Mastering the art of professional photography requires attention to detail, understanding key techniques, and continuous practice. With the tips and guidelines provided by dfphoto.net, you can create stunning visuals that enhance your professional image. Remember, it’s about conveying confidence and professionalism through every shot.
Ready to elevate your photography skills and capture stunning professional photos? Visit dfphoto.net today to explore our comprehensive guides, view inspiring photo collections, and connect with a vibrant community of photographers. Whether you’re looking for detailed tutorials, creative inspiration, or expert advice, dfphoto.net has everything you need to master the art of visual storytelling. Don’t miss out—discover the world of professional photography with dfphoto.net and start creating images that truly stand out! Address: 1600 St Michael’s Dr, Santa Fe, NM 87505, United States. Phone: +1 (505) 471-6001. Website: dfphoto.net.
