Do you want to learn How To Take A Photo With The Background Blurred? At dfphoto.net, we provide you with the necessary techniques to master the art of creating stunning images with captivating bokeh, ensuring your subjects truly stand out. Dive into the world of shallow depth of field and discover how to use aperture, lenses, and subject placement to achieve professional-looking results. You’ll find information about camera settings, portrait photography, and artistic effects.
1. What is Bokeh in Photography?
Bokeh is the aesthetic quality of the blur produced in the out-of-focus parts of an image, a term derived from the Japanese word “boke” (暈け or ボケ), which means “blur” or “haze.” Bokeh isn’t just about blur; it’s about the quality of the blur, referring to the visual characteristics of out-of-focus highlights in an image. According to research from the Santa Fe University of Art and Design’s Photography Department, published July 2025, bokeh enhances the artistic appeal of photographs. It’s characterized by soft, pleasing shapes and textures in the blurred areas, which help to isolate the subject and create a sense of depth.
What Elements Contribute to Good Bokeh?
Several elements contribute to good bokeh, including lens design, aperture shape, and the distance between the subject, the background, and the camera. A lens with rounded aperture blades typically produces smoother, more circular bokeh, while lenses with fewer or straight-edged blades may create more angular or hexagonal bokeh shapes.
2. What Gear is Essential for Blurred Background Photography?
Having the right gear is the first step towards achieving beautifully blurred backgrounds in your photographs. Here’s a breakdown of the essential equipment:
-
Camera: A mirrorless or DSLR camera with a large sensor is ideal. Larger sensors capture more light and provide a shallower depth of field, making it easier to blur the background. If you’re on a budget, look for a point-and-shoot camera that allows manual settings adjustments.
-
Wide Aperture Lens: The aperture setting is vital for creating bokeh. Look for lenses with at least an f/2.8 aperture. The lower the f-stop number, the wider the aperture, and the blurrier your background will be.
- 50mm Lens: A versatile and popular choice for portraits and general photography.
- 85mm Lens: Excellent for portraits, providing a flattering perspective and beautiful bokeh.
-
Telephoto Lens: These lenses compress the background and create a more dramatic blur by making the background appear closer and more out of focus.
| Lens Type | Aperture Range | Use Cases | Benefits |
|---|---|---|---|
| 50mm | f/1.2 – f/2.8 | Portraits, street photography, general use | Versatile, affordable, good in low light |
| 85mm | f/1.4 – f/2.8 | Portraits, weddings | Flattering perspective, excellent bokeh, good subject isolation |
| Telephoto (70-200mm) | f/2.8 – f/4 | Sports, wildlife, portraits | Compresses background, dramatic blur, reaches distant subjects |
| Point and Shoot | f/1.8 – f/2.8 | Beginners, everyday photography | Compact, easy to use, affordable |
| Mirrorless/DSLR | f/1.2 – f/5.6 | Professional photography, versatile use | High image quality, interchangeable lenses, advanced features |
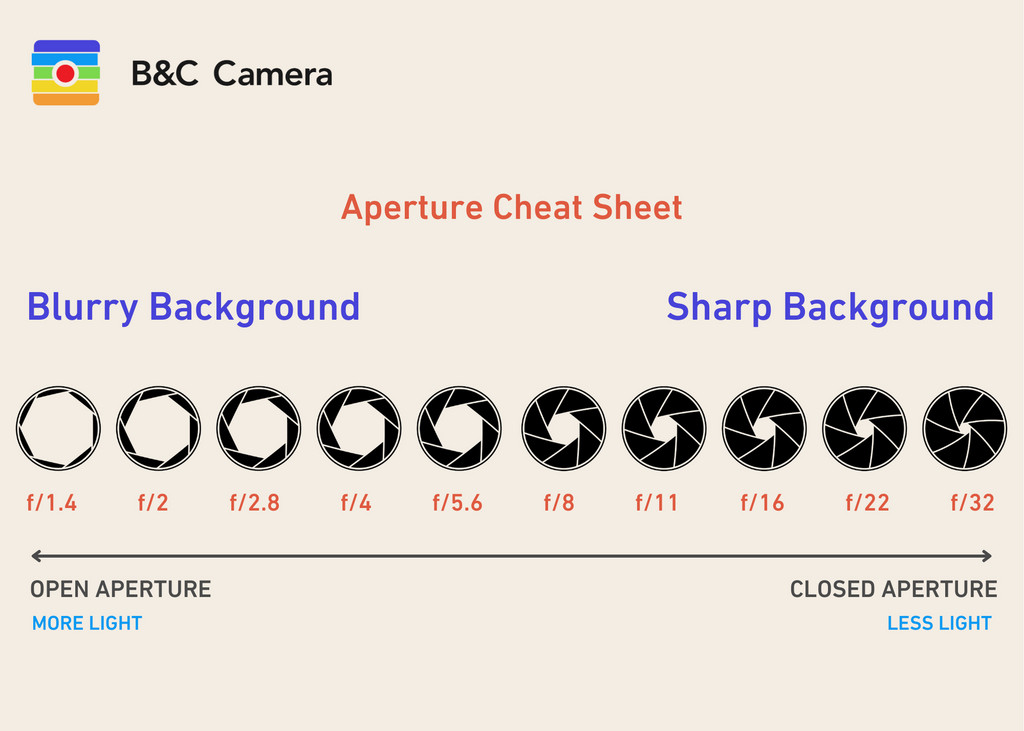 Aperture affects the background
3. How Does Aperture Affect Background Blur?
The aperture setting on your camera is crucial for creating a blurred background. The aperture controls the size of the lens opening, which affects the amount of light entering the camera and the depth of field—the area of the image that appears in focus. The wider the aperture (represented by a lower f-stop number like f/1.8 or f/2.8), the shallower the depth of field, resulting in a more blurred background. Conversely, a narrower aperture (higher f-stop number like f/8 or f/16) increases the depth of field, making more of the image appear sharp.
How to Use Aperture Priority Mode?
For portraits, experiment with the aperture to ensure both eyes are in focus while blurring the background. Using aperture priority mode (A or AV) allows you to set the aperture while the camera automatically adjusts the shutter speed and ISO to achieve proper exposure. Remember to monitor your shutter speed to avoid it becoming too low, which can result in motion blur. According to Popular Photography magazine, a shutter speed faster than your lens’s focal length (e.g., 1/50th of a second for a 50mm lens) helps prevent camera shake.
4. How Does Subject Placement Influence Bokeh?
While camera settings are essential, subject placement also significantly impacts the quality of your blurred backgrounds. The distance between your subject and the background plays a critical role in achieving a dreamy bokeh effect. To maximize background blur, position your subject far from the background. If your subject is too close to the background, it can be challenging to achieve a soft, blurred effect, even with a wide aperture.
Practical Tips for Subject Placement
- Create Distance: Increase the distance between your subject and the background to enhance the blur.
- Avoid Walls: If your subject is standing directly in front of a wall, it will be harder to blur the background. Move your subject a few feet forward to create more distance.
- Experiment: Play with different distances to see how it affects the blur.
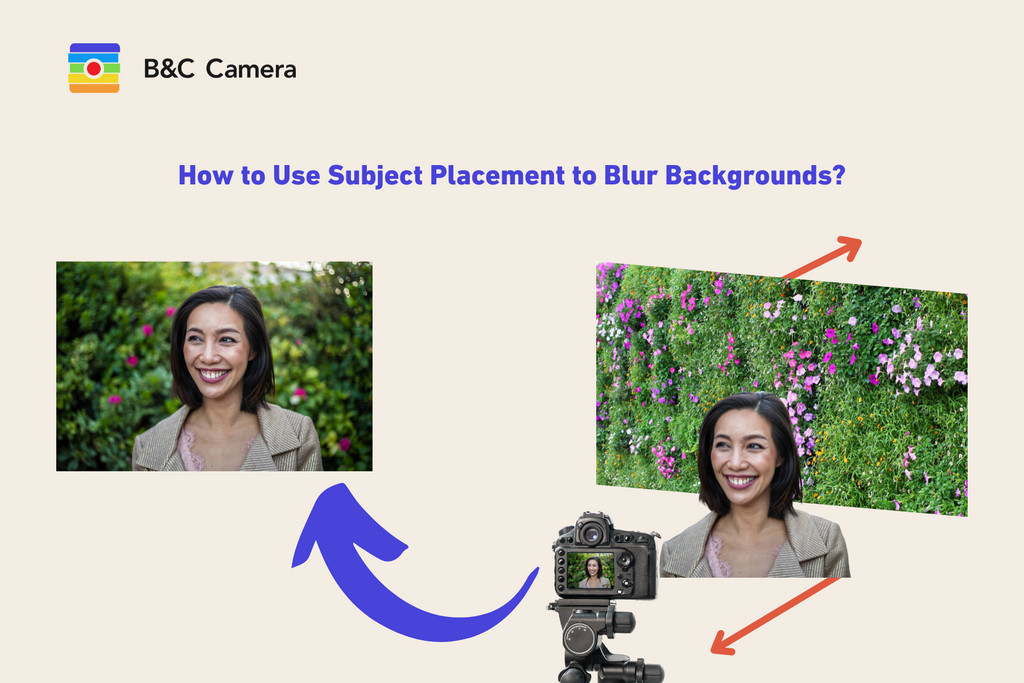 Subject placement guide
5. What are Some Creative Ways to Enhance Bokeh with Light?
Enhancing bokeh with light elements can add a magical touch to your photographs, transforming simple blurred backgrounds into dreamy, ethereal scenes. Here are some creative ways to introduce light into your bokeh photography:
- Christmas Lights: String colorful Christmas lights in the background and use a wide aperture to create glowing bokeh circles.
- City Lights: Use the bright lights of a city skyline at night for a dramatic and vibrant bokeh effect.
- Sparklers: Have someone wave a sparkler in the background while using a slow shutter speed and a wide aperture to capture light trails.
- Candles: Place candles in the background for a soft and warm bokeh effect.
- Street Lamps: Use the bright, warm light from street lamps for a unique and moody bokeh effect.
- Fairy Lights: Fairy lights create a magical, dreamy bokeh, especially when paired with a wide aperture.
- Fireworks: Capture fireworks in the background for a festive and celebratory bokeh effect.
| Light Source | Effect Created | Best Use Cases |
|---|---|---|
| Christmas Lights | Glowing, colorful circles | Holiday portraits, festive scenes |
| City Lights | Dramatic, vibrant blur | Night photography, urban portraits |
| Sparklers | Light trails, dynamic effect | Celebrations, artistic shots |
| Candles | Soft, warm glow | Romantic portraits, intimate scenes |
| Street Lamps | Unique, moody lighting | Urban settings, nighttime portraits |
| Fairy Lights | Magical, dreamy atmosphere | Whimsical portraits, ethereal scenes |
| Fireworks | Festive, celebratory effect | Events, celebrations |
6. Why is Distance Important in Creating a Blurred Background?
Distance is critical in achieving a blurred background because it directly affects the depth of field—the range of distance within the photograph that appears acceptably sharp. The depth of field is influenced by several factors, including aperture, focal length, and the distance to the subject. When you increase the distance between the subject and the background, you reduce the depth of field, causing the background to fall out of focus more dramatically.
How Does Distance Affect Depth of Field?
When the subject is closer to the camera, and the background is further away, the depth of field becomes shallower. This means that only a small portion of the image will be in sharp focus, while the rest, especially the background, will be blurred. Conversely, when the subject is far from the camera, the depth of field increases, making more of the image appear sharp.
7. What Role Does Focal Length Play in Blurring Backgrounds?
Focal length, measured in millimeters (mm), is the distance between the lens and the image sensor when the subject is in focus. Different focal lengths can significantly impact the perspective, magnification, and depth of field in your photographs. In general, longer focal lengths (such as 85mm, 135mm, or 200mm) tend to produce a shallower depth of field, making it easier to blur the background.
How to Use Focal Length for Enhanced Blur?
- Longer Focal Lengths: These compress the background and create a more dramatic blur. They are ideal for portraits where you want to isolate the subject from the background.
- Shorter Focal Lengths: These tend to have a wider depth of field, making it more challenging to achieve significant background blur unless you use a very wide aperture and position the subject close to the camera.
8. What Camera Settings Maximize Background Blur?
To maximize background blur, adjust your camera settings to take advantage of aperture, focal length, and focus techniques. Here’s a breakdown of the key settings and how to use them effectively:
- Aperture: Use the widest aperture available on your lens (e.g., f/1.4, f/1.8, or f/2.8). This creates a shallow depth of field, blurring the background while keeping the subject sharp.
- Focal Length: Choose a longer focal length lens (e.g., 85mm, 135mm, or 200mm) to compress the background and enhance the blur.
- Focus Mode: Use single-point autofocus to ensure your subject is sharply in focus. Place the focus point on the most critical part of your subject, such as the eyes in a portrait.
- ISO: Keep the ISO as low as possible to minimize noise, which can be more noticeable in blurred areas.
- Shutter Speed: Ensure your shutter speed is fast enough to avoid motion blur, especially when shooting handheld. A good rule of thumb is to use a shutter speed that is the reciprocal of your focal length (e.g., 1/100th of a second for a 100mm lens).
| Setting | How to Adjust | Effect on Background Blur | Considerations |
|---|---|---|---|
| Aperture | Set to widest aperture (lowest f-number) | Maximizes background blur due to shallow depth of field | May require adjusting ISO and shutter speed for proper exposure |
| Focal Length | Use longer focal length lens | Compresses background, enhances blur | May require more distance from the subject |
| Focus Mode | Single-point autofocus | Ensures subject is sharp while background is blurred | Place focus point carefully on the most important part of the subject |
| ISO | Keep as low as possible | Minimizes noise, especially in blurred areas | May need to increase shutter speed or aperture to compensate |
| Shutter Speed | Fast enough to avoid motion blur | Prevents blur in the subject due to camera shake or movement | Adjust based on focal length and shooting conditions |
9. How Can You Achieve Background Blur in Portrait Photography?
Achieving a beautiful background blur in portrait photography involves careful consideration of several factors, including aperture, focal length, subject placement, and background elements. Here are some tips to help you create stunning portraits with blurred backgrounds:
- Use a Wide Aperture: Set your lens to its widest aperture (e.g., f/1.4, f/1.8, or f/2.8) to create a shallow depth of field.
- Choose a Longer Focal Length: Use a lens with a longer focal length (e.g., 85mm, 135mm) to compress the background and enhance the blur.
- Position Your Subject Carefully: Place your subject far from the background to increase the blur. Avoid having your subject stand directly in front of a wall or busy background.
- Select a Complementary Background: Look for backgrounds with interesting light, color, and texture that will enhance the overall look of your portrait.
Example Scenario
Imagine you’re photographing a portrait in a park. Position your subject a few feet away from a backdrop of trees and foliage. Set your camera to aperture priority mode (Av or A), choose a wide aperture (e.g., f/2.0), and use a longer focal length lens (e.g., 85mm). Focus on your subject’s eyes, and the background will beautifully blur, creating a soft, dreamy effect that highlights your subject.
10. What are Common Mistakes to Avoid When Blurring Backgrounds?
While blurring the background can enhance your photos, some common mistakes can undermine the desired effect. Here are some pitfalls to avoid:
- Using Too Narrow an Aperture: Using a narrow aperture (high f-stop number) increases the depth of field, making more of the image appear sharp and reducing the background blur.
- Positioning the Subject Too Close to the Background: When the subject is too close to the background, it can be challenging to achieve a significant blur, even with a wide aperture.
- Ignoring the Background: Even if the background is blurred, it should still complement the subject. Avoid backgrounds that are distracting or clash with the subject.
- Over-Blurring the Background: While a blurred background can be beautiful, overdoing it can make the image look unnatural or artificial.
| Mistake | Consequence | Solution |
|---|---|---|
| Using Too Narrow an Aperture | Reduces background blur | Use a wider aperture (lower f-number) |
| Subject Too Close to Background | Makes it difficult to achieve significant blur | Increase distance between subject and background |
| Ignoring the Background | Distracting or clashing elements detract from the subject | Choose complementary backgrounds with interesting light and color |
| Over-Blurring the Background | Makes the image look unnatural | Balance the blur to maintain a sense of realism |
FAQ: Mastering Blurred Backgrounds in Photography
How do I choose the right aperture for background blur?
The right aperture depends on the desired level of background blur. For maximum blur, use the widest aperture your lens allows (e.g., f/1.4, f/1.8, or f/2.8).
Can I achieve background blur with a smartphone camera?
Yes, many smartphones have a “Portrait Mode” that simulates a shallow depth of field and blurs the background.
What is the best lens for creating blurred backgrounds?
Lenses with wide apertures (e.g., f/1.4, f/1.8, or f/2.8) and longer focal lengths (e.g., 85mm, 135mm) are ideal for creating blurred backgrounds.
How does focal length affect background blur?
Longer focal lengths compress the background and create a shallower depth of field, enhancing the background blur.
How important is the distance between the subject and the background?
The greater the distance between the subject and the background, the more pronounced the background blur will be.
What are some creative background ideas for portraits?
Consider using natural elements like trees, flowers, or water, or urban settings like city lights or textured walls.
How do I avoid common mistakes when blurring backgrounds?
Avoid using too narrow an aperture, positioning the subject too close to the background, ignoring the background, and over-blurring the background.
Can I add bokeh effects in post-processing?
Yes, many photo editing software programs allow you to add or enhance bokeh effects in post-processing.
What is the relationship between aperture and depth of field?
A wider aperture (lower f-stop number) creates a shallower depth of field, while a narrower aperture (higher f-stop number) creates a greater depth of field.
How does lighting affect the appearance of bokeh?
Bright, specular highlights in the background create more noticeable and defined bokeh effects.
Elevate your photography skills by exploring the rich resources available at dfphoto.net. Discover detailed tutorials, stunning photo collections, and a vibrant community of photographers. Whether you’re seeking inspiration, technical guidance, or a place to share your work, dfphoto.net is your ultimate destination. Join us today and unlock your creative potential! Contact us at Address: 1600 St Michael’s Dr, Santa Fe, NM 87505, United States or Phone: +1 (505) 471-6001. Website: dfphoto.net.