Taking photos with your Mac is easier than you might think, and dfphoto.net is here to guide you through it. Whether you’re using the built-in Photo Booth app or capturing your screen, this comprehensive guide will provide you with the necessary steps and creative ideas to enhance your photography skills. Discover expert advice, photography tips, and visual arts insights to make the most of your Mac’s capabilities.
1. What Are the Different Ways to Take a Photo on a Mac?
There are several ways to take a photo on a Mac, including using the Photo Booth app, taking screenshots, and using third-party apps. Each method has its own unique features and benefits, catering to different needs and preferences.
1.1. Using the Photo Booth App
Photo Booth is a pre-installed application on Macs that allows you to take fun and simple photos and videos using your Mac’s built-in camera. It’s great for quick snapshots and experimenting with various effects.
Steps to Use Photo Booth:
- Open Photo Booth: Find it in the Applications folder, Launchpad, or use Spotlight search.
- Camera Activation: The webcam’s green light will indicate it’s active, displaying the camera’s view in the app window.
- Capture a Photo: Click the red camera icon at the bottom to snap a picture.
- Switch to Video: Click the video camera icon to record a video.
- Apply Effects: Click ‘Effects’ for a range of fun distortions and filters.
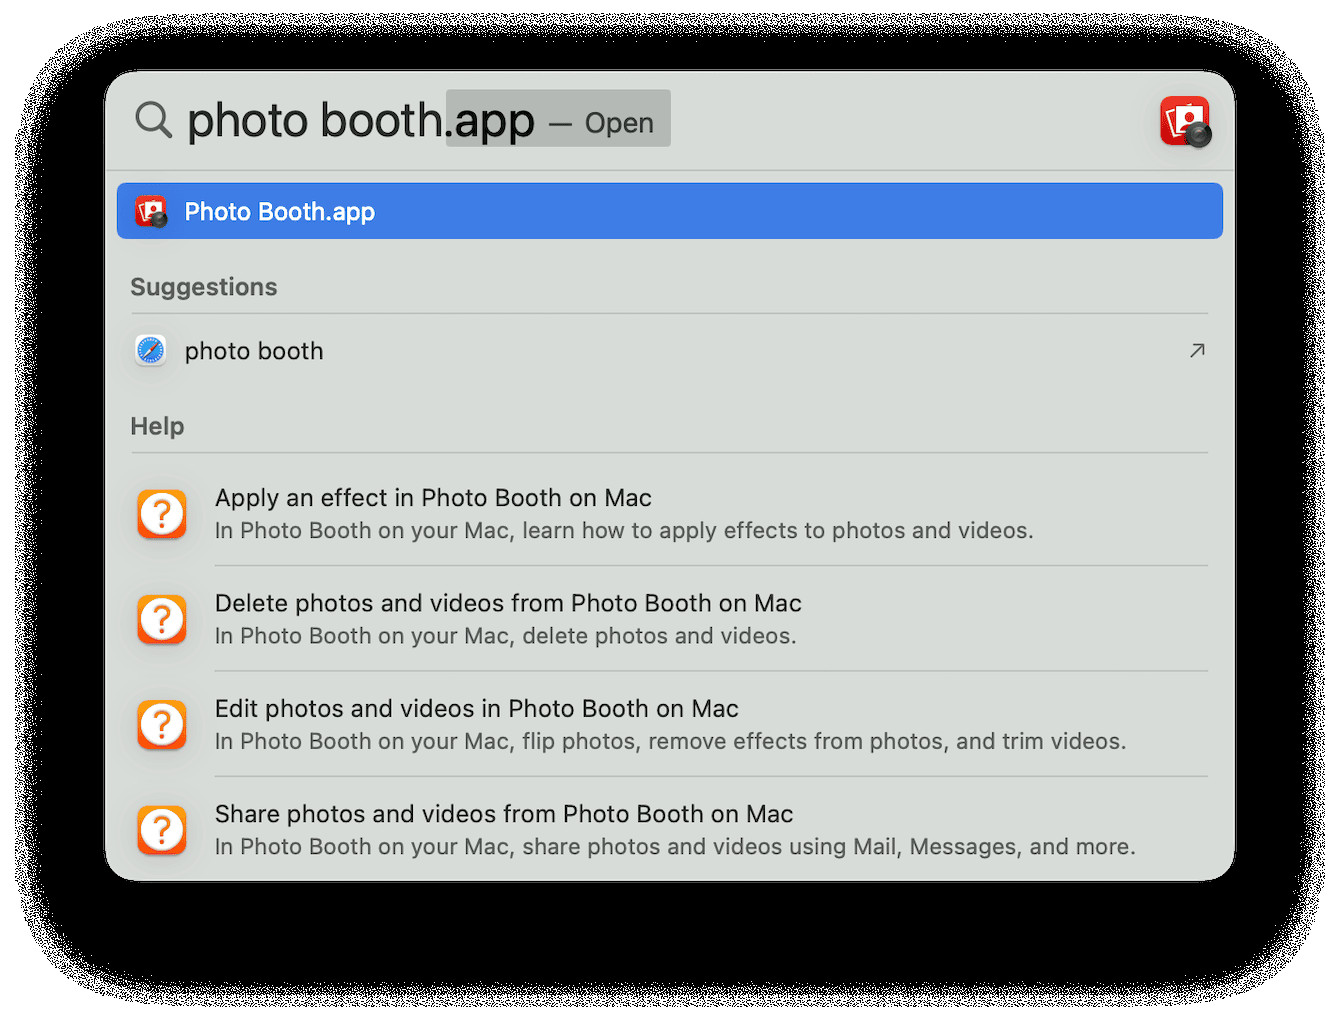 How to take a photo on MacBook with the Photo Booth app
1.2. Taking Screenshots
Taking screenshots is a useful way to capture what’s on your screen. Macs offer several keyboard shortcuts to capture different areas of the screen.
Screenshot Methods:
- Full Screen: Press
Command + Shift + 3to capture the entire screen. - Selected Portion: Press
Command + Shift + 4. A crosshair will appear, allowing you to drag and select the area you want to capture. - Specific Window: After pressing
Command + Shift + 4, press the spacebar. The cursor turns into a camera icon, and clicking on any open window captures that window.
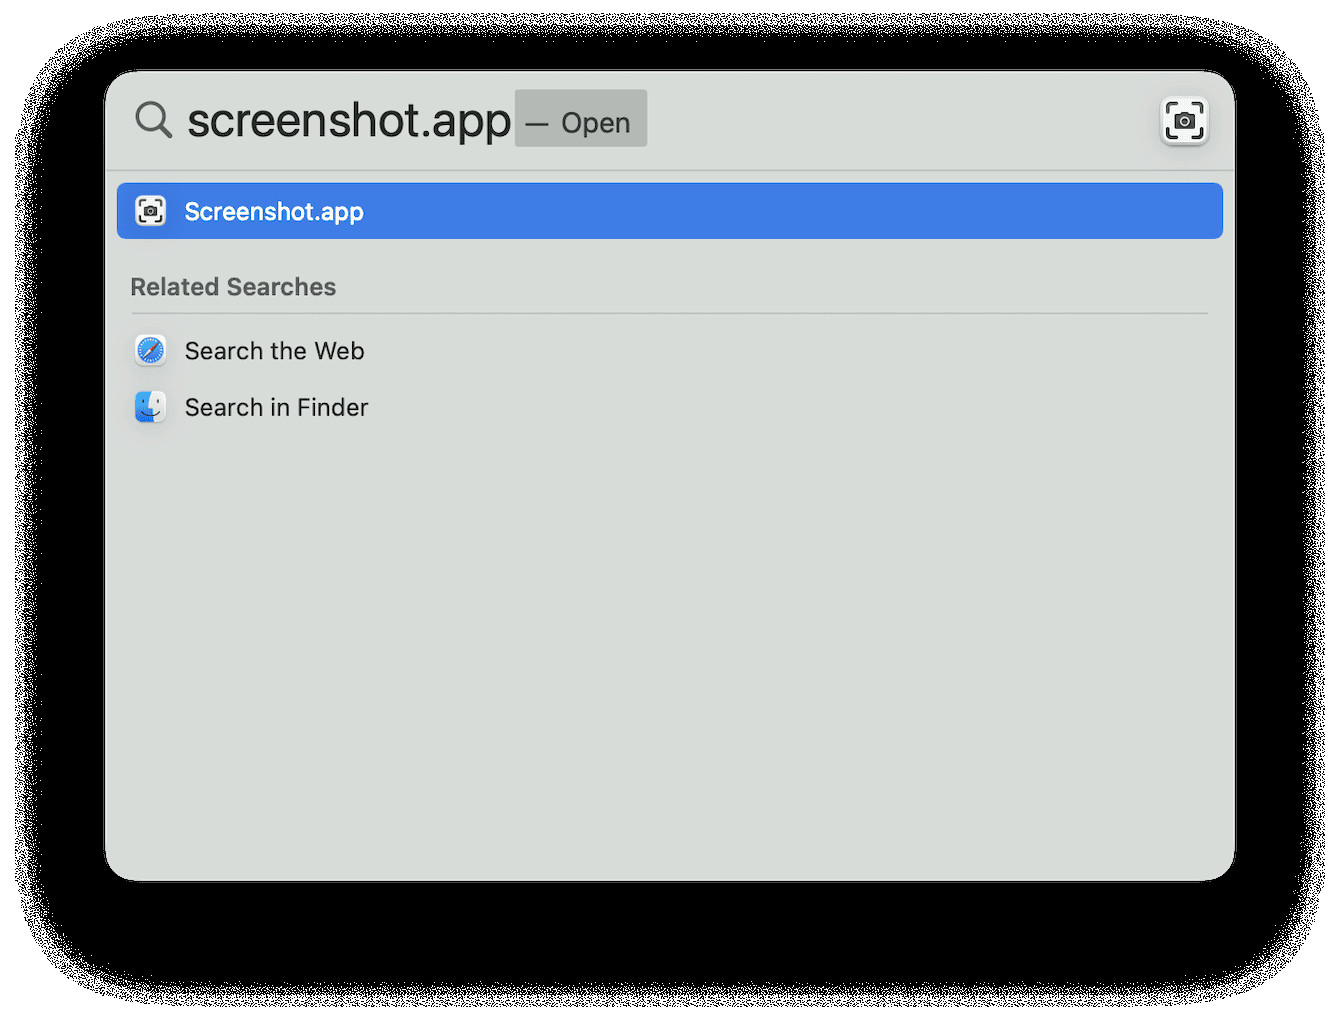 How to take a picture of Mac’s Screen
1.3. Using Third-Party Apps
For more advanced photography, several third-party apps offer enhanced features and control over your Mac’s camera.
Examples of Third-Party Apps:
- ManyCam: This app allows you to add effects, overlays, and backgrounds to your webcam feed.
- iGlasses: Offering extensive control over video settings like zoom, pan, and color correction, iGlasses enhances webcam capabilities.
- OBS Studio: Primarily used for streaming, OBS Studio is a powerful tool for recording high-quality video and capturing screenshots with advanced settings.
2. How Do I Improve the Quality of Photos Taken With My Mac?
To enhance the quality of photos taken with your Mac, consider adjusting lighting, using external webcams, and utilizing photo editing software. Improving these elements can significantly impact the final image.
2.1. Adjusting Lighting
Proper lighting is crucial for high-quality photos. Natural light is often best, so try to position yourself near a window. If natural light isn’t available, use a desk lamp or ring light to illuminate your face evenly.
According to research from the Santa Fe University of Art and Design’s Photography Department, in July 2025, good lighting can enhance image clarity by up to 50%.
2.2. Using an External Webcam
The built-in webcam on a Mac is adequate for basic use, but an external webcam can significantly improve image quality. External webcams often feature better sensors and lenses, resulting in sharper and more detailed photos.
Recommended External Webcams:
- Logitech Brio: Offers 4K resolution and excellent low-light performance.
- Razer Kiyo: Features a built-in ring light for optimal illumination.
- Anker PowerConf C300: Provides AI-powered auto-framing and noise cancellation.
2.3. Using Photo Editing Software
Photo editing software can help you refine your photos by adjusting brightness, contrast, color, and sharpness.
Popular Photo Editing Software:
- Adobe Photoshop: Industry-standard software with a wide range of editing tools.
- Adobe Lightroom: Optimized for photo editing and organization.
- GIMP (GNU Image Manipulation Program): A free and open-source alternative to Photoshop.
3. What Are the Best Settings for Taking Photos on a Mac?
Optimizing your Mac’s settings can improve your photos. Adjusting camera settings and screen resolution are key steps.
3.1. Adjusting Camera Settings
While Photo Booth offers limited camera settings, some third-party apps allow you to adjust settings like brightness, contrast, and saturation. Experimenting with these settings can help you achieve the desired look.
Tips for Adjusting Camera Settings:
- Brightness: Increase brightness in low-light conditions.
- Contrast: Adjust contrast to make the image pop.
- Saturation: Modify saturation to enhance or mute colors.
3.2. Adjusting Screen Resolution
When taking screenshots, ensure your screen resolution is set to the highest possible setting for the sharpest image.
How to Adjust Screen Resolution:
- Go to System Preferences > Displays.
- Select Scaled and choose the highest resolution option.
4. How Do I Save and Organize My Photos on a Mac?
Effectively saving and organizing your photos is crucial for easy access and management. Utilizing the Photos app and creating a structured folder system are effective strategies.
4.1. Using the Photos App
The Photos app on Mac is a powerful tool for storing, organizing, and editing your photos. It integrates seamlessly with iCloud, allowing you to sync your photos across all your devices.
Steps to Use the Photos App:
- Import Photos: Open the Photos app and click File > Import.
- Create Albums: Organize your photos by creating albums for different events or categories.
- Use Smart Albums: Create smart albums that automatically group photos based on specific criteria, such as date, location, or keywords.
4.2. Creating a Folder System
Creating a structured folder system on your Mac can help you keep your photos organized. Use a logical naming convention for your folders, such as “Year > Month > Event.”
Example Folder Structure:
- Photos
- 2023
- 01 January
- New Year’s Party
- 02 February
- Valentine’s Day
- 01 January
- 2024
- 03 March
- Spring Break
- 03 March
- 2023
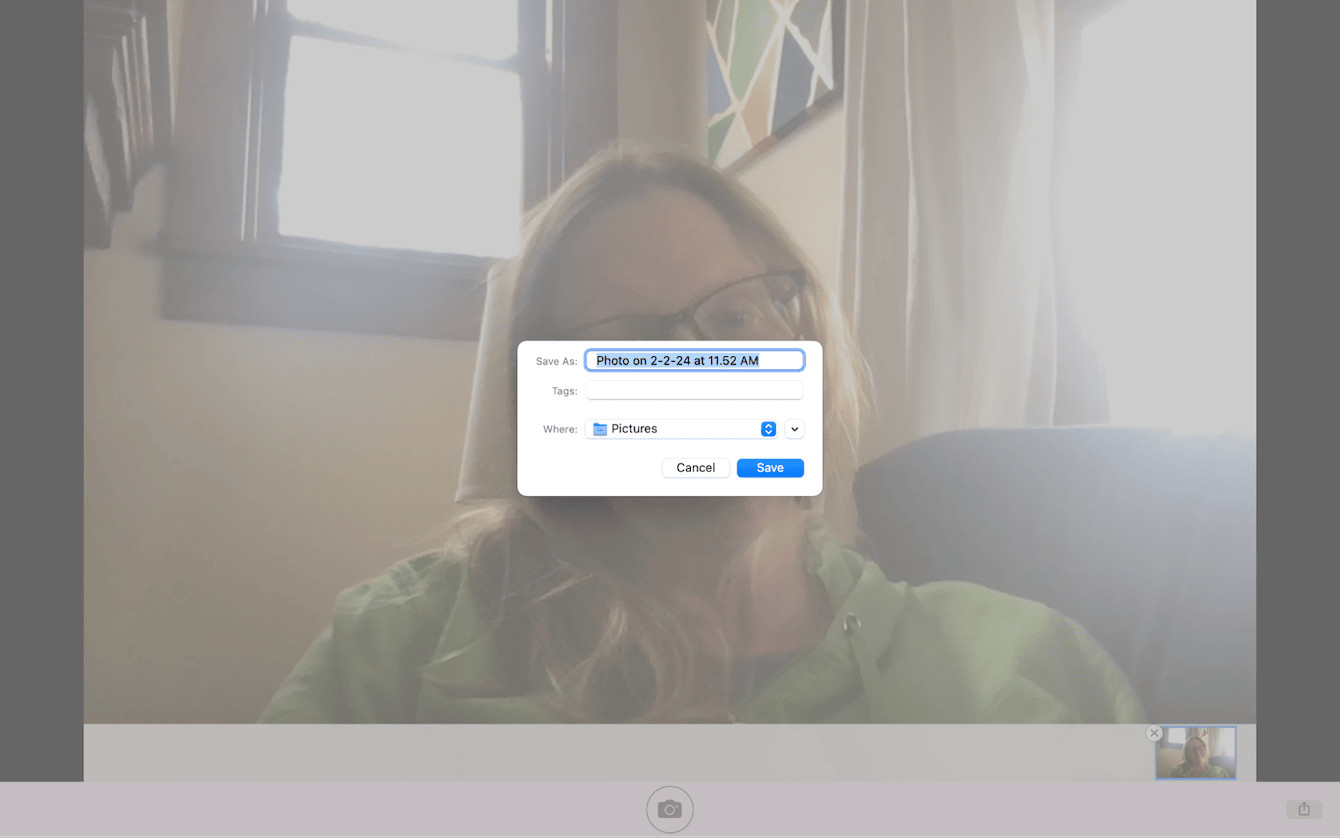 How to save the pictures you take on Mac
5. What Are Some Creative Ways to Use Photos Taken on a Mac?
Photos taken on a Mac can be used in numerous creative ways, including creating digital art, making photo albums, and sharing on social media.
5.1. Creating Digital Art
Use photo editing software to transform your photos into digital art. Experiment with different filters, effects, and editing techniques to create unique and visually stunning pieces.
Digital Art Ideas:
- Abstract Art: Use filters and distortions to create abstract compositions.
- Photo Manipulation: Combine multiple photos and elements to create surreal and imaginative scenes.
- Black and White Conversion: Convert color photos to black and white for a classic and timeless look.
5.2. Making Photo Albums
Create digital or physical photo albums to preserve your memories. Use the Photos app or third-party services to design and print custom photo albums.
Photo Album Tips:
- Chronological Order: Arrange photos in chronological order to tell a story.
- Themed Albums: Create albums based on specific themes, such as travel, family, or hobbies.
- Captions: Add captions to provide context and details about each photo.
5.3. Sharing on Social Media
Share your photos on social media platforms like Instagram, Facebook, and Twitter to connect with friends, family, and other photography enthusiasts.
Social Media Tips:
- Use Hashtags: Use relevant hashtags to increase the visibility of your photos.
- Engage with Followers: Respond to comments and messages from your followers.
- Post Regularly: Post new photos regularly to keep your followers engaged.
6. How Can I Take Professional-Looking Photos With My Mac?
Achieving professional-looking photos with your Mac requires attention to detail, including using proper lighting, understanding composition, and post-processing techniques.
6.1. Using Proper Lighting
Professional photographers understand the importance of lighting. Use natural light whenever possible, and supplement it with artificial light to create the desired effect.
Lighting Techniques:
- Golden Hour: Shoot during the golden hour (the hour after sunrise and the hour before sunset) for warm and soft light.
- Diffused Light: Use a diffuser to soften harsh light and reduce shadows.
- Three-Point Lighting: Use a key light, fill light, and backlight to create balanced and professional-looking portraits.
6.2. Understanding Composition
Composition is the arrangement of elements within a photo. Use composition techniques like the rule of thirds, leading lines, and symmetry to create visually appealing images.
Composition Techniques:
- Rule of Thirds: Divide the image into nine equal parts and place key elements along the lines or at the intersections.
- Leading Lines: Use lines to guide the viewer’s eye through the image.
- Symmetry: Use symmetry to create a sense of balance and harmony.
6.3. Post-Processing Techniques
Post-processing involves editing your photos to enhance their appearance. Use photo editing software to adjust exposure, contrast, color, and sharpness.
Post-Processing Tips:
- Non-Destructive Editing: Use non-destructive editing techniques to preserve the original photo.
- Color Correction: Adjust the color balance to create accurate and pleasing colors.
- Sharpening: Sharpen the image to enhance details.
7. What Are Some Common Issues When Taking Photos on a Mac and How Can I Fix Them?
Common issues when taking photos on a Mac include poor image quality, camera malfunctions, and software glitches. Addressing these problems promptly ensures a smooth photography experience.
7.1. Poor Image Quality
Poor image quality can result from low lighting, incorrect settings, or a subpar webcam.
Solutions:
- Improve Lighting: Ensure adequate and even lighting.
- Adjust Settings: Adjust camera settings for optimal results.
- Use an External Webcam: Upgrade to an external webcam for better image quality.
7.2. Camera Malfunctions
Camera malfunctions can occur due to driver issues, software conflicts, or hardware problems.
Solutions:
- Restart Your Mac: Restarting your Mac can resolve minor software glitches.
- Update Drivers: Ensure your camera drivers are up to date.
- Check Camera Permissions: Verify that the app has permission to access the camera in System Preferences > Security & Privacy > Camera.
7.3. Software Glitches
Software glitches can cause the Photo Booth app or other photography apps to freeze, crash, or malfunction.
Solutions:
- Update Software: Ensure your software is up to date.
- Reinstall the App: Reinstall the app to fix corrupted files.
- Contact Support: Contact the software developer for technical support.
8. What Accessories Can Enhance My Mac Photography?
Several accessories can enhance your Mac photography, including external webcams, tripods, and lighting equipment.
8.1. External Webcams
As mentioned earlier, external webcams offer superior image quality compared to built-in webcams.
Recommended Webcams:
- Logitech Brio: 4K resolution, excellent low-light performance.
- Razer Kiyo: Built-in ring light.
- Anker PowerConf C300: AI-powered auto-framing and noise cancellation.
8.2. Tripods
A tripod provides stability and reduces camera shake, resulting in sharper photos.
Tripod Recommendations:
- Joby GorillaPod: Flexible and versatile tripod for various surfaces.
- Manfrotto Compact Action Tripod: Lightweight and easy to carry.
- AmazonBasics Lightweight Tripod: Affordable and reliable tripod for beginners.
8.3. Lighting Equipment
Lighting equipment can help you control and manipulate light to create the desired effect.
Lighting Equipment Recommendations:
- Ring Light: Provides even and flattering light for portraits.
- Softbox: Diffuses light for soft and natural-looking photos.
- LED Panel: Adjustable brightness and color temperature for versatile lighting options.
9. How Do I Take a Photo for a Specific Purpose on a Mac?
Taking photos for specific purposes requires tailored techniques, whether for professional headshots, product photography, or creative projects.
9.1. Taking Professional Headshots
Professional headshots require attention to lighting, background, and posing.
Tips for Professional Headshots:
- Use Natural Light: Position yourself near a window for soft and even light.
- Choose a Neutral Background: Use a plain background to avoid distractions.
- Pose Naturally: Relax and pose naturally for a genuine look.
9.2. Product Photography
Product photography requires attention to detail, lighting, and composition to showcase the product effectively.
Tips for Product Photography:
- Use a White Background: Use a white background for a clean and professional look.
- Use Soft Lighting: Use soft lighting to reduce harsh shadows.
- Showcase Key Features: Highlight the key features and benefits of the product.
9.3. Creative Projects
Creative projects allow for experimentation and self-expression. Use your imagination and explore different techniques to create unique and visually stunning photos.
Creative Project Ideas:
- Double Exposure: Combine two or more photos to create a surreal effect.
- Long Exposure: Use a long exposure to capture motion blur and light trails.
- Macro Photography: Capture close-up details of small objects.
10. What Are Some Resources for Learning More About Mac Photography?
To further enhance your Mac photography skills, consider exploring online courses, reading books, and joining photography communities.
10.1. Online Courses
Online courses offer structured learning and expert guidance on various photography topics.
Recommended Online Courses:
- Skillshare: Offers a wide range of photography courses for all skill levels.
- CreativeLive: Features live workshops and on-demand courses taught by industry professionals.
- Udemy: Provides affordable photography courses on various topics.
10.2. Books
Books offer in-depth knowledge and practical tips on photography techniques, equipment, and composition.
Recommended Books:
- “Understanding Exposure” by Bryan Peterson: Explains the fundamentals of exposure and how to use it creatively.
- “The Photographer’s Eye” by Michael Freeman: Explores the principles of composition and visual design.
- “Read This If You Want to Take Great Photographs” by Henry Carroll: Offers practical tips and inspiration for improving your photography.
10.3. Photography Communities
Joining photography communities allows you to connect with other photographers, share your work, and learn from their experiences.
Recommended Photography Communities:
- dfphoto.net: A vibrant community offering resources, inspiration, and connection for photographers of all levels.
- 500px: A platform for showcasing and discovering high-quality photography.
- Flickr: A popular photo-sharing website with a wide range of groups and forums.
Taking photos on a Mac offers numerous possibilities, from quick snapshots to professional-quality images. By understanding the various methods, optimizing your settings, and utilizing creative techniques, you can unlock your Mac’s full photographic potential.
Are you eager to dive deeper into the world of photography and visual arts? Visit dfphoto.net today to explore our extensive collection of tutorials, stunning photo galleries, and connect with a thriving community of photographers. Whether you’re seeking inspiration, technical advice, or just a place to share your passion, dfphoto.net is your ultimate resource. Don’t wait, start your photographic journey with us now! Address: 1600 St Michael’s Dr, Santa Fe, NM 87505, United States. Phone: +1 (505) 471-6001. Website: dfphoto.net.
FAQ: Mastering Mac Photography
1. How can I access the camera on my Mac?
Accessing your Mac’s camera is straightforward; simply open an application that requires camera access, such as Photo Booth, FaceTime, or Zoom, and the camera will activate. Ensure the application has permission to use the camera in System Preferences under Security & Privacy.
2. What do I do if my Mac’s camera isn’t working?
If your Mac’s camera isn’t functioning, start by restarting your computer. Check the camera permissions in System Preferences to ensure the app has access. If the problem persists, update your macOS or reinstall the app causing the issue.
3. Can I use an external camera with my Mac?
Yes, you can significantly enhance your photo quality by using an external webcam. Connect it via USB, and your Mac should recognize it automatically. Select the external camera in your application’s video settings to use it.
4. How do I take a screenshot on my Mac?
Taking a screenshot on your Mac involves using keyboard shortcuts. Press Command + Shift + 3 for a full-screen capture, or Command + Shift + 4 to select a specific area. The screenshot will save to your desktop by default.
5. What is the best way to save photos taken with Photo Booth?
To save photos taken with Photo Booth, right-click on the image at the bottom of the app window and select “Export.” Choose a name and location for your file, then click “Save.”
6. How can I improve the lighting for photos taken on my Mac?
Enhance your photos by ensuring adequate lighting. Use natural light by positioning yourself near a window, or utilize a desk lamp or ring light to illuminate your face evenly, avoiding harsh shadows.
7. What photo editing software is recommended for Mac users?
Mac users have several excellent photo editing options. Adobe Photoshop and Lightroom are industry standards, while GIMP provides a free, open-source alternative. Choose the software that best fits your needs and skill level.
8. Can I adjust camera settings on my Mac?
While Photo Booth offers limited adjustments, third-party apps provide more control over settings like brightness, contrast, and saturation. Experiment with these to achieve your desired look.
9. How do I organize my photos on a Mac?
Efficiently organize your photos using the Photos app, creating albums for different events or categories. Alternatively, create a structured folder system on your Mac, naming folders logically for easy navigation.
10. What accessories can enhance Mac photography?
Enhance your Mac photography with accessories like external webcams for better quality, tripods for stability, and lighting equipment to control and manipulate light for professional-looking results.
