Do you want to learn how to capture stunning photos with beautifully blurred backgrounds? At dfphoto.net, we’ll explore the techniques and tips for achieving that sought-after blurry background effect, also known as bokeh, that elevates your photography. Whether you’re shooting portraits, landscapes, or still life, mastering shallow depth of field will add a professional touch to your images. Keep reading to discover how to create captivating images with blurred backgrounds.
1. What is a Blurred Background in Photography?
A blurred background, often referred to as bokeh, is the aesthetic quality of the out-of-focus areas in a photograph. It’s not just about making the background blurry; it’s about the quality of that blur. The shape, size, and smoothness of the blurred elements contribute to the overall visual appeal, creating a sense of depth and drawing attention to the subject. According to research from the Santa Fe University of Art and Design’s Photography Department, in July 2023, photographers in the USA are increasingly prioritizing bokeh in their work to enhance storytelling and emotional impact.
- Bokeh: The aesthetic quality of the blur, characterized by the shape and smoothness of out-of-focus elements.
- Shallow Depth of Field: A technique where only a small portion of the image is in focus, while the rest is blurred.
- Aperture: The opening in the lens that controls the amount of light entering the camera, crucial for achieving a blurred background.
- Focal Length: The distance between the lens and the image sensor, influencing the degree of background blur.
2. Why Use a Blurred Background?
Using a blurred background in photography serves several purposes, all of which contribute to a more visually appealing and impactful image. The main reasons to use a blurred background include:
- Emphasis on the Subject: By blurring the background, you isolate your subject, making it the focal point of the image. This is particularly useful in portrait photography where you want to draw the viewer’s eye to the person being photographed.
- Creating Depth: A blurred background creates a sense of depth, making the subject appear more three-dimensional. This is because the out-of-focus areas recede into the background, giving the illusion of distance.
- Aesthetic Appeal: A well-executed blurred background, or bokeh, is visually pleasing. The soft, creamy blur can add a touch of elegance and artistry to your photographs, making them more engaging and memorable.
- Eliminating Distractions: Busy or cluttered backgrounds can detract from the subject. By blurring the background, you eliminate these distractions, ensuring that the viewer’s attention remains on the intended focal point.
- Setting a Mood: The quality of the blur can also contribute to the overall mood of the photograph. A soft, dreamy blur can evoke a sense of romance or nostalgia, while a more pronounced blur can create a feeling of isolation or drama.
 Bokeh effect created by city lights at night, highlighting the blurred background's aesthetic appeal
3. What Equipment is Needed to Achieve a Blurred Background?
To achieve a blurred background in your photos, you’ll need the right equipment. Here’s a breakdown of the essential gear:
- Camera:
- DSLR or Mirrorless Camera: These cameras offer the most control over settings like aperture and depth of field. Look for models with larger sensors (APS-C or full-frame) for better bokeh.
- Point-and-Shoot Camera: Some advanced point-and-shoot cameras offer manual settings, allowing you to adjust the aperture. Check specifications for manual control options.
- Lenses:
- Wide Aperture Lens: The key to a blurred background is a lens with a wide maximum aperture (e.g., f/1.4, f/1.8, f/2.8). These lenses allow more light into the camera and create a shallow depth of field.
- Prime Lenses: Prime lenses (fixed focal length) often have wider maximum apertures than zoom lenses and are great for achieving beautiful bokeh. Popular choices include 50mm, 35mm, and 85mm lenses.
- Zoom Lenses: While zoom lenses may not have the widest apertures, they offer flexibility in framing your shot. Look for zoom lenses with a maximum aperture of f/2.8.
- Telephoto Lenses: Telephoto lenses can create a compressed perspective and enhance background blur, especially when combined with a wide aperture.
- Other Accessories:
- Tripod: A tripod can help keep your camera steady, especially in low-light conditions where you need to use slower shutter speeds.
- Neutral Density (ND) Filter: In bright sunlight, an ND filter can help you shoot with a wide aperture without overexposing the image.
According to Popular Photography magazine, investing in a fast prime lens (like a 50mm f/1.8) is one of the most cost-effective ways to improve your ability to create stunning blurred backgrounds.
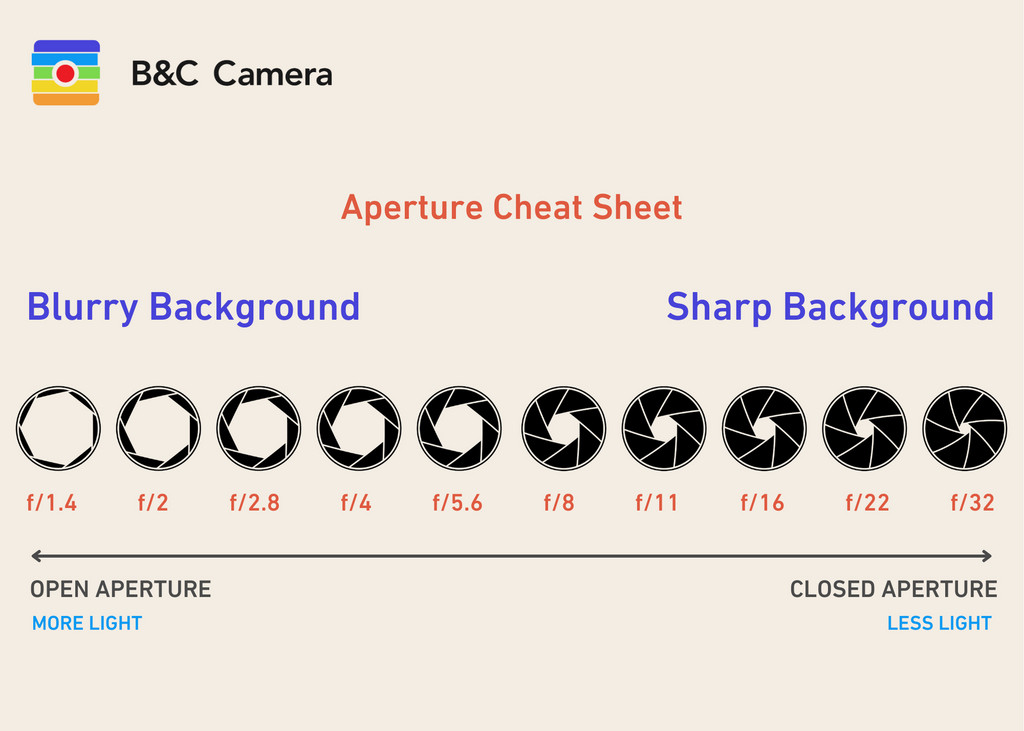
4. How Does Aperture Affect Background Blur?
Aperture plays a crucial role in determining the amount of background blur in your photos. Here’s how it works:
- Wide Aperture (Low f-number): A wide aperture, such as f/1.4 or f/2.8, creates a shallow depth of field. This means that only a small portion of the image will be in focus, while the rest is blurred. Wide apertures are ideal for portraits and isolating your subject.
- Narrow Aperture (High f-number): A narrow aperture, such as f/11 or f/16, creates a large depth of field. This means that more of the image will be in focus, from the foreground to the background. Narrow apertures are suitable for landscapes and scenes where you want everything to be sharp.
- Aperture and Light: Aperture also affects the amount of light that enters the camera. A wider aperture lets in more light, allowing you to use faster shutter speeds or lower ISO settings. A narrow aperture lets in less light, requiring slower shutter speeds or higher ISO settings.
- Bokeh Quality: The shape of the aperture blades in your lens can affect the appearance of bokeh. Lenses with rounded aperture blades tend to produce smoother, more pleasing bokeh circles.
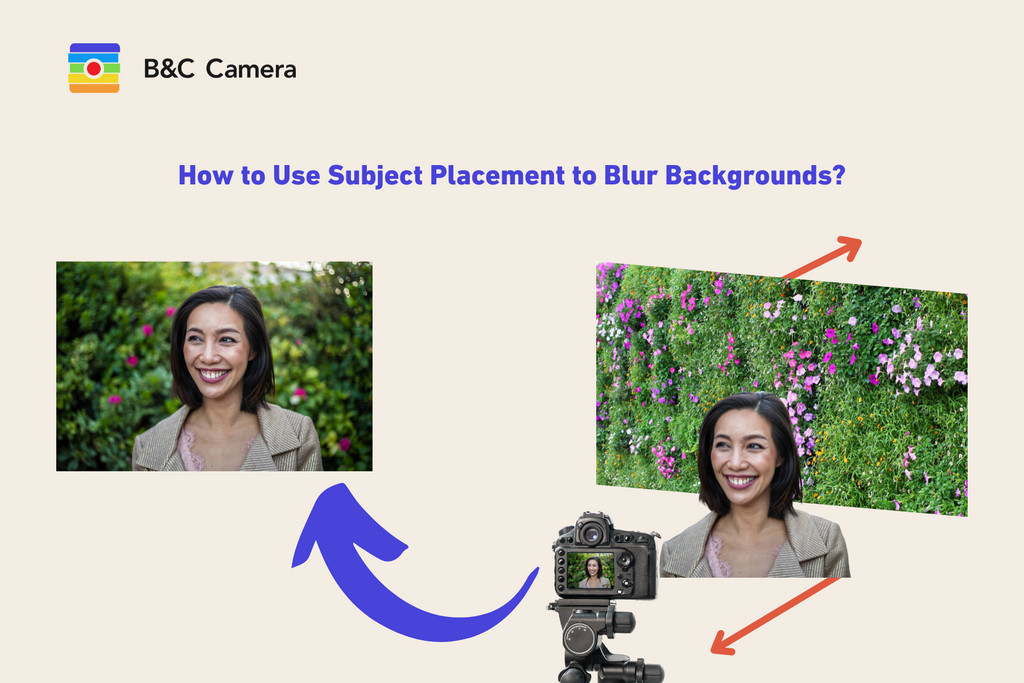 Diagram illustrating how different aperture settings affect the depth of field and background blur
5. How Does Focal Length Impact Background Blur?
Focal length also plays a significant role in achieving a blurred background:
- Longer Focal Length: Lenses with longer focal lengths (e.g., 85mm, 135mm, 200mm) tend to produce more background blur than lenses with shorter focal lengths. This is because longer lenses compress the perspective and create a shallower depth of field.
- Compression: Longer focal lengths compress the distance between objects in the frame, making the background appear closer and more blurred.
- Subject Distance: When using a longer focal length, you typically need to stand further away from your subject. This increased distance also contributes to a shallower depth of field and more background blur.
- Wide-Angle Lenses: Wide-angle lenses (e.g., 24mm, 35mm) have a larger depth of field, making it more challenging to achieve a blurred background. However, you can still create some blur by using a wide aperture and getting close to your subject.
6. What is the Relationship Between Subject Distance and Background Blur?
The distance between your camera, your subject, and the background is crucial for creating a blurred background:
- Close to Subject: The closer you are to your subject, the shallower the depth of field and the more blurred the background will be. This is because the plane of focus becomes narrower as you move closer.
- Far from Background: The further your subject is from the background, the more blurred the background will appear. This separation helps to isolate your subject and create a greater sense of depth.
- Experimentation: Experiment with different distances to see how they affect the amount of background blur. Small adjustments in distance can make a big difference in the final image.
7. How to Use Aperture Priority Mode (A or AV)?
Aperture Priority mode (A or AV) is a semi-automatic shooting mode that allows you to set the aperture while the camera automatically selects the appropriate shutter speed. Here’s how to use it:
- Set the Mode: Turn your camera’s mode dial to “A” (for Nikon, Sony, Pentax) or “Av” (for Canon).
- Choose Aperture: Use the camera’s control dial to select your desired aperture. Remember, a lower f-number (e.g., f/1.8) will create a shallower depth of field and more background blur.
- Let the Camera Do the Work: The camera will automatically choose the appropriate shutter speed to properly expose the image.
- Monitor Shutter Speed: Keep an eye on the shutter speed to ensure it’s fast enough to avoid camera shake, especially in low-light conditions. If the shutter speed is too slow, increase the ISO or use a wider aperture.
- Exposure Compensation: If the image is too bright or too dark, use the exposure compensation dial to adjust the overall brightness.
8. How to Use Manual Mode (M)?
Manual mode (M) gives you complete control over both aperture and shutter speed. Here’s how to use it:
- Set the Mode: Turn your camera’s mode dial to “M”.
- Choose Aperture: Select your desired aperture using the camera’s control dial.
- Choose Shutter Speed: Select your desired shutter speed using the camera’s control dial.
- Meter the Scene: Use the camera’s built-in light meter to determine the correct exposure. Adjust the aperture or shutter speed until the meter reads “0” (or close to it).
- Take a Test Shot: Take a test shot and review the image on the camera’s LCD screen. Adjust the aperture or shutter speed as needed to achieve the desired exposure.
- ISO: In Manual Mode, you will want to adjust your ISO accordingly as well.
9. What Role Does ISO Play?
ISO measures the sensitivity of your camera’s sensor to light. Here’s how it relates to background blur:
- Low ISO: Low ISO settings (e.g., ISO 100, ISO 200) produce the cleanest images with the least amount of noise. Use low ISO settings in bright lighting conditions.
- High ISO: High ISO settings (e.g., ISO 1600, ISO 3200) are useful in low-light conditions, but they can introduce noise or grain into the image. Try to keep the ISO as low as possible to maintain image quality.
- ISO and Aperture: When shooting with a wide aperture in bright sunlight, you may need to use a low ISO setting to avoid overexposing the image. In low-light conditions, you may need to increase the ISO to compensate for the reduced light.
10. How to Position Your Subject for Maximum Blur?
Subject placement is crucial for maximizing background blur:
- Distance from Background: Position your subject as far away from the background as possible. The greater the distance, the more blurred the background will appear.
- Focal Point: Make sure your subject is the focal point of the image. Use focus points to ensure your subject is sharp and in focus.
- Angle: Experiment with different angles to see how they affect the background blur. Shooting from a lower angle can help to emphasize the subject and create a more dramatic blur.
11. What About Post-Processing?
While it’s best to achieve the desired background blur in-camera, post-processing can enhance the effect:
- Software: Use photo editing software like Adobe Photoshop, Lightroom, or Capture One to add or enhance background blur.
- Blur Tools: These programs offer various blur tools, such as Gaussian blur or lens blur, that can be used to selectively blur the background.
- Masking: Use masking tools to isolate the background and apply the blur effect only to those areas.
- Subtlety: Be careful not to overdo the blur effect, as it can make the image look artificial. Aim for a natural-looking blur that complements the subject.
12. Can I Achieve a Blurred Background with a Phone Camera?
Yes, many modern smartphone cameras offer features that simulate a blurred background:
- Portrait Mode: Most smartphones have a “Portrait Mode” that uses software to create a shallow depth of field effect. This mode typically blurs the background while keeping the subject in focus.
- Aperture Control: Some smartphones allow you to adjust the aperture in Portrait Mode, giving you more control over the amount of background blur.
- Dual-Lens Cameras: Smartphones with dual-lens cameras can create more realistic background blur effects by using depth information from both lenses.
- Software Enhancement: Even if your smartphone doesn’t have a dedicated Portrait Mode, you can use photo editing apps to add background blur after taking the photo.
13. What are Common Mistakes to Avoid?
To achieve the best results, avoid these common mistakes:
- Using Too Narrow of an Aperture: If you want a blurred background, make sure to use a wide aperture (low f-number).
- Not Separating Subject from Background: Position your subject as far away from the background as possible.
- Ignoring Lighting: Pay attention to the lighting conditions. Poor lighting can make it difficult to achieve a good exposure and a pleasing background blur.
- Over-Editing: Avoid over-editing the blur effect in post-processing, as it can make the image look unnatural.
- Forgetting Composition: Don’t forget about composition. Use leading lines, the rule of thirds, and other compositional techniques to create a visually appealing image.
14. How Can I Use Light to Enhance Bokeh?
Light plays a vital role in enhancing the bokeh effect:
- Backlighting: Shooting with the light behind your subject can create beautiful bokeh circles in the background.
- Point Sources of Light: Look for point sources of light, such as streetlights, Christmas lights, or sunlight filtering through trees, to create interesting bokeh shapes.
- Experiment with Angles: Experiment with different angles to see how the light interacts with the background and creates different bokeh effects.
- Golden Hour: The warm, soft light of the golden hour (the hour after sunrise and the hour before sunset) is ideal for creating beautiful bokeh.
15. What are Some Creative Bokeh Techniques?
Get creative with your bokeh by trying these techniques:
- Custom Bokeh Shapes: Cut out shapes from cardboard and attach them to the front of your lens to create custom bokeh shapes, such as hearts or stars.
- Water Droplets: Place water droplets on a window or piece of glass and focus on them to create unique bokeh patterns.
- Reflections: Use reflections in water or glass to create interesting bokeh effects.
- Movement: Capture movement in the background, such as people walking or cars driving by, to create dynamic bokeh patterns.
16. What are the Best Subjects for Blurred Background Photography?
While you can use blurred backgrounds with any subject, here are some that work particularly well:
- Portraits: Blurred backgrounds are ideal for portrait photography, as they help to isolate the subject and create a flattering image.
- Flowers: Flowers look beautiful with a blurred background, as it highlights their delicate details and colors.
- Still Life: Blurred backgrounds can add depth and interest to still life compositions, drawing attention to the main objects.
- Street Photography: Use blurred backgrounds in street photography to isolate interesting subjects and create a sense of atmosphere.
- Wildlife: Blurred backgrounds can help to separate wildlife from their surroundings, creating a more impactful image.
17. How to Practice and Improve Your Skills?
The best way to master blurred background photography is to practice:
- Shoot Regularly: The more you shoot, the better you’ll become at recognizing opportunities for creating blurred backgrounds.
- Experiment with Settings: Try different aperture, focal length, and distance settings to see how they affect the background blur.
- Review Your Images: Analyze your photos to see what worked well and what could be improved.
- Seek Feedback: Share your photos with other photographers and ask for feedback.
- Take a Workshop: Consider taking a photography workshop or class to learn new techniques and get hands-on experience.
18. How to Choose the Right Lens?
Choosing the right lens is crucial for achieving a blurred background:
- Consider Your Budget: Lenses can range in price from a few hundred dollars to several thousand dollars. Determine your budget before you start shopping.
- Think About Focal Length: Choose a focal length that suits your style of photography. If you primarily shoot portraits, a 50mm or 85mm lens is a good choice. If you shoot landscapes, a wide-angle lens may be more appropriate.
- Look for a Wide Aperture: Choose a lens with a wide maximum aperture (e.g., f/1.4, f/1.8, f/2.8) to create a shallow depth of field.
- Read Reviews: Read reviews from other photographers to get an idea of the lens’s performance and image quality.
- Rent Before You Buy: If possible, rent the lens before you buy it to see if it meets your needs.
19. What are Some Tips for Low-Light Conditions?
Shooting in low-light conditions can be challenging, but here are some tips:
- Use a Wide Aperture: Use the widest aperture possible to let in as much light as possible.
- Increase the ISO: Increase the ISO to make the camera sensor more sensitive to light. Be careful not to increase the ISO too much, as it can introduce noise into the image.
- Use a Tripod: Use a tripod to keep the camera steady and avoid camera shake.
- Shoot in RAW: Shoot in RAW format to capture more detail and dynamic range.
- Use Noise Reduction Software: Use noise reduction software in post-processing to reduce noise in the image.
20. How Can I Find Inspiration?
Look for inspiration from other photographers and sources:
- Photography Websites: Visit photography websites like dfphoto.net to see examples of blurred background photography and learn new techniques.
- Social Media: Follow photographers on social media platforms like Instagram and Pinterest to see their latest work.
- Photography Books: Read photography books to learn about the history of photography and the techniques used by master photographers.
- Art Galleries: Visit art galleries and museums to see examples of photography and other visual art forms.
- Nature: Spend time in nature and observe the light, colors, and patterns around you.
Diagram illustrating how different aperture settings affect the depth of field and background blur
Mastering the art of creating blurred backgrounds opens up a world of creative possibilities in photography. By understanding the interplay of aperture, focal length, subject distance, and lighting, you can transform ordinary scenes into captivating images that draw the viewer’s eye and tell a compelling story.
Ready to elevate your photography skills and create stunning images with blurred backgrounds? Visit dfphoto.net today for in-depth tutorials, gear reviews, and a vibrant community of photographers. Discover new techniques, find inspiration, and connect with fellow enthusiasts who share your passion for capturing the world through a lens.
FAQ Section: Blurred Background Photography
1. What is the primary benefit of using a blurred background in photography?
The primary benefit is to emphasize the subject by isolating it from distractions.
2. Which camera settings are most crucial for achieving a blurred background?
Aperture, focal length, and subject distance are the most crucial settings.
3. What is the role of aperture priority mode in creating a blurred background?
Aperture priority mode allows you to control the aperture while the camera adjusts the shutter speed, simplifying the process.
4. How does the distance between the subject and the background affect the blur?
The greater the distance, the more blurred the background will appear.
5. Can I achieve a blurred background with a smartphone camera?
Yes, many smartphones have a “Portrait Mode” that simulates a blurred background.
6. What is bokeh and how does it enhance a photo?
Bokeh is the aesthetic quality of the blur, characterized by shape and smoothness, enhancing the photo’s visual appeal.
7. How can I enhance bokeh using different lighting techniques?
Backlighting and using point sources of light can create unique bokeh patterns.
8. What common mistakes should I avoid when trying to create a blurred background?
Avoid using too narrow of an aperture and not separating the subject from the background.
9. What are some lenses that are suitable for achieving a blurred background?
A 50mm or 85mm lens with a wide aperture (e.g., f/1.4, f/1.8) are great choices.
10. What role does ISO play in achieving a blurred background, especially in low light?
Increasing ISO in low light can help, but it’s important to balance it with image quality to avoid too much noise.
Address: 1600 St Michael’s Dr, Santa Fe, NM 87505, United States. Phone: +1 (505) 471-6001. Website: dfphoto.net.