MacBooks come equipped with a built-in camera, making it incredibly easy to capture photos and videos directly from your laptop. Whether you’re aiming to snap a quick selfie, participate in a video conference, or record a memorable moment, your MacBook’s camera is a versatile tool right at your fingertips. This guide will walk you through everything you need to know about using your MacBook camera effectively.
Taking photos and recording videos on your MacBook is straightforward. The camera activates automatically when you launch applications that utilize it, such as FaceTime or Photo Booth. You’ll know the camera is active when a small green light illuminates next to it. To get started with capturing visuals:
- Open Photo Booth: This is Apple’s dedicated application for taking photos and videos with your Mac’s camera. You can find it in your Applications folder or by using Spotlight search (Command + Space bar and type “Photo Booth”).
- Frame Your Shot: Position yourself or your subject in front of the camera. The Photo Booth interface will show you a preview of what the camera sees.
- Take a Photo: Click the red camera icon button below the preview to take a still photo. Photo Booth often takes a burst of four photos by default, creating a fun photo booth effect.
- Record a Video: To record a video, click the red filmstrip icon button, also located below the preview. Click it again to stop recording.
 People using iMac for video call with Center Stage feature
Beyond basic photo and video capture, your MacBook camera offers a range of video effects to enhance your communication and creativity. These effects are readily accessible in applications like FaceTime and Photo Booth, allowing you to add a touch of fun or professionalism to your video calls and recordings. To explore and use video effects:
- Access Video Effects: While in a video-enabled app like FaceTime, look for the “Video” option in the menu bar at the top of your screen. In Photo Booth, effects are typically visible directly in the application window.
- Explore Effects: Click on the icon in the menu bar during a FaceTime call. This will reveal a panel of available effects. These can include filters to change the look of your video, Memoji or Animoji overlays to replace your face with a fun avatar, and even background effects that blur or replace your surroundings.
- Apply and Customize: Click on an effect to apply it to your video. Some effects, like background replacement, might offer customization options to fine-tune the look.
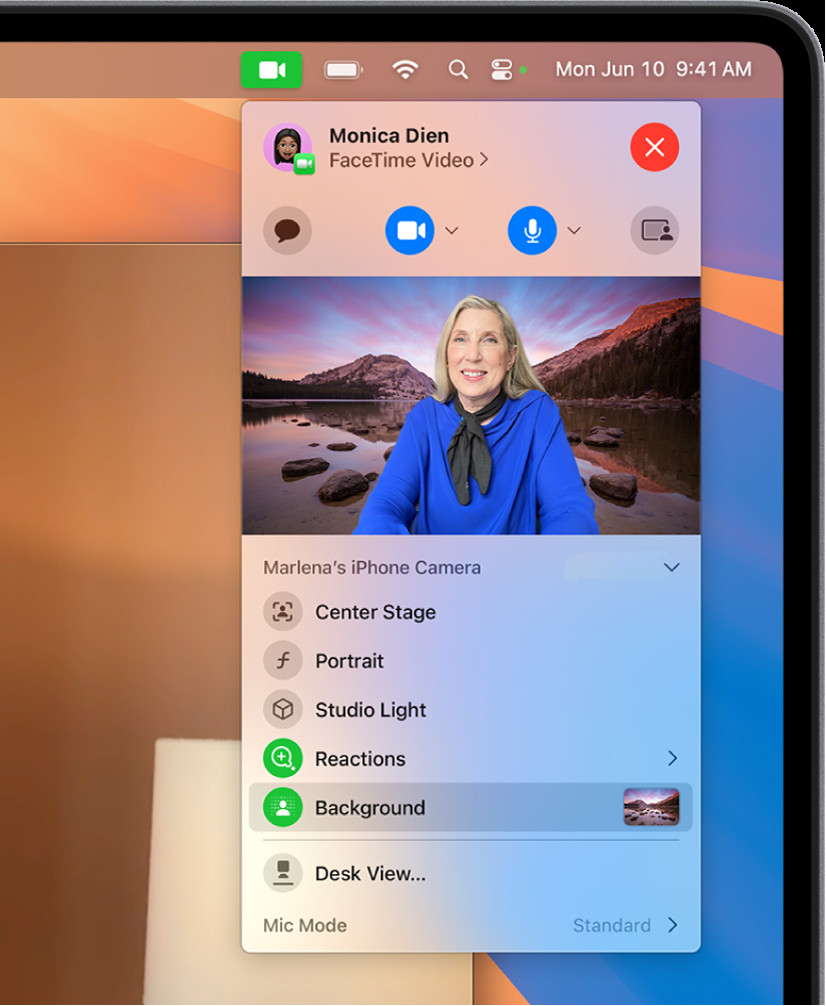 A person using background effects during a FaceTime call on MacBook
For Mac models equipped with a wide-angle camera and when Center Stage is disabled, you have the ability to manually adjust your video framing. This feature offers more control over what your viewers see, allowing you to zoom and pan to perfectly compose your video. Here’s how to manually frame your video:
- Disable Center Stage (if needed): If you wish to manually control the framing and are using a MacBook with Center Stage, you’ll first need to turn this feature off. You can usually find the Center Stage toggle in the Control Center or within the settings of the app you are using (like FaceTime).
- Access Framing Controls: Once Center Stage is off (or if you are using a MacBook without Center Stage), initiate a video call or recording in an app like FaceTime.
- Adjust Zoom and Pan: Hover your cursor over the video preview window. Controls for zoom and pan should appear.
- Zoom: Use the zoom slider or buttons (often marked as 0.5x and 1x for quick zoom levels) to zoom in or out. For precise zoom adjustments, click and hold the zoom controls and drag the slider.
- Pan: Click and drag within the video preview to pan across the scene, adjusting what is visible in the frame.
- Recenter: If you’ve panned and want to quickly re-center on your face, look for a “Recenter” button, which will automatically detect your face and frame you centrally.
- Reset Framing: To revert to the default framing, click the 0.5x or 1x zoom button within the preview.
Even with advanced camera technology, image quality can be influenced by various factors. To ensure you’re getting the best possible image from your MacBook camera, consider these tips to improve image quality:
- Clean Your Camera Lens: Dust or smudges on the camera lens can significantly degrade image clarity. Gently wipe the lens with a soft, lint-free cloth.
- Optimize Lighting: Good lighting is crucial for clear photos and videos. Position yourself so that the light source is in front of you, illuminating your face. Avoid having bright lights directly behind you, as this can create silhouetting. Natural light from a window facing you is often ideal.
- Check Your Wi-Fi: A poor Wi-Fi connection can sometimes affect video quality in real-time video calls, as apps may reduce quality to maintain a stable stream. If you’re experiencing poor video quality during calls, try moving closer to your Wi-Fi router or ensuring there are no obstructions hindering the signal.
- App Settings: Some applications may offer settings to adjust camera quality. Explore the preferences or settings menu within the app you are using to see if there are options to enhance video resolution or quality.
By following these guidelines, you can confidently take photos and videos on your MacBook, utilize fun video effects, manually adjust your framing, and optimize your image quality for various applications, from casual snapshots to important video conferences. For further assistance, Apple Support provides additional resources that may be helpful, such as articles on troubleshooting if your built-in camera isn’t working. You can also explore user guides for specific applications like FaceTime, Messages, and Photo Booth to delve deeper into their camera-related features.