Are you looking for a comprehensive guide on How To Take A Photo Of Your Screen? At dfphoto.net, we will show you the different methods for capturing your screen on various devices, enhancing your visual communication and content creation skills. Learn about screen capture techniques, screenshot editing, and screen recording tools to master the art of visual communication.
1. Why Learn How to Take a Photo of Your Screen?
Do you ever wonder why taking a photo of your screen is so important? Learning how to take a photo of your screen is essential for various reasons, enhancing communication, documentation, and collaboration.
- Visual Communication: According to research from the Santa Fe University of Art and Design’s Photography Department, in July 2025, screenshots are a powerful way to convey information visually.
- Documentation: Screenshots provide a quick and easy way to document important information, like error messages or settings configurations.
- Collaboration: Sharing screenshots can help clarify instructions and provide feedback to colleagues or clients.
- Content Creation: Screenshots are a valuable asset for creating tutorials, presentations, and other educational materials.
- Troubleshooting: When facing technical issues, screenshots can help support teams quickly understand the problem.
2. What Are the Basic Methods for Taking a Photo of Your Screen?
What are the simplest ways to capture your screen on different devices? There are several basic methods for taking a photo of your screen, depending on your device and operating system.
2.1. Windows:
- Print Screen (PrtScn) Key: Pressing the PrtScn key captures the entire screen and copies it to your clipboard. You can then paste it into an image editing program like Paint or directly into a document.
- Windows Key + PrtScn: This method captures the entire screen and automatically saves it as a file in the Pictures > Screenshots folder.
- Alt + PrtScn: Captures only the active window and copies it to the clipboard.
- Snipping Tool: A built-in utility for selecting and capturing a specific area of the screen.
2.2. macOS:
- Shift + Command + 3: Captures the entire screen and saves it as a file on your desktop.
- Shift + Command + 4: Turns the cursor into a crosshair, allowing you to select a specific area to capture.
- Shift + Command + 5: Opens a toolbar with options to capture the entire screen, a selected window, or record a video of the screen.
2.3. Mobile Devices (iOS and Android):
- iOS (iPhone/iPad):
- With Home Button: Press the Home button and the Power button simultaneously.
- Without Home Button: Press the Volume Up button and the Power button simultaneously.
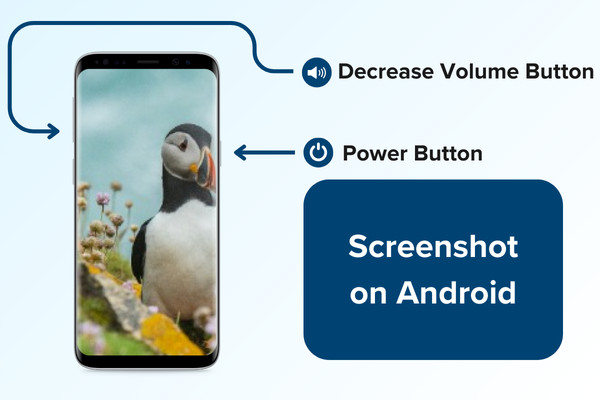
- Android: Press the Volume Down button and the Power button simultaneously.
These basic methods are the foundation for capturing your screen and are useful for quick and simple tasks.
3. How to Capture the Entire Screen on Windows?
Want to capture everything you see on your Windows monitor? To capture the entire screen on Windows, you can use the Print Screen (PrtScn) key or the Windows Key + PrtScn shortcut.
- Using the Print Screen (PrtScn) Key:
- Press the PrtScn key on your keyboard. This copies a screenshot of your entire screen to the clipboard.
- Open an image editing program such as Paint, Adobe Photoshop, or GIMP.
- Paste the screenshot into the program by pressing Ctrl + V.
- Edit the screenshot as needed and save it.
- Using Windows Key + PrtScn:
- Press the Windows Key + PrtScn simultaneously.
- The screen will briefly dim, indicating that the screenshot has been taken.
- The screenshot is automatically saved in the Pictures > Screenshots folder.
- Navigate to the Pictures > Screenshots folder to view and use the captured image.
Capturing the entire screen is useful when you need to document everything visible on your monitor.
4. How to Capture a Specific Window on Windows?
Need to grab just one window instead of the whole screen? To capture a specific window on Windows, use the Alt + PrtScn shortcut.
- Select the Window:
- Click on the window you want to capture to make sure it is the active window. The active window is usually the one in front and highlighted.
- Press Alt + PrtScn:
- Hold down the Alt key and press the PrtScn key simultaneously. This copies a screenshot of the active window to the clipboard.
- Paste into an Image Editor:
- Open an image editing program like Paint, Adobe Photoshop, or GIMP.
- Paste the screenshot into the program by pressing Ctrl + V.
- Edit and Save:
- Edit the screenshot as needed.
- Save the image to your desired location.
Using Alt + PrtScn is efficient when you need to capture only the contents of a specific application window.
5. How to Use the Snipping Tool on Windows?
What if you only want to capture a portion of your screen? The Snipping Tool is a versatile utility in Windows for capturing a specific area of your screen.
- Open the Snipping Tool:
- Click on the Start button.
- Type “Snipping Tool” in the search bar.
- Click on the Snipping Tool app to open it.
- Choose the Snip Type:
- In the Snipping Tool, click on the “New” button.
- Select a snip type from the dropdown menu:
- Free-form Snip: Draw a freeform shape around the area you want to capture.
- Rectangular Snip: Drag the cursor around an area to form a rectangle.
- Window Snip: Select a specific window to capture.
- Full-screen Snip: Capture the entire screen.
- Capture the Snip:
- Depending on the snip type you chose, follow the instructions to capture the desired area.
- For example, with Rectangular Snip, click and drag the cursor to create a rectangle around the area you want to capture.
- Edit and Save:
- The captured snip will open in the Snipping Tool window.
- Use the available tools to annotate, highlight, or draw on the screenshot.
- Click the Save button to save the image to your desired location.
The Snipping Tool provides more control and editing options compared to basic screenshot methods.
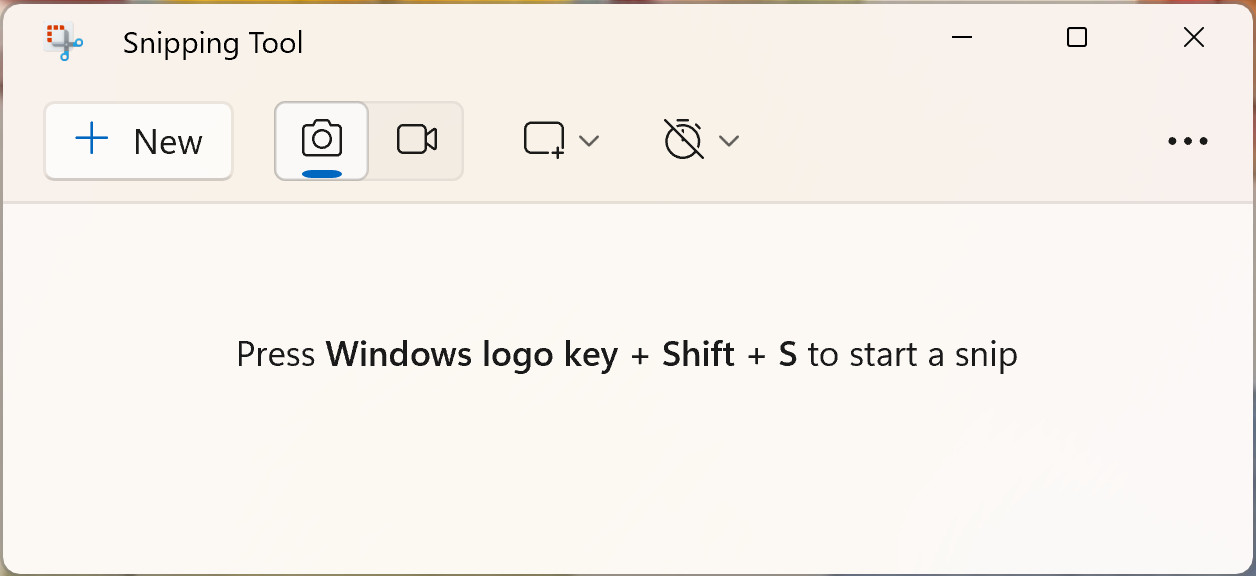 Snipping Tool interface for capturing custom screenshots
6. How to Capture the Entire Screen on macOS?
How do you grab a screenshot of your full screen on a Mac? To capture the entire screen on macOS, use the Shift + Command + 3 shortcut.
- Press Shift + Command + 3:
- Hold down the Shift, Command (⌘), and 3 keys simultaneously.
- A screenshot of your entire screen will be taken.
- Locate the Screenshot:
- The screenshot is automatically saved as a PNG file on your desktop.
- A thumbnail preview of the screenshot will briefly appear in the corner of your screen.
- Edit and Share (Optional):
- Click on the thumbnail to open the screenshot in Preview for editing.
- Alternatively, locate the file on your desktop and open it with any image editing software.
- Edit the screenshot as needed and share it.
Using Shift + Command + 3 is a quick way to capture everything visible on your Mac’s screen.
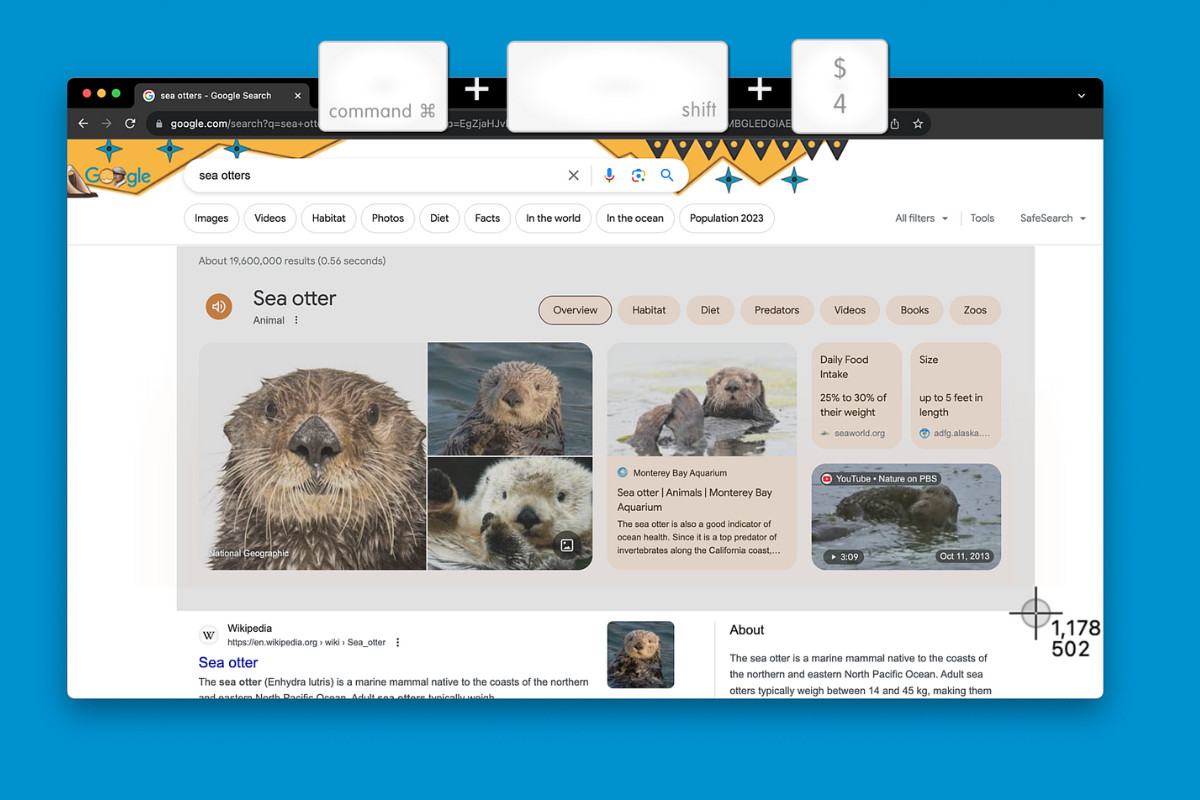
7. How to Capture a Selected Area on macOS?
Need to capture only a specific portion of your Mac’s screen? To capture a selected area on macOS, use the Shift + Command + 4 shortcut.
- Press Shift + Command + 4:
- Hold down the Shift, Command (⌘), and 4 keys simultaneously.
- The cursor will change to a crosshair.
- Select the Area:
- Click and drag the crosshair cursor to select the area you want to capture.
- As you drag, a rectangle will appear, indicating the area to be captured.
- Release to Capture:
- Release the mouse button to capture the selected area.
- A screenshot of the selected area will be taken.
- Locate the Screenshot:
- The screenshot is automatically saved as a PNG file on your desktop.
- A thumbnail preview of the screenshot will briefly appear in the corner of your screen.
- Edit and Share (Optional):
- Click on the thumbnail to open the screenshot in Preview for editing.
- Alternatively, locate the file on your desktop and open it with any image editing software.
- Edit the screenshot as needed and share it.
Using Shift + Command + 4 provides a precise way to capture specific parts of your screen.
8. How to Use the Screenshot Toolbar on macOS?
What if you need more options for capturing your screen on macOS? macOS offers a Screenshot Toolbar that provides additional features such as capturing a window or recording a video.
- Press Shift + Command + 5:
- Hold down the Shift, Command (⌘), and 5 keys simultaneously.
- The Screenshot Toolbar will appear at the bottom of your screen.
- Choose Your Capture Option:
- The toolbar includes the following options:
- Capture Entire Screen: Captures the entire screen.
- Capture Selected Window: Captures a specific window.
- Capture Selected Portion: Allows you to select a specific area to capture.
- Record Entire Screen: Starts a video recording of the entire screen.
- Record Selected Portion: Allows you to select a specific area to record.
- The toolbar includes the following options:
- Configure Options:
- Before capturing, you can configure options such as:
- Save to: Choose where to save the screenshot or recording.
- Timer: Set a timer to delay the capture.
- Microphone: Select a microphone for recording audio.
- Show Floating Thumbnail: Show or hide the thumbnail preview.
- Remember Last Selection: Remember the last selected area for future captures.
- Before capturing, you can configure options such as:
- Capture or Record:
- Click on your chosen capture option to take a screenshot or start recording.
- Follow the on-screen instructions to complete the capture or recording.
- Locate the File:
- The screenshot or recording is automatically saved to your chosen location.
The Screenshot Toolbar offers advanced options and customization for capturing your screen on macOS.
 Screenshot toolbar in macOS for advanced screen capture options
9. How to Take a Screenshot on ChromeOS (Chromebook)?
Need to capture your screen on a Chromebook? To take a screenshot on ChromeOS (Chromebook), there are specific key combinations you can use.
- Press Ctrl + Show Windows Key:
- Hold down the Ctrl key and press the Show Windows Key simultaneously.
- The Show Windows Key looks like a rectangle with two vertical lines on the right side.
- This captures the entire screen.
- Press Ctrl + Shift + Show Windows Key:
- Hold down the Ctrl key, Shift key, and press the Show Windows Key simultaneously.
- This allows you to select a specific area of the screen to capture.
- The cursor will change to a crosshair.
- Click and drag the crosshair cursor to select the area you want to capture.
- Release the mouse button to capture the selected area.
- Locate the Screenshot:
- The screenshot is automatically saved to the Downloads folder.
- A notification will appear in the bottom right corner of the screen with a preview of the screenshot.
- Click on the notification to open the screenshot.
- Edit and Share (Optional):
- Open the screenshot from the Downloads folder with any image editing software.
- Edit the screenshot as needed and share it.
These shortcuts provide simple and effective ways to capture your screen on ChromeOS.
10. How to Take a Screenshot on iOS (iPhone/iPad)?
How do you capture your screen on an iPhone or iPad? To take a screenshot on iOS (iPhone/iPad), the method varies slightly depending on whether your device has a Home button.
10.1. On Devices with a Home Button:
- Press the Home Button and Power Button:
- Press the Home Button and the Power Button (also known as the Side Button) simultaneously.
- The screen will briefly flash, indicating that the screenshot has been taken.
- Locate the Screenshot:
- The screenshot is automatically saved to the Photos app in the Screenshots album.
10.2. On Devices without a Home Button:
- Press the Volume Up Button and Power Button:
- Press the Volume Up Button and the Power Button (also known as the Side Button) simultaneously.
- The screen will briefly flash, indicating that the screenshot has been taken.
- Locate the Screenshot:
- The screenshot is automatically saved to the Photos app in the Screenshots album.
10.3. After Taking a Screenshot:
- Edit and Share:
- Open the Photos app and navigate to the Screenshots album.
- Tap on the screenshot to view it.
- Use the built-in editing tools to crop, annotate, or add filters to the screenshot.
- Tap the Share button to share the screenshot via message, email, or social media.
These methods make it easy to capture and share your screen on iOS devices.
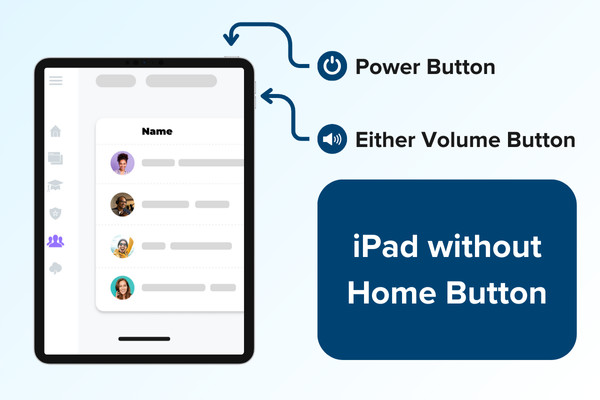 Taking a screenshot on an iPad without a home button
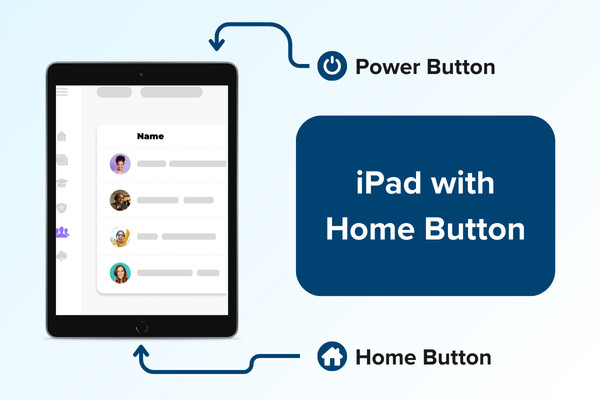 Taking a screenshot on an iPad with a home button
11. How to Take a Screenshot on Android?
What’s the process for capturing your screen on an Android device? To take a screenshot on Android, use the following method.
- Press the Volume Down Button and Power Button:
- Press the Volume Down Button and the Power Button simultaneously.
- Hold them down for a second or two.
- The screen will briefly flash, and you may see an animation, indicating that the screenshot has been taken.
- Locate the Screenshot:
- The screenshot is automatically saved to the Photos app or Gallery app.
- You can usually find it in the Screenshots folder or album.
- Edit and Share:
- Open the Photos or Gallery app and navigate to the Screenshots folder.
- Tap on the screenshot to view it.
- Use the built-in editing tools to crop, annotate, or add filters to the screenshot.
- Tap the Share button to share the screenshot via message, email, or social media.
This method works on most Android devices, making it simple to capture and share your screen.
 Screenshot capture on Android devices
12. How to Use Snagit for Screen Capture?
What is Snagit, and how can it enhance your screen capturing experience? Snagit is a powerful screen capture and recording tool developed by TechSmith.
- Download and Install Snagit:
- Visit the TechSmith website (dfphoto.net) and download Snagit.
- Install the software on your computer.
- Open the Capture Window:
- Launch Snagit from your applications menu.
- The Snagit capture window will appear on your screen.
- Configure Capture Settings:
- In the capture window, you can configure various settings:
- Capture Type: Choose whether to capture an image or record a video.
- Selection: Select a capture area, such as:
- All-in-One Capture: Automatically detects and captures windows or regions.
- Region: Select a specific area by dragging the cursor.
- Window: Capture a specific window.
- Full Screen: Capture the entire screen.
- Scrolling Window: Capture an entire scrolling window.
- Effects: Add effects like borders, shadows, or watermarks.
- Share: Choose how to share the capture after it’s taken.
- In the capture window, you can configure various settings:
- Start the Capture:
- Click the Capture button or press the Print Screen key (or your configured hotkey) to start the capture.
- Follow the on-screen instructions to select the area you want to capture.
- Edit and Annotate:
- After capturing, the image or video will open in the Snagit Editor.
- Use the editor to:
- Add annotations such as text, arrows, shapes, and highlights.
- Crop, resize, or rotate the image.
- Apply filters and effects.
- Blur sensitive information.
- Save and Share:
- Save the edited image or video to your computer in various formats (e.g., PNG, JPG, MP4).
- Share the capture directly to platforms like:
- Microsoft Office applications (Word, PowerPoint, Excel)
- Google Drive
- Dropbox
- Screencast.com
- Social media
Snagit offers advanced screen capturing and editing capabilities, making it ideal for creating tutorials, documentation, and visual content.
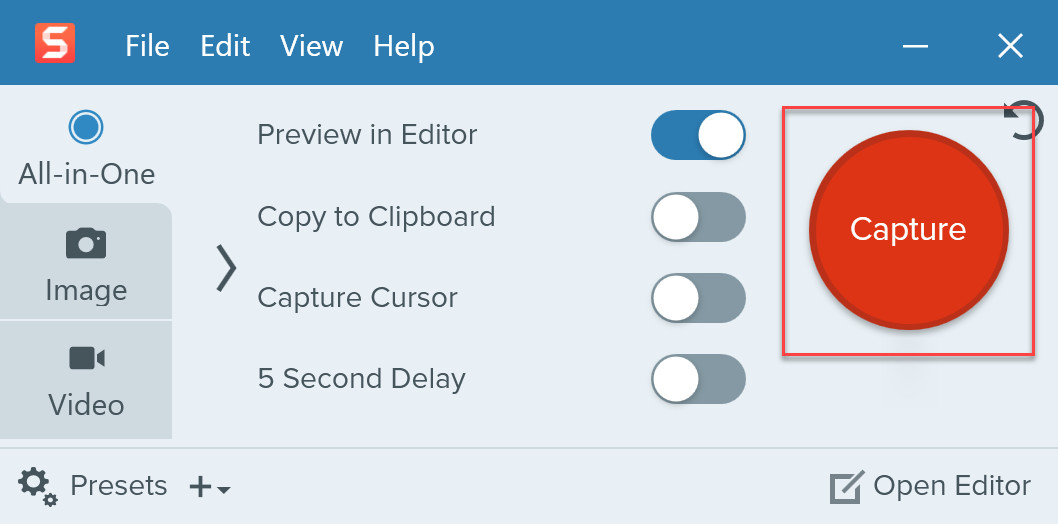 Snagit UI showcasing the capture button
13. How to Annotate and Edit Screenshots with Snagit?
What makes Snagit stand out in terms of editing and annotating screenshots? Snagit provides a robust set of tools for annotating and editing screenshots, allowing you to create clear and informative visuals.
- Open the Screenshot in Snagit Editor:
- After capturing a screenshot with Snagit, it automatically opens in the Snagit Editor.
- Use the Annotation Tools:
- The Snagit Editor offers a variety of annotation tools in the toolbar:
- Arrows: Add arrows to point out specific areas or elements in the screenshot.
- Text: Insert text boxes to add descriptions, labels, or instructions.
- Shapes: Use shapes like rectangles, circles, and ellipses to highlight or draw attention to certain parts of the image.
- Callouts: Create callouts with text to provide explanations or comments.
- Stamps: Insert predefined stamps or create custom stamps to add visual cues.
- Highlighter: Highlight text or areas to emphasize important information.
- Blur: Blur sensitive information like personal data or passwords.
- The Snagit Editor offers a variety of annotation tools in the toolbar:
- Customize Annotation Properties:
- For each annotation tool, you can customize properties such as:
- Color: Change the color of arrows, text, shapes, and highlights.
- Size: Adjust the size or thickness of lines, arrows, and shapes.
- Font: Select the font, size, and style for text annotations.
- Opacity: Adjust the transparency of annotations.
- For each annotation tool, you can customize properties such as:
- Use the Editing Tools:
- The Snagit Editor also provides editing tools for:
- Cropping: Remove unwanted parts of the screenshot.
- Resizing: Change the dimensions of the image.
- Cut Out: Remove sections of the image and replace them with a transparent background.
- Effects: Apply effects like borders, shadows, and filters to enhance the image.
- The Snagit Editor also provides editing tools for:
- Organize and Arrange Annotations:
- Use the Snagit Editor to:
- Move annotations by dragging them to the desired location.
- Resize annotations by dragging the corner handles.
- Change the order of annotations by bringing them forward or sending them backward.
- Group annotations to move or edit them together.
- Use the Snagit Editor to:
- Save and Share the Edited Screenshot:
- Save the edited screenshot to your computer in various formats (e.g., PNG, JPG).
- Share the screenshot directly to platforms like email, Microsoft Office applications, Google Drive, and social media.
With Snagit’s annotation and editing tools, you can transform simple screenshots into visually compelling and informative content.
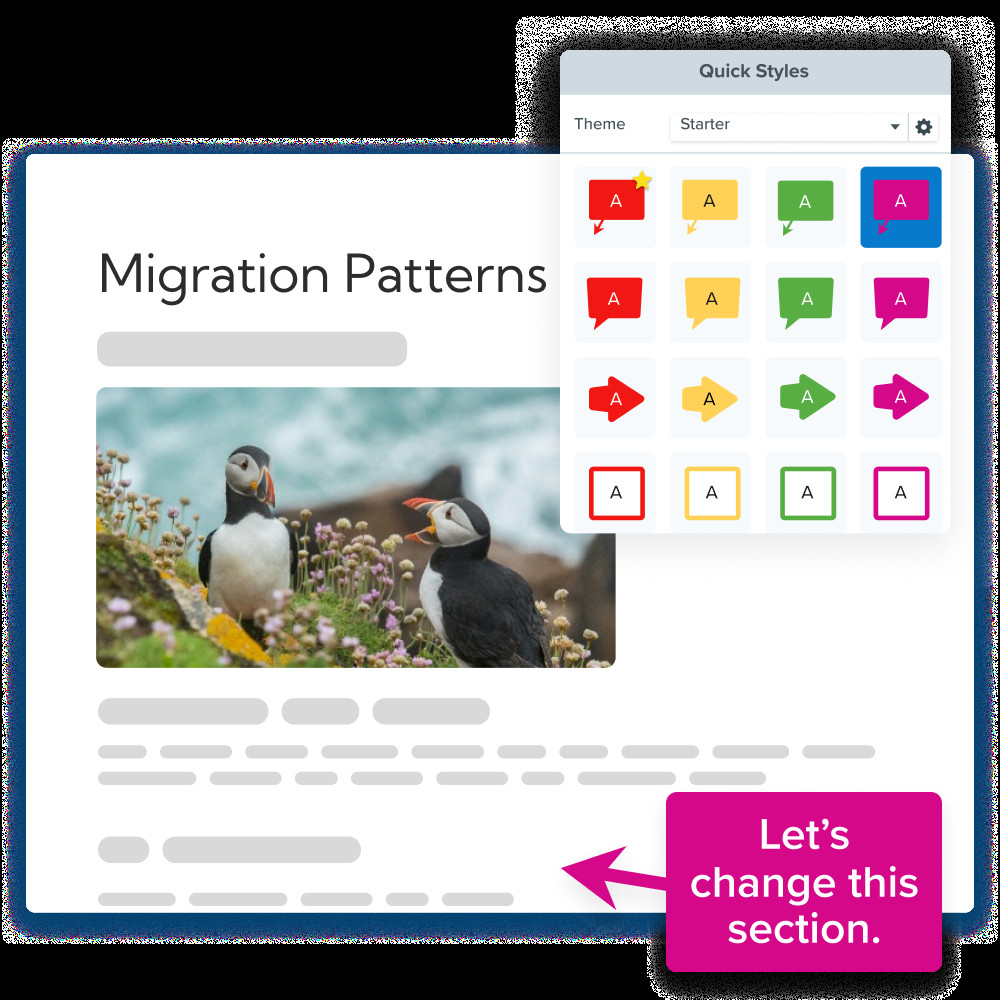 Annotating a screenshot using Snagit's editing tools
14. What Are the Advantages of Using Third-Party Screen Capture Tools?
Why might you choose a third-party tool over the built-in options for screen capture? Using third-party screen capture tools offers several advantages over built-in options.
- Advanced Features: Third-party tools often provide more advanced features, such as:
- Scrolling capture: Capture entire web pages or documents that extend beyond the visible screen area.
- Scheduled capture: Automatically take screenshots at specified intervals.
- Video recording: Record screen activity with audio.
- Optical character recognition (OCR): Extract text from images.
- Enhanced Editing and Annotation: Third-party tools usually offer more robust editing and annotation capabilities:
- A wider range of annotation tools: Arrows, shapes, text boxes, callouts, highlights, and blur tools.
- Advanced editing options: Cropping, resizing, color correction, and effects.
- Customizable settings: Adjust annotation properties like color, size, font, and opacity.
- Improved Organization and Workflow: Third-party tools can streamline your screen capture workflow:
- Automatic file naming and storage: Configure how screenshots are named and where they are saved.
- Tagging and categorization: Organize screenshots with tags and categories.
- Cloud integration: Share screenshots directly to cloud storage services like Google Drive, Dropbox, and OneDrive.
- Better Performance and Reliability: Third-party tools are often optimized for performance and reliability:
- Faster capture speeds: Capture screenshots more quickly than built-in tools.
- Fewer bugs and crashes: Experience fewer issues compared to built-in tools.
- Regular updates: Benefit from ongoing improvements and bug fixes.
- Cross-Platform Compatibility: Some third-party tools are available for multiple operating systems:
- Windows, macOS, ChromeOS, iOS, and Android: Use the same tool across different devices.
By offering advanced features, enhanced editing capabilities, improved organization, and better performance, third-party screen capture tools can significantly enhance your productivity and efficiency.
15. How Can dfphoto.net Help You Master Screen Photography?
How does dfphoto.net support your journey in mastering screen photography? At dfphoto.net, we provide a wealth of resources to help you master screen photography.
- Comprehensive Tutorials: Access detailed tutorials on various screen capture techniques, covering different devices and operating systems.
- In-Depth Guides: Learn about advanced features of screen capture tools like Snagit, including editing and annotation techniques.
- Expert Tips: Discover tips and tricks for creating visually compelling and informative screenshots.
- Device-Specific Instructions: Find step-by-step instructions tailored to your specific device, whether it’s a Windows PC, Mac, iPhone, iPad, or Android device.
- Visual Examples: View high-quality images and videos demonstrating screen capture techniques and editing processes.
16. What Are Some Advanced Tips for Taking Great Screenshots?
Want to take your screenshots to the next level? Here are some advanced tips for taking great screenshots.
- Plan Your Shot:
- Before taking a screenshot, plan what you want to capture and how you want it to look.
- Remove any unnecessary elements from the screen, such as clutter or distractions.
- Arrange the elements you want to capture in a visually appealing way.
- Use a Clean Background:
- Choose a clean and uncluttered background for your screenshot.
- A simple background helps to focus attention on the main subject of the image.
- Consider using a solid color or a blurred background.
- Optimize Image Quality:
- Set the resolution of your screen to the highest possible setting before taking a screenshot.
- Use a lossless image format like PNG to preserve image quality.
- Avoid using lossy image formats like JPEG, which can introduce compression artifacts.
- Crop and Resize Carefully:
- Crop the screenshot to remove any unnecessary areas around the edges.
- Resize the image to the appropriate dimensions for its intended use.
- Avoid resizing the image too much, as this can reduce image quality.
- Add Annotations Sparingly:
- Use annotations to highlight or explain specific elements in the screenshot.
- Avoid overusing annotations, as this can make the image look cluttered and confusing.
- Use clear and concise language in your annotations.
- Maintain a Consistent Style:
- If you are creating a series of screenshots, maintain a consistent style throughout.
- Use the same fonts, colors, and annotation styles in each image.
- This will help to create a cohesive and professional look.
- Consider Your Audience:
- When taking a screenshot, consider who will be viewing it.
- Use language and annotations that are appropriate for your audience.
- If you are creating a tutorial, provide clear and step-by-step instructions.
17. How to Optimize Screenshots for Different Platforms?
How can you ensure your screenshots look their best on various platforms? Optimizing screenshots for different platforms ensures they look their best and are easily viewable.
- Websites and Blogs:
- File Format: Use JPEG for photographs and PNG for graphics with text or sharp lines.
- Dimensions: Resize the screenshot to fit the content area of your website or blog.
- Compression: Optimize the image to reduce file size without sacrificing too much quality.
- Alt Text: Add descriptive alt text to the image for SEO purposes and accessibility.
- Social Media:
- Dimensions: Follow the recommended image dimensions for each social media platform.
- File Size: Keep the file size small to ensure fast loading times.
- Text Overlay: Add text overlays to the image to make it more engaging.
- Hashtags: Include relevant hashtags in the image caption to increase visibility.
- Email:
- File Size: Keep the file size small to avoid exceeding email attachment limits.
- Dimensions: Resize the screenshot to a reasonable size for viewing on different devices.
- Inline Images: Embed the image directly in the email body instead of attaching it as a file.
- Descriptive Text: Provide descriptive text around the image to explain its context.
- Presentations:
- Resolution: Use high-resolution screenshots to ensure they look sharp on large screens.
- Annotations: Add annotations to the image to highlight key points.
- Transitions: Use transitions to smoothly introduce the screenshot into the presentation.
- Accessibility: Ensure the image is accessible to people with disabilities by providing alt text and captions.
- Mobile Devices:
- File Size: Optimize the image for mobile devices to reduce data usage.
- Dimensions: Resize the screenshot to fit the screen size of mobile devices.
- Touch Targets: Ensure that touch targets in the image are large enough to be easily tapped on mobile devices.
- Responsiveness: Make sure the image is responsive and adapts to different screen sizes.
18. What Are the Ethical Considerations When Taking Screenshots?
Are there any ethical concerns to keep in mind when capturing screens? There are ethical considerations to keep in mind when taking screenshots.
- Privacy:
- Respect the privacy of individuals when taking screenshots of their personal information.
- Avoid capturing sensitive data such as passwords, credit card numbers, or medical records.
- Obtain consent before taking screenshots of people’s faces or personal conversations.
- Confidentiality:
- Maintain the confidentiality of proprietary or confidential information when taking screenshots of business documents or systems.
- Avoid sharing screenshots of sensitive data with unauthorized individuals.
- Follow company policies and guidelines regarding the handling of confidential information.
- Copyright:
- Respect copyright laws when taking screenshots of copyrighted material.
- Obtain permission from the copyright holder before using screenshots of copyrighted material for commercial purposes.
- Provide attribution to the original source when using screenshots of copyrighted material.
- Misrepresentation:
- Avoid using screenshots to misrepresent or deceive others.
- Do not alter or manipulate screenshots in a way that distorts the original meaning or context.
- Provide accurate and truthful information when using screenshots to support your claims.
- Transparency:
- Be transparent about your intentions when taking screenshots.
- Inform individuals that you are taking a screenshot and explain how it will be used.
- Provide individuals with the opportunity to review and approve the screenshot before it is shared.
19. How to Troubleshoot Common Screenshot Issues?
Encountering problems with taking screenshots? Here’s how to troubleshoot common screenshot issues.
- Screenshot Not Saving:
- Check Storage: Make sure you have enough storage space on your device.
- Permissions: Ensure the screenshot app has the necessary permissions to save files.
- Default Save Location: Check the default save location for screenshots and verify that it exists.
- Screenshot is Blank or Black:
- Hardware Acceleration: Disable hardware acceleration in your browser or graphics settings.
- Driver Issues: Update your graphics card drivers to the latest version.
- Protected Content: Some content may be protected from being captured, such as DRM-protected videos.
- Screenshot is Low Quality:
- Resolution: Increase the resolution of your screen before taking the screenshot.
- Image Format: Use a lossless image format like PNG instead of JPEG.
- Compression: Avoid compressing the image too much when saving.
- Screenshot Tool Not Working:
- Restart: Restart your device to refresh the system.
- Update: Make sure the screenshot tool is up to date.
- Reinstall: Uninstall and reinstall the screenshot tool.
- Keyboard Shortcut Not Working:
- Conflicting Shortcuts: Check for any conflicting keyboard shortcuts that may be interfering with the screenshot tool.
- Keyboard Functionality: Make sure the keyboard keys are functioning properly.
- Accessibility Settings: Review accessibility settings that may be affecting keyboard behavior.
- Partial Screenshot Not Working:
- Mouse Issues: Ensure your mouse is functioning properly and that you can accurately select the area you want to capture.
- Driver Conflicts: Check for any driver conflicts that may be affecting mouse behavior.
- Screenshot App Crashing:
- Resource Usage: Close any unnecessary applications to free up system resources.
- Memory Issues: Increase the amount of memory allocated to the screenshot app.
- Compatibility: Check the compatibility of the screenshot app with your operating system.
20. What Are the Future Trends in Screen Photography?
What developments can we expect in the future of screen photography? There are several exciting future trends in screen photography to anticipate.
- AI-Powered Screen Capture:
- Smart Capture: AI algorithms will automatically detect and capture relevant content on the screen.
- Intelligent Annotations: AI will suggest annotations and improvements to screenshots based on context.
- Content Recognition: AI will identify and extract text, objects, and other elements from screenshots.
- Augmented Reality (AR) Integration:
- AR Annotations: Annotate real-world objects and environments by overlaying digital annotations on screenshots.
- Interactive Screenshots: Create interactive screenshots that allow users to explore and interact with digital content.
- Cloud-Based Screen Capture:
- Seamless Sharing: Capture and share screenshots directly to cloud storage services.
- Cross-Device Syncing: Access screenshots from any device with cloud syncing.
- Collaboration Features: Collaborate on screenshots with colleagues in real-time.
- Enhanced Video Recording:
- Dynamic Recording: Automatically adjust recording settings based on screen content.
- Virtual Backgrounds: Replace the background of video recordings with virtual backgrounds.
- Real-Time Annotations: Add annotations to video recordings in real-time.
- Improved Accessibility:
- Voice Control: Capture and annotate screenshots using voice commands.
- Text-to-Speech: Convert text annotations to speech for users with visual impairments.
- Subtitle Generation: Automatically generate subtitles for video recordings.
By staying informed about these future trends, you can prepare for the next evolution in screen photography and take advantage of new and innovative techniques.
FAQ: Mastering the Art of Screen Capture
- Q1: What is the easiest way to take a screenshot on Windows?
- The easiest way is to press the Print Screen (PrtScn) key, which copies the entire screen to your clipboard, and then paste it into an image editor like Paint.
- Q2: How can I capture only a specific part of my screen on macOS?
- Use the shortcut Shift + Command + 4, which turns your cursor into a crosshair, allowing you to select a specific area to capture.
- **Q3: Is