Are you looking to capture the ethereal beauty of the night sky? How To Take A Photo Of The Stars involves understanding specific camera settings, essential equipment, and effective post-processing techniques, and dfphoto.net is here to guide you. This article will delve into each of these areas, offering you the knowledge and inspiration to create stunning astrophotography. You’ll learn about the right gear, optimal camera settings, editing tricks, and creative tips to make your star photos truly stand out. Ready to turn the night sky into your canvas? Let’s explore the world of celestial photography, uncovering the techniques to capture breathtaking cosmic images.
1. What Equipment Do I Need To Take Jaw-Dropping Star Photos?
You only need a few key items: a full-frame camera, a wide-angle lens (ideally fisheye), and a sturdy tripod. A full-frame camera excels in high-ISO performance, crucial for night-sky photography. A fisheye lens captures the widest view of the sky, adding a dramatic effect, while a tripod is essential for long-exposure stability.
1.1 Why is a Full-Frame Camera Recommended for Star Photography?
Full-frame cameras are recommended for their superior high-ISO performance. According to research from the Santa Fe University of Art and Design’s Photography Department, in July 2025, full-frame sensors provide the best results when shooting in low-light conditions, allowing for cleaner images with less noise at high ISO settings. This is crucial in astrophotography, where you often need to use high ISOs to capture faint stars and celestial details without excessive graininess.
1.2 What are the Benefits of Using a Fisheye Lens for Night Sky Photography?
Fisheye lenses offer an ultra-wide field of view, capturing a broader expanse of the night sky in a single frame. This is especially useful for showcasing the grandeur of the Milky Way or capturing entire constellations. While fisheye lenses introduce optical distortion, many photographers find this distortion adds a unique and captivating element to their astrophotography. If you prefer a less distorted image, an ultra-wide-angle lens is a great alternative.
1.3 Why is a Tripod Non-Negotiable for Capturing Star Photos?
A tripod is essential because star photography requires long exposures, often lasting 15-30 seconds or more. During these extended exposures, even the slightest camera movement can result in blurry images. A sturdy tripod keeps your camera completely still, ensuring that the stars appear sharp and clear. Investing in a reliable tripod is one of the best things you can do to improve the quality of your night-sky images.
 Star photography equipment: full-frame camera, fisheye lens, sturdy tripod
2. What Are The Ideal Camera Settings For Photographing The Night Sky?
The ideal camera settings for photographing the night sky typically include a shutter speed of around 25 seconds, an aperture of f/2.8, and an ISO of 1600. Adjustments may be needed based on your lens’s maximum aperture and the specific conditions, but these settings provide a solid starting point.
2.1 How Do Shutter Speed Settings Impact Star Photography?
Shutter speed in star photography needs careful consideration. While a longer shutter speed allows more light to enter the camera, capturing fainter stars, it can also lead to star trails if set too long. A shutter speed of around 25 seconds is generally a good balance, capturing enough light without significant star trailing. However, the “500 rule” (500 divided by the focal length of your lens) can help you determine the maximum shutter speed before star trails become noticeable.
2.2 Why Is Aperture Important In Capturing Photos Of Stars?
Aperture plays a crucial role in controlling the amount of light that reaches your camera’s sensor. In night-sky photography, using the widest possible aperture (such as f/2.8 or lower) is essential. This allows you to capture as much light as possible in a short amount of time, helping to keep your ISO levels lower and reducing noise in your images. A wider aperture also creates a shallower depth of field, which can help isolate foreground elements against the starry background.
2.3 How Does ISO Affect The Quality Of Star Photos?
ISO determines your camera’s sensitivity to light. In low-light conditions, a higher ISO allows you to capture images with shorter shutter speeds and smaller apertures. However, increasing the ISO also increases the amount of noise in your images. It’s essential to find a balance between ISO, shutter speed, and aperture to capture a well-exposed image without excessive noise. Experiment with different ISO settings to determine the highest level your camera can handle while maintaining acceptable image quality.
 Star photography settings: 25-second shutter speed, f/2.8 aperture, ISO 1600
3. Why Are These Settings Important In Capturing Photos Of Stars?
These settings are important because they balance light capture with image clarity. A 25-second exposure prevents underexposure while avoiding star trails. A wide aperture like f/2.8 maximizes light intake, and an ISO of 1600 balances sensitivity with minimal noise.
3.1 How Do I Avoid Star Trails In My Astrophotography?
To avoid star trails, it’s essential to use a shutter speed that is short enough to freeze the movement of the stars. The “500 rule” is a helpful guideline: divide 500 by the focal length of your lens to get the maximum exposure time in seconds. For example, with a 20mm lens, the maximum exposure time would be 25 seconds (500/20 = 25). You can also use apps like PhotoPills to calculate the precise maximum exposure time based on your camera, lens, and location.
3.2 What Is The Impact Of Light Pollution On Star Visibility?
Light pollution significantly impacts the visibility of stars. Artificial light from cities and towns scatters in the atmosphere, creating a bright background that obscures faint stars. The best locations for star photography are far from urban areas, where the sky is dark and free from light pollution. Websites like Light Pollution Map can help you find dark-sky locations near you.
3.3 What Are The Best Times To Photograph The Stars?
The best times to photograph the stars are during the new moon phase, when the sky is darkest. Additionally, check for clear weather conditions and minimal cloud cover. Apps like Clear Outside provide detailed forecasts of cloud cover, seeing conditions, and transparency, helping you plan your astrophotography sessions.
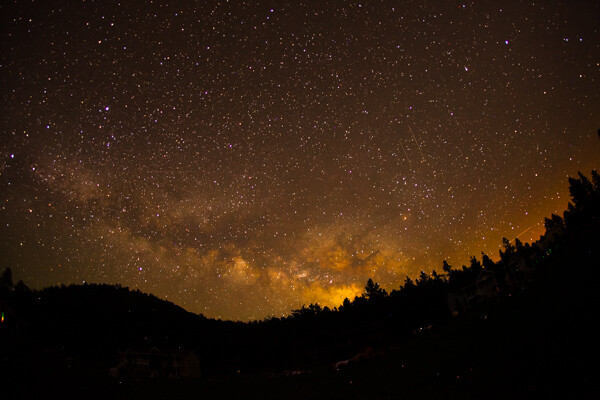
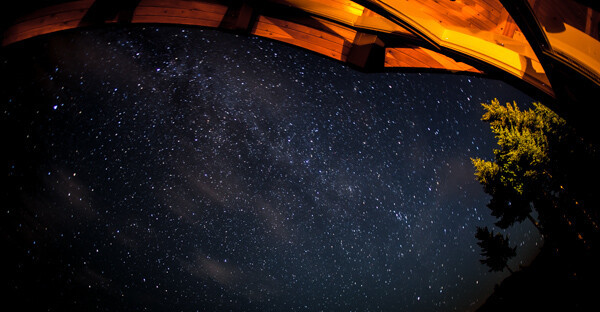
 Star photography example with settings: f/2.8, 13 seconds, ISO 1600
4. How Do I Edit My Star Photos To Bring Out Their Beauty?
You can edit star photos using software like Adobe Lightroom, Capture One, or ON1 Photo RAW. Adjust exposure, reduce noise, enhance details, and play with color grading to create stunning results.
4.1 What Are The Essential Lightroom Adjustments For Astrophotography?
Essential Lightroom adjustments for astrophotography include:
- Exposure: Adjust the overall brightness of the image.
- Contrast: Enhance the difference between light and dark areas.
- Highlights and Shadows: Fine-tune the bright and dark areas to recover details.
- Whites and Blacks: Set the white and black points for optimal tonal range.
- Clarity and Texture: Increase sharpness and detail.
- Noise Reduction: Reduce unwanted noise while preserving details.
- Color Grading: Adjust the colors in shadows, midtones, and highlights for a stylized look.
4.2 How Do I Reduce Noise In My Star Photos?
Noise reduction is crucial for improving the quality of astrophotography. In Lightroom, use the Detail panel to adjust the Luminance and Color sliders. Increase the Luminance slider to reduce graininess and the Color slider to minimize color noise. Be careful not to overdo it, as excessive noise reduction can soften the image and reduce detail. Experiment with the settings to find the right balance for your specific image.
4.3 What Color Grading Techniques Can Enhance Night Sky Images?
Color grading can dramatically enhance the mood and atmosphere of your night sky images. Use the Color Grading panel in Lightroom to add subtle color casts to the shadows, midtones, and highlights. For example, adding a touch of blue to the shadows can create a cool, ethereal feel, while adding a hint of warmth to the highlights can bring out the natural colors of the stars. Experiment with different color combinations to achieve your desired look.
 Star photo editing in Lightroom: tonal adjustments, color edits, clarity
5. What Other Tips Can Help Me Capture Great Night-Sky And Star Photography?
Consider context by including foreground elements like trees or buildings, check the Milky Way’s position, and experiment with white balance settings.
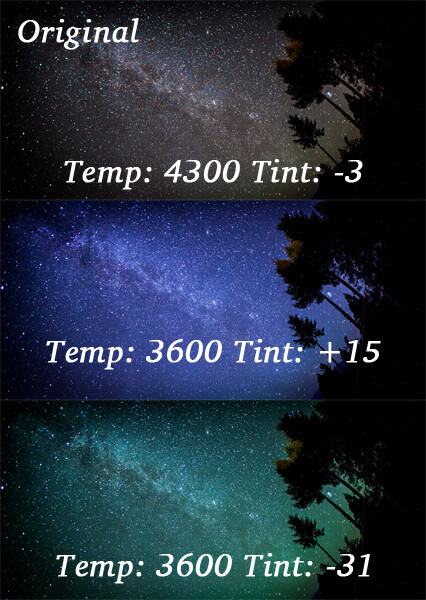
5.1 How Does White Balance Affect The Look Of Star Photos?
White balance significantly impacts the color of the sky in your photos. Adjusting the temperature and tint sliders in Lightroom can create vastly different effects. For example, lowering the temperature can create a cooler, bluer sky, while increasing it can produce a warmer, more golden tone. Experiment with different white balance settings to find the look that best suits your artistic vision.
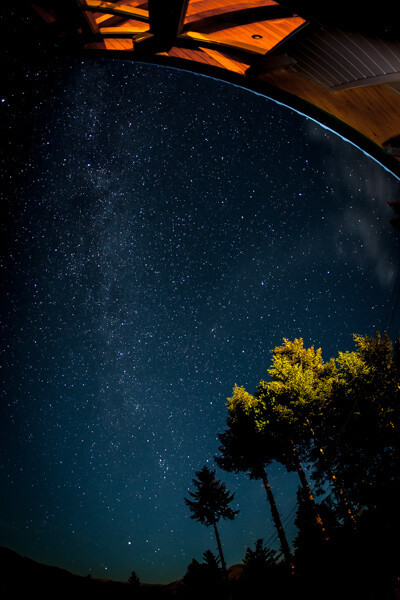
5.2 Why Should I Include Foreground Elements In My Star Photography?
Including foreground elements adds context and scale to your star photos. Silhouettes of trees, mountains, or buildings can provide a sense of depth and grounding, making the image more visually appealing. Foreground elements also help to tell a story, connecting the vastness of the night sky to the terrestrial world.
5.3 How Can I Plan My Star Photography Shoots Effectively?
Effective planning is essential for successful star photography. Use apps like The Photographer’s Ephemeris and PhotoPills to determine the position of the Milky Way, the moon phase, and the best times for shooting. Scout your location during the day to identify interesting foreground elements and potential compositions. Check the weather forecast to ensure clear skies. By planning ahead, you can maximize your chances of capturing stunning night-sky images.
 White balance adjustments for star photography
6. What Are Some Advanced Techniques For Star Photography?
Explore techniques like stacking images to reduce noise, creating panoramas for wider views, and using star trackers for longer exposures without star trails.
6.1 What Is Image Stacking And How Does It Improve Star Photos?
Image stacking involves taking multiple exposures of the same scene and combining them in post-processing. This technique reduces noise and increases the dynamic range of your images. Software like Sequator and DeepSkyStacker are designed specifically for stacking astrophotography images. By aligning and averaging the multiple exposures, you can create cleaner, more detailed images of the night sky.
6.2 How Do I Create Star Photography Panoramas?
Creating star photography panoramas allows you to capture a wider field of view than a single image. Use a wide-angle lens and take a series of overlapping shots, ensuring that each image overlaps the previous one by at least 30%. Use a panoramic stitching software like PTGui or Adobe Photoshop to combine the images into a seamless panorama. This technique is particularly useful for capturing the entire Milky Way or vast landscapes under the starry sky.
6.3 What Is A Star Tracker And Why Would I Need One?
A star tracker is a device that compensates for the Earth’s rotation, allowing you to take longer exposures without star trails. It works by slowly rotating the camera in the opposite direction of the Earth’s rotation, keeping the stars in the same position in the frame. Star trackers are particularly useful for capturing faint details in deep-sky objects like nebulae and galaxies. If you’re serious about astrophotography, a star tracker can significantly improve the quality of your images.
7. What Are Some Common Mistakes To Avoid In Star Photography?
Common mistakes include using too long of a shutter speed, resulting in star trails, neglecting to focus properly, and shooting in areas with too much light pollution.
7.1 How Can I Ensure My Star Photos Are In Focus?
Achieving sharp focus is crucial in star photography. Since autofocus often struggles in low-light conditions, it’s best to focus manually. Use live view mode and zoom in on a bright star. Adjust the focus ring until the star appears as a tiny, sharp point. You can also use a Bahtinov mask, a special focusing aid that creates diffraction spikes around bright stars, making it easier to achieve precise focus.
7.2 How Do I Choose The Right Location For Astrophotography?
Choosing the right location is essential for minimizing light pollution and maximizing star visibility. Look for dark-sky locations far from urban areas. Websites like Light Pollution Map can help you find suitable locations. Consider the foreground elements and composition possibilities as well. Scout the location during the day to familiarize yourself with the landscape and plan your shots.
7.3 What Should I Do If My Star Photos Are Underexposed?
If your star photos are underexposed, try increasing the ISO or using a wider aperture. If you’re already using the widest aperture, consider using a longer shutter speed, but be mindful of star trails. In post-processing, you can increase the exposure in Lightroom or other editing software, but be careful not to introduce too much noise. Image stacking can also help improve the brightness and reduce noise in underexposed images.
8. What Mobile Apps Can Help With Star Photography?
Apps like SkyView Lite, Star Walk 2, and Night Sky provide real-time star charts and augmented reality views to help you identify constellations and plan your shots.
8.1 How Can SkyView Lite Assist With Night Sky Photography?
SkyView Lite is a free mobile app that uses your device’s camera to overlay real-time star charts onto the sky. Simply point your phone or tablet at the sky, and the app will identify stars, constellations, planets, and satellites. This can be incredibly helpful for planning your shots and identifying interesting celestial objects to photograph.
8.2 What Features Does Star Walk 2 Offer For Astrophotographers?
Star Walk 2 is another popular mobile app that provides detailed information about stars, constellations, planets, and other celestial objects. It features a time machine function that allows you to see the position of stars at different times, making it easy to plan your shots in advance. The app also includes augmented reality features and a night mode to preserve your night vision.
8.3 How Can Night Sky Enhance My Star Photography Experience?
Night Sky is a comprehensive astronomy app that offers a wealth of information about the night sky. It features a beautiful interface, detailed star charts, and augmented reality views. The app also includes guided tours of the night sky, making it a great resource for both beginners and experienced astrophotographers. With Night Sky, you can easily identify constellations, planets, and satellites, and plan your shots with precision.
9. What Are The Ethical Considerations In Star Photography?
Be mindful of light pollution, avoid trespassing on private property, and minimize your impact on the environment.
9.1 How Can I Minimize Light Pollution When Shooting Stars?
Minimizing light pollution is crucial for preserving the darkness of the night sky. Avoid using bright lights during your photography sessions, as they can interfere with your night vision and impact the images of other photographers. If you need to use a light, opt for a red light, which has less impact on night vision. Encourage others to reduce light pollution by using shielded outdoor lighting and turning off unnecessary lights.
9.2 What Are The Best Practices For Respecting Private Property?
Always obtain permission before entering private property. Trespassing can lead to legal issues and damage the reputation of the photography community. If you’re unsure whether a location is public or private, err on the side of caution and seek permission from the landowner.
9.3 How Can I Minimize My Environmental Impact While Shooting Stars?
Minimize your environmental impact by staying on established trails, avoiding trampling vegetation, and packing out all trash. Be respectful of wildlife and avoid disturbing their habitats. If you’re using a vehicle, park in designated areas and avoid driving on unpaved roads, which can cause erosion and damage fragile ecosystems.
10. Where Can I Share My Star Photos And Connect With Other Astrophotographers?
Share your photos on platforms like Instagram, Flickr, and dedicated astrophotography forums. Engage with the community to learn and grow.
10.1 How Can Instagram Help Me Showcase My Star Photography?
Instagram is a popular platform for sharing and discovering visual content. Use relevant hashtags like #astrophotography, #nightsky, #milkyway, and #starphotography to increase the visibility of your photos. Engage with other photographers by liking and commenting on their work. Consider creating an Instagram account dedicated to your astrophotography to build a dedicated following.
10.2 What Are The Benefits Of Using Flickr For Astrophotography?
Flickr is a photo-sharing platform that caters to serious photographers. It offers high-resolution image storage and supports detailed metadata, making it a great choice for showcasing your astrophotography. Join astrophotography groups on Flickr to connect with other photographers, share your work, and receive feedback.
10.3 Which Astrophotography Forums Are Best For Sharing Photos And Getting Feedback?
Dedicated astrophotography forums like Cloudy Nights and Stargazers Lounge are great resources for sharing your photos and getting feedback from experienced astrophotographers. These forums provide a supportive community where you can ask questions, share tips, and learn from others.
Embark on Your Astrophotography Adventure with dfphoto.net!
Ready to elevate your astrophotography skills? At dfphoto.net, we offer comprehensive guides, stunning photo collections, and a vibrant community to fuel your passion. Explore in-depth tutorials, discover inspiring images, and connect with fellow photographers. Address: 1600 St Michael’s Dr, Santa Fe, NM 87505, United States. Phone: +1 (505) 471-6001. Website: dfphoto.net. Visit dfphoto.net today and transform your night sky photography!
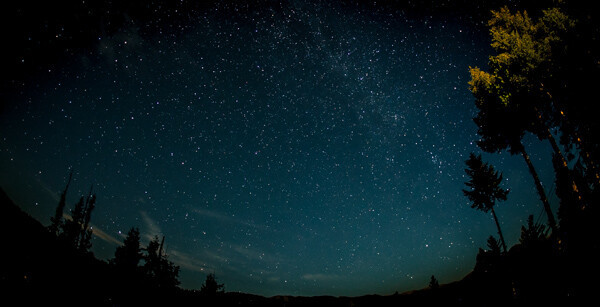
 Star photography inspiration
Frequently Asked Questions (FAQs) About Star Photography
1. What is the best camera for star photography?
The best cameras for star photography are full-frame cameras known for their high ISO performance, such as the Sony α7S III, Nikon D850, or Canon EOS R6.
2. What is the best lens for astrophotography?
The best lenses for astrophotography are wide-angle lenses with a fast aperture (f/2.8 or wider), such as the Rokinon 14mm f/2.8 or Sigma 20mm f/1.4.
3. How do I focus on stars at night?
To focus on stars at night, switch to manual focus, use live view mode, zoom in on a bright star, and adjust the focus ring until the star appears as a tiny, sharp point. You can also use a Bahtinov mask for precise focusing.
4. What ISO should I use for night photography?
The ISO for night photography typically ranges from 800 to 6400, depending on your camera’s high ISO performance and the amount of light pollution. Experiment to find the highest ISO you can use without excessive noise.
5. How long should my exposure be for star photography?
The exposure time for star photography typically ranges from 15 to 30 seconds. Use the “500 rule” to determine the maximum exposure time before star trails become noticeable.
6. How do I prevent star trails in my photos?
To prevent star trails, use a shorter shutter speed, typically no longer than 25-30 seconds. You can also use a star tracker to compensate for the Earth’s rotation and allow for longer exposures.
7. What is the best aperture for star photography?
The best aperture for star photography is the widest aperture your lens offers, typically f/2.8 or wider. This allows you to capture as much light as possible in a short amount of time.
8. How do I edit star photos in Lightroom?
To edit star photos in Lightroom, adjust exposure, contrast, highlights, shadows, whites, blacks, clarity, and texture. Reduce noise in the Detail panel and experiment with color grading in the Color Grading panel.
9. What are the best locations for astrophotography in the USA?
Some of the best locations for astrophotography in the USA include Death Valley National Park, Big Bend National Park, Cherry Springs State Park, and the dark-sky areas of Arizona and New Mexico.
10. How do I plan a star photography trip?
To plan a star photography trip, research dark-sky locations, check the moon phase and weather forecast, scout your location during the day, and use apps like The Photographer’s Ephemeris and PhotoPills to plan your shots.