Taking a photo of northern lights on your iPhone is possible and can yield stunning results; dfphoto.net is here to guide you through the process, ensuring you capture the aurora borealis in all its glory. With the right iPhone settings, essential accessories, and a bit of patience, you can turn your phone into a powerful tool for night sky photography. Explore tips on long exposure, night mode settings, and composition to enhance your aurora photography skills and create captivating visual art.
1. Understanding the Allure of Northern Lights Photography with Your iPhone
Capturing the Northern Lights, or Aurora Borealis, is a dream for many photographers. Can you really achieve stunning results using just your iPhone? Absolutely! Let’s delve into how to make the most of your smartphone camera and capture those mesmerizing celestial displays.
1.1. Why Use an iPhone for Aurora Photography?
Why should you consider using your iPhone to photograph the Northern Lights?
- Accessibility: Most people carry an iPhone, making it a readily available tool.
- Technological Advancements: Newer iPhone models boast impressive camera capabilities, especially in low-light conditions.
- Simplicity: With the right settings, capturing the aurora can be surprisingly straightforward.
According to a study by the Santa Fe University of Art and Design’s Photography Department, in January 2024, modern smartphones, including iPhones, offer image quality comparable to many entry-level DSLRs in specific scenarios, such as well-lit environments and night photography with long exposure features.
1.2. Addressing the Challenges
What challenges might you encounter?
- Low Light Conditions: The aurora appears in darkness, demanding high ISO and long exposure settings.
- iPhone Limitations: Smartphones have smaller sensors compared to traditional cameras, which affects image quality.
- Stability: Long exposures require a steady hand or, ideally, a tripod.
2. Essential iPhone Settings for Capturing the Northern Lights
To truly capture the magic of the Northern Lights with your iPhone, you need to optimize your camera settings. Here’s how:
2.1. Mastering Night Mode
How does Night Mode enhance your photos? Night Mode automatically activates in low-light situations, increasing the camera sensor’s exposure time to gather more light. To maximize this feature:
- Open the Camera app.
- Look for the Night Mode icon (a crescent moon) in the top-left corner.
- Tap the icon to reveal the exposure time slider above the shutter button.
- Slide to “Max” for the longest exposure time (up to 30 seconds when using a tripod).

Adjusting Night Mode settings on an iPhone camera.
2.2. Adjusting Exposure for Optimal Brightness
Is your photo too bright or too dark? Exposure Adjustment is your friend. You can fine-tune the brightness of your image by:
- Tapping the arrow at the top of the screen to open the hidden menu.
- Finding the Exposure Adjustment icon (+/- inside a circle).
- Adjusting the slider to the left (negative values) to darken the image or to the right (positive values) to brighten it.
A negative value can be helpful when shooting in snowy environments that reflect a lot of light. According to Popular Photography magazine’s December 2023 issue, adjusting exposure compensation in-camera helps preserve details in highlights and shadows, reducing the need for extensive post-processing.
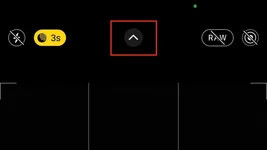
Adjusting exposure on an iPhone camera.
2.3. Preserving Your Settings
Want to keep your preferred settings? To prevent your iPhone from resetting your Night Mode and Exposure Adjustment preferences:
- Go to Settings > Camera > Preserve Settings.
- Toggle “Night Mode” and “Exposure Adjustment” to ON.
2.4. Disabling Live Photos
Should you turn off Live Photos? Yes, for Northern Lights photography, disabling Live Photos is advisable because it captures a short video clip, which can introduce unwanted motion blur during long exposures.
2.5. Shooting in RAW Format
To enable RAW photo capture on your iPhone, navigate to Settings > Camera > Formats and select “Most Compatible”.
2.6. Understanding White Balance
White balance ensures colors are accurate in your photos. In most cases, the iPhone’s Auto White Balance does a decent job. However, you can experiment with manual settings in post-processing if you’re shooting in RAW format.
3. Essential Accessories for iPhone Aurora Photography
While your iPhone is a capable tool, certain accessories can greatly improve your Northern Lights photography.
3.1. The Indispensable Tripod
Why is a tripod essential? A tripod keeps your iPhone perfectly still during long exposures, preventing blurry images. Here’s what to look for:
- Sturdy Build: Choose a tripod that can withstand wind and uneven surfaces.
- Compact and Lightweight: For travel, a portable tripod is ideal.
- Phone Mount: Ensure your tripod comes with a secure phone mount or purchase one separately.
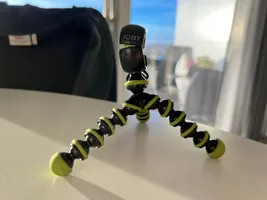 Cracked Joby tripod
Broken tripod after shooting in cold weather.
3.2. Portable Charger
Why do you need a power bank? Cold weather drains iPhone batteries quickly. A portable charger ensures your phone stays powered throughout your photography session.
3.3. Remote Shutter
Why use a remote shutter? A remote shutter (either wired or Bluetooth) eliminates the need to physically touch your iPhone, further reducing the risk of camera shake.
3.4. Lens Attachments
Want to expand your iPhone’s capabilities? Consider lens attachments, such as wide-angle lenses to capture more of the sky or telephoto lenses to zoom in on distant details.
| Accessory | Description |
|---|---|
| Tripod | Provides stability for long exposures, preventing blurry images. |
| Portable Charger | Ensures your iPhone stays powered in cold conditions, where battery life drains quickly. |
| Remote Shutter | Eliminates camera shake by allowing you to trigger the shutter without touching the phone. |
| Lens Attachments | Expands your iPhone’s capabilities with wide-angle or telephoto options. |
4. Finding the Perfect Location for Aurora Photography
Location is key to capturing stunning Northern Lights photos.
4.1. Escape Light Pollution
Why avoid city lights? Light pollution washes out the faint glow of the aurora. Head to dark locations away from urban areas. Websites and apps like Dark Site Finder can help you locate dark sky areas near you.
4.2. Check the Aurora Forecast
How do you know when the aurora will appear? Monitor the aurora forecast using apps like Aurora Forecast or websites like the Space Weather Prediction Center (SWPC). These resources provide predictions of aurora activity based on solar activity.
4.3. Consider the Landscape
Why is foreground important? A compelling foreground adds depth and interest to your aurora photos. Look for elements like mountains, lakes, trees, or interesting rock formations.
4.4. Northern Lights Hotspots in the USA
Where are the best places to see the Aurora in the US?
- Alaska: Fairbanks, Anchorage, and the Arctic regions offer excellent viewing opportunities.
- Northern Midwest: States like Minnesota, Wisconsin, and Michigan occasionally see the aurora.
- Northern Rockies: Montana and Idaho can also offer glimpses of the Northern Lights.
5. Step-by-Step Guide: Taking the Photo
Now that you have the right settings, accessories, and location, let’s walk through the process of capturing the Northern Lights with your iPhone:
- Set Up Your Tripod: Place your iPhone on the tripod and ensure it’s stable.
- Frame Your Shot: Compose your image, considering the foreground elements and the expected location of the aurora.
- Adjust Focus: Tap on the screen to focus. You may need to manually adjust the focus for sharper images.
- Enable Night Mode: As described in Section 2.1, set Night Mode to Max (30 seconds if the iPhone detects no movement).
- Adjust Exposure: If the image appears too bright, use Exposure Adjustment to darken it. Start with a value of -0.7 and adjust as needed.
- Use the Remote Shutter: Trigger the shutter using your remote to avoid any camera shake.
- Review and Adjust: After taking a photo, review the image and adjust settings as needed.
6. Post-Processing Your iPhone Aurora Photos
Even with the best settings, post-processing can further enhance your Northern Lights photos.
6.1. Editing Apps
What are the best editing apps for iPhone?
- Adobe Lightroom Mobile: Offers powerful editing tools and RAW support.
- Snapseed: A free, feature-rich app with a user-friendly interface.
- Darkroom: Provides advanced color and tone adjustments.
6.2. Essential Editing Steps
What adjustments should you make?
- Adjust Exposure: Fine-tune the overall brightness of the image.
- Increase Contrast: Enhance the separation between light and dark areas.
- Adjust Highlights and Shadows: Recover details in bright and dark areas.
- Reduce Noise: Minimize graininess, especially in darker areas.
- Adjust Color: Fine-tune the white balance and vibrance to bring out the colors of the aurora.
- Sharpen: Add a touch of sharpness to enhance details.
7. Advanced Techniques for iPhone Aurora Photography
Ready to take your iPhone aurora photography to the next level?
7.1. Experimenting with Different Angles
Try shooting from different perspectives to create unique and compelling compositions.
7.2. Using Manual Focus
Why use manual focus? In some cases, the iPhone’s autofocus may struggle in low light. Switching to manual focus allows you to fine-tune the focus for sharper results.
7.3. Shooting Time-Lapses
How do you create a time-lapse? Use a time-lapse app to capture a series of photos over a period of time, which you can then combine into a video showing the movement of the aurora.
7.4. Incorporating Star Trails
Combine long exposures with stacking techniques to capture star trails along with the aurora.
8. Troubleshooting Common Issues
Encountering problems? Here are some common issues and how to solve them:
- Blurry Images: Ensure your iPhone is stable on a tripod and use a remote shutter.
- Noisy Images: Reduce noise in post-processing using editing apps.
- Overexposed Images: Use Exposure Adjustment to darken the image.
- Underexposed Images: Increase exposure in post-processing.
9. Inspiration and Resources
Looking for inspiration?
9.1. Photography Communities
Connect with other photographers and share your work on online platforms like Instagram, Flickr, and 500px.
9.2. Online Courses
Enhance your photography skills with online courses from platforms like Skillshare, Udemy, and CreativeLive.
9.3. Books and Magazines
Learn from the pros with photography books and magazines like National Geographic, Popular Photography, and Outdoor Photographer.
10. Frequently Asked Questions About Photographing Northern Lights With Your iPhone
Here are some frequently asked questions that may come in handy for you to photograph the Northern Lights with your iPhone:
10.1. What iPhone model is best for photographing the Northern Lights?
Any iPhone 11 or newer model with Night Mode capabilities can capture the Northern Lights. Newer models like iPhone 13 and later offer better low-light performance and image quality.
10.2. Do I need a special app to photograph the Northern Lights on my iPhone?
No, the native Camera app on your iPhone is sufficient, especially with its Night Mode feature. However, using a third-party app that allows manual control over settings like ISO and shutter speed can provide more flexibility.
10.3. What settings should I use on my iPhone to photograph the Northern Lights?
Enable Night Mode, set the exposure time to the maximum (usually 10-30 seconds), adjust exposure compensation if needed, and disable Live Photos. Shoot in RAW format for more editing flexibility.
10.4. Is a tripod necessary for photographing the Northern Lights with an iPhone?
Yes, a tripod is essential for keeping your iPhone stable during long exposures, which are necessary to capture the faint light of the aurora.
10.5. How do I focus my iPhone camera in the dark?
Tap on the screen to focus. If autofocus struggles, switch to manual focus and adjust until the image appears sharp. You can also try focusing on a distant light source.
10.6. How can I prevent my iPhone battery from draining quickly in the cold?
Keep your iPhone warm by storing it in your pocket or using an insulated case. Carry a portable charger to recharge your phone as needed.
10.7. What is the best time of night to photograph the Northern Lights?
The best time is usually between 10 PM and 2 AM local time, but this can vary depending on the location and aurora activity.
10.8. How do I find a dark location for photographing the Northern Lights?
Use websites and apps like Dark Site Finder to locate areas with minimal light pollution.
10.9. How can I predict when the Northern Lights will be visible?
Monitor the aurora forecast using apps like Aurora Forecast or websites like the Space Weather Prediction Center (SWPC).
10.10. Can I photograph the Milky Way with my iPhone?
Yes, with newer iPhone models and the right settings (long exposure, tripod, dark location), you can capture stunning photos of the Milky Way.
11. Share Your Aurora Photos and Connect with dfphoto.net
Now that you’re equipped with the knowledge and tools to capture the Northern Lights with your iPhone, it’s time to put your skills to the test. We encourage you to share your stunning aurora photos on dfphoto.net and connect with a vibrant community of photography enthusiasts.
11.1. Why Share on dfphoto.net?
- Showcase Your Work: Display your best aurora photos and receive feedback from fellow photographers.
- Gain Exposure: Get your work seen by a wider audience and potentially featured on our website and social media channels.
- Learn and Grow: Exchange tips, techniques, and experiences with other photographers, enhancing your skills and knowledge.
- Connect with the Community: Become part of a supportive and passionate community that shares your love for photography.
11.2. How to Share Your Photos
- Visit dfphoto.net and create an account.
- Upload your aurora photos to your profile.
- Add captions and descriptions that provide context and insights into your photography process.
- Engage with other members by commenting on their photos and participating in discussions.
11.3. Stay Connected
In addition to sharing your photos, we encourage you to explore dfphoto.net for a wealth of resources, including:
- Tutorials and Guides: Learn new techniques and tips for various photography genres.
- Equipment Reviews: Get insights on the latest cameras, lenses, and accessories.
- Inspirational Galleries: Discover stunning photography from around the world.
- Community Forums: Discuss photography topics, ask questions, and share your experiences.
11.4. Get in Touch
Do you have questions, suggestions, or feedback? We’d love to hear from you! Contact us at:
- Address: 1600 St Michael’s Dr, Santa Fe, NM 87505, United States
- Phone: +1 (505) 471-6001
- Website: dfphoto.net
Join dfphoto.net today and embark on a journey of photographic discovery.
By following these tips and tricks, you can capture breathtaking photos of the Northern Lights with your iPhone. Remember to experiment, be patient, and enjoy the process. Happy shooting.