Taking a photo of a screen can be trickier than it looks, but don’t worry, dfphoto.net is here to help you master the art of screen photography. This comprehensive guide will cover various techniques, from using your smartphone to employing professional photography gear, ensuring you capture clear, glare-free images of any screen. Learn how to take professional-quality pictures and discover screen photography tips, image capture techniques, and visual content creation strategies.
1. What is Screen Photography and Why is it Important?
Screen photography involves capturing images of screens, whether they are computer monitors, smartphone displays, TVs, or any other type of electronic display. It is important because it allows you to share digital content, document information, and create visual aids.
Screen photography is the process of capturing images of screens, and its importance stems from several key applications. It’s a practical skill, from preserving important information to sharing visual content. Here’s why it matters:
- Documentation: It allows you to document important information displayed on a screen, such as error messages, software interfaces, or online data.
- Sharing: Screen photos are perfect for sharing content with others, whether it’s a funny meme, a crucial piece of data, or a design concept.
- Visual Aids: Screen captures are widely used in presentations, tutorials, and guides to illustrate steps or concepts visually.
- Archiving: You can archive digital content for future reference or to preserve records of specific events or data.
- Troubleshooting: When troubleshooting technical issues, screen photos can help you show the problem to support staff or seek assistance online.
2. What are the Different Search Intents for “How to Take a Photo of a Screen?”
Understanding the different search intents behind the query “How To Take A Photo Of A Screen” helps tailor content to meet user needs effectively. Here are five common search intents:
- Informational: Users want to learn the basic steps to capture a screen image.
- Tutorial: Users seek detailed instructions on how to use specific tools or devices for screen photography.
- Troubleshooting: Users are looking for solutions to common problems, such as glare, blur, or poor image quality.
- Comparison: Users want to compare different methods or tools for capturing screen images to find the best option.
- Product-Related: Users are interested in learning how to use specific software or apps for advanced screen capture and editing.
3. What Equipment Do You Need to Take a Photo of a Screen?
The equipment needed for screen photography can range from basic to advanced, depending on the desired quality and use case.
Here’s a breakdown:
- Camera:
- Smartphone: Modern smartphones have capable cameras for basic screen photography.
- Digital Camera: A DSLR or mirrorless camera offers more control and higher image quality.
- Tripod: Provides stability to avoid blurring, especially in low light.
- Lighting:
- Natural Light: Diffused natural light can work well if positioned correctly.
- Artificial Light: Avoid direct reflections by using soft, diffused lighting.
- Software:
- Built-in Tools: Windows Snipping Tool or macOS Screenshot Tool for basic captures.
- Third-party Apps: Snagit for advanced capture and editing features.
- Lens:
- Standard Lens: A kit lens (e.g., 18-55mm) is suitable for general screen photography.
- Macro Lens: For capturing fine details on the screen.
- Polarizing Filter: Reduces glare and reflections from the screen.
4. What are the Basic Techniques for Taking a Photo of a Screen with a Smartphone?
Capturing a clear screen image with a smartphone requires a few simple steps and considerations. Here’s how you can achieve the best results:
- Clean the Screen: Remove any smudges or fingerprints from the screen to ensure a clear image.
- Stabilize Your Phone: Use a tripod or rest your phone on a stable surface to prevent blurring.
- Adjust Lighting: Avoid direct light sources that can cause glare. Diffused natural light works best.
- Disable Flash: The flash can create harsh reflections on the screen.
- Use HDR Mode: High Dynamic Range (HDR) can help balance the screen’s brightness with the surroundings.
- Focus Manually: Tap on the screen to focus on the content you want to capture.
- Shoot in a Dark Room: Reducing ambient light can minimize reflections.
- Edit After: Use a photo editing app to crop, adjust brightness, and enhance clarity.
- Use a Polarizing Filter (Optional): Attach a polarizing filter to your phone’s camera to reduce glare.
5. How to Set Up Your Camera for Screen Photography?
Setting up your camera correctly is essential for capturing high-quality screen photos.
Here’s a detailed guide:
- Camera Mode:
- Manual Mode (M): Provides full control over settings like aperture, shutter speed, and ISO.
- Aperture Priority Mode (Av or A): Allows you to set the aperture while the camera adjusts the shutter speed.
- Aperture:
- f/8 to f/11: A narrow aperture ensures sharpness across the screen.
- Shutter Speed:
- 1/60 second or Slower: Adjust to match the screen’s refresh rate and avoid banding.
- ISO:
- ISO 100 to ISO 400: Keep ISO low to minimize noise.
- White Balance:
- Custom White Balance: Use a gray card to set a custom white balance for accurate colors.
- Preset White Balance: Select a preset like “Fluorescent” or “Custom” based on the screen type.
- Focus:
- Manual Focus: Use live view and zoom in to focus precisely on the screen.
- Image Stabilization:
- Turn Off: When using a tripod, disable image stabilization to prevent unwanted vibrations.
- Metering Mode:
- Evaluative Metering: Useful for screens with varying brightness levels.
- Spot Metering: Use for screens with uniform brightness.
- File Format:
- RAW: Capture in RAW format for maximum editing flexibility.
- JPEG: Use high-quality JPEG for quick sharing.
6. What are the Best Camera Settings for Screen Photography?
The best camera settings for screen photography depend on the specific screen and lighting conditions. Here’s a detailed breakdown of recommended settings:
| Setting | Recommendation | Explanation |
|---|---|---|
| Camera Mode | Manual (M) or Aperture Priority (Av/A) | Provides maximum control over exposure and depth of field. |
| Aperture | f/8 to f/11 | Ensures sharpness across the screen. |
| Shutter Speed | 1/60 second or slower, adjust based on screen refresh rate | Prevents banding and ensures proper exposure. |
| ISO | 100 to 400 | Minimizes noise and maintains image clarity. |
| White Balance | Custom (using a gray card) or preset (Fluorescent/Custom) | Ensures accurate color reproduction. |
| Focus | Manual Focus (using live view and zoom) | Allows precise focusing on the screen. |
| Image Stabilization | Off (when using a tripod) | Prevents unwanted vibrations and maintains sharpness. |
| Metering Mode | Evaluative (for varying brightness) or Spot (for uniform brightness) | Helps achieve balanced exposure. |
| File Format | RAW (for maximum editing flexibility) or high-quality JPEG (for quick sharing) | Provides options for both extensive editing and quick use. |
| Polarizing Filter | Use to reduce glare and reflections | Reduces reflections and enhances contrast. |
| Lighting | Soft, diffused light; avoid direct light sources | Minimizes reflections and ensures even lighting. |
| Tripod | Essential for stability | Prevents blurring and allows for longer exposures. |
| Remote Shutter Release | Optional, but helpful for minimizing camera shake during long exposures | Prevents camera shake and ensures sharpness. |
7. How Do You Prevent Glare and Reflections When Taking a Photo of a Screen?
Glare and reflections can ruin screen photos, but several techniques can help minimize these issues:
- Control Lighting:
- Diffuse Light: Use soft, diffused lighting instead of direct light sources.
- Positioning: Position lights at an angle to the screen to avoid direct reflections.
- Dim Ambient Lights: Reduce ambient light in the room to minimize reflections on the screen.
- Use a Polarizing Filter:
- Circular Polarizer: Attach a circular polarizing filter to your lens to reduce glare.
- Adjust the Filter: Rotate the filter until the glare is minimized.
- Screen Angle:
- Adjust the Angle: Change the angle of the screen slightly to move reflections out of the shot.
- Camera Position: Adjust your camera position to avoid capturing reflections.
- Clean the Screen:
- Microfiber Cloth: Use a microfiber cloth to clean the screen and remove smudges.
- Dark Room:
- Shoot in the Dark: Minimize ambient light by shooting in a darkened room.
- Hood or Baffle:
- Lens Hood: Use a lens hood to block stray light from entering the lens.
- DIY Baffle: Create a baffle using cardboard to shield the screen from light.
- Software Solutions:
- Post-Processing: Use photo editing software to reduce glare and reflections.
8. How to Deal with Moire Patterns in Screen Photography?
Moire patterns, those distracting wavy lines or patterns that sometimes appear when photographing screens, occur due to the interaction between the camera’s sensor and the screen’s pixel grid.
Here are several methods to reduce or eliminate them:
- Adjust Camera Angle:
- Slight Angle Change: Even a minor adjustment to the camera’s angle can significantly reduce moire. Experiment by tilting the camera slightly up, down, or to the side.
- Change Distance:
- Move Closer or Further: Altering the distance between the camera and the screen can sometimes shift the moire pattern or eliminate it altogether.
- Adjust Focus:
- Slightly Soften Focus: A very slight softening of the focus can blur the pixel grid enough to minimize moire without significantly affecting overall image sharpness.
- Use a Lower Resolution:
- Reduce Image Size: If possible, capturing the image at a slightly lower resolution can help reduce moire. This works by averaging out the pixel patterns.
- Shoot in RAW Format:
- RAW Editing: Shooting in RAW provides more flexibility during post-processing. You can use software tools to reduce moire more effectively than with JPEG images.
- Software Solutions:
- Moire Reduction Tools: Many photo editing software programs, like Adobe Photoshop and Lightroom, have dedicated moire reduction tools. These tools can selectively blur or blend the problematic areas.
- Frequency Separation: Advanced techniques like frequency separation can isolate and smooth out the moire patterns without affecting the fine details of the image.
- Polarizing Filter:
- Reduce Screen Artifacts: Polarizing filters can sometimes help reduce moire by minimizing reflections and screen artifacts.
- Resample the Image:
- Post-Processing Resampling: In post-processing, slightly resampling the image (e.g., reducing and then increasing the resolution) can disrupt the moire pattern.
- Avoid Over-Sharpening:
- Careful Sharpening: Over-sharpening can exacerbate moire patterns. Apply sharpening judiciously and only where needed.
9. What are the Best Angles and Compositions for Screen Photography?
Choosing the right angle and composition can enhance the visual appeal and clarity of your screen photos. Here are some tips:
- Straight-On Angle:
- Square to the Screen: Position the camera directly in front of the screen to minimize distortion.
- Rule of Thirds:
- Divide the Screen: Use the rule of thirds to place important elements off-center for a more dynamic composition.
- Symmetry:
- Balanced Composition: If the screen content is symmetrical, use a symmetrical composition for a balanced look.
- Leading Lines:
- Guide the Eye: Use lines on the screen to guide the viewer’s eye to the focal point.
- Close-Up Shots:
- Capture Details: Take close-up shots to highlight specific details or areas of interest on the screen.
- Contextual Shots:
- Include Surroundings: Show the screen in its environment to provide context.
- Avoid Obstructing Elements:
- Clear View: Ensure that no objects or reflections obstruct the view of the screen.
- Adjust Screen Angle:
- Minimize Reflections: Experiment with slight adjustments to the screen angle to reduce reflections.
- Use a Tripod:
- Stable Composition: A tripod helps maintain a consistent angle and composition.
10. How to Edit and Enhance Your Screen Photos?
Post-processing is essential for refining screen photos and achieving the best possible results. Here’s a guide to editing and enhancing your images:
- Basic Adjustments:
- Brightness and Contrast: Adjust brightness and contrast to make the screen content pop.
- Exposure: Correct any over or underexposure.
- Color Correction:
- White Balance: Fine-tune the white balance to ensure accurate colors.
- Saturation: Adjust saturation to make colors more vibrant or muted, as needed.
- Sharpening:
- Apply Sharpening: Use sharpening tools to enhance the clarity of text and details.
- Avoid Over-Sharpening: Be careful not to over-sharpen, which can create artifacts.
- Noise Reduction:
- Reduce Noise: Apply noise reduction to minimize graininess, especially in low-light photos.
- Cropping and Straightening:
- Crop Unwanted Areas: Remove any unnecessary elements from the frame.
- Straighten the Image: Ensure the screen is perfectly aligned.
- Glare and Reflection Removal:
- Use Cloning and Healing Tools: Remove or reduce glare and reflections using cloning and healing tools.
- Moire Reduction:
- Apply Moire Reduction: Use specialized moire reduction tools to eliminate distracting patterns.
- Local Adjustments:
- Use Adjustment Brushes: Apply local adjustments to specific areas of the screen.
- Color Grading:
- Adjust Colors: Experiment with color grading to achieve a desired aesthetic.
- Software Options:
- Adobe Photoshop: For advanced editing and retouching.
- Adobe Lightroom: For color correction and basic adjustments.
- GIMP: A free, open-source alternative to Photoshop.
11. What are Common Problems and Solutions in Screen Photography?
Screen photography can present several challenges, but understanding these issues and their solutions can help you achieve better results.
| Problem | Solution |
|---|---|
| Glare and Reflections | – Use a polarizing filter. – Control lighting by using diffused light or shooting in a darkened room. – Adjust the screen and camera angles. – Clean the screen. |
| Moire Patterns | – Adjust the camera angle or distance. – Slightly soften the focus. – Use moire reduction tools in photo editing software. – Shoot in RAW format for better post-processing. |
| Blurry Images | – Use a tripod to stabilize the camera. – Ensure proper focus, using manual focus if necessary. – Use a remote shutter release or timer to minimize camera shake. |
| Incorrect Colors | – Use a custom white balance with a gray card. – Select the appropriate white balance preset (e.g., Fluorescent, Custom). – Adjust colors in post-processing. |
| Over/Underexposure | – Use manual mode or aperture priority mode to control exposure. – Adjust aperture, shutter speed, and ISO settings. – Use evaluative or spot metering to achieve balanced exposure. |
| Banding | – Adjust the shutter speed to match the screen’s refresh rate. – Experiment with slightly different shutter speeds to minimize banding. |
| Distortion | – Position the camera straight on to the screen. – Use a lens with minimal distortion. – Correct distortion in post-processing. |
| Low Detail | – Use a narrow aperture (f/8 to f/11) to ensure sharpness across the screen. – Focus precisely using manual focus and live view. – Sharpen the image in post-processing. |
| Unwanted Reflections | – Minimize ambient light in the room. – Use a lens hood or create a baffle to block stray light. – Adjust the camera and screen angles to move reflections out of the shot. |
| Low Image Quality | – Use a high-resolution camera or smartphone. – Shoot in RAW format for maximum editing flexibility. – Optimize camera settings for screen photography. |
12. How to Take a Photo of a TV Screen?
Photographing a TV screen requires careful attention to detail to avoid common issues like glare and banding. Here’s how to get the best results:
- Turn Off Room Lights:
- Reduce Reflections: Minimize ambient light to reduce reflections on the TV screen.
- Use a Tripod:
- Stable Image: A tripod ensures stability and prevents blurring.
- Camera Settings:
- Manual Mode: Set your camera to manual mode for full control.
- Aperture: Use an aperture between f/8 and f/11 for sharpness.
- ISO: Keep ISO low (ISO 100 to ISO 400) to minimize noise.
- Shutter Speed: Start with 1/30 second and adjust to eliminate banding.
- White Balance:
- Custom White Balance: Use a gray card to set a custom white balance for accurate colors.
- Focus:
- Manual Focus: Use manual focus to precisely focus on the screen.
- Disable Image Stabilization:
- Tripod Use: Turn off image stabilization when using a tripod.
- Polarizing Filter:
- Reduce Glare: Attach a polarizing filter to reduce glare and reflections.
- Angle and Position:
- Straight-On Angle: Position the camera directly in front of the TV screen.
- Adjust TV Angle: Adjust the TV angle slightly to minimize reflections.
- Avoid Flash:
- No Flash: Never use flash, as it will create harsh reflections.
- Post-Processing:
- Edit the Photo: Use photo editing software to fine-tune brightness, contrast, and colors.
13. What are the Ethical Considerations in Screen Photography?
When engaging in screen photography, it’s essential to consider ethical implications.
Here are several key points:
- Privacy:
- Personal Information: Avoid capturing and sharing screens containing personal or sensitive information without consent.
- Data Protection: Be mindful of data protection laws and regulations.
- Copyright:
- Copyrighted Material: Respect copyright laws when capturing and sharing copyrighted material.
- Fair Use: Understand the limitations of fair use and seek permission when necessary.
- Confidentiality:
- Confidential Information: Do not capture or share screens containing confidential or proprietary information.
- Non-Disclosure Agreements: Adhere to any non-disclosure agreements you have signed.
- Misrepresentation:
- Avoid Misleading Images: Ensure that screen photos are not used to misrepresent information or deceive others.
- Context is Key: Provide appropriate context when sharing screen photos to prevent misunderstandings.
- Consent:
- Obtain Consent: When capturing screens featuring individuals or their personal information, obtain their consent.
- Transparency:
- Be Transparent: Be open and honest about your intentions when capturing screen photos.
- Security:
- Secure Storage: Store screen photos securely to prevent unauthorized access.
- Data Breaches: Be aware of the potential for data breaches and take steps to protect sensitive information.
- Professional Standards:
- Adhere to Standards: Follow ethical guidelines and professional standards in your field.
- Legal Compliance:
- Comply with Laws: Ensure that your screen photography practices comply with all applicable laws and regulations.
14. How Can dfphoto.net Help You Improve Your Screen Photography Skills?
dfphoto.net is your go-to resource for mastering the art of screen photography. Here’s how we can help you improve your skills:
- Comprehensive Tutorials: Access detailed, step-by-step tutorials on various screen photography techniques, from basic smartphone captures to advanced DSLR setups.
- Expert Advice: Learn from experienced photographers who share their insights, tips, and tricks for capturing high-quality screen images.
- Equipment Reviews: Get unbiased reviews and recommendations on the best cameras, lenses, and accessories for screen photography.
- Troubleshooting Guides: Find solutions to common problems like glare, moire patterns, and blurry images with our troubleshooting guides.
- Creative Inspiration: Explore stunning screen photos from talented photographers and discover new ideas for your own projects.
- Community Forum: Connect with other photographers, share your work, and get feedback in our active community forum.
- Software Tutorials: Master essential photo editing software like Adobe Photoshop and Lightroom with our detailed tutorials.
- Ethical Guidelines: Understand the ethical considerations involved in screen photography and learn how to capture images responsibly.
- Personalized Support: Get personalized advice and support from our team of experts to help you overcome specific challenges.
- Latest Trends: Stay up-to-date with the latest trends and techniques in screen photography.
By joining dfphoto.net, you’ll gain access to a wealth of knowledge and resources that will help you elevate your screen photography skills.
15. FAQ About How to Take a Photo of a Screen
Here are some frequently asked questions about screen photography, along with concise answers:
1. What is the best camera to use for screen photography?
The best camera ranges from a modern smartphone to a DSLR or mirrorless camera, depending on your needs and desired quality.
2. How do I prevent glare when photographing a screen?
Control lighting by using diffused light, a polarizing filter, and adjusting screen and camera angles.
3. What settings should I use on my camera for screen photography?
Use manual mode with an aperture of f/8 to f/11, low ISO (100-400), and adjust shutter speed to avoid banding.
4. How can I eliminate moire patterns in screen photos?
Adjust the camera angle or distance, slightly soften the focus, and use moire reduction tools in photo editing software.
5. Should I use flash when taking a photo of a screen?
No, avoid using flash as it creates harsh reflections and glare.
6. How do I focus properly when photographing a screen?
Use manual focus and live view to precisely focus on the screen.
7. What is the best angle for photographing a screen?
Position the camera straight on to the screen to minimize distortion.
8. How do I correct the colors in a screen photo?
Use a custom white balance with a gray card or select an appropriate white balance preset and adjust colors in post-processing.
9. What is the ideal shutter speed for screen photography?
Adjust the shutter speed to match the screen’s refresh rate to avoid banding, starting with 1/60 second.
10. Why are my screen photos blurry, and how can I fix it?
Use a tripod for stability, ensure proper focus, and use a remote shutter release to minimize camera shake.
Address: 1600 St Michael’s Dr, Santa Fe, NM 87505, United States. Phone: +1 (505) 471-6001. Website: dfphoto.net.
Ready to capture stunning screen photos? Visit dfphoto.net now to explore in-depth tutorials, discover inspiring photography, and connect with a vibrant community of photography enthusiasts!
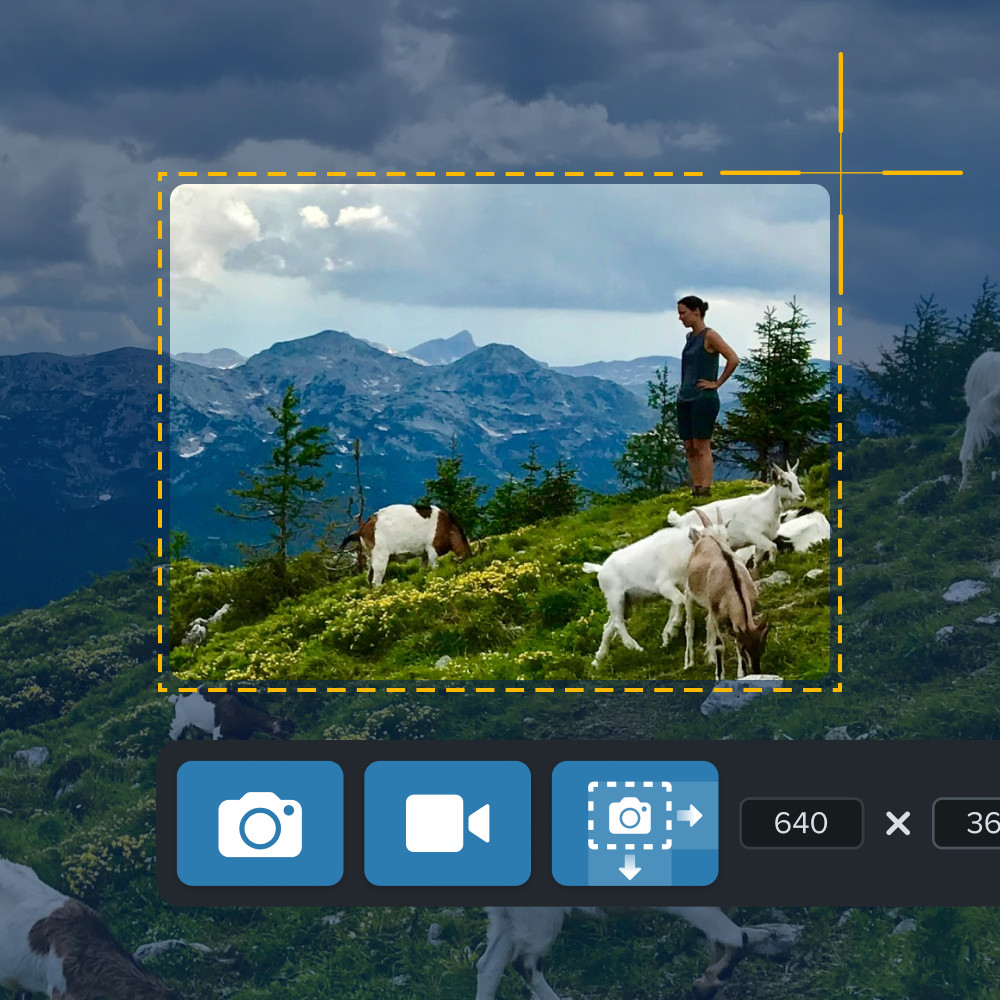 Someone using Snagit to take a screenshot of a mountain scene with cropping tools visible.
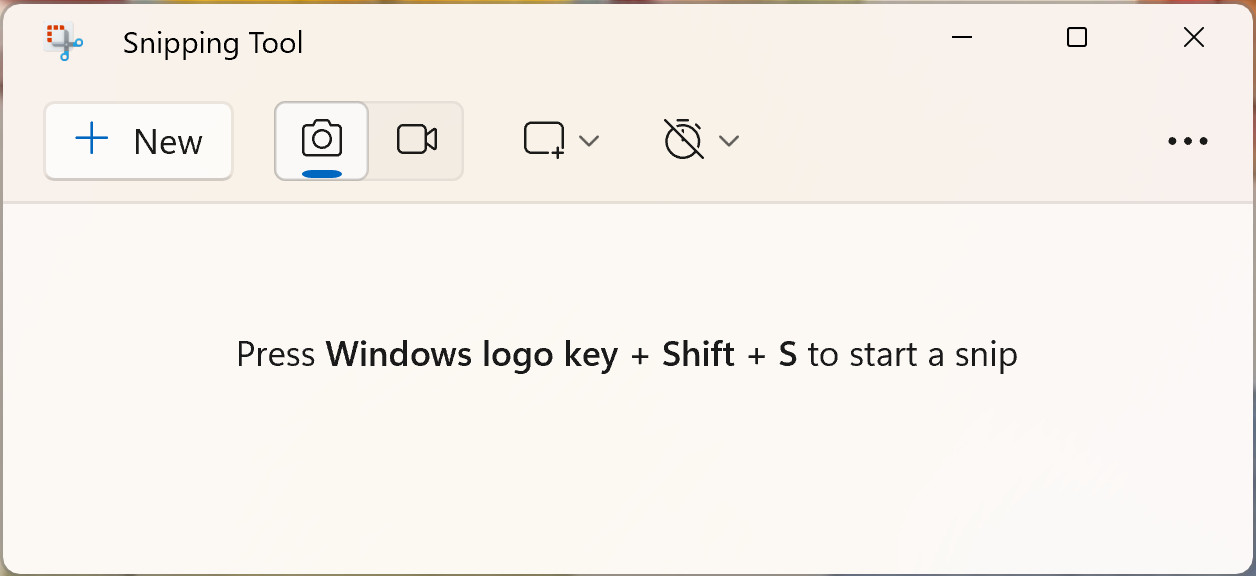 Snipping Tool UI at startup, ready to capture screenshots.
 Screenshot tool shortcut on a Mac, activated with Command Shift 4.
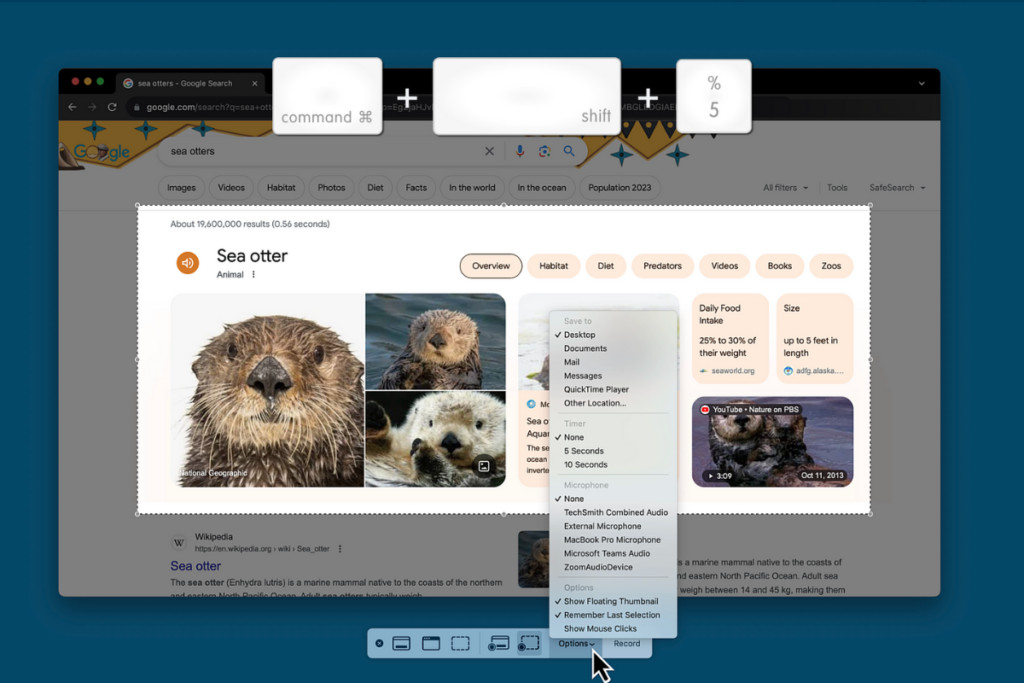 Screenshot tool options on a Mac, accessed with Command Shift 5.
 Taking a screenshot on an iPad without a home button, using the power and volume buttons.
 Taking a screenshot on an iPad with a home button, using the home and power buttons.
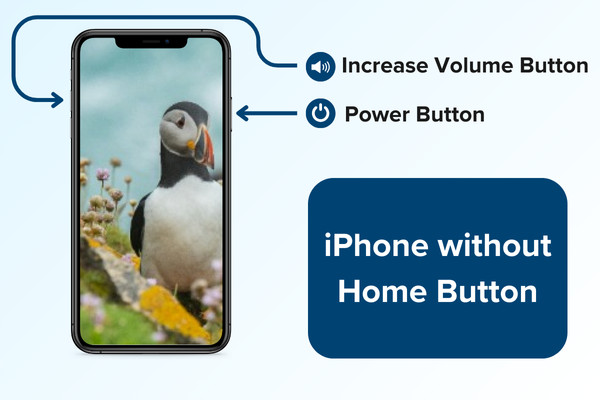 Taking a screenshot on an iPhone without a home button, using the power and volume up buttons.
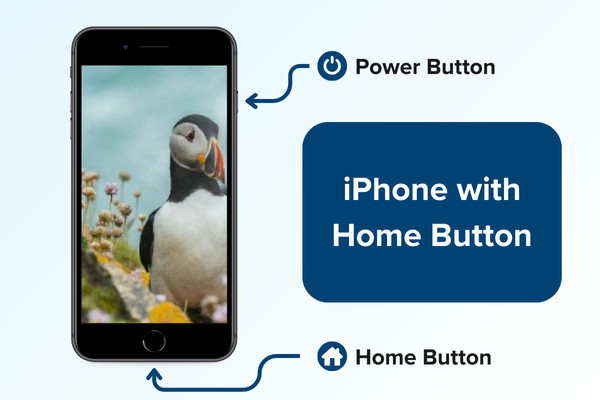 Taking a screenshot on an iPhone with a home button, using the home and power buttons simultaneously.
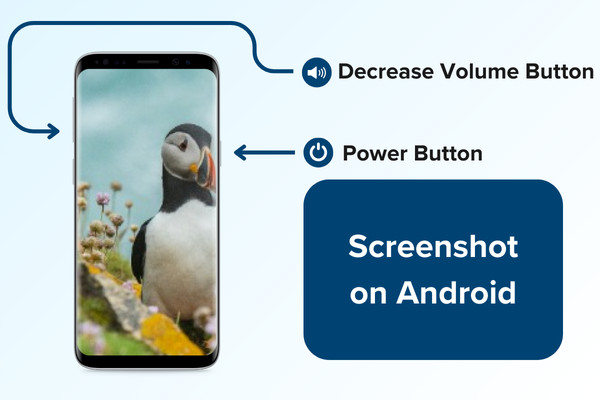 Screenshot capture method on Android, using the volume down and power buttons.
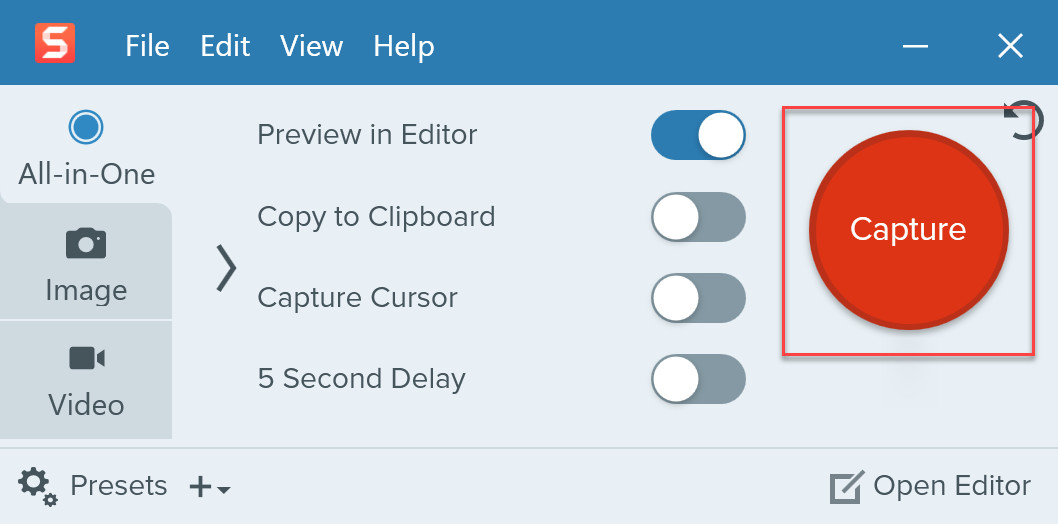 Snagit's user interface, highlighting the red capture button.