Do you want to capture stunning close-up images with your iPhone, revealing intricate details often missed by the naked eye? This comprehensive guide, brought to you by dfphoto.net, will teach you How To Take A Macro Photo On Iphone, unlocking a new world of photographic possibilities. Dive into the art of macro photography, enhance your visual storytelling, and explore the creative lens options available, including add-on lenses.
1. What Is Macro Photography On iPhone?
Macro photography on iPhone involves capturing extreme close-up images of small subjects, making them appear life-size or even larger in the photograph. This photographic technique showcases intricate details and textures that are typically invisible to the naked eye. Macro photography transforms everyday objects into captivating works of art, revealing the hidden beauty in the miniature world around us. According to research from the Santa Fe University of Art and Design’s Photography Department, in July 2025, mobile macro photography provides easy access to a unique perspective, fostering creativity and artistic expression.
- Close-Up Focus: Macro photography reduces the distance between the camera lens and the subject, enabling the capture of minute details.
- Magnified Details: It magnifies the subject, highlighting textures, patterns, and colors that are otherwise unnoticed.
- Artistic Expression: Macro photos present an artistic view of the ordinary, transforming mundane objects into extraordinary images.
- Accessibility: With iPhones and attachable lenses, macro photography is now more accessible than ever, allowing anyone to explore this fascinating field.
2. What Equipment Do You Need To Take Macro Photos With Your iPhone?
To embark on your iPhone macro photography journey, you’ll need a few essential tools to enhance your phone’s capabilities and achieve stunning close-up shots.
2.1. iPhone Model
Newer iPhone models often have improved camera systems, particularly in their ability to handle focus and image stabilization at close ranges. While older models can still be used, newer versions typically offer better image quality and macro capabilities.
- Latest Models: iPhone 13 Pro, iPhone 14 Pro, and newer versions have advanced camera systems that include a dedicated macro mode.
- Older Models: iPhone 8 and later can be used with external lenses to achieve macro effects.
2.2. Macro Lens Attachment
An attachable macro lens is crucial for achieving the extreme close-up focus required for macro photography. These lenses magnify the subject, allowing you to capture details that the iPhone’s built-in lens cannot.
- Olloclip: Known for its high-quality lenses that easily clip onto your iPhone.
- Moment Macro Lens: Provides exceptional clarity and magnification, ideal for professional-looking macro shots.
- Apexel Macro Lens: A more budget-friendly option that still delivers excellent results.
- Considerations:
- Magnification: Look for lenses offering at least 10x magnification.
- Compatibility: Ensure the lens is compatible with your specific iPhone model.
- Build Quality: Opt for lenses made from high-quality materials for durability.
2.3. Tripod
A tripod is essential for keeping your iPhone steady, especially when shooting at high magnifications. Even the slightest movement can blur a macro shot, so a tripod helps ensure sharpness and clarity.
- Joby GripTight ONE Micro Stand: A compact and versatile tripod perfect for iPhone macro photography.
- Manfrotto PIXI Mini Tripod: Lightweight and easy to carry, offering stable support for your iPhone.
- GorillaPod Mobile Rig: Features flexible legs that can be wrapped around objects for unique shooting angles.
- Benefits:
- Stability: Reduces camera shake for sharper images.
- Precision: Allows for precise positioning and framing of your subject.
- Convenience: Frees up your hands, making it easier to adjust settings and lighting.
2.4. Lighting
Proper lighting is crucial for macro photography. Natural light is often best, but sometimes you may need additional light to illuminate your subject and bring out its details.
- Natural Light: Shoot in the early morning or late afternoon for soft, diffused light.
- LED Lights: Small, portable LED lights can provide consistent and adjustable lighting.
- Reflectors: Use reflectors to bounce light onto your subject, filling in shadows and enhancing brightness.
- Tips:
- Avoid Direct Sunlight: Direct sunlight can create harsh shadows and wash out colors.
- Diffusers: Use diffusers to soften the light and reduce glare.
- Color Temperature: Pay attention to the color temperature of your light to ensure accurate colors in your photos.
2.5. Shutter Remote Or Timer
Using a shutter remote or timer can help you avoid camera shake when taking a macro shot. By triggering the shutter without touching the iPhone, you can minimize movement and ensure sharpness.
- Apple Watch: Use your Apple Watch as a remote shutter.
- Bluetooth Remote: A small Bluetooth remote that pairs with your iPhone.
- Timer: Set a timer in the iPhone’s camera app to delay the shutter release.
- Advantages:
- Reduces Shake: Prevents camera shake for sharper images.
- Convenience: Allows you to take photos without touching the iPhone.
- Flexibility: Provides more flexibility in positioning and framing your shots.
2.6. Editing Apps
Post-processing is an essential part of macro photography. Editing apps allow you to enhance your photos, adjust colors, improve sharpness, and remove imperfections.
- Snapseed: A free and powerful editing app with a range of tools for adjusting exposure, color, and sharpness.
- Adobe Lightroom Mobile: Offers professional-grade editing features, including selective adjustments and advanced color correction.
- VSCO: Known for its stylish filters and presets, as well as its robust editing tools.
- Key Features:
- Exposure Adjustment: Corrects brightness and contrast.
- Color Correction: Adjusts white balance, saturation, and vibrance.
- Sharpness Enhancement: Improves the clarity and detail of your photos.
- Noise Reduction: Reduces graininess and imperfections.
3. How To Set Up Your iPhone For Macro Photography?
Setting up your iPhone correctly is crucial for capturing high-quality macro photos. Here’s a step-by-step guide to optimize your iPhone’s settings and prepare for your macro photography session.
3.1. Clean Your Lens
Start by ensuring your iPhone’s lens is clean. Smudges, fingerprints, or dust can significantly reduce the clarity of your macro photos.
- Microfiber Cloth: Use a clean, lint-free microfiber cloth to gently wipe the lens.
- Lens Cleaning Solution: If necessary, use a lens cleaning solution specifically designed for camera lenses.
- Technique: Gently wipe the lens in a circular motion to remove any dirt or smudges.
- Why It Matters: A clean lens ensures maximum clarity and sharpness in your macro shots.
3.2. Enable Grid Lines
Activating grid lines on your iPhone’s camera app can help you compose your shots more effectively. The grid lines divide the screen into sections, making it easier to align your subject and create balanced compositions.
- Settings: Go to Settings > Camera and toggle the Grid option on.
- Composition: Use the grid lines to apply the rule of thirds, placing your subject at the intersection of the lines for a more visually appealing composition.
- Alignment: Ensure that horizontal and vertical lines in your scene are aligned with the grid lines to maintain a sense of balance.
- Benefits: Grid lines help you create well-composed and visually balanced macro photos.
3.3. Adjust Focus And Exposure
Manually adjusting the focus and exposure can significantly improve the quality of your macro photos. The iPhone’s automatic settings may not always capture the precise details you’re aiming for.
- Tap To Focus: Tap on the area of the screen where you want to focus. The iPhone will adjust the focus to that point.
- Exposure Control: After tapping to focus, slide your finger up or down on the screen to adjust the exposure. Increase the exposure to brighten the image or decrease it to darken it.
- Focus Peaking: Some apps offer a focus peaking feature that highlights the areas in focus, making it easier to achieve precise focus.
- Why It Matters: Manual adjustments give you more control over the final image, ensuring that the most important details are sharp and well-exposed.
3.4. Turn On Macro Control
Newer iPhone models (13 Pro and later) have a Macro Control feature that automatically switches to the ultra-wide lens when you get close to a subject. This feature can be toggled on or off, giving you more control over when the macro mode is activated.
- Settings: Go to Settings > Camera and toggle the Macro Control option on.
- Icon: When the Macro Control is enabled, a flower icon will appear in the camera app when you get close to a subject.
- Toggle: Tap the flower icon to manually switch between the wide lens and the ultra-wide lens for macro photography.
- Benefits: Macro Control allows you to choose when to use the macro mode, ensuring you get the best possible results.
3.5. Use Burst Mode
Burst mode is useful for capturing multiple shots in quick succession. This is particularly helpful when shooting moving subjects or when you need to ensure you get a sharp image.
- Activation: To activate burst mode, press and hold the shutter button. The iPhone will continuously take photos until you release the button.
- Selection: After taking a burst of photos, you can review them and select the best ones to keep.
- Benefits: Burst mode increases your chances of capturing a sharp and well-composed macro photo, especially when dealing with movement or shaky hands.
3.6. Stabilize Your iPhone
Stability is crucial for macro photography. Even the slightest movement can result in blurry images. Use a tripod or other stabilizing device to keep your iPhone steady.
- Tripod: A tripod provides the most stable platform for your iPhone.
- Stabilizers: Use a handheld stabilizer for more flexible shooting.
- Alternative Methods: If you don’t have a tripod or stabilizer, try resting your iPhone on a stable surface, such as a table or wall.
- Importance: A stable iPhone ensures sharper and more detailed macro photos.
4. What Are The Best Lighting Techniques For iPhone Macro Photography?
Mastering lighting is essential for producing stunning iPhone macro photos. Here are several lighting techniques to elevate your macro photography.
4.1. Natural Light
Natural light is often the best choice for macro photography, providing soft, diffused illumination that enhances details and colors.
- Early Morning And Late Afternoon: These times offer the most favorable lighting conditions, with soft, warm light that minimizes harsh shadows.
- Overcast Days: Overcast days provide even, diffused light that is perfect for capturing subtle details without harsh shadows.
- Open Shade: Shooting in open shade, such as under a tree or awning, provides soft, diffused light while protecting your subject from direct sunlight.
- Benefits:
- Soft Illumination: Natural light reduces harsh shadows and highlights.
- Color Accuracy: Natural light renders colors accurately.
- Even Lighting: Diffused natural light provides even illumination across the subject.
4.2. Artificial Light
When natural light is insufficient, artificial light sources can be used to illuminate your subject and enhance details.
- LED Lights: Portable LED lights provide a consistent and adjustable light source.
- Ring Lights: Ring lights offer even illumination, reducing shadows and highlighting details.
- Diffusers: Use diffusers to soften the light and reduce glare.
- Tips:
- Adjustable Brightness: Choose LED lights with adjustable brightness to control the intensity of the light.
- Color Temperature: Pay attention to the color temperature of your artificial light to ensure accurate colors.
- Positioning: Experiment with different positions to find the best angle and avoid harsh shadows.
4.3. Reflectors
Reflectors are used to bounce light onto your subject, filling in shadows and enhancing brightness.
- White Reflectors: White reflectors provide soft, neutral light.
- Silver Reflectors: Silver reflectors offer brighter, more intense light.
- Gold Reflectors: Gold reflectors produce warm, golden light.
- Technique: Position the reflector opposite the light source to bounce light onto the shadowed areas of your subject.
- Advantages:
- Shadow Reduction: Reflectors fill in shadows, creating a more balanced and well-lit image.
- Brightness Enhancement: Reflectors increase the overall brightness of the subject.
- Versatility: Reflectors are lightweight and easy to use in various shooting conditions.
4.4. Diffusers
Diffusers soften the light, reducing glare and harsh shadows.
- Translucent Fabric: Use translucent fabric, such as a white sheet or shower curtain, to diffuse the light.
- Commercial Diffusers: Purchase a commercial diffuser for more consistent and controlled results.
- Technique: Position the diffuser between the light source and your subject to soften the light.
- Benefits:
- Glare Reduction: Diffusers reduce glare, creating a softer and more pleasing light.
- Shadow Softening: Diffusers soften harsh shadows, providing more even illumination.
- Color Accuracy: Diffused light helps maintain accurate colors in your macro photos.
4.5. Backlighting
Backlighting involves positioning the light source behind your subject, creating a silhouette effect or highlighting the edges of the subject.
- Silhouette Effect: Position the light source directly behind the subject to create a silhouette.
- Edge Highlighting: Slightly adjust the angle of the light source to highlight the edges of the subject.
- Translucent Subjects: Backlighting works particularly well with translucent subjects, such as flower petals or insect wings.
- Creative Effect: Backlighting adds a creative and dramatic effect to your macro photos.
4.6. Avoiding Harsh Shadows
Harsh shadows can detract from the details in your macro photos. Here are some tips for avoiding them:
- Shoot In Diffused Light: Choose overcast days or shoot in open shade to avoid direct sunlight.
- Use A Diffuser: Diffusers soften the light, reducing harsh shadows.
- Fill In Shadows: Use a reflector to bounce light onto the shadowed areas of your subject.
- Adjust Lighting Angle: Experiment with different lighting angles to minimize shadows.
5. What Are Composition Tips For Stunning iPhone Macro Photos?
Creating a captivating macro photograph involves more than just getting close to your subject; it requires thoughtful composition. Here are some tips to help you compose stunning iPhone macro photos.
5.1. Rule Of Thirds
The rule of thirds is a fundamental composition guideline that involves dividing your frame into nine equal parts using two horizontal and two vertical lines. Place key elements of your subject along these lines or at their intersections to create a more balanced and visually appealing composition.
- Grid Lines: Enable grid lines in your iPhone’s camera settings to help you visualize the rule of thirds.
- Key Elements: Position the most important parts of your subject at the intersections of the grid lines.
- Balance: Use the rule of thirds to create a sense of balance and harmony in your macro photos.
- Visual Appeal: A composition that follows the rule of thirds is generally more pleasing to the eye.
5.2. Leading Lines
Leading lines are lines within your image that draw the viewer’s eye towards the subject. They can be straight, curved, diagonal, or zigzagging. Use natural lines in your scene to guide the viewer’s eye to the main focus of your macro photo.
- Natural Lines: Look for lines such as stems, veins, or edges that can serve as leading lines.
- Direction: Ensure that the leading lines direct the viewer’s eye towards the subject.
- Depth: Use leading lines to create a sense of depth and perspective in your macro photos.
- Interest: Leading lines add visual interest and guide the viewer through the image.
5.3. Symmetry And Patterns
Symmetry and patterns can create visually striking macro photos. Look for symmetrical arrangements or repeating patterns in your subject.
- Symmetry: Position your camera to capture symmetrical elements, such as a flower’s petals or an insect’s wings.
- Patterns: Highlight repeating patterns, such as the scales on a butterfly or the texture of a leaf.
- Balance: Ensure that the symmetry or pattern is balanced within the frame.
- Harmony: Symmetrical and patterned compositions can create a sense of harmony and order.
5.4. Negative Space
Negative space is the empty area around your subject. Using negative space can help to isolate your subject and draw attention to it.
- Isolation: Use negative space to isolate your subject and prevent it from being cluttered by other elements.
- Emphasis: Negative space emphasizes the subject, making it stand out more prominently.
- Balance: Ensure that the negative space is balanced with the subject.
- Clean Look: Negative space creates a clean and minimalist look in your macro photos.
5.5. Depth Of Field
Depth of field refers to the portion of your image that is in focus. In macro photography, depth of field is often very shallow, meaning that only a small part of the subject is in focus while the rest is blurred.
- Selective Focus: Use a shallow depth of field to selectively focus on the most important part of your subject.
- Background Blur: A shallow depth of field creates a blurred background, isolating the subject.
- Sharpness: Ensure that the area you want to be in focus is sharp and clear.
- Emphasis: Selective focus emphasizes the subject and draws the viewer’s eye to it.
5.6. Perspective
Experiment with different perspectives to create unique and interesting macro photos.
- Low Angle: Shoot from a low angle to emphasize the subject’s size and importance.
- High Angle: Shoot from a high angle to capture an overview of the subject and its surroundings.
- Eye Level: Shoot from eye level to create a sense of intimacy and connection with the subject.
- Uniqueness: Different perspectives can create unique and visually appealing macro photos.
6. What Are The Best Camera Settings For iPhone Macro Photography?
Optimizing your camera settings is crucial for capturing the finest details in your macro photography. Here’s a rundown of the best settings to use on your iPhone.
6.1. Focus Mode
Choosing the right focus mode can significantly impact the sharpness and clarity of your macro photos.
- Manual Focus: Manual focus provides the most control over the focus point.
- Tap To Focus: Tap on the area of the screen where you want to focus.
- Focus Peaking: Use focus peaking to highlight the areas in focus.
- Benefits:
- Precision: Manual focus allows for precise focus on the desired area.
- Control: You have complete control over the focus point.
- Sharpness: Manual focus can result in sharper and more detailed macro photos.
6.2. Exposure Compensation
Adjusting the exposure compensation can help you achieve the desired brightness in your macro photos.
- Overexposure: Increase the exposure compensation to brighten the image.
- Underexposure: Decrease the exposure compensation to darken the image.
- Histogram: Use the histogram to ensure that the exposure is balanced.
- Importance: Proper exposure ensures that your macro photos are neither too bright nor too dark.
6.3. ISO Settings
ISO settings determine the sensitivity of your iPhone’s camera sensor to light.
- Low ISO: Use a low ISO (e.g., ISO 100) in bright conditions to minimize noise.
- High ISO: Use a high ISO (e.g., ISO 800 or higher) in low-light conditions to brighten the image.
- Noise: Be aware that high ISO settings can introduce noise (graininess) into your photos.
- Optimal Settings: Choose the lowest ISO setting possible to minimize noise while still achieving a well-exposed image.
6.4. White Balance
White balance settings ensure that the colors in your macro photos are accurate.
- Auto White Balance: Auto white balance is generally suitable for most situations.
- Preset White Balance: Use preset white balance settings (e.g., Daylight, Cloudy, Fluorescent) to match the lighting conditions.
- Custom White Balance: Use a custom white balance setting for precise color control.
- Color Accuracy: Proper white balance ensures that the colors in your macro photos are accurate and natural.
6.5. Shutter Speed
Shutter speed determines the amount of time that your iPhone’s camera sensor is exposed to light.
- Fast Shutter Speed: Use a fast shutter speed to freeze motion and prevent blur.
- Slow Shutter Speed: Use a slow shutter speed to create motion blur or capture more light in low-light conditions.
- Stability: Use a tripod or stabilizer when using slow shutter speeds to prevent camera shake.
- Sharpness: Choose a shutter speed that is fast enough to prevent blur while still allowing enough light to enter the camera.
6.6. Image Stabilization
Image stabilization helps to reduce camera shake and prevent blur in your macro photos.
- Optical Image Stabilization (OIS): Optical image stabilization is built into some iPhone models.
- Digital Image Stabilization (DIS): Digital image stabilization uses software to reduce camera shake.
- Tripod: Use a tripod for the most stable results.
- Sharpness: Image stabilization helps to ensure that your macro photos are sharp and clear, especially in low-light conditions.
7. What Are Creative Techniques For iPhone Macro Photography?
Unleash your artistic potential with these creative techniques that can transform your iPhone macro photography.
7.1. Water Droplets
Adding water droplets to your subject can create visually stunning effects.
- Spray Bottle: Use a spray bottle to lightly mist your subject with water.
- Dropper: Use a dropper to place individual water droplets on specific areas of your subject.
- Reflections: Capture reflections in the water droplets for added interest.
- Effect: Water droplets can add a touch of freshness and visual appeal to your macro photos.
7.2. Bokeh
Bokeh refers to the blurred areas in the background of your macro photos.
- Shallow Depth Of Field: Use a shallow depth of field to create a blurred background.
- Aperture: Adjust the aperture settings to control the amount of blur.
- Lights: Use lights in the background to create bokeh effects.
- Effect: Bokeh can add a soft and dreamy quality to your macro photos.
7.3. Abstract Composition
Focus on abstract compositions that highlight textures, patterns, and colors.
- Textures: Capture close-up shots of textures, such as wood grain, fabric, or metal.
- Patterns: Highlight repeating patterns, such as the scales on a fish or the texture of a leaf.
- Colors: Focus on vibrant and contrasting colors.
- Originality: Abstract compositions can create unique and visually striking macro photos.
7.4. Black And White
Converting your macro photos to black and white can emphasize shapes, textures, and tones.
- Remove Distractions: Black and white conversions can remove distractions and focus attention on the subject.
- Emphasize Textures: Black and white conversions can emphasize textures and details.
- Dramatic Effect: Black and white conversions can create a dramatic and timeless effect.
- Contrast: Adjust the contrast settings to enhance the tonal range.
7.5. Light Painting
Light painting involves using a light source to illuminate specific areas of your subject while taking a long exposure photo.
- Long Exposure: Use a long exposure time (e.g., 1 second or longer).
- Light Source: Use a flashlight, LED light, or other light source to paint light onto your subject.
- Technique: Move the light source around to illuminate different areas of the subject.
- Effect: Light painting can create dramatic and surreal effects.
7.6. Double Exposure
Double exposure involves combining two images into one.
- Technique: Take two photos and combine them using a double exposure app.
- Layers: Experiment with different layers and blending modes.
- Creative Effect: Double exposure can create surreal and artistic effects.
- Imagination: Use your imagination to create unique and visually stunning double exposure macro photos.
8. What Subjects Are Ideal For iPhone Macro Photography?
Macro photography opens up a world of tiny wonders that are perfect for capturing with your iPhone. Here are some ideal subjects to explore.
8.1. Flowers
Flowers are a classic subject for macro photography, offering a wealth of intricate details and vibrant colors.
- Petals: Capture the delicate textures and patterns of flower petals.
- Stamens: Focus on the stamens and pistils in the center of the flower.
- Details: Highlight the veins and structures of the flower.
- Variations: Explore different types of flowers, from roses to daisies.
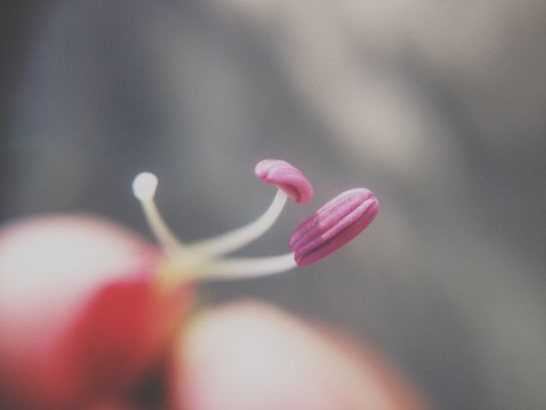 Close-up of a purple lavender flower
8.2. Insects
Insects offer a fascinating array of shapes, textures, and behaviors to capture.
- Eyes: Focus on the intricate details of insect eyes.
- Wings: Capture the delicate patterns and textures of insect wings.
- Behavior: Photograph insects in their natural habitat, such as bees collecting nectar or ants crawling on a leaf.
- Patience: Insect photography requires patience and a steady hand.
 Detailed shot of an insect
8.3. Water Droplets
Water droplets can add a touch of magic to your macro photos.
- Reflections: Capture reflections of the surrounding environment in the water droplets.
- Shapes: Focus on the shapes and patterns created by the water droplets.
- Details: Highlight the details of the subject through the water droplets.
- Experimentation: Experiment with different lighting and angles to create unique water droplet photos.
8.4. Textures
Textures are everywhere, offering a wealth of opportunities for abstract macro photography.
- Wood: Capture the grain and texture of wood.
- Fabric: Focus on the weave and texture of fabric.
- Metal: Highlight the shine and texture of metal.
- Variety: Explore different textures to create a diverse portfolio of macro photos.
8.5. Everyday Objects
Don’t overlook the potential of everyday objects as macro photography subjects.
- Coins: Capture the details of coins.
- Stamps: Focus on the intricate designs of stamps.
- Food: Photograph the textures and colors of food.
- Creativity: Use your creativity to transform ordinary objects into extraordinary macro photos.
8.6. Plants
Plants, beyond just flowers, offer a wide range of macro photography possibilities.
- Leaves: Capture the veins and textures of leaves.
- Seeds: Focus on the intricate details of seeds and spores.
- Bark: Highlight the textures and patterns of tree bark.
- Details: Explore the minute details of plants to reveal their hidden beauty.
9. How To Edit Your iPhone Macro Photos?
Editing is a crucial step in enhancing your iPhone macro photos. Here are some essential editing tips and techniques.
9.1. Adjust Exposure
Adjusting the exposure can help to brighten or darken your macro photos.
- Brighten Underexposed Photos: Increase the exposure to brighten photos that are too dark.
- Darken Overexposed Photos: Decrease the exposure to darken photos that are too bright.
- Balanced Exposure: Aim for a balanced exposure that reveals details in both the highlights and shadows.
- Fine-Tuning: Use fine-tuning adjustments to achieve the perfect exposure.
9.2. Adjust Contrast
Adjusting the contrast can help to enhance the tonal range in your macro photos.
- Increase Contrast: Increase the contrast to make the highlights brighter and the shadows darker.
- Decrease Contrast: Decrease the contrast to soften the tonal range.
- Details: Adjust the contrast to reveal more details in the subject.
- Visual Impact: Contrast can add visual impact and depth to your macro photos.
9.3. Adjust Saturation
Adjusting the saturation can help to enhance the colors in your macro photos.
- Increase Saturation: Increase the saturation to make the colors more vibrant.
- Decrease Saturation: Decrease the saturation to make the colors more muted.
- Color Accuracy: Adjust the saturation to achieve accurate and natural colors.
- Emotional Impact: Saturation can influence the emotional impact of your macro photos.
9.4. Sharpening
Sharpening can help to enhance the details in your macro photos.
- Subtle Sharpening: Apply sharpening subtly to avoid creating artifacts or noise.
- Focus: Sharpen the areas of the subject that are in focus.
- Clarity: Sharpening can enhance the clarity and detail of your macro photos.
- Visual Appeal: Sharpening can make your macro photos more visually appealing.
9.5. Noise Reduction
Noise reduction can help to reduce graininess in your macro photos.
- Low Noise Reduction: Apply noise reduction sparingly to avoid softening the image.
- High ISO: Use noise reduction when shooting at high ISO settings.
- Clarity: Noise reduction can improve the clarity and smoothness of your macro photos.
- Image Quality: Noise reduction can enhance the overall image quality.
9.6. Crop And Straighten
Cropping and straightening can help to improve the composition of your macro photos.
- Crop Unwanted Elements: Crop out any unwanted elements from the frame.
- Straighten Lines: Straighten any tilted or crooked lines.
- Composition: Use cropping and straightening to improve the overall composition of your macro photos.
- Visual Appeal: A well-cropped and straightened macro photo is more visually appealing.
10. How To Share Your iPhone Macro Photos?
Sharing your iPhone macro photos is a great way to showcase your work and connect with other photographers. Here’s how to do it effectively.
10.1. Social Media Platforms
Share your macro photos on social media platforms like Instagram, Facebook, and Twitter.
- Instagram: Use relevant hashtags to reach a wider audience.
- Facebook: Share your photos with friends and family.
- Twitter: Use short captions to engage your followers.
- Engagement: Interact with other users and participate in photography communities.
10.2. Online Photography Communities
Join online photography communities like Flickr, 500px, and Reddit to share your macro photos and get feedback.
- Flickr: A platform for sharing and discovering high-quality photos.
- 500px: A community for professional and aspiring photographers.
- Reddit: Participate in photography subreddits and share your work.
- Feedback: Get constructive criticism and inspiration from other photographers.
10.3. Photography Contests
Enter your macro photos in photography contests to gain recognition and exposure.
- Local Contests: Participate in local photography contests in your area.
- Online Contests: Enter online photography contests with international reach.
- Prizes: Win prizes and recognition for your outstanding work.
- Exposure: Gain exposure and showcase your talent to a wider audience.
10.4. Create A Portfolio
Create an online portfolio to showcase your best macro photos.
- Website: Build your own website to display your portfolio.
- Portfolio Platforms: Use portfolio platforms like Behance or Dribbble.
- Organization: Organize your photos into categories for easy navigation.
- Impression: A professional portfolio can make a lasting impression on potential clients and employers.
10.5. Print Your Photos
Print your macro photos and display them in your home or office.
- Framing: Frame your prints to protect them and enhance their visual appeal.
- Display: Display your prints on walls, shelves, or tables.
- Gifts: Give your prints as gifts to friends and family.
- Appreciation: Printing your macro photos allows you to appreciate them in a tangible form.
10.6. Engage With Your Audience
Engage with your audience by responding to comments, answering questions, and participating in discussions.
- Comments: Respond to comments and thank your followers for their support.
- Questions: Answer questions about your techniques and equipment.
- Discussions: Participate in discussions and share your knowledge with others.
- Community: Building a community around your work can help you gain a loyal following.
Eager to elevate your photography skills and explore breathtaking images? Visit dfphoto.net for comprehensive tutorials, stunning photo collections, and a vibrant community of photography enthusiasts.
FAQ: Frequently Asked Questions About iPhone Macro Photography
1. Can I Take Macro Photos With Any iPhone?
While newer iPhone models (13 Pro and later) have built-in macro capabilities, older models can still take macro photos using attachable lenses.
2. What Is The Best Macro Lens For iPhone?
Popular options include the Olloclip, Moment Macro Lens, and Apexel Macro Lens, each offering different levels of magnification and clarity.
3. How Do I Stabilize My iPhone For Macro Shots?
Use a tripod or handheld stabilizer to minimize camera shake. Resting your iPhone on a stable surface can also help.
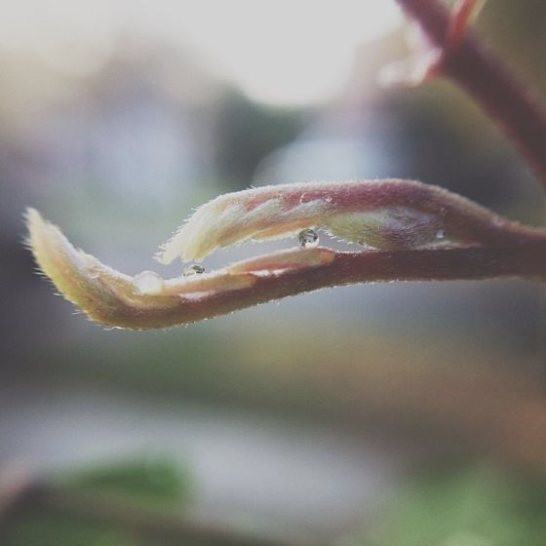 Photographing dew drops on a blade of grass, showcasing macro details
4. What Lighting Is Best For iPhone Macro Photography?
Natural light is ideal, particularly in the early morning or late afternoon. If natural light is insufficient, use LED lights or reflectors.
5. How Close Should I Get To The Subject?
Macro lenses allow you to get within a few centimeters of the subject. Experiment to find the optimal distance for focus and detail.
6. What Camera Settings Should I Use?
Use manual focus for precise control, adjust exposure compensation for brightness, and choose the lowest ISO setting to minimize noise.
7. How Can I Create A Blurred Background (Bokeh)?
Use a shallow depth of field by getting close to the subject and adjusting the focus.
8. What Subjects Are Best For Macro Photography?
Flowers, insects, water droplets, textures, and everyday objects are all excellent choices.
9. How Do I Edit My Macro Photos?
Use editing apps like Snapseed or Adobe Lightroom Mobile to adjust exposure, contrast, saturation, and sharpness.
10. How Can I Share My Macro Photos?
Share your photos on social media platforms, online photography communities, create a portfolio, or enter photography contests.
Address: 1600 St Michael’s Dr, Santa Fe, NM 87505, United States.
Phone: +1 (505) 471-6001
Website: dfphoto.net.
Ready to transform ordinary scenes into extraordinary macro photographs? Visit dfphoto.net now and discover a treasure trove of tips, tutorials, and inspiration to fuel your passion for iPhone macro photography. Connect with a vibrant community of photographers, share your work, and unlock your creative potential today!