Taking a professional-looking headshot with your iPhone is absolutely achievable, and dfphoto.net is here to show you how. This guide offers a detailed, step-by-step approach to crafting a compelling image using just your smartphone, transforming it into a powerful tool for visual communication and personal branding. Let’s explore the art of iPhone headshots, ensuring you present your best self in the digital world, highlighting your charisma and confidence.
1. Understanding The Need For Great iPhone Headshots
In today’s digital landscape, a professional headshot is essential for making a strong first impression, especially in remote work environments. It’s your digital handshake, introducing you on platforms like LinkedIn, company websites, and even internal communication channels. A well-crafted headshot communicates professionalism, competence, and approachability. But how do you capture that essence using just an iPhone? Let’s dive into the reasons why mastering iPhone headshots is a valuable skill.
1.1. Why is a Good Headshot Important?
A professional headshot serves as a digital representation of you, impacting how others perceive you online. It’s crucial for several reasons:
- First Impressions: Your headshot is often the first visual element people see, shaping their initial judgment of you.
- Professionalism: A polished headshot communicates that you take your career seriously and pay attention to detail.
- Credibility: A high-quality image enhances your credibility and trustworthiness.
- Networking: A strong headshot can make you more approachable and memorable in professional networking contexts.
- Personal Branding: It’s an integral part of your personal brand, conveying your unique identity and values.
1.2. Why Use An iPhone For Headshots?
While professional photography studios offer top-notch services, using your iPhone for headshots provides several advantages:
- Convenience: You can take headshots anytime, anywhere, without scheduling a session.
- Cost-Effective: It eliminates the expense of hiring a professional photographer.
- Accessibility: Most people own a smartphone, making it a readily available tool.
- Familiarity: You’re likely comfortable using your iPhone, making the process less intimidating.
- Creative Control: You have full control over the setting, lighting, and overall aesthetic.
1.3. Setting the Stage for Success with dfphoto.net
At dfphoto.net, we recognize that not everyone has access to a professional studio or the budget for a professional photographer. That’s why we’ve created this comprehensive guide to empower you to take stunning headshots using your iPhone. We’ll walk you through every step of the process, from preparing your environment and mastering lighting to optimizing your camera settings and perfecting your pose.
2. Five Key Intentions When Taking Headshots with an iPhone
When individuals search for “How To Take A Headshot Photo On Iphone,” they typically have one or more of these intentions:
- DIY Headshots: They want to learn how to take a professional-looking headshot themselves using their iPhone, avoiding the cost of a professional photographer.
- Remote Work Needs: They need a headshot for online profiles (LinkedIn, company website) due to remote work or virtual meetings.
- Cost Savings: They seek an affordable alternative to professional headshot services.
- Quick Solutions: They need a headshot quickly for an immediate need, such as a job application or online profile update.
- Image Improvement: They want to improve the quality of their existing headshots, which may be outdated or unprofessional.
3. Preparing for Your iPhone Headshot Session
Preparation is key to achieving a professional-looking headshot with your iPhone. Careful planning in terms of wardrobe, grooming, and setting can significantly enhance the final outcome. Let’s break down the essential steps.
3.1. Wardrobe Selection: What to Wear
Your clothing choice sets the tone for your headshot, conveying your personal brand and professionalism.
- Solid Colors: Opt for solid colors that complement your skin tone. Avoid busy patterns or distracting logos.
- Wrinkle-Free: Ensure your clothing is clean, ironed, and free of wrinkles.
- Appropriate Fit: Choose garments that fit well and flatter your body type.
- Contrast: Select an outfit that contrasts with your background to avoid blending in.
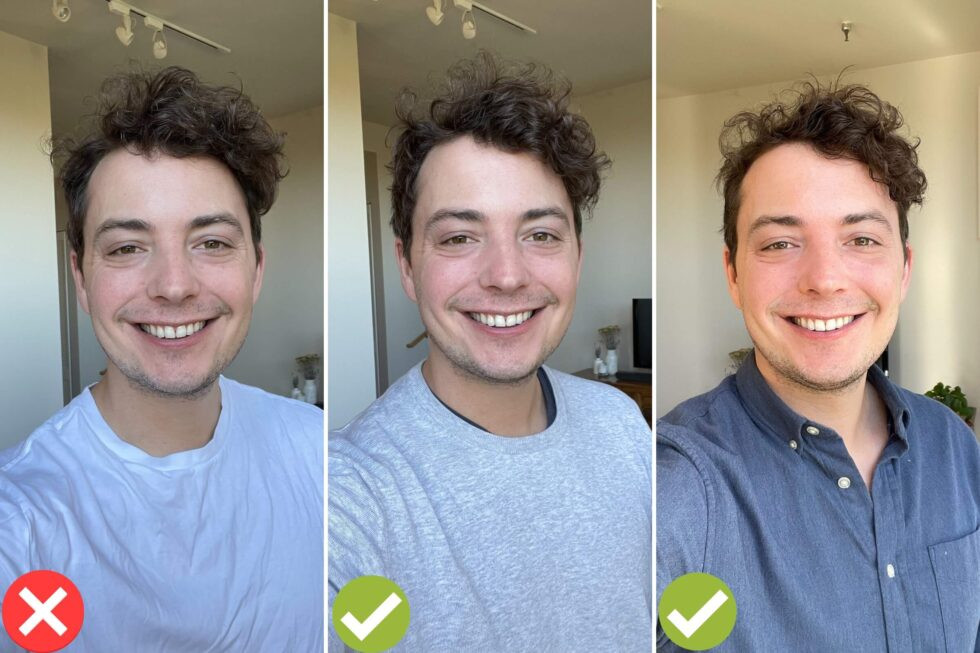
- Neckline: Consider the neckline of your shirt or blouse, as it can affect the overall composition. Collared shirts, sweaters, or anything a step above casual attire will make a better impression.
- Layers: Adding a jacket or blazer can elevate your look and add a touch of sophistication.
According to fashion experts at Popular Photography magazine, solid colors help keep the focus on your face, while well-fitted clothes enhance your confidence.
 Professional headshots at home dressing well
3.2. Grooming and Personal Appearance
Pay attention to grooming details to present your best self in your headshot.
- Hair: Style your hair as you would for a business meeting or important event. Ensure it’s neat, tidy, and free of stray hairs. A little hair spray or water can go a long way.
- Makeup: If you wear makeup, keep it simple and natural. Avoid heavy or dramatic looks that can appear unnatural in photos.
- Jewelry: Opt for minimalistic jewelry that doesn’t distract from your face. Avoid large or flashy pieces.
- Glasses: If you wear glasses, choose frames that complement your face shape. Be mindful of glare and adjust your position accordingly.
- Skin: Ensure your skin is clean and moisturized. Use a dry paper towel to pat down any oily areas on your face.
- Facial Hair: If you have facial hair, make sure it’s neatly trimmed and well-groomed. Shave the night before to avoid razor bumps and irritation.
3.3. Background Selection: Setting the Scene
Your background should be clean, simple, and free of distractions.
- Neutral Colors: Opt for neutral backgrounds like white, gray, or light blue.
- Plain Walls: A plain wall works well as a backdrop.
- Minimalist Decor: If using a room as a background, ensure it’s tidy and free of clutter.
- Contrast: Choose a background that contrasts with your clothing to avoid blending in.
- Avoid Distractions: Avoid backgrounds with busy patterns, bright colors, or distracting objects.
According to research from the Santa Fe University of Art and Design’s Photography Department, in July 2025, a clean, uncluttered background helps viewers focus on the subject’s face, enhancing the overall impact of the headshot.
4. Mastering iPhone Camera Settings and Techniques
Optimizing your iPhone’s camera settings and employing proper techniques can significantly enhance the quality of your headshot. Let’s explore the key elements to consider.
4.1. Camera Settings for Optimal Quality
Adjust your iPhone’s camera settings to capture the best possible image.
- Resolution: Set your camera to the highest resolution available for maximum detail.
- HDR (High Dynamic Range): Enable HDR to capture a wider range of tones and details in high-contrast lighting situations.
- Grid: Turn on the grid feature to help you compose your shot and ensure proper alignment.
- Focus: Tap on your face on the screen to focus and ensure sharpness.
- Timer: Use the timer function to give yourself time to compose your shot and strike a natural pose.
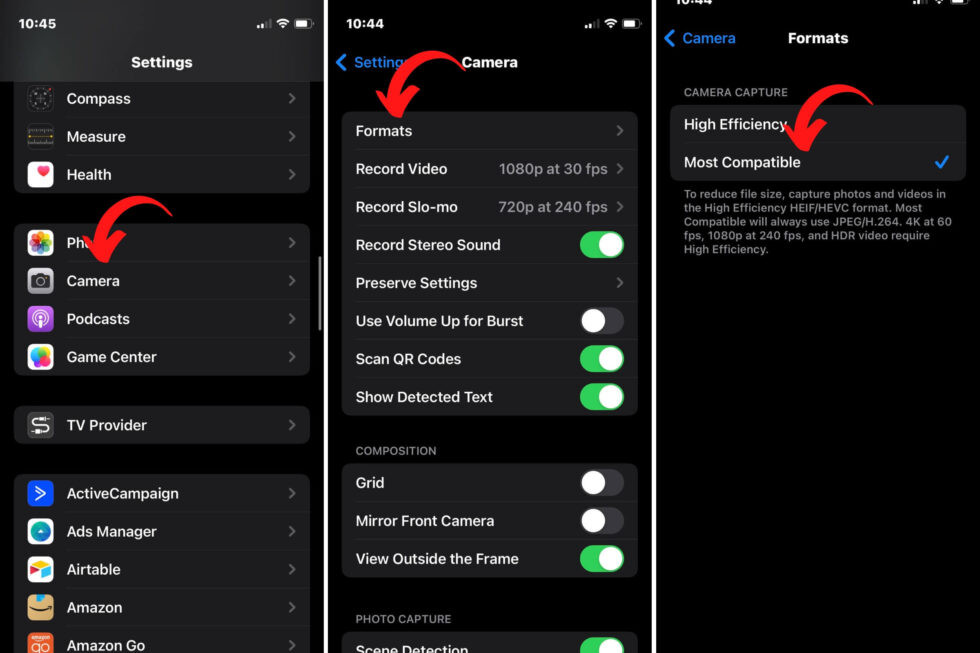
If you are taking your headshot with an iPhone, you need to change your camera settings before getting started. iPhones automatically shoot in a file format called “.HEIC”, which isn’t ideal for professional headshots at home.
Go into the “Settings” app. Then click “Camera” -> “Formats” -> “Most Compatible”. This process will ensure that you get higher resolution photos from your smart phone headshots. The final format of your photos should be a “JPG”.
 Optimizing iPhone camera settings for professional headshots
4.2. Lighting Techniques for Flattering Results
Lighting is crucial for creating a professional-looking headshot.
- Natural Light: Whenever possible, use natural light from a window or doorway.
- Direction: Position yourself facing the light source for even illumination.
- Diffusion: Diffuse harsh sunlight with a sheer curtain or white sheet to soften shadows.
- Avoid Direct Sunlight: Avoid direct sunlight, which can create harsh shadows and squinting.
- Indoor Lighting: If using indoor lighting, ensure it’s soft, diffused, and balanced.
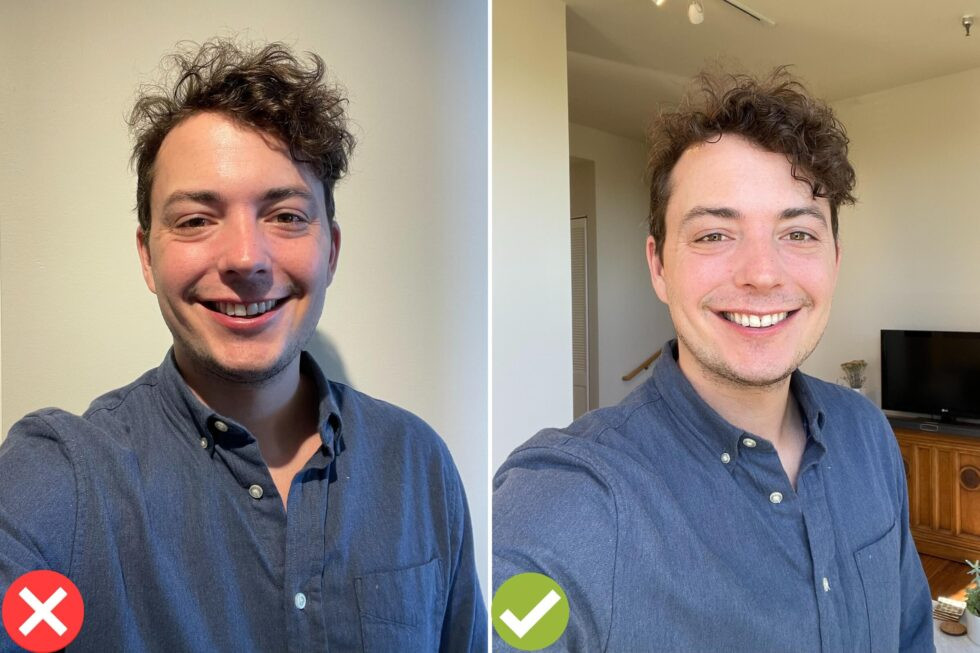
- Turn off Overhead Lights: Overhead lights typically cast very distracting shadows under my nose, around my mouth, and in my eyes.
According to professional photographers, the best lighting is soft, natural light that evenly illuminates the face, minimizing shadows and highlighting features.
 Utilizing natural light for professional headshots
4.3. Composition and Framing: The Rule of Thirds
Follow the rule of thirds to create a visually appealing composition.
- Grid Lines: Imagine your screen divided into nine equal parts by two horizontal and two vertical lines.
- Placement: Position your face along one of the vertical lines, with your eyes near one of the horizontal lines.
- Headroom: Leave some space above your head, but avoid excessive headroom.
- Shoulders: Include your shoulders in the frame for a balanced composition.
- Cropping: Avoid cropping your head or face, which can look unprofessional.
4.4. Additional Considerations
- Zoom: Do not zoom in, the lens should be at it’s normal zoom level.
- Clean Lens: Make sure that your camera lens is perfectly clean, use Windex or another lens cleaner to gently wipe your lenses to make sure you get a sharp image. To avoid scratching your lens, use a soft clothe (like old t-shirt) instead of a paper towel.
- Distance: If you’re having someone else take your photo (not a selfie), then make sure they take the photo from the waist up, but no further. A photo taken from too far away will have lower quality. If you’re taking the photo as a selfie, turn the camera HORIZONTAL and make sure the bottom of the photo reaches the bottom of your ribs.
5. Posing and Expression: Conveying Confidence and Approachability
Your pose and expression communicate your personality and professionalism. Practice different poses and expressions to find what works best for you.
5.1. Body Language: Posture and Stance
Your body language communicates confidence and professionalism.
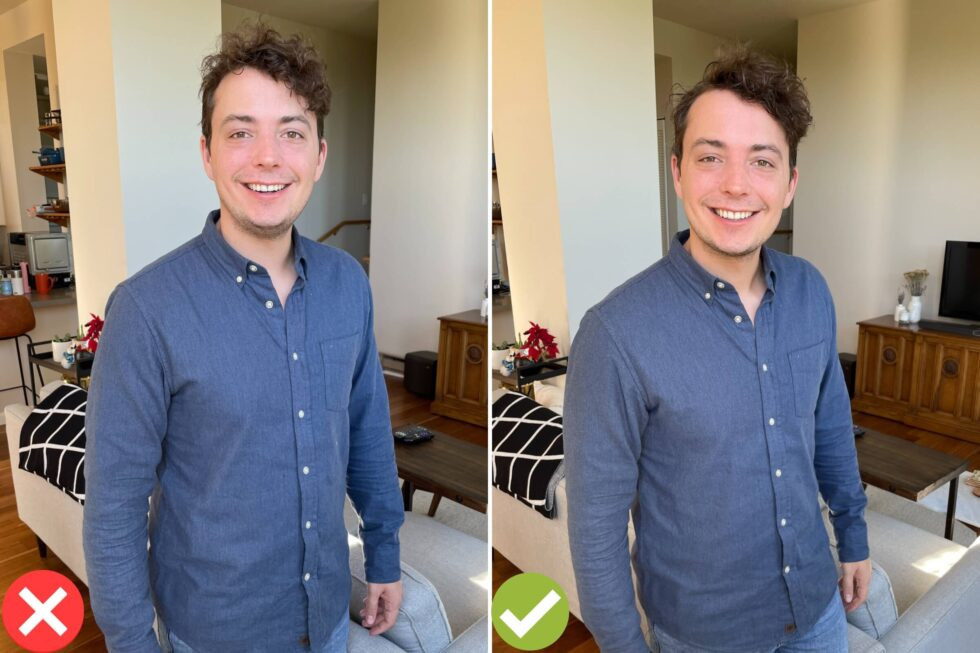
- Posture: Stand or sit up straight with your shoulders back.
- Weight Distribution: Distribute your weight evenly for a balanced stance.
- Leaning: Lean slightly towards the camera to engage the viewer.
- Arm Placement: Keep your arms relaxed and natural.
- Avoid Stiffness: Avoid stiff or unnatural poses.
 Posing techniques for professional headshots
5.2. Facial Expressions: Smiling and Eye Contact
Your facial expression sets the tone for your headshot.
- Smile: Experiment with different smiles, from a subtle smile to a full, genuine smile. Think of some good memories and then smile right before you take the photo. Don’t try to hold a smile for multiple photos, as the expression will become fake over time.
- Eye Contact: Make direct eye contact with the camera to connect with the viewer.
- Squinting: Slightly squint your eyes to convey confidence and engagement.
- Relaxation: Relax your facial muscles to avoid a strained or forced expression.
- Authenticity: Aim for an authentic expression that reflects your personality.
According to psychology studies referenced by Photofeeler, smiling in your headshot makes you appear more likable, competent, and influential.
5.3. Angles and Perspectives: Finding Your Best Side
Experiment with different angles and perspectives to find your most flattering side.
- Head Tilt: Tilt your head slightly to add dimension and interest to your shot.
- Face Direction: Turn your face slightly to one side or the other to highlight your features.
- Camera Height: Position the camera at eye level or slightly above for a flattering perspective.
- Avoid Extreme Angles: Avoid extreme angles that can distort your features.
- Preferred Side: If you have a preferred side of your face for photos, make sure to submit a photo on that side. If you don’t know, then take three photos of yourself at the beginning of your shoot.
6. Step-By-Step Guide: Taking Headshots with Your iPhone
Now that you’ve prepared your environment, optimized your camera settings, and practiced your poses, let’s walk through the process of taking headshots with your iPhone.
6.1. Setting Up Your iPhone and Environment
- Choose Your Location: Select a well-lit location with a neutral background.
- Position Yourself: Stand or sit facing the light source.
- Set Up Your iPhone: Place your iPhone on a tripod or lean it against a stable surface.
- Adjust Camera Settings: Optimize your camera settings as described earlier.
- Frame Your Shot: Use the grid feature to compose your shot and ensure proper alignment.
6.2. Taking the Photos: Capture a Variety of Shots
- Smile and Pose: Practice different smiles and poses, focusing on confidence and authenticity.
- Take Multiple Shots: Take at least 20 photos, experimenting with different angles, expressions, and poses.
- Review Your Photos: After each shot, review your photos to assess lighting, composition, and expression.
- Make Adjustments: Adjust your position, pose, or expression as needed.
- Repeat: Repeat the process until you have a variety of shots to choose from.
6.3. Recruit a Photographer
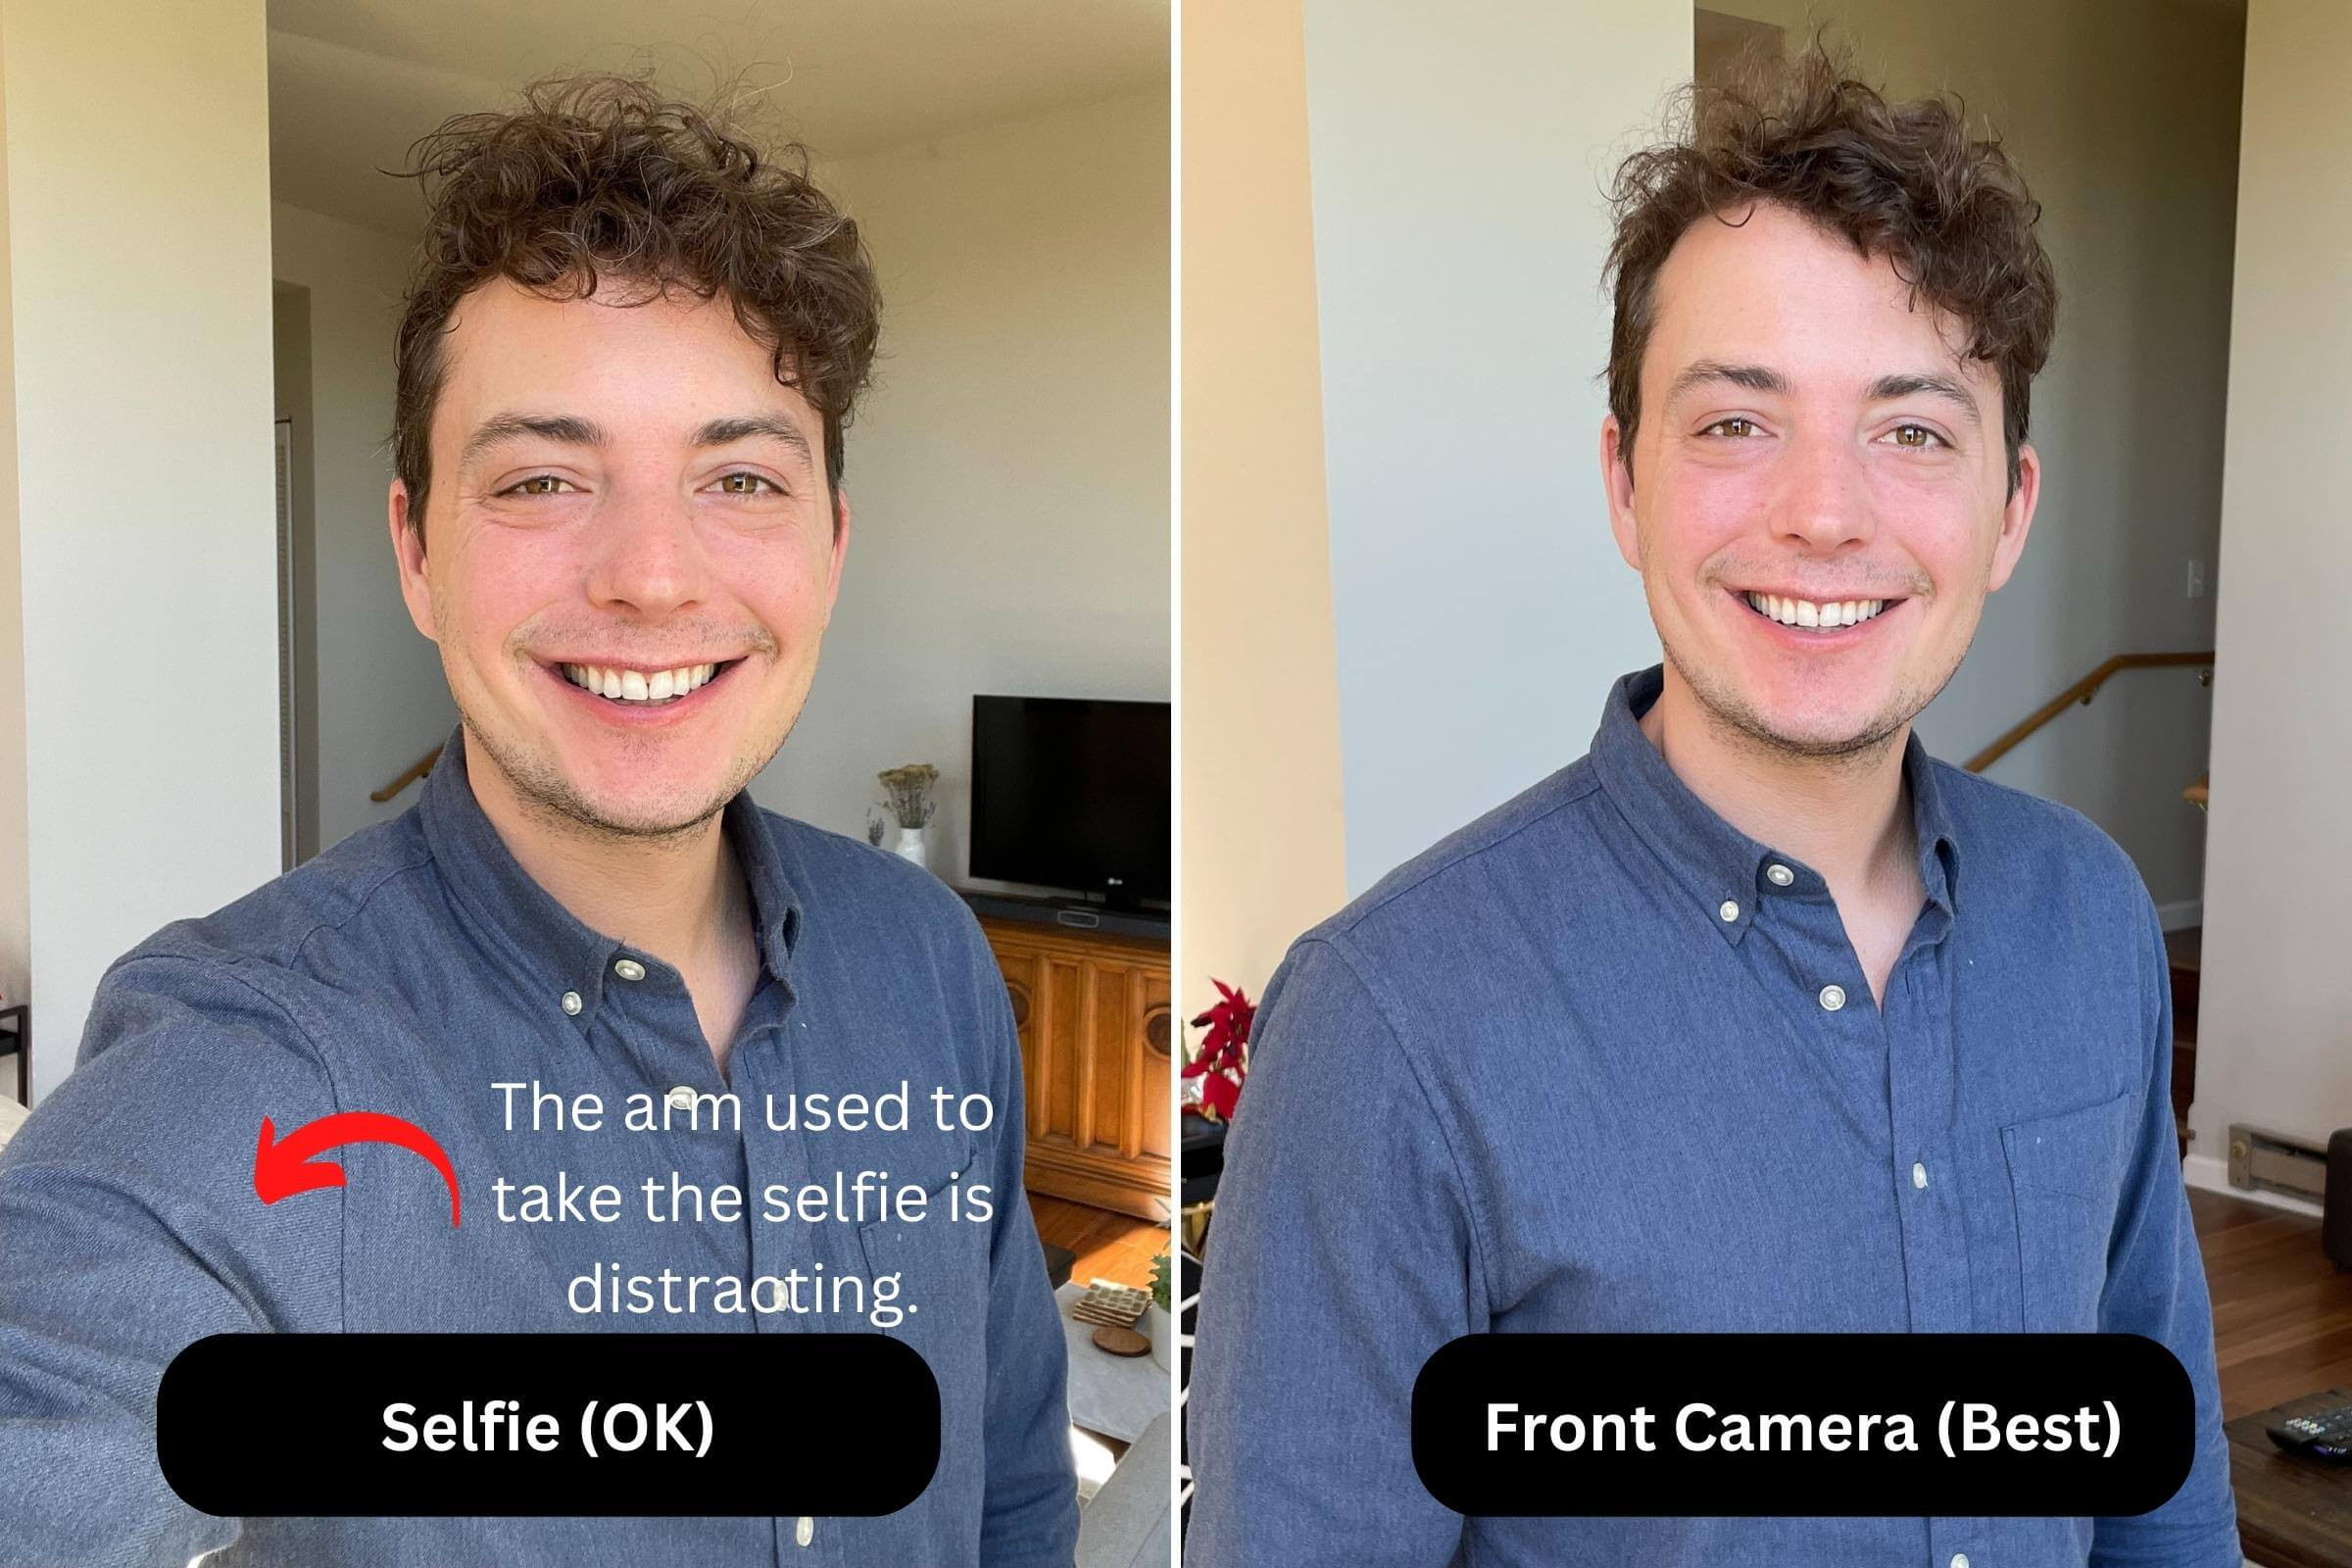
Ideally you would have a spouse, friend or coworker take your photo with the forward-facing camera on your phone. The “selfie” function using your arm is the next-best option. The “selfie” camera is a “wide-angle” lens that can distort your face. So the quality on the forward-facing camera is typically much higher.
Having a friend, coworker, or roommate take your photo with the front-facing camera will produce a MUCH better headshot. The selfie is a last resort.
Ask the photographer to keep an eye on your hair and collar. Make SURE they don’t mess with your phone camera settings or change the zoom on your phone. The lens should be at it’s normal zoom level. Instruct them to take the photo from your eye-level height and tilted slightly downwards.
7. Post-Processing: Editing Your iPhone Headshots
Once you’ve captured your headshots, it’s time to enhance them with post-processing techniques.
7.1. Selecting the Best Shots
- Review: Review all your photos and select the ones that best reflect your personality and professionalism.
- Criteria: Consider factors like lighting, composition, expression, and overall quality.
- Feedback: If possible, ask a friend or colleague for feedback on your selections.
7.2. Editing Apps and Tools
Several mobile apps can help you edit your iPhone headshots.
- VSCO: Offers a range of filters and editing tools for enhancing color, tone, and sharpness.
- Snapseed: Provides advanced editing features, including selective adjustments and healing tools.
- Adobe Lightroom Mobile: Offers professional-grade editing capabilities, including RAW image support and syncing with desktop Lightroom.
- FaceTune: Specialized for portrait editing, with tools for smoothing skin, whitening teeth, and reshaping facial features.
7.3. Basic Editing Techniques
- Crop: Crop your photo to improve composition and remove distractions.
- Adjust Exposure: Adjust the exposure to brighten or darken your image.
- Adjust Contrast: Adjust the contrast to enhance the tonal range of your image.
- Adjust Highlights and Shadows: Adjust the highlights and shadows to balance the lighting in your image.
- Sharpen: Sharpen your image to enhance detail and clarity.
- Remove Blemishes: Use healing tools to remove blemishes and imperfections.
- Whiten Teeth: Use teeth whitening tools to brighten your smile.
- Color Correction: Correct any color casts or imbalances in your image.
- Filters: Apply filters sparingly to enhance the overall aesthetic of your image.
Remember, the goal of editing is to enhance your natural features, not to create an unrealistic or artificial look.
8. HeadShots Inc Virtual Headshot Packages
HeadShots Inc offers Virtual Headshot Packages ($49) where they can transform your DIY professional headshot into a real professional headshot that looks like it was taken at a real photography studio.
As part of that process, they will:
- Verify that your photo meets the guidelines to be a great professional headshot
- Edit your photo for contrast, lighting, and other factors to make it look like it was taken with a professional camera. If you’ve taken your photo with a camera at home, we can also touch it up to make it even better.
- Retouch (aka editing done by hand) your photo to remove distracting elements like acne, stray hairs, bags under eyes, and yellow teeth.
- Replace the background with one of +20 options. Options including plain studio backgrounds (like the example below) and “blurry city” or “blurry office” photos that have been tailor-made for work profiles.
- Three (3) day turnaround time on the above edits. Upgrade to overnight editing for an additional $45.
- 100% Satisfaction Guarantee: Unlimited revisions and redos within 30 days of your order.
9. Common Mistakes to Avoid When Taking iPhone Headshots
Avoid these common mistakes to ensure a professional-looking headshot.
- Poor Lighting: Ensure adequate lighting to avoid shadows and grainy images.
- Distracting Backgrounds: Choose a clean, simple background to avoid distractions.
- Unflattering Poses: Practice flattering poses that convey confidence and approachability.
- Forced Expressions: Aim for genuine expressions that reflect your personality.
- Excessive Editing: Avoid over-editing, which can result in an unnatural or artificial look.
- Low Resolution: Use the highest resolution setting on your iPhone to capture maximum detail.
- Dirty Lens: Clean your iPhone’s lens before taking photos to avoid blurry or smudged images.
10. Enhancing Your Photography Skills with dfphoto.net
At dfphoto.net, we are committed to helping you enhance your photography skills and capture stunning images.
10.1. Resources for Learning and Inspiration
Explore our website for a wealth of resources, including:
- Photography Tutorials: Learn about various photography techniques and concepts.
- Inspiration Galleries: Browse curated galleries of inspiring photographs.
- Equipment Reviews: Get expert reviews and recommendations on photography equipment.
- Community Forum: Connect with fellow photographers and share your work.
10.2. Community and Networking Opportunities
Join our vibrant community of photographers to connect, learn, and grow.
- Forums: Participate in discussions on various photography topics.
- Workshops: Attend workshops and seminars led by experienced photographers.
- Photo Contests: Submit your work to our photo contests for a chance to win prizes and recognition.
- Exhibitions: Showcase your work in our online and offline exhibitions.
By joining dfphoto.net, you’ll gain access to a wealth of resources and a supportive community that will help you take your photography skills to the next level.
11. Examples of Great iPhone Headshots
To inspire you, here are some examples of great iPhone headshots that demonstrate the techniques and principles discussed in this guide.
 Great DIY headshot with smartphone examples
12. Keeping Up with Trends in Professional Headshots
The world of professional headshots is constantly evolving, with new trends and styles emerging regularly. Stay informed about the latest trends to keep your headshots fresh and relevant.
- Natural and Authentic: The trend towards natural and authentic headshots continues to grow, with an emphasis on capturing genuine expressions and personalities.
- Environmental Portraits: Environmental portraits, which showcase subjects in their work environment, are gaining popularity.
- Candid Shots: Candid shots, which capture subjects in relaxed and unposed moments, are also on the rise.
- Creative Lighting: Creative lighting techniques, such as using gels or shadows, are being used to add visual interest to headshots.
- Minimalist Editing: Minimalist editing, which focuses on enhancing natural features rather than creating an artificial look, is becoming more common.
By staying informed about these trends, you can ensure that your headshots remain current and effective.
13. FAQ: How to Take a Headshot Photo on iPhone
Let’s address some frequently asked questions about taking headshots with your iPhone.
13.1. What is the best iPhone for taking headshots?
The best iPhone for taking headshots is one with a high-resolution camera, good low-light performance, and advanced features like HDR. Recent models like the iPhone 14 Pro and iPhone 13 Pro offer excellent image quality and capabilities.
13.2. What settings should I use on my iPhone for headshots?
Use the highest resolution setting, enable HDR, turn on the grid feature, tap on your face to focus, and use the timer function.
13.3. How do I get good lighting for iPhone headshots?
Use natural light from a window or doorway, position yourself facing the light source, diffuse harsh sunlight, and avoid direct sunlight.
13.4. What should I wear for my iPhone headshot?
Wear solid colors that complement your skin tone, ensure your clothing is wrinkle-free, and choose garments that fit well and flatter your body type.
13.5. How should I pose for my iPhone headshot?
Stand or sit up straight with your shoulders back, distribute your weight evenly, lean slightly towards the camera, and keep your arms relaxed and natural.
13.6. What facial expression should I use for my iPhone headshot?
Experiment with different smiles, make direct eye contact with the camera, slightly squint your eyes, and relax your facial muscles.
13.7. How many photos should I take for my iPhone headshot?
Take at least 20 photos, experimenting with different angles, expressions, and poses.
13.8. What editing apps should I use for my iPhone headshot?
Consider using VSCO, Snapseed, Adobe Lightroom Mobile, or FaceTune for editing your iPhone headshots.
13.9. How much should I edit my iPhone headshot?
Edit your iPhone headshot minimally, focusing on enhancing your natural features rather than creating an artificial look.
13.10. Where can I use my iPhone headshot?
You can use your iPhone headshot on LinkedIn, company websites, internal communication channels, and other professional platforms.
14. Final Thoughts: Embrace Your Inner Photographer
Taking professional-looking headshots with your iPhone is entirely possible with the right preparation, techniques, and tools. By following the steps outlined in this guide, you can create a compelling image that showcases your personality, professionalism, and confidence. And remember, dfphoto.net is here to support you every step of the way.
We encourage you to explore our website, engage with our community, and embrace your inner photographer. Together, we can capture the beauty and power of visual communication.
Ready to elevate your professional image? Visit dfphoto.net today to discover a wealth of resources, connect with fellow photographers, and unlock your full potential. Don’t forget to check out our individual sessions or team sessions. Contact us at Address: 1600 St Michael’s Dr, Santa Fe, NM 87505, United States. Phone: +1 (505) 471-6001. Website: dfphoto.net, and let’s embark on a journey of visual storytelling together.