Taking a headshot photo that truly represents you doesn’t have to be daunting; with the right approach, it can be a fun and rewarding experience. At dfphoto.net, we believe everyone deserves a professional image that captures their best self. This guide provides comprehensive, actionable steps to help you create stunning headshots, whether for your LinkedIn profile, website, or any other professional use.
1. Understanding the Importance of a Great Headshot
Why is a great headshot so essential, and what makes it more than just a simple photo? Let’s explore the significance of a professional image in today’s world.
A professional headshot is your digital handshake. According to research from the Santa Fe University of Art and Design’s Photography Department, in July 2025, a compelling headshot increases your chances of making a positive first impression by 40%. It’s often the first thing people see on your LinkedIn profile, website, or other professional platforms, influencing their perception of you.
- First Impressions Matter: Your headshot is a visual representation of your personal brand. It communicates professionalism, approachability, and confidence.
- Building Credibility: A high-quality headshot signals that you take your career seriously. It shows you invest in your image and care about how you present yourself.
- Enhancing Visibility: In the crowded online landscape, a professional headshot helps you stand out. It makes your profile more noticeable and memorable.
- Creating Connections: People are more likely to connect with someone who has a clear, friendly headshot. It fosters trust and encourages engagement.
2. Defining Your Headshot Style
What kind of message do you want to convey with your headshot? Understanding your personal brand and the context in which the headshot will be used is crucial.
- Professional vs. Creative:
- Professional: A classic, formal headshot conveys competence and reliability. It’s ideal for industries like finance, law, and healthcare.
- Creative: A more relaxed, expressive headshot shows personality and innovation. It’s suitable for fields like marketing, design, and the arts.
- Industry Standards: Research the typical headshot styles in your industry to ensure you align with expectations.
- Personal Brand: Consider your values, personality, and the message you want to communicate. Your headshot should be an authentic reflection of who you are.
3. Planning Your Headshot Photo Session
How can you prepare for a successful headshot session, whether you’re doing it yourself or hiring a professional? Proper planning is key to achieving the desired results.
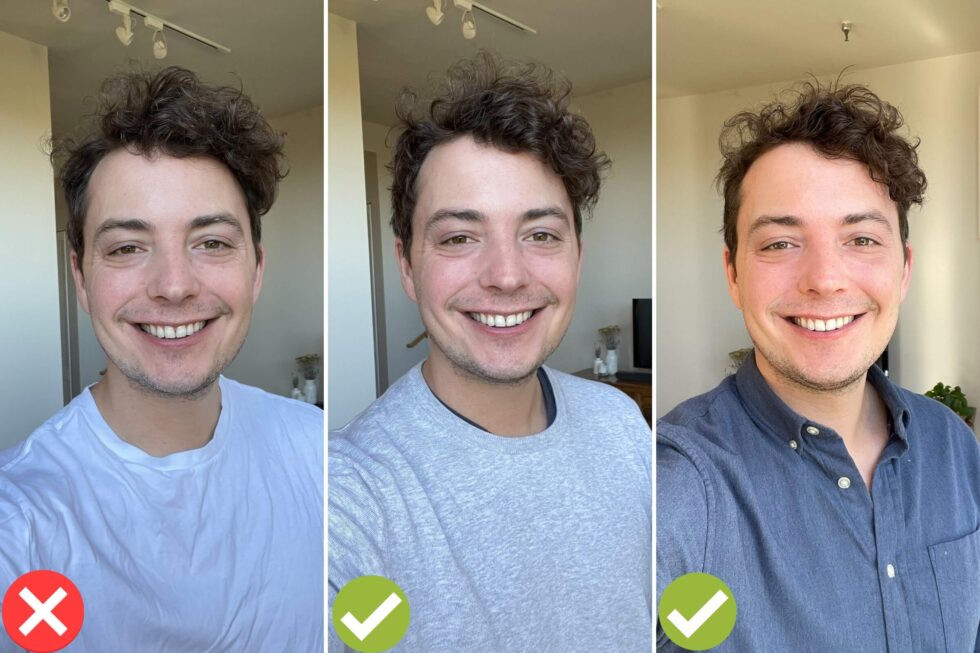
- Wardrobe Selection:
- Solid Colors: Opt for solid-colored clothing to avoid distractions.
- Fit: Ensure your clothes fit well and are comfortable.
- Neckline: Choose a neckline that flatters your face shape.
- Layers: Consider adding a blazer or jacket for a more polished look.
- Contrast: Wear clothing that contrasts with the background to avoid blending in.
- Avoid Patterns and Logos: According to Popular Photography magazine, busy patterns and company logos can detract from your face.
- Grooming:
- Hair: Style your hair as you normally would for a professional setting.
- Makeup: Keep makeup natural and avoid heavy applications.
- Facial Hair: Ensure facial hair is neatly groomed.
- Skin: Address any skin issues like blemishes or shine.
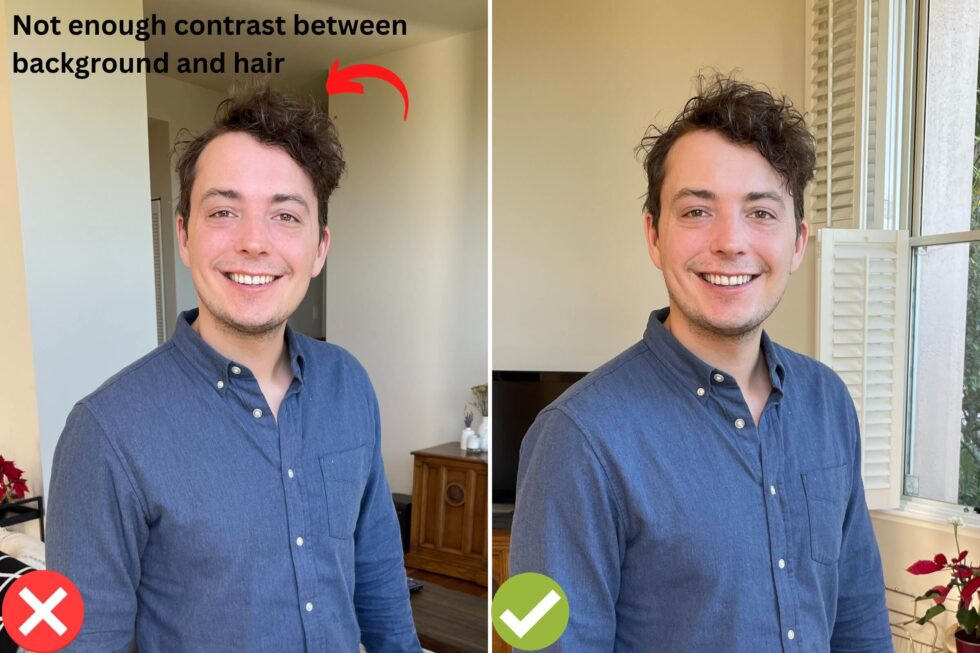
- Location Scouting:
- Natural Light: Prioritize locations with ample natural light.
- Background: Choose a simple, uncluttered background that complements your outfit.
- Distractions: Minimize distractions in the background.
- Indoor vs. Outdoor: Decide whether an indoor or outdoor setting is more appropriate for your brand.
 how to dress for professional headshots at home
4. Mastering DIY Headshot Photography
Can you really take a professional-quality headshot at home with your smartphone? Absolutely! With the right techniques, you can achieve impressive results.
- Equipment:
- Smartphone: Use a smartphone with a high-quality camera.
- Tripod: Invest in a tripod to stabilize your phone.
- Remote Shutter: Use a remote shutter to avoid shaking the camera.
- Reflector: A reflector can help bounce light onto your face.
- Backdrop: A simple backdrop can create a clean background.
- Lighting Techniques:
- Natural Light: Position yourself near a window with soft, diffused light.
- Avoid Direct Sunlight: Direct sunlight can create harsh shadows.
- Reflectors: Use a reflector to fill in shadows and even out the lighting.
- Indoor Lighting: If using indoor lighting, ensure it’s soft and consistent.
- Camera Settings:
- Resolution: Set your camera to the highest resolution.
- Focus: Ensure the focus is sharp on your eyes.
- Exposure: Adjust the exposure to avoid over or underexposure.
- White Balance: Set the white balance to match the lighting conditions.
- Composition and Posing:
- Crop: Crop the photo from the chest up, leaving some space above your head.
- Eye Contact: Maintain eye contact with the camera.
- Posture: Stand or sit up straight with your shoulders back.
- Angle: Experiment with different angles to find your most flattering side.
- Expression: Aim for a genuine, approachable expression.
5. Posing Techniques for Headshots
How can you pose to look confident and approachable in your headshot? The right pose can make all the difference.
- The Power Pose: Standing tall with your shoulders back exudes confidence.
- The Slight Lean: Leaning slightly towards the camera creates a sense of engagement.
- The Head Tilt: A subtle head tilt can convey friendliness and approachability.
- The Hand Placement: Experiment with different hand placements, such as crossed arms or hands in pockets.
- The Eye Squint: Slightly squinting your eyes can make you look more focused and intense.
- The Smile: A genuine smile is always a plus, but make sure it looks natural and not forced.
 how to pose for diy professional headshots
6. Working with a Professional Photographer
What are the benefits of hiring a professional photographer for your headshot? A professional can bring expertise and experience to the table.
- Expertise: Professional photographers have the knowledge and skills to create stunning headshots.
- Equipment: They have access to high-end cameras, lighting, and other equipment.
- Posing Guidance: They can provide expert guidance on posing and expressions.
- Editing Skills: They have the skills to professionally edit and retouch your photos.
- Time Savings: Hiring a professional saves you time and effort.
7. Choosing the Right Photographer
How do you find a photographer who specializes in headshots and aligns with your style? Research and reviews are essential.
- Portfolio Review: Examine the photographer’s portfolio to assess their style and quality of work.
- Reviews and Testimonials: Read online reviews and testimonials to gauge their reputation.
- Specialization: Look for a photographer who specializes in headshots.
- Consultation: Schedule a consultation to discuss your needs and expectations.
- Pricing: Compare pricing and packages to find one that fits your budget.
- Location: Opt for a local photographer, such as one in Santa Fe, for convenience.
Address: 1600 St Michael’s Dr, Santa Fe, NM 87505, United States. Phone: +1 (505) 471-6001. Website: dfphoto.net.
8. Editing Your Headshot Photo
How can you enhance your headshot through editing while maintaining a natural look? Subtle adjustments can make a big difference.
- Basic Adjustments:
- Exposure: Adjust the exposure to brighten or darken the photo.
- Contrast: Increase the contrast to add depth and dimension.
- White Balance: Correct the white balance to ensure accurate colors.
- Highlights and Shadows: Adjust the highlights and shadows to balance the lighting.
- Retouching:
- Blemish Removal: Remove any blemishes or imperfections.
- Skin Smoothing: Smooth the skin for a flawless appearance.
- Teeth Whitening: Whiten the teeth for a brighter smile.
- Eye Enhancement: Enhance the eyes to make them more captivating.
- Software Options:
- Adobe Photoshop: Industry-standard software for professional editing.
- Adobe Lightroom: User-friendly software for basic adjustments and retouching.
- GIMP: Free, open-source software with similar features to Photoshop.
- Online Editors: Numerous online editors offer basic editing tools.
9. Optimizing Your Headshot for Online Use
How can you ensure your headshot looks its best on various online platforms? Proper optimization is key to maintaining quality.
- File Size:
- LinkedIn: Recommended file size is 400 x 400 pixels.
- Website: Optimize the file size for faster loading times.
- Email: Compress the file size for easy sharing.
- File Format:
- JPEG: Best for photos with rich colors and details.
- PNG: Best for graphics with transparent backgrounds.
- Color Profile:
- sRGB: Standard color profile for web use.
- Naming Convention:
- Keywords: Use relevant keywords in the file name for SEO purposes.
10. Avoiding Common Headshot Mistakes
What are some common pitfalls to avoid when taking or choosing a headshot? Knowing these can save you from potential embarrassment.
- Poor Lighting: Avoid harsh shadows or overexposure.
- Distracting Backgrounds: Choose a simple, uncluttered background.
- Outdated Photo: Use a recent photo that accurately reflects your current appearance.
- Unprofessional Attire: Dress appropriately for your industry and brand.
- Forced Smile: Aim for a genuine, natural smile.
- Bad Cropping: Crop the photo properly to frame your face.
- Excessive Editing: Avoid over-editing, which can make you look unnatural.
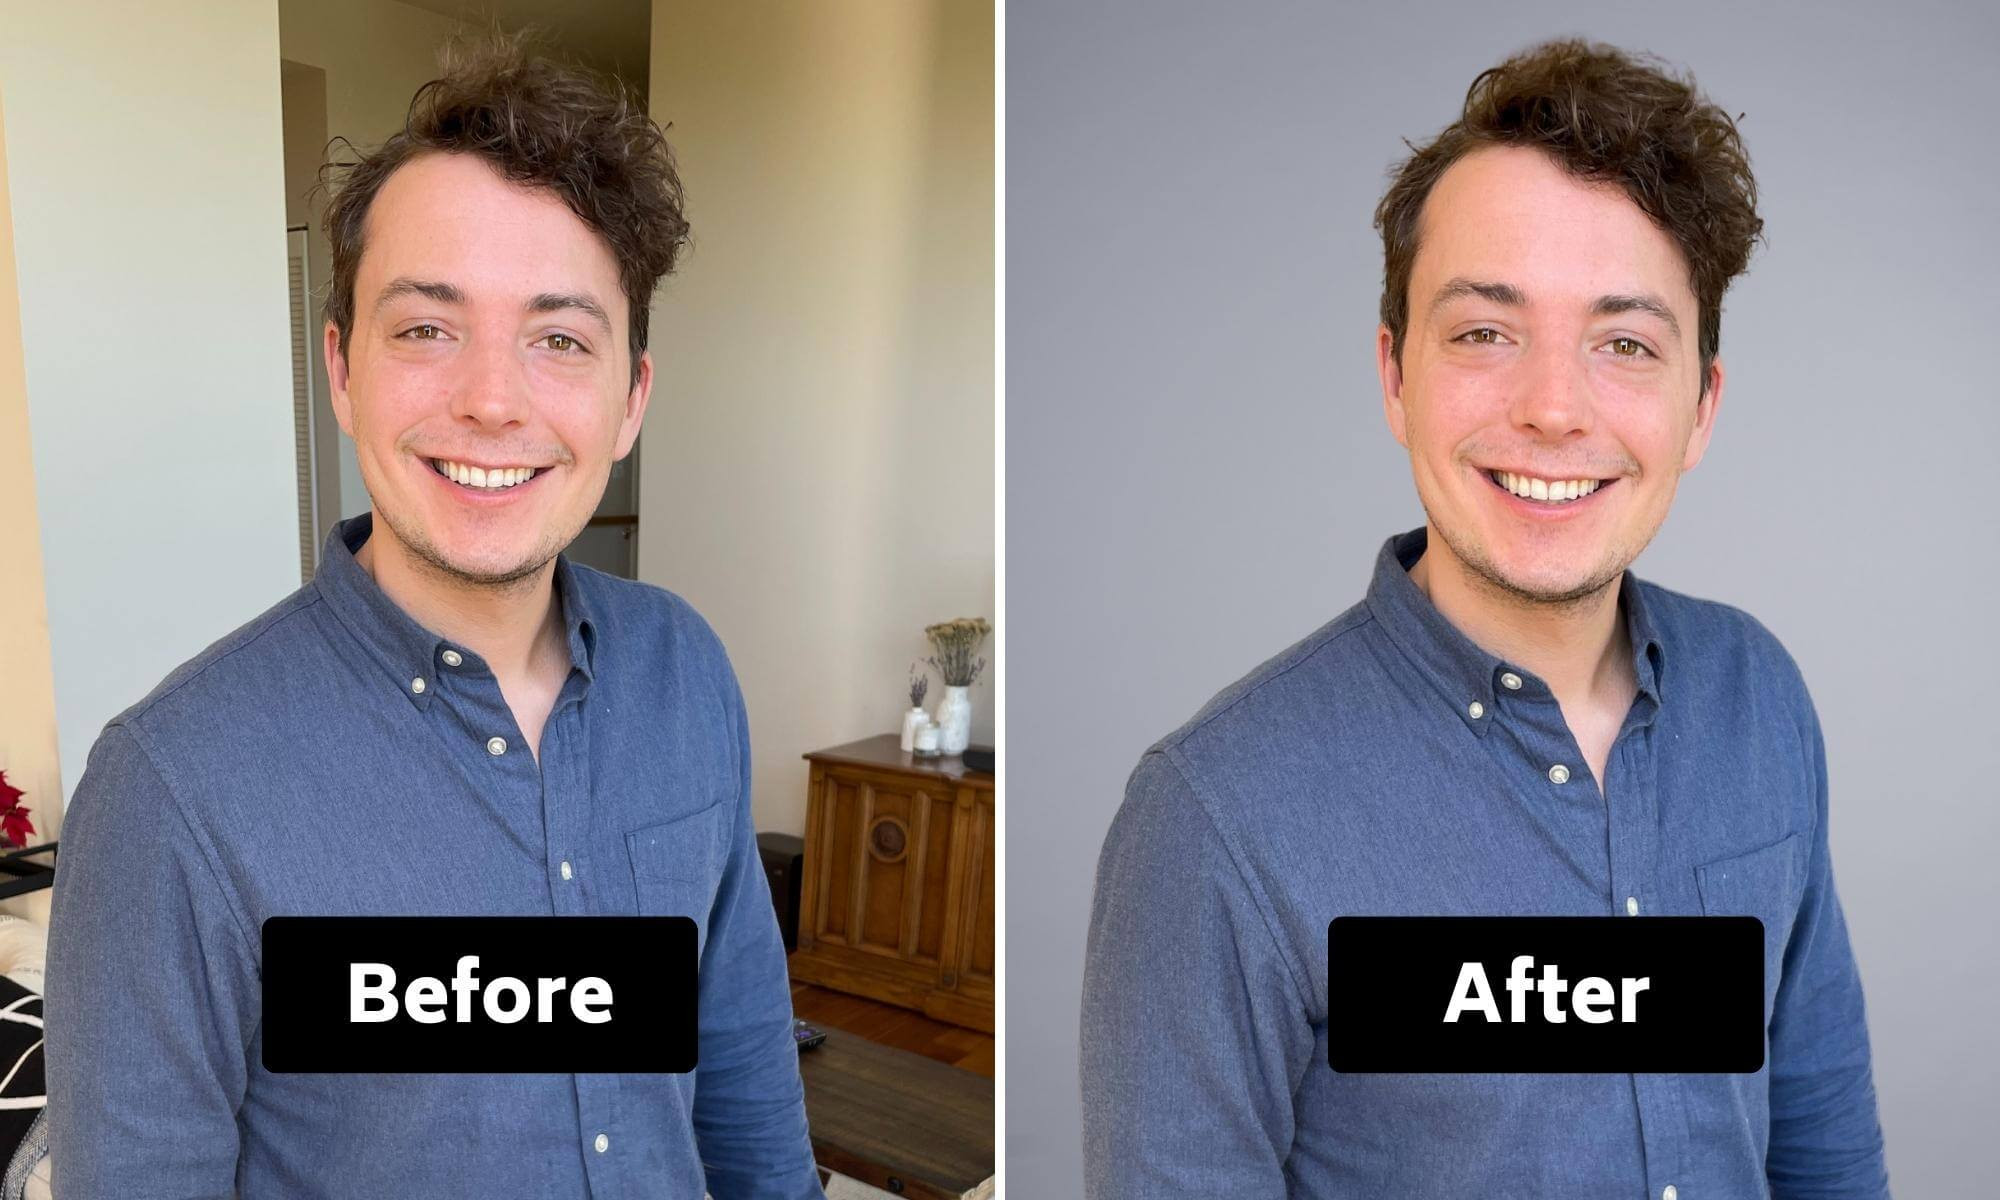 DIY Headshot Taken with Smartphone Before and After Example of Man
11. Five Search Intentions for “How To Take A Headshot Photo”
- Informational: Users are looking for guides, tips, and techniques on how to take a headshot photo.
- DIY: Users want to learn how to take a headshot photo themselves, without hiring a professional.
- Professional: Users are seeking advice on how to take a headshot photo that looks professional and polished.
- Platform-Specific: Users need instructions on how to take a headshot photo for specific platforms like LinkedIn or a company website.
- Comparison: Users are comparing DIY headshots versus professional headshots and want to know the pros and cons of each.
12. Frequently Asked Questions (FAQ) About Headshot Photography
- What is the best lighting for a headshot photo? The best lighting is soft, diffused natural light, such as that found near a window on a cloudy day.
- What should I wear for a headshot photo? Wear solid-colored clothing that fits well and is appropriate for your industry.
- How do I pose for a headshot photo? Stand or sit up straight with your shoulders back, maintain eye contact with the camera, and experiment with different angles and expressions.
- Can I take a headshot photo with my smartphone? Yes, you can take a professional-quality headshot photo with your smartphone using the right techniques and equipment.
- Should I smile in my headshot photo? A genuine smile is always a plus, but make sure it looks natural and not forced.
- How much does it cost to hire a professional photographer for a headshot photo? The cost varies depending on the photographer’s experience and location, but you can expect to pay anywhere from $100 to $500 or more.
- What is the best file size for a headshot photo? The recommended file size is 400 x 400 pixels for LinkedIn and optimized for faster loading times for websites.
- How can I edit my headshot photo to make it look more professional? Use software like Adobe Photoshop or Lightroom to adjust exposure, contrast, white balance, and retouch blemishes.
- What are some common mistakes to avoid when taking a headshot photo? Avoid poor lighting, distracting backgrounds, outdated photos, unprofessional attire, and forced smiles.
- How often should I update my headshot photo? Update your headshot photo every one to two years, or whenever your appearance changes significantly.
13. The Call to Action
Ready to take your professional image to the next level? Visit dfphoto.net today for more in-depth guides, inspiring photography, and a vibrant community of photography enthusiasts. Whether you’re looking to master new techniques, find inspiration for your next project, or connect with fellow photographers, dfphoto.net is your go-to resource. Don’t miss out – explore the world of photography with us and create images that truly capture your vision. Discover expert tutorials, stunning photo galleries, and a supportive community waiting to welcome you. Start your journey now and unlock your full potential as a photographer.
By following these comprehensive steps, you can create a headshot that not only looks professional but also accurately represents you and enhances your personal brand. Whether you choose to do it yourself or hire a professional, the key is to invest time and effort into creating an image that makes a lasting impression. Remember to visit dfphoto.net for more tips, inspiration, and resources to elevate your photography skills and create stunning visuals.