While standard 2D photos are still common online, 360-degree photos are becoming increasingly popular, especially among smartphone users. Sharing immersive panoramas used to be complex, but now, with the right tools, it’s straightforward and free. If you’re looking to explore the world of immersive photography, now is the perfect time to learn how to create your own 360 photos.
For dedicated 360 photography enthusiasts, investing in a specialized 360° camera is a worthwhile consideration as prices become more accessible. However, if you’re not ready for that investment yet, you can still capture and share stunning 360 panoramas using just your Android smartphone. All you need is the right application to get started.
This guide will walk you through the simple steps of shooting 360-degree panoramic images using your Android phone, empowering you to create your own immersive visual experiences.
Step 1: Download the Google Street View App
Creating 360-degree photos on an Android smartphone is remarkably easy, thanks to the Google Street View app. This free application is readily available on the Google Play Store.
To begin, head to the Google Play Store and download the Google Street View app. This app is your key to unlocking 360 photo capabilities on your Android device.
Step 2: Launch the Camera Feature
Once installed, open the Google Street View app. After navigating through a few introductory screens, you’ll arrive at the app’s homepage. To initiate the 360 photo capture process, look for the “Camera” icon located in the bottom-right corner of your screen and tap it.
A contextual menu will then appear. From the options presented, select the third option labeled “Camera.” This action will launch the 360 photo capture interface within the Street View app.
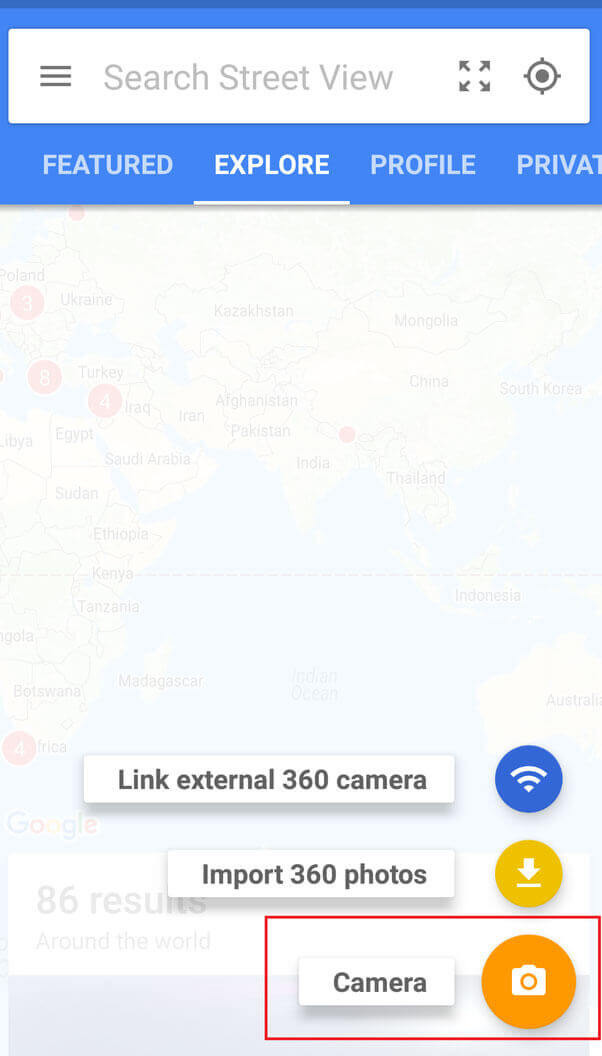 Launching Street View Camera
Step 3: Capture Your 360 Panorama
Upon selecting “Camera,” the Street View app will transition to the camera screen, ready for you to begin capturing your 360 photo. The app provides an intuitive guide to lead you through the process.
The core technique involves standing in one spot and steadily rotating your phone to capture images in all directions. You’ll see orange circles appear on your screen; your goal is to point your camera at each dot, one by one.
As you align your camera with the orange circles, the app automatically captures the necessary images. There’s no need to manually press a shutter button. Remember to pan your phone around in a complete 360-degree circle, ensuring you capture everything around you. Once you have hit all the orange circles and reached the final dot, a white button will appear in the center of the screen. Tap this white button to finalize the capture process. The app will then return you to the home screen.
 360 photo capture process on Android
At this stage, the Google Street View app automatically starts stitching the individual images together to create your seamless 360-degree panorama. An orange loading bar at the bottom of the screen will indicate the stitching progress. Once completed, the app will notify you that your 360 photo is “ready to publish,” meaning the panorama is successfully created and saved within the app.
Step 4: Accessing Your 360 Photo on Android
After the Google Street View app has stitched your images into a 360 panorama, you’ll want to access the raw image file on your Android device. While you can preview the panorama within the Street View app, saving it to your device’s storage allows for wider sharing and usage.
For Android users, locating the 360 photo is straightforward. Open your device’s file explorer app (often called “Files” or “My Files,” or “Explorer”). Navigate to the “Images” folder. In some newer Android versions, you might find the panorama within the “Gallery” app. The 360 photo will be saved as a standard image file, ready for the next steps of sharing or embedding.
Step 5: Sharing Your 360 Photos
Now that you have successfully captured and accessed your 360 photo on your Android smartphone, you’re ready to share your immersive creation with the world.
By uploading your 360 image to platforms like Panoraven, you can easily share your panoramic photos across various social media and communication channels directly from your smartphone. Panoraven allows you to share your 360 photos via:
- WhatsApp, Twitter, and Facebook
- SMS
Furthermore, if you wish to showcase your 360 photo on a website, you can also embed your 360 image in a website. While embedding is manageable on a smartphone, it is often more convenient to perform this step from a computer for easier file management and website integration.
Tips for Capturing Great 360 Photos
Creating high-quality 360 photos with the Street View app takes a little practice. Initially, you might find yourself moving too much or too quickly while trying to hit the on-screen circles. However, with a bit of patience and a few attempts, you’ll be producing impressive 360° images.
Here are a few tips to enhance your 360 photography:
- Shoot in Open Spaces: For your first few attempts, choose open, outdoor areas. While Street View can function indoors, the greater the distance to the objects you are photographing, the more accurate the image stitching will be. Wide-open spaces minimize parallax issues and result in smoother panoramas.
- Stay Stationary: The key to a sharp 360 photo is to remain as still as possible while rotating your phone. Try to pivot your body from one spot, rather than walking around while capturing. This minimizes distortion and keeps the stitching clean.
- Practice Makes Perfect: Don’t be discouraged if your first few attempts aren’t perfect. Like any photography skill, mastering 360 photos takes practice. Experiment with different locations and lighting conditions to get a feel for what works best.
For indoor 360 photography or for professional-level results, consider investing in dedicated 360 cameras which offer advanced features and image quality.
Below is an example of a 360° photo taken using the Street View app:
Wrapping Up: Embrace the 360° Revolution
360-degree photos are rapidly gaining traction, and for good reason. They offer a more immersive and engaging way to experience visual content. Thanks to advancements in smartphone technology and user-friendly apps like Google Street View, creating these panoramic images has never been easier.
Whether you intend to use 360 photos for business purposes, to document your travels, or simply for fun, now is the time to harness the power of 360 photography. With this guide, you’re well-equipped to start taking your own stunning 360 photos on your Android phone and share them with the world. Shooting panoramas is no longer a complex task – grab your Android, download Street View, and begin capturing your 360° perspectives today!
Quick Guide: How to Take a 360 Photo with Your Android Smartphone
Time needed: 5 minutes
- Download Google Street View: Get the app from the Google Play Store.
- Capture Your 360° Photo: Stand still, launch the camera in the app, and point your phone in all directions, hitting each orange circle. Tap the white dot when finished.
- Save to Your Phone: Once stitching is complete, access the raw image. Find it in “Images” or “Gallery” on your Android device.
- Share Your 360 Photo: Upload to Panoraven to share via social media, email, or embed on websites.