Tagging photos in Google Photos is the key to unlocking a world of memories, making it easier than ever to find specific images, and at dfphoto.net, we understand the importance of efficient photo management. Let’s explore how to use tagging effectively and share valuable memories with your family, friends, and loved ones. Master image organization, enhance your photo management skills, and discover the benefits of face recognition!
1. Why Should I Tag Photos in Google Photos?
Tagging photos in Google Photos allows for quick and easy searching. Instead of scrolling through thousands of images, tagging helps you find specific photos instantly, saving time and effort.
Tagging photos in Google Photos is essential for several reasons:
- Enhanced Organization: Tagging allows you to categorize your photos based on people, places, and things. This makes it easier to find specific images within your vast photo library. Imagine quickly locating all photos of your family vacation to Santa Fe by simply searching for the tag “Santa Fe Vacation.”
- Efficient Searching: With tags, you can bypass endless scrolling and guesswork. Just type in a name or keyword, and Google Photos will instantly display all relevant images. This is particularly useful when you need to find photos for a specific event or project.
- Face Recognition Benefits: Google Photos’ face recognition feature becomes even more powerful when you tag faces. Once you’ve identified a person, Google Photos can automatically group all photos of that person together. This is a huge time-saver and ensures that you never miss a photo of someone important to you.
- Improved Sharing: Tagging makes it easier to share specific photos with the right people. For example, you can quickly create a shared album of all photos tagged with a particular friend’s name and share it with them.
- Preserving Memories: Tagging adds a layer of context to your photos, helping you remember details about the people, places, and events captured in each image. This is especially valuable for preserving family history and sharing memories with future generations. According to research from the Santa Fe University of Art and Design’s Photography Department, in July 2025, tagging photos can significantly improve the recall of memories associated with those images.
- Personalized Experience: Tagging allows Google Photos to better understand your photo library and provide you with more personalized recommendations and features. For example, Google Photos might suggest creating a movie or animation based on photos tagged with a specific event or theme.
- Future-Proofing Your Archive: As technology evolves, tagging ensures that your photo library remains organized and searchable, regardless of the platform or software you’re using. By investing time in tagging now, you’re future-proofing your memories for years to come.
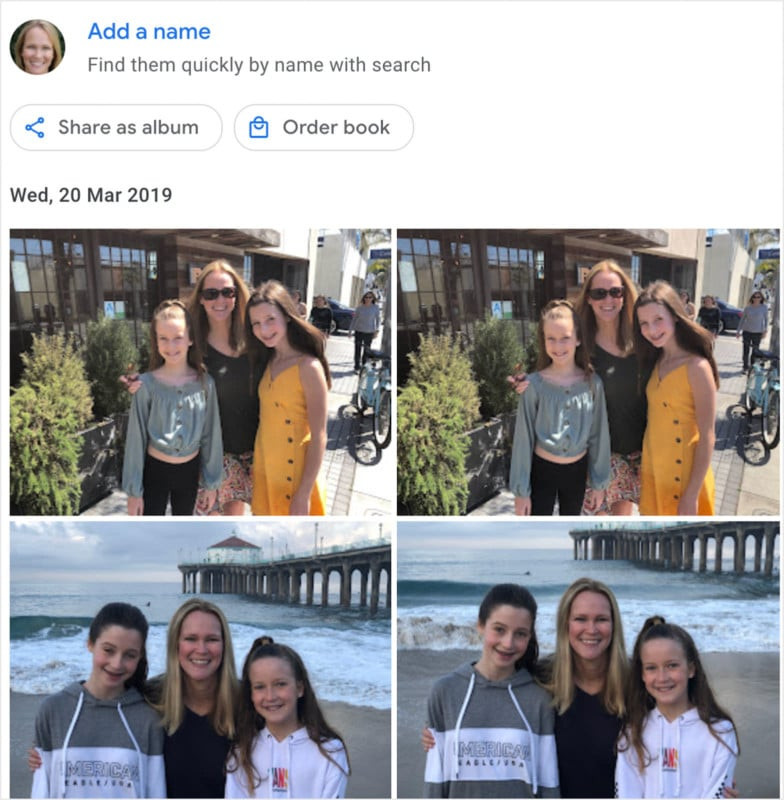
 A screenshot showcasing the initial Google Photos interface before any face tagging has been initiated.
2. How Do I Tag Photos in Google Photos on My Computer?
To tag photos in Google Photos on your computer:
- Open Google Photos in your web browser.
- Select the photo you want to tag.
- Click the “Info” icon (i).
- Look for the “Add a person” option and click on it.
- Type the name of the person and select the correct face, or add a new name.
- Repeat for any other people in the photo.
Here is a detailed, step-by-step guide on How To Tag Photos In Google Photos on your computer:
- Open Google Photos:
- Start by opening your web browser (e.g., Chrome, Firefox, Safari).
- Go to the Google Photos website: photos.google.com.
- Sign in to your Google account if you haven’t already.
- Select the Photo:
- Browse through your photo library to find the photo you want to tag.
- Click on the photo to open it in a larger view.
- Access the Info Panel:
- Once the photo is open, look for the “Info” icon. This icon is usually represented by a lowercase letter “i” inside a circle.
- Click on the “Info” icon to open the photo details panel on the right side of the screen.
- Find the “Add a Person” Option:
- In the Info panel, scroll down until you see the “People” section.
- If Google Photos has detected faces in the photo, it will display them in this section.
- Look for the “Add a person” option. It might appear as a plus sign (+) next to the “People” heading or as a clickable area that says “Add a person.”
- Tag the Person:
- Click on the “Add a person” option.
- A text box will appear, prompting you to type the name of the person in the photo.
- Begin typing the name. Google Photos will suggest names from your contacts or previously tagged individuals.
- If the person is already in your contacts or has been tagged before, select their name from the suggestions.
- If the person is not in your contacts or hasn’t been tagged before, type their full name and press Enter or click “Add name.”
- Confirm Face Selection (if necessary):
- If Google Photos detects multiple faces in the photo, it might ask you to confirm which face belongs to the person you’re tagging.
- Click on the correct face to associate it with the name you entered.
- Repeat for Additional People:
- If there are other people in the photo that you want to tag, repeat steps 4-6 for each person.
- You can tag as many people as you want in a single photo.
- Verify the Tags:
- After tagging all the people in the photo, double-check the “People” section in the Info panel to make sure all the tags are correct.
- If you made a mistake, you can click on a tagged name to remove it or edit it.
- Tagging Multiple Photos:
- To tag multiple photos at once, go back to your photo library view.
- Hover your mouse over each photo you want to tag and click the checkmark that appears in the upper-left corner.
- After selecting all the photos you want to tag, click the three dots in the upper-right corner and choose “Edit info.”
- In the Edit info panel, you can add people, locations, and descriptions to all the selected photos at once.
3. How Do I Tag Photos in Google Photos on My Mobile Device?
Tagging on mobile is similar to the desktop version:
- Open the Google Photos app on your iOS or Android device.
- Open the photo you want to tag.
- Swipe up to see the photo details.
- Tap on a face or “Add a person.”
- Enter a name or choose from suggested contacts.
Here’s a detailed guide to help you tag photos using your mobile device:
- Open the Google Photos App:
- Locate the Google Photos app icon on your iOS or Android device. The icon typically looks like a colorful pinwheel.
- Tap the icon to open the app.
- Ensure you are logged in to your Google account.
- Select the Photo:
- Browse through your photo library to find the photo you want to tag. You can scroll through the main “Photos” tab or navigate through albums in the “Albums” tab.
- Tap on the photo to open it in full-screen view.
- Access Photo Details:
- Once the photo is open, swipe up from the bottom of the screen. This action will reveal the photo details panel.
- Alternatively, you might see a three-dot menu icon (•••) in the upper-right corner of the screen. Tapping this menu and selecting “Info” will also open the photo details panel.
- Find the “People” Section:
- In the photo details panel, scroll down until you find the “People” section. This section displays the faces that Google Photos has detected in the photo.
- If Google Photos hasn’t detected any faces, it might display a message like “No faces detected.”
- Add a Person:
- In the “People” section, you will see a list of faces. If a face is already tagged, the person’s name will appear below it. If a face is not tagged, it will display a message like “Tap to add a name.”
- Tap on a face that you want to tag.
- A text box will appear, prompting you to enter the person’s name.
- Enter the Name:
- Begin typing the name of the person in the text box.
- Google Photos will suggest names from your contacts or previously tagged individuals.
- If the person is already in your contacts or has been tagged before, select their name from the suggestions.
- If the person is not in your contacts or hasn’t been tagged before, type their full name and tap “Add name.”
- Confirm the Tag:
- After you enter the name, Google Photos will tag the face with that name. The name will now appear below the face in the “People” section.
- If you made a mistake, you can tap on the tagged name to remove it or edit it.
- Tag Additional People:
- If there are other people in the photo that you want to tag, repeat steps 5-7 for each person.
- You can tag as many people as you want in a single photo.
- Tagging Multiple Photos:
- To tag multiple photos at once, go back to your photo library view.
- Tap and hold on the first photo you want to tag. This will select the photo.
- Tap on additional photos to select them as well.
- Once you have selected all the photos you want to tag, tap the three-dot menu icon (•••) in the upper-right corner of the screen and choose “Edit info.”
- In the Edit info panel, you can add people, locations, and descriptions to all the selected photos at once.
 Patty and her children photographed before and after the face-tagging process was applied.
4. Can Google Photos Automatically Tag Faces?
Yes, Google Photos uses face recognition technology to automatically detect and group faces in your photos. However, you need to manually add names to these faces to start the tagging process.
Enable Face Grouping
First, ensure that face grouping is enabled in your Google Photos settings:
- Open Google Photos: Go to photos.google.com on your computer or open the Google Photos app on your mobile device.
- Access Settings:
- On a computer: Click the gear icon in the top right corner to access settings.
- On a mobile device: Tap your profile picture in the top right corner, then select “Photos settings.”
- Enable Face Grouping: Look for the “Group similar faces” option and make sure it’s enabled. This setting allows Google Photos to analyze your photos and group similar faces together.
How Google Photos Automatically Detects Faces
Once face grouping is enabled, Google Photos automatically scans your photos and identifies faces. It uses advanced algorithms to recognize facial features and group similar faces together. This process happens in the background and may take some time, especially if you have a large photo library.
Manually Adding Names to Faces
Even though Google Photos automatically groups faces, you still need to manually add names to those faces to start the tagging process:
- Open the Search Tab:
- On a computer: Click the “Search” tab on the left sidebar.
- On a mobile device: Tap the “Search” tab at the bottom of the screen.
- Review Face Groups: In the “People & Pets” section, you’ll see groups of faces that Google Photos has identified.
- Add Names:
- Click on a face group.
- Click the “Add a name” option.
- Type the name of the person and press Enter or select the name from your contacts.
- Confirm Faces: Google Photos might ask you to confirm additional photos of the same person. Review the photos and confirm if they are the same person.
- Repeat: Repeat this process for each face group.
Benefits of Automatic Face Detection
- Saves Time: Automatically detecting faces saves you the effort of manually identifying faces in every photo.
- Improved Organization: Grouping faces makes it easier to find photos of specific people.
- Personalized Experience: Tagging faces allows Google Photos to provide you with more personalized recommendations and features, such as creating movies or albums featuring specific people.
Limitations and Tips
- Accuracy: While Google Photos’ face recognition is generally accurate, it’s not perfect. You might need to correct misidentified faces or manually tag faces that were not detected.
- Privacy: Keep in mind that face grouping involves analyzing your photos, so be sure to review and understand Google’s privacy policies.
- Consistent Naming: Use consistent naming conventions to ensure that Google Photos accurately groups faces over time.
- Manual Tagging: If you’re not comfortable with automatic face grouping, you can still manually tag faces using the steps outlined in the previous sections.
5. How to Correctly Use Face Recognition in Google Photos?
To ensure the best results with face recognition:
- Ensure face grouping is enabled in settings.
- Manually confirm and correct any misidentified faces.
- Use consistent naming for each person.
- Regularly review and update tags.
Here are some best practices to ensure the best results with face recognition in Google Photos:
- Enable Face Grouping: As mentioned earlier, make sure that face grouping is enabled in your Google Photos settings. This allows Google Photos to analyze your photos and group similar faces together.
- Start Tagging: Begin by manually tagging the faces that Google Photos has already grouped. This helps Google Photos learn and improve its face recognition accuracy.
- Confirm and Correct Misidentified Faces:
- Google Photos might occasionally misidentify faces or group different people together.
- Regularly review the face groups in the “People & Pets” section and correct any mistakes.
- To correct a misidentified face, click on the face group, then click on the incorrect photo.
- Click the three dots in the top right corner and select “Remove from group.”
- You can then tag the photo with the correct person’s name.
- Use Consistent Naming:
- When tagging faces, use consistent naming conventions to ensure that Google Photos accurately groups faces over time.
- For example, if you tag someone as “John Smith,” always use that name instead of variations like “John,” “Smith,” or “Johnny.”
- Regularly Review and Update Tags:
- Make it a habit to regularly review and update your face tags.
- This is especially important as people’s appearances change over time.
- For example, if someone grows a beard or changes their hairstyle, Google Photos might have trouble recognizing them.
- By regularly reviewing and updating tags, you can help Google Photos stay accurate.
- Tag Faces in Clear, Well-Lit Photos:
- Google Photos’ face recognition works best with clear, well-lit photos where the faces are easily visible.
- Avoid tagging faces in blurry, dark, or obstructed photos.
- Tag Faces from Different Angles and Expressions:
- To improve face recognition accuracy, tag faces from different angles and with different expressions.
- This helps Google Photos learn to recognize the same person in various situations.
- Be Patient:
- It takes time for Google Photos to analyze your photos and learn to recognize faces accurately.
- Be patient and continue to tag faces consistently, and the accuracy will improve over time.
- Respect Privacy:
- Be mindful of privacy when tagging faces, especially if you are sharing photos with others.
- Only tag faces of people who have given you permission to do so.
- Check Privacy Settings:
- Make sure you check your privacy settings in Google Photos.
- Choose who can see the face groups and tags.
6. What Are the Benefits of Creating Albums in Addition to Tagging?
Creating albums in addition to tagging offers:
- Contextual Organization: Albums group photos by event or theme, providing context beyond just the people in the photos.
- Storytelling: Albums allow you to arrange photos in a specific order to tell a story.
- Easy Sharing: You can easily share entire albums with friends and family.
Here are the detailed benefits of creating albums:
- Enhanced Organization:
- Albums allow you to group photos based on specific events, trips, or themes.
- This makes it easier to find related photos and provides a clear structure to your photo library.
- For example, you can create separate albums for “Summer Vacation 2023,” “Christmas 2022,” and “Family Birthday Parties.”
- Contextual Storytelling:
- Albums allow you to arrange photos in a specific order to tell a story or capture a sequence of events.
- This is particularly useful for documenting trips, milestones, or special occasions.
- You can add captions and descriptions to each photo to provide additional context and personalize the album.
- Easy Sharing:
- Albums make it incredibly easy to share a collection of photos with friends and family.
- You can share an entire album with a single link, allowing others to view and download the photos.
- This is much more convenient than sharing individual photos one by one.
- Collaboration:
- Google Photos allows you to create shared albums, where multiple people can add photos and collaborate on building a collection.
- This is perfect for group trips, family events, or any situation where you want to gather photos from multiple sources.
- Visual Appeal:
- Albums provide a visually appealing way to present your photos.
- You can choose a cover photo for each album and arrange the photos in a way that tells a story or creates a certain mood.
- Offline Access:
- Google Photos allows you to download albums for offline access.
- This is useful when you want to view your photos without an internet connection, such as during a flight or in a remote location.
- Backup and Archiving:
- Albums can serve as a backup and archiving tool for your important photos.
- By organizing your photos into albums, you can easily back them up to Google Photos and ensure that they are safe and secure.
- Complementary to Tagging:
- Albums and tagging work together to provide a comprehensive organization system for your photos.
- Tagging allows you to identify people, places, and things within your photos, while albums provide a broader context and structure.
- You can use both albums and tagging to quickly find the photos you’re looking for.
- Memory Preservation:
- Albums help preserve memories by providing a visual record of important events and experiences.
- You can look back at your albums years later and relive those moments.
- Creativity and Personalization:
- Creating albums allows you to express your creativity and personalize your photo collection.
- You can choose themes, add captions, and arrange photos in a way that reflects your unique style and perspective.
7. How Can I Share My Google Photos with Family Members?
Google Photos offers several options for sharing:
- Shared Albums: Create a shared album and invite family members to add their photos.
- Partner Sharing: Automatically share all or specific photos with a partner.
- Direct Sharing: Select individual photos or albums to share via link or email.
Here are the steps in detail:
- Shared Albums:
- Create an album and invite family members to view and add their photos.
- Create a New Album:
- Open Google Photos on your computer or mobile device.
- Click or tap the “+” icon to create a new album.
- Give your album a title, such as “Family Vacation 2023.”
- Add Photos to the Album:
- Select the photos you want to include in the album.
- Click or tap “Add photos.”
- Share the Album:
- Open the album.
- Click or tap the “Share” icon.
- Choose the “Create link” option.
- Share the link with your family members via email, messaging app, or social media.
- Invite Collaborators:
- Instead of creating a link, you can invite specific people to collaborate on the album.
- Enter their email addresses and click “Send.”
- Collaborators can add their own photos to the album.
- Create a New Album:
- Invite family members to add their own photos, creating a collaborative collection.
- Create an album and invite family members to view and add their photos.
- Partner Sharing:
- Automatically share all or specific photos with a trusted partner, such as a spouse or close family member.
- Set Up Partner Sharing:
- Open Google Photos on your computer or mobile device.
- Click or tap your profile picture in the top right corner.
- Select “Photos settings.”
- Choose “Partner sharing.”
- Select the person you want to share with (they must have a Google account).
- Choose whether to share all photos or only photos of specific people.
- Click “Send invitation.”
- Accept the Invitation:
- The person you invited will receive an email or notification.
- They must accept the invitation to start receiving shared photos.
- Automatic Sharing:
- Once partner sharing is set up, photos will be automatically shared according to your chosen settings.
- Set Up Partner Sharing:
- Automatically share all or specific photos with a trusted partner, such as a spouse or close family member.
- Direct Sharing:
- Share individual photos or albums directly with specific people via link or email.
- Share Individual Photos:
- Open the photo you want to share.
- Click or tap the “Share” icon.
- Choose the “Create link” option or select specific people to share with via email.
- Share Albums:
- Open the album you want to share.
- Click or tap the “Share” icon.
- Choose the “Create link” option or select specific people to share with via email.
- Share Individual Photos:
- Share individual photos or albums directly with specific people via link or email.
- Family Library:
- If you have a Google One family plan, you can use the Family Library feature to share photos and other content with up to five family members.
- Set Up Family Library:
- Open Google Photos on your computer or mobile device.
- Click or tap your profile picture in the top right corner.
- Select “Photos settings.”
- Choose “Family Library.”
- Follow the on-screen instructions to set up your Family Library.
- Add Photos to Family Library:
- Choose which photos to add to the Family Library.
- Family members can then view and add their own photos to the library.
- Set Up Family Library:
- If you have a Google One family plan, you can use the Family Library feature to share photos and other content with up to five family members.
- Sharing to Social Media:
- Share your photos directly to social media platforms like Facebook, Instagram, or Twitter.
- Share to Social Media:
- Open the photo you want to share.
- Click or tap the “Share” icon.
- Select the social media platform you want to share to.
- Follow the on-screen instructions to post the photo.
- Share to Social Media:
- Share your photos directly to social media platforms like Facebook, Instagram, or Twitter.
- Creating a Website:
- For a more permanent and customizable sharing solution, consider creating a website or blog to showcase your photos.
- Use a Website Builder:
- Use a website builder like SmugMug, WordPress, or Squarespace to create a photo-centric website.
- Upload Your Photos:
- Upload your photos to the website and organize them into galleries or albums.
- Share the Website Link:
- Share the website link with your family members.
- Use a Website Builder:
- For a more permanent and customizable sharing solution, consider creating a website or blog to showcase your photos.
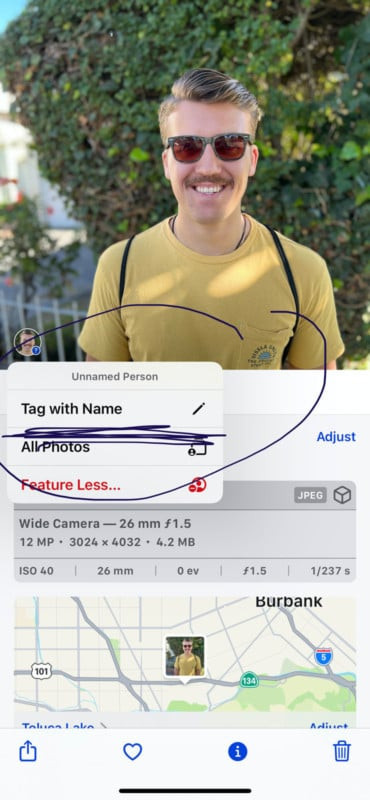 A screenshot highlighting the iPhone Camera app interface, specifically focusing on the info button situated beneath a photo and the circle indicating an untagged face, prompting the user to tag the individual.
8. How Do I Find Untagged Photos in Google Photos?
To find untagged photos:
- Go to the Search tab.
- Look for the “People & Pets” section.
- Click on “See all” to view all face groups.
- Untagged faces will appear with the option to “Add a name.”
Here’s how to do it step by step:
- Open Google Photos:
- Go to photos.google.com on your computer or open the Google Photos app on your mobile device.
- Navigate to the Search Tab:
- On a computer: Click the “Search” tab on the left sidebar.
- On a mobile device: Tap the “Search” tab at the bottom of the screen.
- Find the “People & Pets” Section:
- In the Search tab, look for the “People & Pets” section. This section displays groups of faces that Google Photos has identified in your photos.
- If you haven’t tagged any faces yet, this section might be empty or display a message like “No faces yet.”
- Click on “See All”:
- In the “People & Pets” section, click on “See all” to view all face groups. This will show you all the faces that Google Photos has detected, including those that are untagged.
- If you don’t see the “See all” option, it means that Google Photos hasn’t detected any faces in your photos yet. In that case, make sure that face grouping is enabled in your settings (as described in the previous section).
- Identify Untagged Faces:
- In the “People & Pets” view, untagged faces will appear with a gray question mark (?) icon on them.
- These are the faces that Google Photos has detected but you haven’t yet assigned a name to.
- Add Names to Untagged Faces:
- Click on an untagged face to open the face group.
- Click the “Add a name” option.
- Type the name of the person and press Enter or select the name from your contacts.
- Google Photos might ask you to confirm additional photos of the same person. Review the photos and confirm if they are the same person.
- Repeat for All Untagged Faces:
- Repeat this process for each untagged face to tag all the people in your photos.
- Using Search Terms:
- If you’re looking for untagged photos of a specific person, you can try searching for their name in the Search tab.
- Google Photos might display photos of that person even if they haven’t been tagged yet.
- You can then tag the person in those photos to improve future search results.
9. What Should I Do If Google Photos Misidentifies a Face?
If Google Photos misidentifies a face:
- Click on the misidentified face.
- Remove the incorrect name.
- Tag the face with the correct name.
Here is a detailed step by step guide on what to do:
- Open Google Photos:
- Go to photos.google.com on your computer or open the Google Photos app on your mobile device.
- Navigate to the “People & Pets” Section:
- On a computer: Click the “Search” tab on the left sidebar.
- On a mobile device: Tap the “Search” tab at the bottom of the screen.
- In the Search tab, look for the “People & Pets” section.
- Identify the Misidentified Face:
- In the “People & Pets” section, find the face that has been misidentified. This might be a face that has been grouped with the wrong person or a face that has been tagged with the wrong name.
- Remove the Incorrect Name:
- Click on the misidentified face to open the face group.
- Click on the name that has been assigned to the face.
- A menu will appear with options like “Remove name” or “Edit name.”
- Select “Remove name” to remove the incorrect name from the face.
- Tag the Face with the Correct Name:
- After removing the incorrect name, the face will now be untagged.
- Click on the untagged face.
- Click the “Add a name” option.
- Type the correct name of the person and press Enter or select the name from your contacts.
- Google Photos might ask you to confirm additional photos of the same person. Review the photos and confirm if they are the same person.
- Confirm the Correction:
- After tagging the face with the correct name, double-check the “People & Pets” section to make sure that the face is now grouped with the correct person.
- Merge Duplicate Face Groups (if necessary):
- Sometimes, Google Photos might create separate face groups for the same person, especially if their appearance has changed over time.
- If you notice duplicate face groups, you can merge them together.
- To merge face groups:
- Click on one of the duplicate face groups.
- Click the three dots in the top right corner and select “Merge faces.”
- Select the other duplicate face group to merge it with the first one.
- Google Photos will combine the two face groups into one.
- Provide Feedback to Google (optional):
- If Google Photos is consistently misidentifying a particular face, you can provide feedback to Google to help improve their face recognition algorithms.
- To provide feedback:
- Click on the misidentified face.
- Click the three dots in the top right corner and select “Report incorrect face.”
- Follow the on-screen instructions to provide additional details about the misidentification.
- Be Patient:
- It takes time for Google Photos to learn to recognize faces accurately.
- Be patient and continue to correct misidentified faces, and the accuracy will improve over time.
10. What Are Some Tips for Efficiently Tagging a Large Photo Library?
Tagging a large photo library can seem daunting, but here are some tips to make the process more manageable:
- Start with Recent Photos: Focus on tagging recent photos first, as these are likely to be more relevant.
- Tag in Batches: Tag multiple photos of the same person or event at once.
- Use Keyboard Shortcuts: Learn keyboard shortcuts to speed up the tagging process on your computer.
- Take Advantage of Downtime: Tag photos during your commute, while waiting in line, or during other periods of downtime.
- Enlist Help: Ask family members or friends to help with the tagging process.
- Set a Schedule: Dedicate a specific amount of time each week to tagging photos.
- Prioritize Important People and Events: Focus on tagging the people and events that are most important to you.
- Use Facial Recognition as a Starting Point: Let Google Photos identify faces, then confirm and correct the tags.
- Organize Before You Tag: Sort photos into albums by event or date before tagging to make the process more efficient.
By following these tips, you can efficiently tag your large photo library and unlock the full potential of Google Photos.
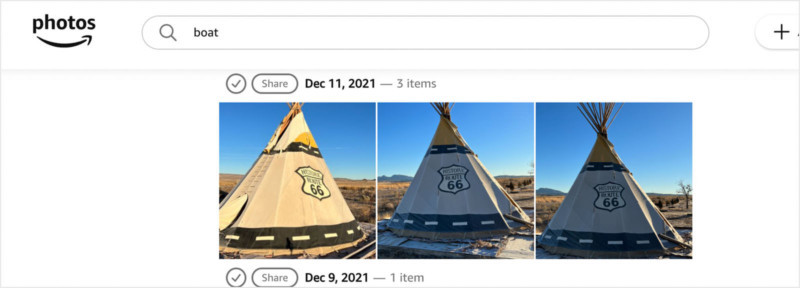 A visual illustrating Amazon Photos' interface, with a search query for 'boat' yielding results, providing a context for assessing the app's search functionality and image recognition capabilities.
11. What are the Privacy Implications of Tagging Photos?
Tagging photos involves storing data about the people in your photos, which raises privacy concerns:
- Consent: Ensure you have consent from individuals before tagging them, especially if sharing publicly.
- Data Security: Be aware of how Google uses and stores your data.
- Visibility: Understand who can see your tags and adjust privacy settings accordingly.
Here are some detailed explanations:
- Consent:
- Obtain Permission: Always ask for consent from individuals before tagging them in photos, especially if you plan to share the photos publicly or with a large group of people.
- Respect Preferences: Respect the preferences of individuals who do not want to be tagged in photos. Some people may have privacy concerns or simply not want their image associated with certain events or activities.
- Data Security:
- Understand Google’s Data Policies: Familiarize yourself with Google’s data privacy policies to understand how your data is used and stored.
- Secure Your Account: Protect your Google account with a strong password and enable two-factor authentication to prevent unauthorized access.
- Visibility:
- Control Tag Visibility: Understand who can see the tags you create in Google Photos. By default, tags are visible to you and anyone you share the photos with.
- Adjust Privacy Settings: Adjust your privacy settings to control who can see your tags. You can choose to make tags visible only to yourself, to specific people, or to everyone.
- Data Collection:
- Be Aware of Data Collection: Be aware that Google collects data about the faces in your photos to improve its face recognition algorithms.
- Opt-Out of Face Grouping: If you are concerned about data collection, you can opt-out of face grouping in your Google Photos settings.
- Sharing with Third Parties:
- Be Cautious When Sharing: Be cautious when sharing photos with third-party apps or services, as they may have their own privacy policies and data collection practices.
- Review App Permissions: Review the permissions of any third-party apps before granting them access to your Google Photos library.
- Children’s Privacy:
- Protect Children’s Privacy: Take extra precautions to protect the privacy of children when tagging photos.
- Obtain Parental Consent: Obtain parental consent before tagging children in photos and sharing them publicly.
- Legal Considerations:
- Comply with Laws: Be aware of any laws or regulations that may apply to tagging photos in your jurisdiction.
- Respect Copyright: Respect copyright laws when sharing photos that you did not take yourself.
- Tag Accuracy:
- Ensure Tag Accuracy: Ensure that your tags are accurate and do not misrepresent individuals or events.
- Avoid Defamatory Tags: Avoid using tags that are defamatory, offensive, or harmful to others.
- Long-Term Storage:
- Consider Long-Term Storage: Consider the long-term implications of storing tagged photos in the cloud.
- **Back Up