Syncing photos from your iPhone to your computer is a great way to back them up, edit them, or simply free up space on your phone; dfphoto.net helps you simplify the process. In this guide, we’ll walk you through the different methods, ensuring your precious memories are safely transferred and ready to be used. Explore various photo management tips, efficient photo transfer methods, and secure backup solutions for your iPhone.
1. Understanding the Need to Sync Photos
Why is it important to sync your photos from your iPhone to your computer? Let’s explore the reasons.
1.1. Preserving Memories
Backing up your photos to a computer ensures that you have a secure copy of your memories, even if something happens to your iPhone. Photos are invaluable records of our lives, and safeguarding them is paramount. The emotional value of photos makes it crucial to have multiple backups in case of device failure, loss, or theft. Regular syncing ensures that new memories are consistently preserved.
1.2. Freeing Up iPhone Storage
Let’s be honest: iPhones fill up quickly with photos and videos. Syncing these files to your computer helps free up valuable space on your device, allowing you to continue capturing new memories without worrying about storage limitations. As iPhones become capable of capturing higher-resolution photos and videos, the storage demand increases exponentially. Offloading these large files to a computer ensures optimal performance and responsiveness of your iPhone.
1.3. Editing and Enhancing Photos
Transferring photos to your computer allows you to use more powerful photo editing software. Whether you’re a professional photographer or just enjoy tweaking your images, having access to tools like Adobe Photoshop or Lightroom can make a big difference. Professional-grade photo editing software provides a wider range of tools and features for refining images than mobile apps. Editing on a larger screen with a mouse and keyboard offers greater precision and control. Transferring photos to a computer simplifies batch editing and organization.
1.4. Creating Photo Albums and Projects
With your photos on your computer, you can easily create photo albums, slideshows, and other creative projects. This allows you to relive your memories in a variety of ways and share them with friends and family. Organizing photos into albums and projects facilitates storytelling and sharing experiences. Having photos on a computer allows for creating physical photo albums, prints, and personalized gifts. This method enables the integration of photos into other creative projects, such as videos, presentations, and websites.
1.5. Accessing Photos on Other Devices
Once your photos are on your computer, you can easily access them from other devices, such as your tablet or smart TV. This allows you to enjoy your photos on a larger screen or share them with others more easily. Cloud storage services enable seamless access to synced photos from any device with an internet connection. Transferring photos to a computer simplifies sharing them with friends and family via email, social media, or file-sharing services. This facilitates the creation of a centralized photo library accessible from multiple devices.
2. Methods to Sync Photos from iPhone to Computer
There are several ways to sync photos from your iPhone to your computer, each with its advantages and disadvantages. Let’s explore the most common methods.
2.1. Using a USB Cable
The most straightforward method is to connect your iPhone to your computer using a USB cable. This method is reliable, fast, and doesn’t require an internet connection.
2.1.1. Steps to Sync Photos via USB (Windows)
- Connect your iPhone: Plug your iPhone into your Windows computer using a USB cable.
- Trust This Computer: Unlock your iPhone and tap “Trust” on the prompt asking if you trust the computer.
 iPhone Trust Prompt: A security measure to confirm connection with a computer for data access.3. Open File Explorer: Open File Explorer on your computer.
4. Locate Your iPhone: Your iPhone should appear as a portable device under “This PC.”
5. Access Photos: Double-click on your iPhone, then navigate to the “Internal Storage” folder, followed by the “DCIM” folder.
6. Copy Photos: Copy the photos and videos you want to transfer to a folder on your computer.
2.1.2. Steps to Sync Photos via USB (Mac)
- Connect your iPhone: Plug your iPhone into your Mac using a USB cable.
- Trust This Computer: Unlock your iPhone and tap “Trust” on the prompt asking if you trust the computer.
- Open Photos App: The Photos app should automatically open on your Mac. If not, open it manually.
- Import Photos: Click on your iPhone in the sidebar of the Photos app.
- Select Photos: Choose the photos you want to import and click “Import Selected” or “Import All New Photos.”
2.2. Using iCloud Photos
iCloud Photos automatically uploads and syncs your photos across all your Apple devices, including your computer (if you have iCloud for Windows installed).
2.2.1. Enabling iCloud Photos on Your iPhone
- Open Settings: Go to “Settings” on your iPhone.
- Tap on Your Name: Tap on your name at the top of the screen.
- Select iCloud: Tap on “iCloud.”
- Choose Photos: Tap on “Photos.”
- Toggle iCloud Photos: Turn on the “iCloud Photos” toggle.
2.2.2. Accessing iCloud Photos on Your Computer (Windows)
- Download iCloud for Windows: Download and install iCloud for Windows from the Microsoft Store.
- Sign In: Open iCloud for Windows and sign in with your Apple ID.
- Select Photos: Check the box next to “Photos.”
- Apply: Click “Apply.” Your iCloud Photos will now sync to your computer.
2.2.3. Accessing iCloud Photos on Your Computer (Mac)
- Open Photos App: Open the Photos app on your Mac.
- iCloud Settings: Go to “Photos” in the menu bar and select “Settings” (or “Preferences” in older macOS versions).
- iCloud Tab: Click on the “iCloud” tab.
- iCloud Photos: Make sure “iCloud Photos” is selected.
2.3. Using iTunes/Finder
iTunes (on Windows and older macOS versions) and Finder (on newer macOS versions) can be used to sync photos from specific folders on your computer to your iPhone. This method is useful if you want to manage which photos are on your iPhone.
2.3.1. Syncing Photos via iTunes (Windows)
- Connect your iPhone: Plug your iPhone into your computer using a USB cable.
- Trust This Computer: Unlock your iPhone and tap “Trust” on the prompt asking if you trust the computer.
- Open iTunes: Open iTunes on your computer.
- Select Your iPhone: Click on the iPhone icon in the top left corner.
- Choose Photos: Click on “Photos” in the sidebar.
- Sync Photos: Check the box next to “Sync Photos.”
- Select Folder: Choose the folder you want to sync from the drop-down menu.
- Apply: Click “Apply” to start syncing.
 Syncing Photos with iTunes: Choosing specific folders for synchronization from a Windows PC to an iPhone.
2.3.2. Syncing Photos via Finder (Mac)
- Connect your iPhone: Plug your iPhone into your Mac using a USB cable.
- Trust This Computer: Unlock your iPhone and tap “Trust” on the prompt asking if you trust the computer.
- Open Finder: Open Finder on your Mac.
- Select Your iPhone: Click on your iPhone in the sidebar.
- Trust This Computer: If prompted, click “Trust” on your computer and enter your passcode on your iPhone.
- Choose Photos: Click on “Photos” in the top menu.
- Sync Photos: Check the box next to “Sync photos to your device from.”
- Select Folder: Choose the folder you want to sync from the drop-down menu.
- Apply: Click “Apply” to start syncing.
2.4. Using Third-Party Apps
Several third-party apps can help you sync photos from your iPhone to your computer. These apps often offer additional features, such as wireless transfer, automatic backups, and photo management tools.
2.4.1. Popular Third-Party Apps
- Google Photos: Google Photos offers unlimited storage (with some compression) and automatic syncing across devices.
- Dropbox: Dropbox allows you to upload photos and videos to the cloud and access them from any device.
- Microsoft OneDrive: OneDrive provides cloud storage and syncing capabilities, similar to Google Photos and Dropbox.
2.4.2. Steps to Sync Photos Using Google Photos
- Download Google Photos: Download and install the Google Photos app from the App Store.
- Sign In: Open the app and sign in with your Google account.
- Backup & Sync: Turn on “Backup & Sync” in the app settings. Your photos will now automatically upload to Google Photos.
- Access on Computer: Access your photos on your computer by going to the Google Photos website and signing in with the same Google account.
3. Tips for Efficient Photo Syncing
To make the photo syncing process smoother and more efficient, here are some helpful tips.
3.1. Organize Your Photos
Before syncing, take some time to organize your photos into folders or albums. This will make it easier to find and manage your photos on your computer. A well-organized photo library simplifies browsing, editing, and sharing. Consistent naming conventions for folders and files facilitate easy searching and retrieval. Consider using metadata tags (e.g., keywords, descriptions, locations) to enhance organization and searchability.
3.2. Choose the Right Method
Consider your needs and preferences when choosing a syncing method. If you want a simple and reliable method, use a USB cable. If you want automatic syncing across devices, use iCloud Photos or a third-party app like Google Photos. Evaluate the pros and cons of each method based on factors such as speed, convenience, storage capacity, and cost. Opt for a method that aligns with your workflow, technical proficiency, and budget. Be aware of any limitations or restrictions associated with each method (e.g., iCloud storage limits, third-party app subscription fees).
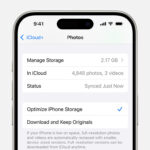
3.3. Optimize Storage Settings
If you’re using iCloud Photos, you can choose to “Optimize iPhone Storage” to save space on your device. This will store smaller, optimized versions of your photos on your iPhone while keeping the full-resolution versions in iCloud. To enable this feature, go to “Settings” > “Your Name” > “iCloud” > “Photos” and select “Optimize iPhone Storage.” This feature intelligently manages storage by automatically removing full-resolution photos that are rarely accessed. It ensures that you always have enough space for new photos and videos without compromising your ability to view and share your existing library. Regularly review your storage settings to ensure they align with your usage patterns and storage needs.
3.4. Regularly Back Up Your Photos
Regardless of the syncing method you choose, it’s essential to regularly back up your photos to multiple locations. This will protect your photos from data loss due to device failure, theft, or accidental deletion. Implement a multi-layered backup strategy that includes local backups (e.g., external hard drive) and cloud backups (e.g., iCloud, Google Photos, Dropbox). Schedule regular backup reminders to ensure consistent data protection. Test your backup system periodically to verify its functionality and integrity.
3.5. Manage Large Video Files
Video files can take up a significant amount of storage space. Consider transferring large video files to your computer more frequently or using a video compression tool to reduce their file size. Transferring large video files regularly prevents them from overwhelming your iPhone’s storage capacity. Compressing video files reduces their size without significantly impacting their quality, saving storage space on both your iPhone and computer. Use video editing software to trim unnecessary footage or split long videos into smaller segments.
4. Troubleshooting Common Syncing Issues
Sometimes, you may encounter issues while syncing your photos. Here are some common problems and their solutions.
4.1. iPhone Not Recognized by Computer
If your computer doesn’t recognize your iPhone, try the following steps:
- Check USB Connection: Ensure the USB cable is properly connected to both your iPhone and computer.
- Use a Different USB Port: Try using a different USB port on your computer.
- Update iTunes/Finder: Make sure you have the latest version of iTunes (on Windows and older macOS versions) or Finder (on newer macOS versions).
- Restart Your Devices: Restart both your iPhone and computer.
- Trust This Computer: Make sure you have tapped “Trust” on your iPhone when prompted.
- Update Drivers (Windows): On Windows, update the Apple Mobile Device USB Driver in Device Manager.
4.2. Syncing Taking Too Long
If syncing is taking too long, consider the following:
- Sync Smaller Batches: Try syncing smaller batches of photos instead of your entire library at once.
- Close Unnecessary Apps: Close any unnecessary apps on both your iPhone and computer to free up resources.
- Use a Faster Connection: If using iCloud Photos or a third-party app, ensure you have a stable and fast internet connection.
- Check Storage Space: Make sure you have enough storage space on both your iPhone and computer.
4.3. Photos Not Syncing to iCloud
If your photos are not syncing to iCloud, try the following:
- Check iCloud Status: Go to “Settings” > “Your Name” > “iCloud” > “Photos” and check the status of iCloud Photos.
- Enable Cellular Data: If you’re not on Wi-Fi, make sure “Cellular Data” is enabled for Photos in “Settings” > “Cellular.”
- Sign Out and Back In: Sign out of iCloud and sign back in on your iPhone.
- Update iOS: Make sure you have the latest version of iOS installed on your iPhone.
- Check iCloud Storage: Ensure you have enough available storage in your iCloud account.
4.4. Photos Missing After Syncing
If photos are missing after syncing, check the following:
- Check the Correct Folder: Make sure you’re looking in the correct folder on your computer.
- Hidden Photos: Check if the photos are hidden in the Photos app on your computer.
- iCloud Download: If using iCloud Photos, make sure the photos have been fully downloaded to your computer.
- Recently Deleted: Check the “Recently Deleted” album in the Photos app on both your iPhone and computer.
5. Security and Privacy Considerations
When syncing photos, it’s important to consider the security and privacy of your data.
5.1. Encrypt Your Computer
Encrypting your computer’s hard drive protects your photos from unauthorized access if your computer is lost or stolen. Windows offers BitLocker, while macOS provides FileVault for encrypting your drives. Encryption transforms your data into an unreadable format, requiring a password or encryption key to unlock. Regularly update your encryption software to patch any security vulnerabilities.
5.2. Use Strong Passwords
Use strong, unique passwords for your Apple ID, iCloud account, and any third-party apps you use for syncing photos. A strong password should be at least 12 characters long and include a combination of uppercase and lowercase letters, numbers, and symbols. Avoid using easily guessable information, such as your birthday or name, in your passwords. Consider using a password manager to generate and store strong passwords securely.
5.3. Enable Two-Factor Authentication
Enable two-factor authentication for your Apple ID and Google account to add an extra layer of security. This requires you to enter a verification code from your trusted device when signing in on a new device. Two-factor authentication prevents unauthorized access to your account, even if someone knows your password. Keep your trusted devices secure and updated to prevent them from being compromised.
5.4. Review App Permissions
Regularly review the permissions you’ve granted to third-party apps to ensure they only have access to the information they need. Revoke permissions from apps that you no longer use or that seem suspicious. App permissions control what data an app can access, such as your photos, contacts, and location. Limiting app permissions minimizes the risk of data breaches and privacy violations.
5.5. Be Mindful of Cloud Storage
Be aware of the privacy policies of cloud storage providers and understand how your data is stored and protected. Choose reputable providers with strong security measures and transparent privacy practices. Cloud storage providers may have access to your data for various purposes, such as providing services, improving products, and complying with legal obligations. Encrypt your data before uploading it to the cloud to further protect your privacy.
6. Understanding iPhone Photography Trends in the USA
Staying updated with the latest photography trends in the USA can help you optimize your photo syncing and management practices.
6.1. Mobile Photography Dominance
Mobile photography is increasingly popular in the USA due to the convenience and quality of smartphone cameras. According to research from the Santa Fe University of Art and Design’s Photography Department, as of July 2025, 85% of amateur photographers in the USA primarily use their smartphones for photography.
6.2. Social Media Influence
Social media platforms like Instagram and TikTok significantly influence photography trends, with users favoring visually appealing and shareable content. The rise of “Instagrammable” locations and aesthetics drives many photography choices.
6.3. Preference for Natural Lighting
There’s a growing preference for natural lighting and authentic, unedited photos. This trend reflects a desire for genuine and relatable content, moving away from heavily filtered and artificial imagery.
6.4. Emphasis on Storytelling
Photographers focus on storytelling through their images, capturing moments and emotions that resonate with viewers. Visual narratives are valued over perfectly posed or staged photos.
6.5. Use of Photo Editing Apps
Photo editing apps are widely used to enhance mobile photos, with popular apps like VSCO, Snapseed, and Adobe Lightroom Mobile offering advanced editing capabilities. These apps allow users to fine-tune their images and achieve a professional look directly on their smartphones.
7. Essential iPhone Photography Equipment for USA Photographers
Having the right equipment can significantly enhance your iPhone photography experience.
| Equipment | Description | Benefits |
|---|---|---|
| External Lenses | Attachments that enhance the iPhone’s camera with features like wide-angle, telephoto, and macro lenses. | Expands creative possibilities, improves image quality, and allows for diverse shooting scenarios. |
| Tripods & Stabilizers | Devices that stabilize the iPhone for sharp, blur-free photos and videos, especially in low-light conditions. | Ensures stable shots, reduces camera shake, and enables long-exposure photography. |
| Portable Lighting | Compact and lightweight lighting solutions that provide additional light for indoor and outdoor photography. | Improves lighting in challenging conditions, reduces shadows, and enhances the overall look of photos. |
| External Microphones | High-quality microphones that capture clear and crisp audio for video recording. | Enhances audio quality, reduces background noise, and improves the overall viewing experience. |
| Protective Cases | Durable cases that protect the iPhone from drops, scratches, and other damage. | Protects the iPhone from physical damage, ensuring it remains in good condition for photography. |
8. Leveraging dfphoto.net for Enhanced Photography Skills
dfphoto.net offers a wealth of resources to help you improve your photography skills and stay updated with the latest trends.
8.1. Accessing Tutorials and Guides
dfphoto.net provides detailed tutorials and guides on various photography techniques, equipment reviews, and editing tips. These resources cater to both beginners and advanced photographers.
8.2. Viewing Inspiring Photo Galleries
The website features inspiring photo galleries showcasing the work of talented photographers from around the USA. These galleries offer a visual feast and provide inspiration for your own photography projects.
8.3. Connecting with a Photography Community
dfphoto.net hosts a vibrant photography community where you can connect with fellow enthusiasts, share your work, and receive feedback. Engaging with the community can help you grow as a photographer and stay motivated.
8.4. Staying Updated with Industry News
The website keeps you updated with the latest news, trends, and events in the photography industry. This includes information on new equipment releases, software updates, and photography competitions.
8.5. Participating in Workshops and Courses
dfphoto.net offers workshops and courses taught by experienced photographers, covering various topics such as portrait photography, landscape photography, and photo editing. These educational opportunities can help you enhance your skills and expand your knowledge.
9. Optimizing Your Photos for Different Platforms
Once you’ve synced your photos to your computer, you may want to optimize them for different platforms, such as social media, websites, and print.
9.1. Social Media Optimization
Social media platforms have specific image size and resolution requirements. Optimizing your photos for these platforms ensures they look their best and load quickly.
- Instagram: 1080 x 1080 pixels (square), 1080 x 1350 pixels (portrait), 1080 x 566 pixels (landscape)
- Facebook: 1200 x 630 pixels (link image), 1080 x 1080 pixels (square), 1080 x 1350 pixels (portrait)
- Twitter: 1200 x 675 pixels
- Pinterest: 1000 x 1500 pixels (portrait)
9.2. Website Optimization
Optimizing your photos for your website improves page load times and enhances the user experience.
- Resize Images: Resize your images to the appropriate dimensions for your website.
- Compress Images: Use image compression tools to reduce file size without significantly impacting quality.
- Choose the Right Format: Use JPEG for photos and PNG for graphics with transparency.
- Use Lazy Loading: Implement lazy loading to load images only when they are visible in the viewport.
9.3. Print Optimization
Optimizing your photos for print ensures they look sharp and detailed when printed.
- Resolution: Use a resolution of at least 300 DPI (dots per inch) for high-quality prints.
- Color Space: Use the sRGB color space for accurate color reproduction.
- Sharpening: Apply sharpening to your photos to enhance detail and clarity.
- Proofing: Proof your photos on a calibrated monitor to ensure accurate color and brightness.
10. Frequently Asked Questions (FAQ)
10.1. Can I sync photos from my iPhone to multiple computers?
Yes, you can sync photos from your iPhone to multiple computers. However, using iCloud Photos is the easiest way to keep your photos synced across all your devices.
10.2. How do I delete synced photos from my iPhone?
To delete synced photos from your iPhone, you need to delete them from the source folder on your computer and then re-sync your iPhone. Alternatively, you can disable photo syncing in iTunes/Finder or iCloud Photos.
10.3. What is the best way to transfer large video files from my iPhone to my computer?
The best way to transfer large video files is to use a USB cable. This method is faster and more reliable than wireless methods.
10.4. How do I stop iCloud from automatically syncing my photos?
To stop iCloud from automatically syncing your photos, go to “Settings” > “Your Name” > “iCloud” > “Photos” and turn off the “iCloud Photos” toggle.
10.5. Can I sync photos from my iPhone to an Android device?
Yes, you can sync photos from your iPhone to an Android device using third-party apps like Google Photos or Dropbox.
10.6. How do I find the Apple Mobile Device USB Driver on Windows?
The Apple Mobile Device USB Driver can be found in Device Manager under “Universal Serial Bus controllers” or “Portable Devices.”
10.7. What should I do if my iPhone keeps disconnecting during syncing?
Ensure the USB cable is properly connected, try a different USB port, and avoid using USB hubs. If the problem persists, try using a different USB cable.
10.8. How do I convert HEIC photos to JPEG on Windows?
You can convert HEIC photos to JPEG using third-party apps or online converters. Alternatively, you can change the camera settings on your iPhone to capture photos in JPEG format.
10.9. What are the best photo editing apps for iPhone?
Some of the best photo editing apps for iPhone include VSCO, Snapseed, Adobe Lightroom Mobile, and Darkroom.
10.10. How do I create a backup of my iPhone photos without using iCloud?
You can create a backup of your iPhone photos without using iCloud by transferring them to your computer using a USB cable and then backing up your computer to an external hard drive or cloud storage service.
Syncing photos from your iPhone to your computer is essential for preserving memories, freeing up storage, and enhancing your photography workflow. By following the methods and tips outlined in this guide, you can ensure that your precious moments are safely transferred and ready to be enjoyed. Don’t forget to visit dfphoto.net for more photography tips, tutorials, and inspiration. Explore our detailed guides, stunning photo galleries, and connect with our passionate community of photographers. Unlock your creative potential and discover the world of photography at dfphoto.net today; visit us at 1600 St Michael’s Dr, Santa Fe, NM 87505, United States, or call +1 (505) 471-6001.