Syncing photos from your iPhone to your computer can seem daunting, but dfphoto.net is here to simplify the process, ensuring your precious memories are safely backed up and easily accessible; we aim to provide a seamless experience, whether you’re a professional photographer or just love capturing life’s moments. Understanding different methods of photo transfer like iCloud Photos, iTunes, and third-party apps can transform how you manage your visual content.
1. Why Sync Photos From Your iPhone to Your Computer?
There are many reasons to sync photos from your iPhone to your computer, including freeing up storage space, creating backups, and editing photos on a larger screen.
Freeing Up Storage Space: Transferring photos to your computer helps clear valuable storage on your iPhone, preventing performance slowdowns and allowing you to capture more memories.
Creating Backups: Syncing acts as a safety net, protecting your photos from loss due to device damage, theft, or accidental deletion, ensuring peace of mind.
Editing Photos on a Larger Screen: Editing photos on your computer provides a more detailed and precise editing experience with better color accuracy and a wider range of tools.
Organization: Transferring photos to your computer allows for better organization and management of your photo library, making it easier to find and share memories.
Accessibility: Having photos on your computer allows you to access them even without your iPhone, ensuring your memories are always within reach, no matter the situation.
2. What Are the Different Methods to Sync Photos From iPhone to Computer?
There are several methods to transfer your photos, each with its advantages. Options include using iCloud Photos, iTunes, direct transfer via USB, and third-party applications.
iCloud Photos: iCloud Photos automatically syncs your photos across all your Apple devices, ensuring seamless access and backup. It’s convenient but requires sufficient iCloud storage and a stable internet connection.
iTunes: iTunes allows you to sync photos from your computer to your iPhone and vice versa. While it’s a reliable method, it can be less flexible than other options and is gradually being phased out by Apple.
Direct Transfer via USB: Connecting your iPhone to your computer with a USB cable allows for quick and easy photo transfer. This method doesn’t rely on internet connectivity and is ideal for transferring large amounts of data.
Third-Party Applications: Numerous third-party apps offer advanced features for photo transfer and management. These apps often provide greater flexibility and control over your photo library, such as selective syncing and automatic organization.
3. How to Sync Photos Using iCloud Photos?
iCloud Photos is a seamless way to keep your photos synced across all your Apple devices.
Turning on iCloud Photos: Go to Settings > Photos on your iPhone and toggle iCloud Photos to on. This ensures all new photos are automatically uploaded to iCloud.
Accessing Photos on Your Computer: On your computer, you can access your iCloud Photos via the iCloud website or by downloading the iCloud for Windows application.
Pros and Cons: iCloud Photos offers convenience and automatic syncing but requires sufficient iCloud storage and a stable internet connection. Free storage is limited, so upgrading to a paid plan may be necessary.
Managing iCloud Storage: Regularly manage your iCloud storage by deleting unwanted photos and videos. Consider archiving older photos to an external drive to free up space.
Troubleshooting iCloud Syncing Issues: If photos aren’t syncing, ensure your iPhone is connected to Wi-Fi, has enough battery life, and that iCloud Photos is enabled. Restarting your device can also resolve syncing issues.
4. How to Sync Photos Using iTunes?
While iTunes is an older method, it’s still a reliable option for syncing photos.
Connecting Your iPhone to Your Computer: Connect your iPhone to your computer using a USB cable. Ensure iTunes is installed and updated to the latest version.
Opening iTunes and Selecting Your Device: Open iTunes and select your iPhone from the device list in the upper-left corner of the iTunes window.
Navigating to the Photos Tab: In the iTunes sidebar, click on the “Photos” tab. This will open the photo syncing options.
Choosing Albums or Folders to Sync: Select “Sync Photos” and choose the albums or folders you want to sync from your computer to your iPhone. You can choose to sync all photos or selected albums.
Starting the Sync Process: Click the “Apply” button in the lower-right corner of the iTunes window to start the syncing process. Wait for iTunes to complete the sync.
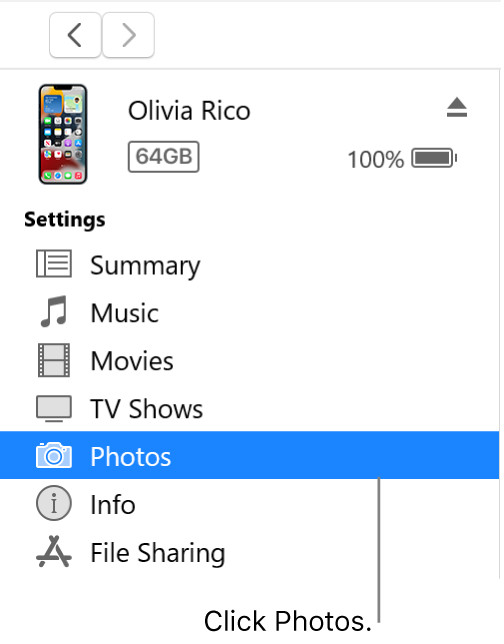 iTunes device window with photos tab selected
Navigating to the photos tab in iTunes allows users to customize their synchronization settings and specify which albums or folders to sync between their computer and Apple devices.
Pros and Cons of Using iTunes: iTunes is a reliable method for syncing photos without relying on internet connectivity. However, it can be less flexible than other options and is gradually being phased out by Apple.
Troubleshooting iTunes Syncing Issues: If you encounter issues, ensure your iPhone is trusted on your computer and that iTunes is authorized to access your Apple ID. Restarting both devices can also resolve syncing problems.
Alternative to iTunes: If you find iTunes cumbersome, consider using direct transfer via USB or third-party apps for more flexibility and control.
5. How to Transfer Photos Directly Via USB?
Transferring photos directly via USB is a straightforward method for quickly moving large amounts of data.
Connecting Your iPhone to Your Computer: Connect your iPhone to your computer using a USB cable. Your computer should recognize your iPhone as an external drive.
Accessing Your iPhone’s Storage: On Windows, open File Explorer and locate your iPhone under “This PC.” On macOS, open Finder and find your iPhone in the sidebar.
Navigating to the DCIM Folder: Open the internal storage of your iPhone and navigate to the “DCIM” folder, which contains all your photos and videos.
Copying Photos to Your Computer: Copy the photos you want to transfer from the “DCIM” folder to a folder on your computer. You can drag and drop the files or use the copy-paste function.
Pros and Cons of Using USB Transfer: USB transfer is quick and doesn’t rely on internet connectivity. However, it can be less convenient than automatic syncing methods like iCloud Photos.
6. What Are Some Third-Party Apps for Syncing Photos?
Numerous third-party apps offer advanced features for photo transfer and management.
Overview of Popular Apps: Popular apps include Google Photos, Dropbox, and AnyTrans. These apps provide greater flexibility and control over your photo library.
Features and Benefits: Google Photos offers unlimited free storage (with some compression), Dropbox provides cloud storage and syncing, and AnyTrans allows for seamless transfer between devices.
How to Use Them: Download and install the app on both your iPhone and computer. Follow the app’s instructions to set up syncing and transfer your photos.
Security Considerations: Ensure you choose reputable apps with strong security measures to protect your photos from unauthorized access.
Comparison Table:
| App | Features | Benefits |
|---|---|---|
| Google Photos | Unlimited free storage (compressed), automatic backup, photo editing | Convenient, accessible from any device, easy to share photos |
| Dropbox | Cloud storage, file syncing, collaboration tools | Secure, reliable, ideal for backing up and sharing files |
| AnyTrans | Transfer between devices, backup and restore, data management | Seamless transfer between iPhone and computer, comprehensive data management tools |
7. Understanding HEIC vs. JPEG: Which Format to Choose?
HEIC and JPEG are common image formats, each with its advantages and disadvantages.
What is HEIC? HEIC (High Efficiency Image File Format) is a modern image format that offers better compression and image quality compared to JPEG.
What is JPEG? JPEG (Joint Photographic Experts Group) is a widely compatible image format that has been the standard for many years.
Pros and Cons of HEIC: HEIC offers smaller file sizes and better image quality but may not be compatible with all devices and software.
Pros and Cons of JPEG: JPEG is universally compatible but has lower compression and image quality compared to HEIC.
Converting HEIC to JPEG: You can convert HEIC images to JPEG using various online tools or by adjusting your iPhone’s camera settings to capture photos in JPEG format.
iPhone Settings for JPEG: To set your iPhone to capture photos in JPEG format, go to Settings > Camera > Formats and choose “Most Compatible.”
8. How to Manage Your Photo Library on Your Computer?
Properly managing your photo library on your computer ensures your photos are organized and easily accessible.
Creating a Folder Structure: Create a logical folder structure based on dates, events, or themes. This makes it easier to find specific photos.
Using Metadata: Use metadata tags (keywords, descriptions, locations) to add information to your photos. This helps with searching and organizing.
Software for Photo Management: Consider using photo management software like Adobe Lightroom, Apple Photos, or Google Photos to organize and edit your photos.
Backing Up Your Photo Library: Regularly back up your photo library to an external drive or cloud storage service to protect your photos from loss.
Tips for Organizing Photos: Delete unwanted photos, rename files for clarity, and use ratings or flags to prioritize your best shots.
9. What Are the Best Practices for Backing Up Your Photos?
Backing up your photos is crucial to protect them from loss due to device failure, theft, or accidental deletion.
Importance of Regular Backups: Regular backups ensure you always have a copy of your photos, no matter what happens to your original files.
Backup Options: Options include external hard drives, cloud storage services, and network-attached storage (NAS) devices.
3-2-1 Backup Strategy: The 3-2-1 strategy involves keeping three copies of your data, on two different media, with one copy stored offsite.
Using Time Machine (macOS): Time Machine is a built-in macOS backup tool that automatically backs up your entire system, including your photo library.
Cloud Backup Services: Cloud backup services like Backblaze and Carbonite offer automatic and offsite backups, ensuring your photos are safe even if your computer is lost or stolen.
Testing Your Backups: Regularly test your backups to ensure they are working correctly and that you can restore your photos if needed.
10. How to Edit Photos After Syncing Them to Your Computer?
Editing photos on your computer allows for more precise and detailed adjustments.
Software Options: Popular software options include Adobe Photoshop, Adobe Lightroom, GIMP (free), and Apple Photos.
Basic Editing Techniques: Basic techniques include adjusting exposure, contrast, white balance, and color saturation.
Advanced Editing Techniques: Advanced techniques include using layers, masks, and filters to create more complex and artistic effects.
Non-Destructive Editing: Use non-destructive editing techniques to preserve your original photos. This allows you to revert to the original image at any time.
Exporting Edited Photos: Export your edited photos in a suitable format (JPEG, PNG, TIFF) and resolution for sharing or printing.
11. Addressing Common Syncing Problems and Their Solutions?
Encountering syncing issues can be frustrating, but most problems can be resolved with a few troubleshooting steps.
Photos Not Syncing to iCloud: Ensure iCloud Photos is enabled, your iPhone is connected to Wi-Fi, and you have sufficient iCloud storage.
iTunes Not Recognizing Your iPhone: Ensure your iPhone is trusted on your computer, iTunes is authorized to access your Apple ID, and your USB cable is working correctly.
HEIC Compatibility Issues: Convert HEIC images to JPEG using online tools or adjust your iPhone’s camera settings to capture photos in JPEG format.
Slow Syncing Speeds: Close unnecessary apps, use a faster USB cable, and ensure your computer and iPhone have sufficient processing power.
Contacting Apple Support: If you’re still experiencing issues, contact Apple Support for further assistance.
12. Optimizing Your iPhone’s Camera Settings for Better Photos?
Optimizing your iPhone’s camera settings can significantly improve the quality of your photos.
Resolution and Format: Choose the highest resolution and format (HEIC or JPEG) that suits your needs. HEIC offers better compression but may not be universally compatible.
HDR Settings: Enable HDR (High Dynamic Range) to capture more detail in both bright and dark areas of your photos.
Grid and Level: Use the grid and level tools to help you compose your shots and keep your horizons straight.
Live Photos: Enable Live Photos to capture a short video clip along with your photo, adding motion and context to your memories.
Camera Modes: Explore different camera modes (Portrait, Panorama, Time-Lapse) to capture different types of photos.
Tips for Taking Better Photos: Clean your lens, use natural light, focus carefully, and experiment with different angles and perspectives.
13. Understanding Copyright Issues When Sharing Photos?
Understanding copyright issues is essential when sharing photos to avoid legal problems.
What is Copyright? Copyright is a legal right that protects the creators of original works, including photos, from unauthorized use.
Copyright Ownership: The photographer typically owns the copyright to their photos, unless they have transferred those rights to someone else.
Using Photos You Didn’t Take: You must obtain permission from the copyright owner before using photos you didn’t take.
Creative Commons Licenses: Creative Commons licenses allow creators to grant certain rights to others while retaining copyright ownership.
Fair Use: Fair use allows for limited use of copyrighted material for purposes such as criticism, commentary, news reporting, teaching, and research.
Best Practices for Sharing Photos: Always credit the photographer, obtain permission before using photos you didn’t take, and respect copyright laws.
14. How to Print Your Photos After Syncing Them to Your Computer?
Printing your photos allows you to enjoy them in physical form and create lasting memories.
Printer Options: Options include inkjet printers, laser printers, and photo printers. Photo printers are specifically designed for printing high-quality photos.
Paper Types: Choose the right paper type (glossy, matte, satin) for your photos. Glossy paper is ideal for vibrant colors, while matte paper is better for black and white photos.
Print Settings: Adjust your printer settings to optimize the quality of your prints. Choose the correct paper type, resolution, and color profile.
Photo Printing Services: Consider using professional photo printing services for high-quality prints. These services offer a wide range of options, including prints, canvases, and photo books.
Creating Photo Albums: Create photo albums to organize and display your prints. This is a great way to preserve your memories and share them with others.
15. Exploring Photo Sharing Platforms and Social Media?
Sharing your photos on social media allows you to connect with others and showcase your work.
Popular Platforms: Popular platforms include Instagram, Facebook, Flickr, and 500px.
Choosing the Right Platform: Choose the platform that best suits your needs and audience. Instagram is ideal for sharing photos with a wide audience, while Flickr is better for serious photographers.
Optimizing Photos for Social Media: Optimize your photos for social media by resizing them, adjusting the resolution, and adding captions and hashtags.
Protecting Your Photos Online: Protect your photos online by adding watermarks, disabling right-clicking, and using strong passwords.
Engaging with Your Audience: Engage with your audience by responding to comments, asking questions, and participating in discussions.
16. Staying Updated with the Latest Photo Technology Trends?
Staying updated with the latest photo technology trends helps you capture better photos and stay ahead of the curve.
Following Industry Blogs and Websites: Follow industry blogs and websites like dfphoto.net, Popular Photography, and DPReview to stay informed about the latest trends.
Attending Workshops and Seminars: Attend workshops and seminars to learn new techniques and network with other photographers.
Experimenting with New Gear: Experiment with new cameras, lenses, and accessories to improve your photography skills.
Learning New Editing Techniques: Learn new editing techniques to enhance your photos and create unique effects.
Joining Photography Communities: Join photography communities to share your work, get feedback, and learn from others.
At dfphoto.net, we’re passionate about helping you master the art of photography. Whether you’re looking to improve your technical skills, find inspiration for your next project, or connect with a community of like-minded photographers, we’ve got you covered.
17. The Impact of Santa Fe on the Art of Photography
Santa Fe, New Mexico, has profoundly influenced the art of photography, drawing artists and enthusiasts alike with its unique landscapes and vibrant cultural scene.
A Haven for Artists: Santa Fe has long been a haven for artists, attracting photographers with its stunning natural beauty and rich artistic heritage.
Unique Landscapes: The city’s unique landscapes, including the Sangre de Cristo Mountains and the high desert, provide endless inspiration for photographers.
Cultural Scene: Santa Fe’s vibrant cultural scene, with its numerous art galleries, museums, and festivals, creates a supportive environment for photographers.
Santa Fe University of Art and Design: The Santa Fe University of Art and Design has played a significant role in nurturing emerging photographers and promoting the art of photography. According to research from the Santa Fe University of Art and Design’s Photography Department, in July 2025, innovative courses provide Y.
Famous Photographers: Santa Fe has been home to many famous photographers, including Ansel Adams and Laura Gilpin, who have captured the beauty and spirit of the region.
Photography Workshops: Numerous photography workshops are held in Santa Fe, offering photographers the opportunity to learn from experienced instructors and improve their skills. Address: 1600 St Michael’s Dr, Santa Fe, NM 87505, United States. Phone: +1 (505) 471-6001. Website: dfphoto.net.
18. How Geotagging Enhances Photo Organization and Discovery
Geotagging, the process of adding geographical metadata to photos, significantly enhances photo organization and discovery, making it easier to manage and share your visual memories.
What is Geotagging? Geotagging involves embedding location data (latitude, longitude, altitude) into your photos, allowing you to see exactly where they were taken.
Benefits of Geotagging: Geotagging helps you organize your photos by location, create interactive maps, and discover new places to photograph.
Enabling Geotagging on Your iPhone: To enable geotagging on your iPhone, go to Settings > Privacy > Location Services > Camera and choose “While Using the App.”
Using Geotagging Software: Geotagging software like Adobe Lightroom and Google Photos allows you to view and edit the location data of your photos.
Privacy Considerations: Be mindful of your privacy when sharing geotagged photos online. Consider removing location data from sensitive photos.
Creating Photo Maps: Use geotagging to create interactive photo maps that showcase your travels and photography projects.
19. The Art of Storytelling Through Photo Essays
Photo essays are a powerful way to tell stories through a series of compelling images, conveying emotions and narratives that words alone cannot capture.
What is a Photo Essay? A photo essay is a series of photos that tell a story or explore a theme.
Planning a Photo Essay: Plan your photo essay by defining your story, creating a shot list, and researching your subject.
Capturing Compelling Images: Capture compelling images by using strong compositions, interesting lighting, and emotional expressions.
Arranging Your Photos: Arrange your photos in a logical order to tell your story effectively.
Adding Captions: Add captions to provide context and enhance the narrative of your photo essay.
Sharing Your Photo Essay: Share your photo essay on social media, your website, or in a photo book.
20. Mastering Long Exposure Photography on Your iPhone
Long exposure photography, capturing images with a slow shutter speed, allows you to create ethereal and dreamlike effects, transforming ordinary scenes into captivating works of art.
What is Long Exposure Photography? Long exposure photography involves using a slow shutter speed to capture motion blur and create dreamy effects.
iPhone Apps for Long Exposure: iPhone apps like Slow Shutter Cam and Average Camera Pro allow you to control the shutter speed and create long exposure effects.
Using a Tripod: Use a tripod to keep your iPhone steady during long exposures.
Adjusting Settings: Adjust the shutter speed, ISO, and aperture to achieve the desired effect.
Shooting in Low Light: Long exposure photography is best suited for low-light conditions.
Experimenting with Motion Blur: Experiment with motion blur by capturing moving water, clouds, or traffic.
FAQ: Syncing Photos from iPhone to Computer
1. How do I sync photos from my iPhone to my computer without iCloud?
You can sync photos using a USB cable by connecting your iPhone to your computer and transferring the photos directly from the DCIM folder. Alternatively, you can use iTunes or third-party apps like Google Photos or Dropbox.
2. What is the best way to transfer photos from iPhone to computer?
The best method depends on your needs. iCloud Photos offers seamless automatic syncing, USB transfer is quick and reliable for large amounts of data, and third-party apps provide advanced features and flexibility.
3. Why are my iPhone photos not syncing to my computer?
Ensure iCloud Photos is enabled, your iPhone is connected to Wi-Fi, and you have sufficient iCloud storage. For iTunes, ensure your iPhone is trusted on your computer and that iTunes is authorized to access your Apple ID.
4. How do I convert HEIC photos to JPEG on my computer?
You can convert HEIC images to JPEG using various online tools or by adjusting your iPhone’s camera settings to capture photos in JPEG format by going to Settings > Camera > Formats and choosing “Most Compatible”.
5. Can I sync photos from my iPhone to multiple computers?
Yes, you can sync photos to multiple computers using iCloud Photos or third-party apps. However, syncing with iTunes is typically limited to one computer at a time.
6. How do I organize my photos on my computer after syncing?
Create a logical folder structure based on dates, events, or themes. Use metadata tags (keywords, descriptions, locations) to add information to your photos and consider using photo management software like Adobe Lightroom or Apple Photos.
7. What are the best cloud storage options for backing up my iPhone photos?
Popular cloud storage options include iCloud Photos, Google Photos, Dropbox, and Amazon Photos, each offering different features and storage capacities.
8. How do I delete photos from my iPhone after syncing them to my computer?
After ensuring your photos are safely backed up on your computer, you can delete them directly from your iPhone by selecting the photos and tapping the trash can icon.
9. What is the 3-2-1 backup strategy for photos?
The 3-2-1 strategy involves keeping three copies of your data, on two different media (e.g., external hard drive and cloud storage), with one copy stored offsite.
10. How do I ensure my photos are secure when syncing them to my computer?
Use strong passwords, enable two-factor authentication, choose reputable apps with strong security measures, and be mindful of your privacy when sharing photos online.
We encourage you to explore dfphoto.net for more in-depth guides, stunning photo collections, and a vibrant community ready to support your photographic journey. Discover new techniques, find inspiration, and connect with fellow photography enthusiasts today!