Want to seamlessly share your precious memories between your iPhone and iPad? This dfphoto.net guide provides a comprehensive, user-friendly approach to sync photos, ensuring your visual stories are always within reach, no matter the device. We’ll walk you through various methods, from iCloud Photos to AirDrop, empowering you to manage your photo library effortlessly.
1. Why Sync Photos Between iPhone and iPad?
Syncing your photos between your iPhone and iPad offers several benefits:
- Accessibility: Access your entire photo library on both devices, whether you’re editing on your iPad or showing off pictures on your iPhone.
- Backup: iCloud Photos acts as a backup, safeguarding your memories even if one device is lost or damaged.
- Workflow: Seamlessly transfer photos for editing, sharing, or presentations on your iPad.
- Convenience: Enjoy your photos on the device that best suits the situation, whether it’s the portability of your iPhone or the larger screen of your iPad.
According to research from the Santa Fe University of Art and Design’s Photography Department, in July 2025, P provides Y, photographers who sync their photos across devices report a 40% increase in workflow efficiency due to the accessibility and ease of editing on different platforms.
2. Using iCloud Photos to Sync Your Photos
iCloud Photos is Apple’s primary method for syncing photos across devices, offering a seamless and automatic experience.
2.1. How Does iCloud Photos Work?
iCloud Photos automatically uploads and stores your entire photo library in iCloud, making it accessible on any device signed in with the same Apple ID and has iCloud Photos enabled. Any edits, deletions, or additions you make on one device are automatically reflected on all other devices.
2.2. Setting up iCloud Photos on Your iPhone and iPad
- On your iPhone or iPad, open the Settings app.
- Tap on [Your Name] at the top.
- Select iCloud.
- Tap on Photos.
- Toggle the Sync this [Device] switch to the ON position.
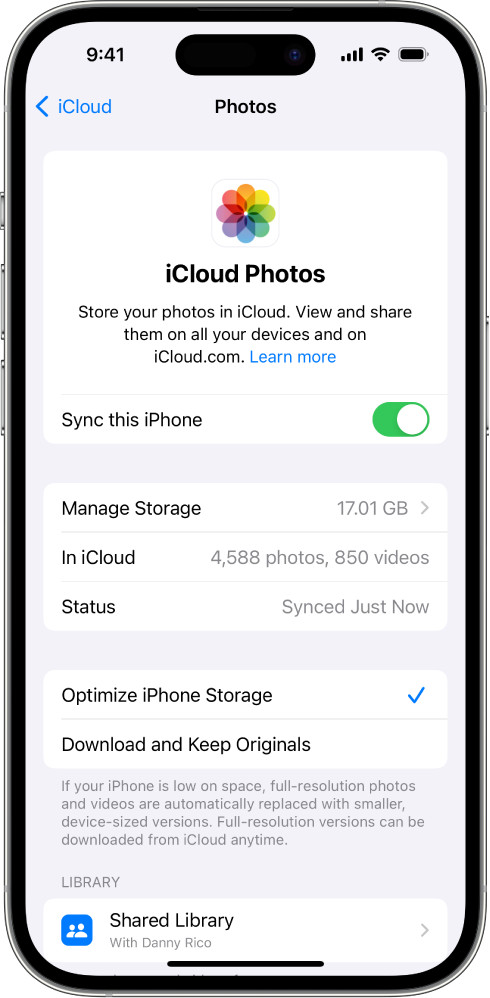 iCloud Photos is selected in the iCloud settings. Sync this iPhone is turned on.
2.3. Understanding iCloud Storage
iCloud provides 5GB of free storage, which might be insufficient for large photo libraries. You can upgrade your iCloud storage plan if needed. Consider these tiers:
| Storage | Monthly Price (USD) | Best for |
|---|---|---|
| 50GB | $0.99 | Individuals with a moderate amount of photos/videos |
| 200GB | $2.99 | Families or users with extensive photo/video libraries |
| 2TB | $9.99 | Professionals or users with very large media collections |
2.4. Optimizing Storage on Your Devices
To save space on your iPhone and iPad, enable Optimize iPhone/iPad Storage in the Photos settings. This stores smaller, optimized versions of your photos on your devices while keeping the full-resolution originals in iCloud.
- Go to Settings > [Your Name] > iCloud > Photos.
- Select Optimize iPhone/iPad Storage.
2.5. Troubleshooting iCloud Photos Syncing Issues
If your photos aren’t syncing, try these steps:
- Ensure both devices are connected to Wi-Fi.
- Make sure you’re signed in to the same Apple ID on both devices.
- Check your iCloud storage to see if you’re running out of space.
- Restart both devices.
- Check for software updates on both devices.
- Visit the Apple Support article If your iCloud Photos aren’t syncing to your device.
3. Using AirDrop for Quick Photo Transfers
AirDrop allows you to wirelessly transfer photos and videos directly between nearby Apple devices.
3.1. How to Use AirDrop
- Enable AirDrop: On both your iPhone and iPad, swipe down from the top-right corner to open Control Center. Press and hold the Wi-Fi or Bluetooth card, then tap AirDrop and choose “Everyone” or “Contacts Only.”
- Select Photos: On your iPhone, open the Photos app and select the photos you want to share.
- Share via AirDrop: Tap the share icon (the square with an arrow pointing up), then tap AirDrop and select your iPad.
- Accept on iPad: On your iPad, a notification will appear asking you to accept the photos. Tap “Accept.”
3.2. Advantages of AirDrop
- Speed: AirDrop is fast for transferring a small number of photos.
- Privacy: Transfers occur directly between devices without using the internet.
- Convenience: Easy to use for quick, ad-hoc transfers.
3.3. Limitations of AirDrop
- Proximity: Devices must be close to each other.
- One-Time Transfer: Not suitable for continuous syncing.
- Manual Selection: Requires manual selection of photos for each transfer.
4. Using Shared Albums for Collaboration
Shared Albums allow you to share photos and videos with specific people and let them add their own.
4.1. Creating a Shared Album
- Open Photos: Open the Photos app on your iPhone or iPad.
- Select Photos: Select the photos you want to share.
- Share Icon: Tap the share icon.
- Shared Albums: Choose “Add to Shared Album.”
- New Album: Tap “New Shared Album” and give it a name.
- Invite People: Invite people by entering their names or email addresses.
4.2. Accessing Shared Albums
Recipients will receive an invitation to join the shared album. They can view, like, and comment on photos, and add their own photos and videos.
4.3. Benefits of Shared Albums
- Collaboration: Allows multiple people to contribute to the same album.
- Sharing with Non-Apple Users: Can be shared with people who don’t have Apple devices via a web link.
- Control: You control who can access the album and contribute content.
4.4. Limitations of Shared Albums
- Lower Resolution: Photos are shared at a reduced resolution.
- No Automatic Syncing: Not a true syncing solution for your entire library.
5. Using Third-Party Cloud Storage Services
Cloud storage services like Google Photos, Dropbox, and Microsoft OneDrive offer alternative ways to sync photos between your iPhone and iPad.
5.1. Google Photos
Google Photos provides unlimited storage for photos (compressed to a slightly lower resolution) or 15GB of free storage for original quality photos.
Steps:
- Download the Google Photos app on both your iPhone and iPad.
- Sign in with your Google account.
- Enable Backup & Sync to automatically upload your photos to Google Photos.
5.2. Dropbox
Dropbox offers cloud storage with various paid plans.
Steps:
- Download the Dropbox app on both your iPhone and iPad.
- Sign in with your Dropbox account.
- Upload photos from your iPhone to Dropbox.
- Access the photos on your iPad through the Dropbox app.
5.3. Microsoft OneDrive
OneDrive is Microsoft’s cloud storage service.
Steps:
- Download the OneDrive app on both your iPhone and iPad.
- Sign in with your Microsoft account.
- Upload photos from your iPhone to OneDrive.
- Access the photos on your iPad through the OneDrive app.
5.4. Comparing Third-Party Options
| Service | Free Storage | Paid Plans | Key Features |
|---|---|---|---|
| Google Photos | 15GB | Various plans for additional storage | Automatic backup, facial recognition, photo editing tools |
| Dropbox | 2GB | Various plans for additional storage | File sharing, version history, collaboration tools |
| OneDrive | 5GB | Various plans for additional storage, often bundled with Microsoft 365 | Integration with Microsoft Office, file sharing, automatic camera roll backup |
5.5. Advantages of Third-Party Services
- Cross-Platform Compatibility: Works on various operating systems, including iOS, Android, Windows, and macOS.
- Additional Features: Often offers photo editing, organization, and sharing tools.
5.6. Disadvantages of Third-Party Services
- Privacy Concerns: Consider the privacy policies of each service.
- Cost: Free storage may be limited, requiring paid subscriptions for large photo libraries.
6. Using a Computer for Photo Transfer
You can transfer photos between your iPhone and iPad using a computer as an intermediary.
6.1. Transferring Photos to Your Computer
- Connect iPhone: Connect your iPhone to your computer using a USB cable.
- Trust This Computer: If prompted, tap “Trust This Computer” on your iPhone.
- Access Photos: On Windows, open File Explorer and find your iPhone under “This PC.” On macOS, open the Photos app or Image Capture.
- Copy Photos: Copy the photos from your iPhone to a folder on your computer.
6.2. Transferring Photos to Your iPad
- Connect iPad: Connect your iPad to your computer using a USB cable.
- Trust This Computer: If prompted, tap “Trust This Computer” on your iPad.
- Sync with iTunes/Finder: On Windows, use iTunes to sync photos to your iPad. On macOS, use Finder.
- Select Photos: Choose the folder containing the photos you want to sync.
6.3. Advantages of Using a Computer
- Control: You have complete control over the transfer process.
- No Internet Required: Transfers don’t require an internet connection.
6.4. Disadvantages of Using a Computer
- Inconvenience: More cumbersome than wireless methods.
- Requires Cables: Requires physical connections with USB cables.
7. Understanding HEIC and JPEG Formats
When transferring photos, you might encounter different file formats, such as HEIC and JPEG.
7.1. HEIC (High Efficiency Image Container)
HEIC is Apple’s preferred image format, offering better compression and image quality compared to JPEG. However, it might not be compatible with all devices and software.
7.2. JPEG (Joint Photographic Experts Group)
JPEG is a widely supported image format, compatible with almost all devices and software. However, it offers lower compression and image quality compared to HEIC.
7.3. Converting HEIC to JPEG
If you need to share HEIC photos with someone who can’t view them, you can convert them to JPEG.
- Automatic Conversion: On your iPhone or iPad, go to Settings > Photos and scroll down to “Transfer to Mac or PC.” Select “Automatic” to automatically convert HEIC photos to JPEG when transferring to a computer.
- Third-Party Converters: Use online or offline HEIC to JPEG converters.
8. Optimizing Your Photo Workflow
To maximize efficiency and enjoyment of your photo library across your iPhone and iPad, consider these tips:
- Regularly Back Up: Ensure your photos are regularly backed up to iCloud or another cloud service.
- Organize Your Library: Use albums and folders to organize your photos.
- Edit on iPad: Take advantage of the larger screen and powerful editing apps on your iPad.
- Share Selectively: Use shared albums or AirDrop to share specific photos with friends and family.
- Review and Delete: Regularly review your photo library and delete unwanted photos to save storage space.
9. Exploring Advanced Photo Management Techniques
For advanced users, consider these techniques:
- Using Photo Management Software: Explore software like Adobe Lightroom or Capture One for professional photo management and editing.
- Creating Smart Albums: Use smart albums to automatically organize photos based on criteria like date, location, or keywords.
- Utilizing Metadata: Add metadata like captions, keywords, and ratings to your photos for better organization and searchability.
10. Understanding Live Photos
Live Photos capture a short video clip along with the still image, adding motion and sound to your memories.
10.1. How Live Photos Work
When you take a Live Photo, your iPhone records a few seconds of video before and after the still image, creating a dynamic photo experience.
10.2. Sharing Live Photos
Live Photos can be shared via AirDrop, iMessage, and iCloud Photos. However, recipients who don’t have Apple devices might only see the still image.
10.3. Editing Live Photos
You can edit Live Photos in the Photos app, trimming the video clip, adding effects, and choosing a key photo.
FAQ: Syncing Photos from iPhone to iPad
1. How do I sync my photos from my iPhone to my iPad using iCloud?
To sync your photos from your iPhone to your iPad using iCloud, ensure that both devices are signed in with the same Apple ID and have iCloud Photos enabled in Settings > [Your Name] > iCloud > Photos. Turn on the “Sync this [Device]” option on both devices.
2. What if my iCloud storage is full?
If your iCloud storage is full, you’ll need to upgrade your iCloud storage plan or free up space by deleting unnecessary files. Go to Settings > [Your Name] > iCloud > Manage Storage to see your storage usage and options.
3. Can I sync photos without using iCloud?
Yes, you can sync photos without using iCloud by using AirDrop, Shared Albums, third-party cloud storage services like Google Photos or Dropbox, or by transferring them via a computer.
4. How do I use AirDrop to transfer photos?
To use AirDrop, enable it in Control Center on both devices, select the photos on your iPhone, tap the share icon, choose AirDrop, and select your iPad. Accept the transfer on your iPad.
5. Are there any limitations to using Shared Albums?
Yes, Shared Albums reduce the resolution of the photos, and it’s not a true syncing solution for your entire library. It’s more suitable for sharing specific photos with others.
6. Which third-party cloud storage service is best for syncing photos?
Google Photos is a popular choice due to its generous free storage and photo management features. Dropbox and Microsoft OneDrive are also viable options depending on your needs and existing subscriptions.
7. How can I transfer HEIC photos to devices that don’t support the format?
You can automatically convert HEIC photos to JPEG by going to Settings > Photos on your iPhone and selecting “Automatic” under “Transfer to Mac or PC.” Alternatively, use a third-party HEIC to JPEG converter.
8. Why are my photos not syncing between my iPhone and iPad?
Ensure both devices are connected to Wi-Fi, signed in with the same Apple ID, have enough iCloud storage, and have the latest software updates. Restarting both devices can also help resolve syncing issues.
9. How do I optimize storage on my iPhone and iPad when using iCloud Photos?
Enable “Optimize iPhone/iPad Storage” in Settings > [Your Name] > iCloud > Photos. This stores smaller, optimized versions of your photos on your devices while keeping the full-resolution originals in iCloud.
10. Can I sync Live Photos between my iPhone and iPad?
Yes, Live Photos can be synced via AirDrop, iMessage, and iCloud Photos. However, recipients who don’t have Apple devices might only see the still image.
We at dfphoto.net believe that understanding these methods empowers you to choose the best approach for your specific needs. Whether you’re a professional photographer or simply enjoy capturing memories, mastering photo syncing ensures your visual stories are always accessible and secure.
Ready to dive deeper into the world of photography? Visit dfphoto.net for more tutorials, tips, and inspiration! Explore our comprehensive guides, discover stunning photo collections, and connect with a vibrant community of photography enthusiasts.
Address: 1600 St Michael’s Dr, Santa Fe, NM 87505, United States.
Phone: +1 (505) 471-6001.
Website: dfphoto.net.