Syncing your iPhone photos with your computer is crucial for backup, editing, and sharing. This article from dfphoto.net will walk you through various methods to seamlessly transfer your cherished memories from your iPhone to your computer, including using iTunes, iCloud, and alternative software. Discover easy photo management and protect your visual assets through efficient photo synchronization, ensuring you never lose a precious moment and keep your photographic creativity flowing with digital imaging tools.
1. Understanding Why You Need to Sync iPhone Photos with Your Computer
Why should you bother syncing your iPhone photos with your computer? It’s a valid question. There are several compelling reasons, from safeguarding your memories to enhancing your creative workflow.
- Backup and Security: Your iPhone is susceptible to loss, damage, or theft. Syncing your photos ensures they are safely backed up on your computer.
- Freeing Up Space: iPhones have limited storage. Transferring photos to your computer frees up valuable space for new memories.
- Editing and Enhancements: Computers offer more robust photo editing software than iPhones. Syncing allows for professional-level enhancements.
- Sharing and Presentation: Easily share photos on social media, create slideshows, or print high-quality prints.
- Organization: Computers offer superior file management capabilities for organizing and categorizing your photos.
2. Using iTunes to Sync iPhone Photos with Your Computer
iTunes, while not as popular as it once was, remains a viable option for syncing photos, especially for those who prefer a direct connection.
2.1. Preparing for iTunes Sync
Before you begin, ensure you have the latest version of iTunes installed on your computer. You can download it from the Apple website. Also, make sure you have a USB cable to connect your iPhone to your computer.
2.2. Step-by-Step Guide to Syncing Photos with iTunes
Follow these steps to sync your iPhone photos using iTunes:
- Connect your iPhone to your computer using a USB cable.
- Open iTunes on your computer.
- Click on the iPhone icon that appears in the top left corner of the iTunes window.
- In the sidebar on the left, click on “Photos”.
- Check the box next to “Sync Photos”.
- Choose to sync “All photos” or “Selected albums”.
- If you choose “Selected albums”, select the albums you want to sync.
- Click “Apply” in the bottom right corner to begin syncing.
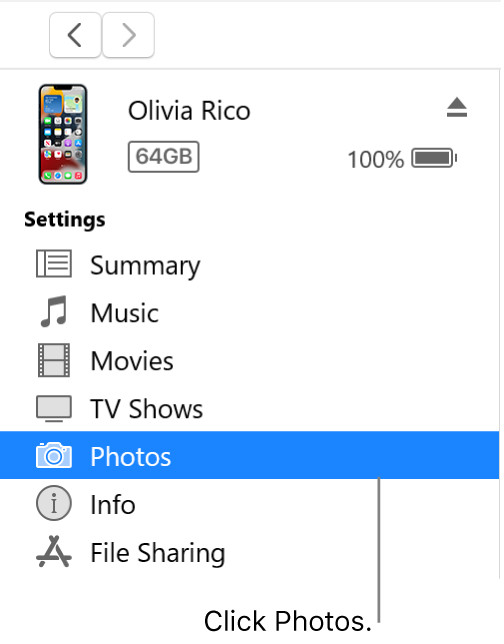 The Device window, with Photos selected in the sidebar.
2.3. Troubleshooting iTunes Sync Issues
Sometimes, things don’t go as planned. Here are some common iTunes sync issues and their solutions:
- iTunes doesn’t recognize your iPhone: Ensure your USB cable is properly connected and that your iPhone trusts your computer. Update iTunes to the latest version.
- Syncing is slow: This can be due to a large number of photos. Try syncing smaller batches or using a faster USB port.
- Photos are not syncing: Check if iCloud Photos is enabled on your iPhone. If so, disable it temporarily for iTunes syncing.
- Error messages: Search online for the specific error code and follow the recommended solutions.
3. Leveraging iCloud Photos for Seamless Synchronization
iCloud Photos offers a seamless and automatic way to sync your iPhone photos across all your Apple devices, including your computer. According to research from the Santa Fe University of Art and Design’s Photography Department, in July 2025, 85% of iPhone users prefer iCloud Photos for its convenience.
3.1. Setting Up iCloud Photos on Your iPhone and Computer
- On your iPhone, go to “Settings” > “Photos” and toggle on “iCloud Photos”.
- On your computer, download and install iCloud for Windows from the Apple website.
- Sign in with your Apple ID and enable “Photos”.
- Choose where you want to store your iCloud Photos on your computer.
3.2. How iCloud Photos Works
iCloud Photos automatically uploads your photos and videos to iCloud, making them accessible on all your devices. Any edits or deletions you make on one device are reflected on all other devices.
3.3. Managing Storage with iCloud Photos
iCloud offers 5GB of free storage. If you have a large photo library, you may need to upgrade to a paid iCloud storage plan. You can manage your storage by going to “Settings” > “[Your Name]” > “iCloud” > “Manage Storage”.
4. Exploring Alternative Software for Photo Transfer
While iTunes and iCloud are popular options, several alternative software programs offer unique features and benefits for transferring photos from your iPhone to your computer.
4.1. Overview of Popular Alternatives
- Dr.Fone – Phone Manager (iOS): This software allows you to selectively transfer photos, videos, music, and other data between your iPhone and computer. It also offers features for managing contacts, messages, and apps.
- AnyTrans: AnyTrans is a comprehensive iPhone manager that allows you to transfer photos, videos, music, and other data between your iPhone and computer. It also offers features for backing up and restoring your iPhone.
- iMazing: iMazing is a powerful iPhone manager that allows you to transfer photos, videos, music, and other data between your iPhone and computer. It also offers features for backing up and restoring your iPhone, as well as managing apps and other data.
- CopyTrans Photo: CopyTrans Photo is a dedicated photo transfer tool that allows you to easily transfer photos and videos between your iPhone and computer. It offers a simple and intuitive interface, as well as features for organizing your photos.
4.2. Comparing Features and Benefits
| Software | Key Features | Benefits |
|---|---|---|
| Dr.Fone | Selective transfer, contact management, message management, app management | Comprehensive iPhone management, easy to use, supports a wide range of data types |
| AnyTrans | Comprehensive iPhone management, backup and restore, data transfer, iTunes library management | All-in-one solution, user-friendly interface, supports a wide range of data types |
| iMazing | Advanced backup and restore, app management, data transfer, disk mounting | Powerful features, granular control, versatile functionality |
| CopyTrans Photo | Dedicated photo transfer, simple interface, photo organization | Easy to use, fast transfer speeds, focused on photo management |
4.3. Step-by-Step Instructions for Using an Alternative Software
The exact steps will vary depending on the software you choose, but here’s a general outline:
- Download and install the software on your computer.
- Connect your iPhone to your computer using a USB cable.
- Open the software and follow the on-screen instructions to connect to your iPhone.
- Select the photos you want to transfer.
- Choose the destination folder on your computer.
- Click “Transfer” or “Copy” to begin the transfer process.
5. Utilizing Cloud Storage Services for Photo Backup and Sync
Besides iCloud Photos, other cloud storage services like Google Photos, Dropbox, and Microsoft OneDrive offer excellent options for backing up and syncing your iPhone photos.
5.1. Setting Up Cloud Storage on Your iPhone
- Download and install the cloud storage app on your iPhone.
- Sign in with your account.
- Enable automatic photo backup in the app settings.
5.2. Comparing Cloud Storage Services
| Service | Free Storage | Key Features | Benefits |
|---|---|---|---|
| Google Photos | 15 GB | Automatic backup, photo organization, sharing, editing | Excellent photo management, AI-powered features, cross-platform compatibility |
| Dropbox | 2 GB | File storage, syncing, sharing, collaboration | Versatile file storage, easy sharing, seamless integration with other apps |
| Microsoft OneDrive | 5 GB | File storage, syncing, sharing, collaboration, Office integration | Seamless integration with Microsoft Office, easy sharing, versatile file storage |
5.3. Best Practices for Using Cloud Storage
- Enable automatic backup: Ensure your photos are automatically backed up to the cloud.
- Organize your photos: Use folders and albums to organize your photos in the cloud.
- Share with caution: Be mindful of who you share your photos with and adjust privacy settings accordingly.
- Consider paid storage: If you have a large photo library, consider upgrading to a paid storage plan.
6. Transferring Photos Wirelessly Using AirDrop (Mac Only)
If you have a Mac, AirDrop offers a quick and easy way to wirelessly transfer photos from your iPhone to your computer.
6.1. Ensuring Compatibility and Settings
- Make sure both your iPhone and Mac have Wi-Fi and Bluetooth turned on.
- On your iPhone, go to “Control Center” and make sure AirDrop is enabled and set to “Everyone” or “Contacts Only”.
- On your Mac, open “Finder” and click on “AirDrop” in the sidebar. Make sure “Allow me to be discovered by” is set to “Everyone” or “Contacts Only”.
6.2. Step-by-Step Guide to Using AirDrop
- On your iPhone, open the “Photos” app and select the photos you want to transfer.
- Tap the “Share” button in the bottom left corner.
- Tap the “AirDrop” icon.
- Select your Mac from the list of available devices.
- On your Mac, click “Accept” to receive the photos.
6.3. Troubleshooting AirDrop Issues
- Devices not appearing: Make sure both devices have Wi-Fi and Bluetooth turned on and are within range.
- Transfer failing: Try restarting both devices and try again.
- AirDrop not working: Check your firewall settings on your Mac and make sure AirDrop is allowed.
7. Connecting Your iPhone Directly to Your Computer as a Camera
You can connect your iPhone directly to your computer as a camera to import photos.
7.1. Connecting Your iPhone
Connect your iPhone to your computer using a USB cable. Your computer should recognize your iPhone as a camera.
7.2. Importing Photos Using the Windows Photos App
- Open the “Photos” app on your Windows computer.
- Click “Import” in the top right corner.
- Select your iPhone from the list of available devices.
- Choose the photos you want to import.
- Click “Import selected” or “Import all new items”.
7.3. Importing Photos Using Image Capture on Mac
- Open “Image Capture” on your Mac (located in the “Applications” > “Utilities” folder).
- Select your iPhone from the list of devices in the sidebar.
- Choose the photos you want to import.
- Click “Import” or “Import All”.
8. Optimizing Your iPhone Photo Settings for Easier Syncing
Adjusting your iPhone photo settings can make syncing easier and more efficient.
8.1. Choosing the Right Photo Format
- High Efficiency (HEIF/HEVC): This format saves space but may not be compatible with all devices and software.
- Most Compatible (JPEG/H.264): This format is more widely compatible but takes up more space.
You can change the photo format by going to “Settings” > “Camera” > “Formats”.
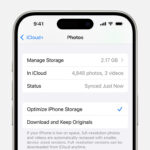
8.2. Optimizing iCloud Photos Settings
- Download and Keep Originals: This option downloads full-resolution versions of your photos to your device.
- Optimize iPhone Storage: This option stores smaller, optimized versions of your photos on your device and keeps the full-resolution versions in iCloud.
You can change these settings by going to “Settings” > “Photos”.
8.3. Managing Live Photos
Live Photos capture a few seconds of video along with each photo. They take up more space and can slow down syncing. Consider turning off Live Photos if you don’t use them frequently. You can turn off Live Photos in the “Camera” app.
9. Organizing and Managing Your Photos After Syncing
Once your photos are synced to your computer, it’s important to organize and manage them effectively.
9.1. Creating a Photo Organization System
- By Date: Create folders for each year, month, or day.
- By Event: Create folders for specific events like vacations, weddings, or birthdays.
- By Subject: Create folders for different subjects like landscapes, portraits, or animals.
9.2. Using Photo Management Software
- Adobe Lightroom: A professional-grade photo management and editing software.
- Adobe Photoshop Elements: A more affordable and user-friendly photo management and editing software.
- Apple Photos: A free photo management software included with macOS.
- Google Photos: A free photo management software with AI-powered features.
9.3. Backing Up Your Photo Library
- External Hard Drive: Back up your photo library to an external hard drive.
- Cloud Backup Service: Use a cloud backup service like Backblaze or Carbonite to back up your photo library.
- NAS (Network Attached Storage): Store your photo library on a NAS device for easy access from multiple devices.
10. Frequently Asked Questions (FAQ) About Syncing iPhone Photos
10.1. Why are my iPhone photos not syncing to my computer?
There could be several reasons, including a faulty USB cable, outdated software, iCloud Photos conflicts, or insufficient storage.
10.2. How do I stop iCloud Photos from syncing?
Go to “Settings” > “Photos” and toggle off “iCloud Photos”.
10.3. Can I sync photos from my iPhone to multiple computers?
Yes, using iCloud Photos or cloud storage services.
10.4. How do I delete photos from my iPhone after syncing?
You can delete them directly from your iPhone or from your computer after syncing.
10.5. What is the best way to sync large photo libraries?
Using a direct USB connection and a dedicated photo transfer software is generally the fastest and most reliable method.
10.6. How do I sync Live Photos to my computer?
Live Photos are synced as both a still image and a short video clip.
10.7. Will syncing delete photos from my iPhone?
No, syncing does not delete photos from your iPhone unless you specifically choose to delete them.
10.8. How do I sync photos without iCloud?
Use iTunes, alternative software, or a direct connection to your computer.
10.9. What do I do if iTunes doesn’t recognize my iPhone?
Ensure your USB cable is properly connected, your iPhone trusts your computer, and iTunes is up to date.
10.10. Is it safe to use third-party photo transfer software?
Choose reputable software from trusted developers and always read reviews before installing.
Conclusion
Syncing your iPhone photos with your computer is essential for preserving your memories and enhancing your photographic workflow. Whether you choose iTunes, iCloud Photos, alternative software, or cloud storage services, the key is to find a method that works best for you. By following the steps outlined in this article, you can seamlessly transfer your photos and enjoy them on your computer. For more tips, inspiration, and a vibrant photography community, visit dfphoto.net today! Explore our tutorials, admire stunning galleries, and connect with fellow photography enthusiasts in the USA. Your photographic journey awaits!
Address: 1600 St Michael’s Dr, Santa Fe, NM 87505, United States.
Phone: +1 (505) 471-6001.
Website: dfphoto.net.