Stretching a photo on your iPhone is definitely possible, and understanding how to do it can significantly enhance your photo editing skills. At dfphoto.net, we guide you through the best techniques for reshaping images, exploring both native iPhone tools and third-party applications to achieve your desired artistic vision with aspect ratio, resizing photo and maintaining high resolution photos. Learn how to modify image dimensions effectively and discover creative ideas for photo manipulation.
1. Understanding Image Resizing
Image resizing involves altering an image’s dimensions, either enlarging or shrinking it along its width and height. When you resize, whether making it smaller or bigger, the pixel density changes, affecting the file size and usability across different platforms. It’s essential to resize images to meet specific pixel requirements while ensuring the visual appeal isn’t compromised.
According to research from the Santa Fe University of Art and Design’s Photography Department, in July 2025, resizing images is the most popular way to modify photos on mobile devices.
1.1. Why is Resizing Important?
Resizing images is important for several reasons:
- File Size Management: Reducing the size of your image makes it easier to store and share.
- Platform Compatibility: Different platforms have varied image dimension requirements. Resizing ensures your photos fit perfectly on social media, websites, or print media.
- Storage Efficiency: Smaller image sizes mean you can store more photos on your device without running out of space.
2. Reasons to Resize Photos on Your iPhone
Why might you need to resize an image on your iPhone? Here are several compelling reasons:
- Easy Sharing: Large image files can be difficult to send via email or SMS due to data limitations. Resizing reduces file size, making sharing seamless across various platforms.
- Save Storage Space: High-resolution images consume significant storage on your iPhone. Resizing to smaller dimensions frees up valuable space, allowing you to store more memories.
- Social Media Optimization: Social media platforms have specific image size requirements. Resizing ensures your photos fit perfectly, enhancing their appearance and professionalism.
3. Reducing Image Size Before Capture
Did you know you can reduce image size directly through your iPhone’s settings before even taking a photo? Here’s how:
- Open Settings: Navigate to the “Camera” app.
- Select Formats: Tap on “Formats.”
- Choose High Efficiency: Opt for “High Efficiency” to save space.
- HEIF Max: For even smaller files, choose “HEIF Max” to get files around 5MB each.
 iPhone camera settings for high-efficiency image capture, showing the formats option selected
4. Cropping Images Without Cutting Using Mail
One clever method to resize photos without losing any part of the image is by using the Mail app. Here’s how:
- Open Photos App: Choose the picture you want to resize.
- Tap Share Icon: Select the upright arrow icon in a square.
- Select Mail: Enter your email address in the “To” field.
- Send: Tap the “Send” button.
- Choose File Size: A menu will pop up with options like small, medium, large, and actual size. Select your preferred size.
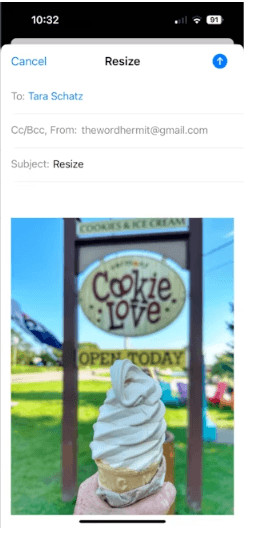 Email options in the share menu of the iPhone photo app, showing the mail icon highlighted
5. Resizing Photos with the Shortcuts App
The Shortcuts app offers a fantastic way to resize photos without cropping them. Here’s a simple guide:
- Open Shortcuts App: Launch the app on your iPhone.
- Add Action: Tap “Add Action” and search for “Resize Image.”
- Select Resize Image: Choose “Resize Image” from the list.
- Input Dimensions: Enter the desired width or height, and the app will automatically adjust the other dimension to maintain the aspect ratio.
- Rename Shortcut: Tap the name at the top to rename the shortcut and enable “Show in Share Sheet” by tapping “Details.”
- Use the Shortcut: Open any photo in the Photos app, tap the share icon, and select your shortcut to resize the image.
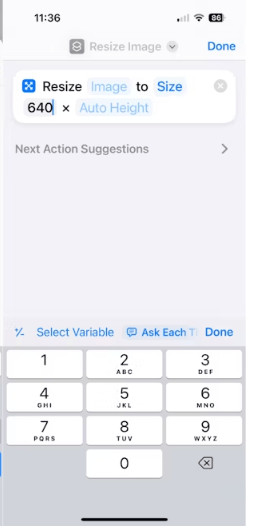 iPhone shortcuts app showing the resize image action selected
6. Leveraging Third-Party Apps for Resizing
If you’re looking for more advanced resizing options, third-party apps offer a plethora of features, including batch resizing and high image quality. Here are a few notable apps:
6.1. Desqueeze
Desqueeze is perfect for resizing multiple pictures at once. You can easily alter image dimensions by setting the width and height. The app also supports video resizing, making it versatile for various projects. It allows custom size options, catering to specific social media or project requirements. It can be downloaded for free from the App Store.
6.2. CropSize
CropSize allows you to crop up to 50 images simultaneously, saving you significant time. This app maintains image quality while resizing, ensuring your photos remain clear. It also includes features for adding filter texts and editing metadata. CropSize offers both free and paid versions and is known for its user-friendly interface.
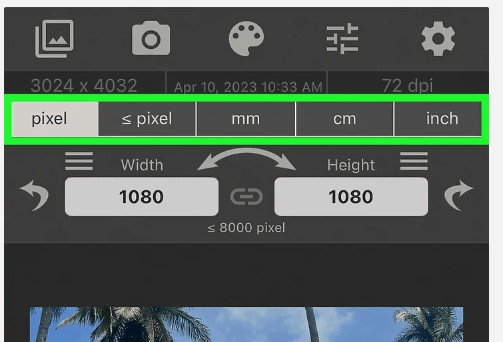
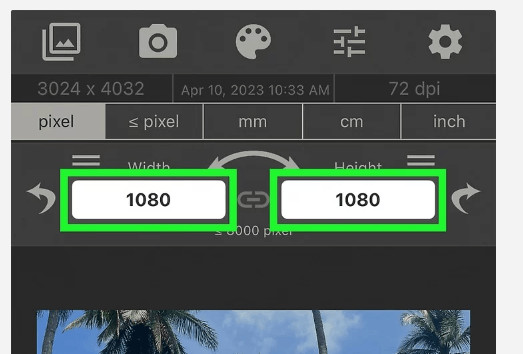
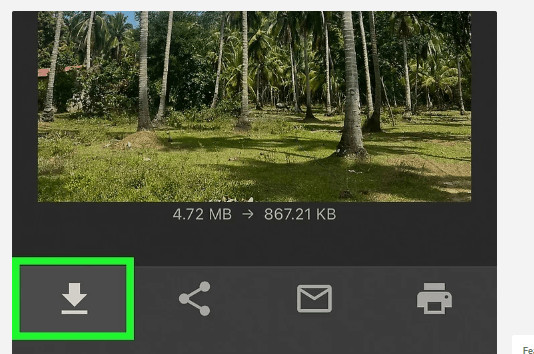
6.3. Image Size App
The Image Size app is designed for easy image resizing while maintaining high quality. It’s particularly useful when you need to reduce or enlarge photos without compromising their visual appeal.
Steps to resize a photo using the Image Size application:
- Download and Open: Download the Image Size app from the App Store and open it.
- Select Photo: Tap the photo icon in the top-left corner to choose the photo you want to resize.
- Choose from Library: Select the photo from your library and tap “Choose.”
- Enter Dimensions: Type in the new width and height in the text boxes.
- Adjust Units: Change the units of measurement if necessary (pixels, inches, cm).
- Save Resized Photo: Tap the Arrow icon in the bottom left-hand corner to save the resized photo to your Camera Roll.
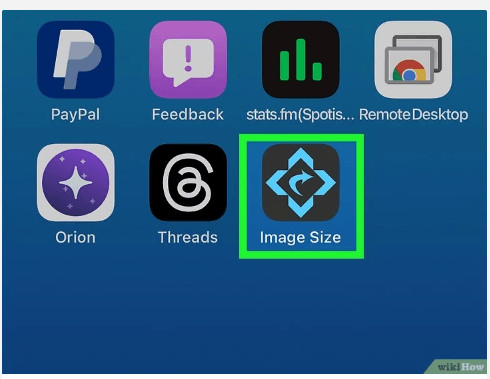 Image Size app on iPhone, displaying the app icon on the home screen
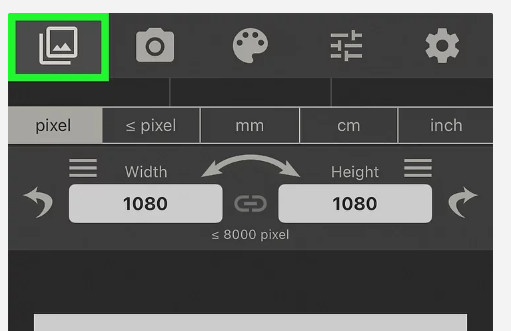 Image Size app interface, prompting to select a photo from the library
 Choosing a photo from the iPhone's photo library in the Image Size app
 Typing new dimensions for the photo in the Image Size app
 Changing units of measurement in the Image Size app settings
 Saving the resized photo to the camera roll using the Image Size app
7. Image Quality and File Size
When resizing images, understanding the relationship between image quality and file size is crucial. Here’s a detailed breakdown:
| Feature | Description | Impact |
|---|---|---|
| Resolution | The number of pixels in an image. Higher resolution means more pixels, resulting in sharper and more detailed images. | Directly affects image quality and file size. Higher resolution increases both. |
| File Format | Different file formats (JPEG, PNG, TIFF) use varying compression techniques. JPEG is best for photos, while PNG is better for graphics with text. | Impacts file size and quality. JPEG uses lossy compression, which reduces file size but can degrade quality. |
| Compression | Reducing the file size of an image by removing or simplifying data. Lossy compression permanently removes some data, while lossless compression retains all original data. | Affects file size and image quality. Lossy compression offers smaller files but can reduce quality. |
| Aspect Ratio | The proportional relationship between the width and height of an image. Maintaining aspect ratio prevents distortion when resizing. | Crucial for preserving the correct visual appearance of the image. |
| Pixel Density | The number of pixels per inch (PPI) or centimeter (PPCM). Higher pixel density results in sharper images, especially important for printing. | Affects the clarity and sharpness of the image, particularly when printed. |
| Resampling | The process of adding or removing pixels when resizing an image. Different resampling methods (e.g., bilinear, bicubic) can affect the quality of the resized image. | Influences the sharpness and detail of the resized image. |
| Color Depth | The number of bits used to represent each color in an image. Higher color depth results in more accurate and vibrant colors. | Affects the richness and accuracy of colors in the image. |
| Metadata | Information embedded within the image file, such as camera settings, date, and location. | Does not directly affect image quality or file size but is important for organization and information. |
| Viewing Medium | The device or platform on which the image will be viewed (e.g., computer screen, smartphone, print). Different mediums have different requirements for image size and resolution. | Determines the optimal image size and resolution for the best viewing experience. |
| Editing | Adjustments made to the image, such as brightness, contrast, and color correction. | Can impact image quality and file size, depending on the extent of the edits. |
8. Creative Ideas for Photo Manipulation
Stretching photos isn’t just about resizing; it’s an art form. Here are some creative ideas for manipulating your images:
- Exaggerated Perspectives: Stretch photos to create surreal, distorted perspectives.
- Artistic Effects: Use stretching to add a sense of motion or speed to your images.
- Creative Composites: Combine stretched and non-stretched elements for unique visual effects.
9. Mobile Photography Trends in the USA
Mobile photography continues to evolve. In the USA, here are the latest trends:
- AI-Powered Editing: Artificial intelligence is enhancing mobile photo editing, offering sophisticated tools for enhancing images.
- Social Media Integration: Seamless sharing to platforms like Instagram and TikTok is a key feature.
- High-Resolution Sensors: Smartphone cameras boast increasingly high-resolution sensors, rivaling traditional cameras.
10. Understanding Aspect Ratio
Maintaining the correct aspect ratio is crucial when resizing images to prevent distortion. The aspect ratio is the proportional relationship between the width and height of an image. Here’s why it matters:
- Preserving Proportions: An incorrect aspect ratio can make images look stretched or squashed.
- Professional Appearance: Maintaining aspect ratio ensures your photos look professional and polished.
- Avoiding Distortion: Correct aspect ratio avoids unwanted distortion, preserving the integrity of your image.
11. Overcoming Challenges in Mobile Photography
Mobile photography presents unique challenges. Here’s how to overcome them:
- Low Light Conditions: Utilize night mode features or external lighting to improve image quality.
- Limited Dynamic Range: Use HDR (High Dynamic Range) mode to capture more detail in both highlights and shadows.
- Lens Limitations: Employ external lenses to expand the capabilities of your smartphone camera.
12. Professional Tips for iPhone Photography
Enhance your iPhone photography with these professional tips:
- Master Composition: Use the rule of thirds to create visually appealing images.
- Focus and Exposure: Tap to focus and adjust exposure for optimal results.
- Utilize Natural Light: Take advantage of natural light for the best image quality.
13. Integrating dfphoto.net into Your Photography Journey
At dfphoto.net, we are dedicated to enhancing your photography journey. Here’s how we can help:
- Extensive Learning Resources: Access detailed tutorials and guides on various photography techniques.
- Beautiful Photo Collection: Explore an inspiring collection of stunning photographs.
- Thriving Community: Connect with fellow photographers, share your work, and receive valuable feedback.
14. Call to Action
Ready to take your photography skills to the next level? Visit dfphoto.net today to discover expert tutorials, inspiring photo collections, and a vibrant community of photography enthusiasts. Start exploring and elevate your photography journey now!
15. The Role of Lenses and Accessories in Enhancing iPhone Photos
While the iPhone camera is powerful on its own, adding lenses and accessories can significantly enhance your photography. Here’s a look at some must-have items:
- Wide Angle Lenses: Capture expansive landscapes and architectural shots.
- Telephoto Lenses: Get closer to your subject without losing clarity.
- Macro Lenses: Capture intricate details of small objects.
- Tripods: Stabilize your iPhone for sharp, blur-free photos.
- External Lighting: Improve image quality in low-light conditions.
According to Popular Photography magazine, using external lenses can improve the dynamic range and sharpness of iPhone photos.
16. Exploring Different Genres of Photography on iPhone
The iPhone is versatile enough to tackle various photography genres. Here are a few to explore:
- Portrait Photography: Capture stunning portraits with beautiful bokeh.
- Landscape Photography: Document breathtaking landscapes with wide-angle lenses.
- Street Photography: Capture candid moments in urban environments.
- Macro Photography: Explore the intricate details of small subjects.
- Night Photography: Capture stunning night scenes with long exposure techniques.
17. The Impact of Geotagging on iPhone Photography
Geotagging adds location data to your photos, providing several benefits:
- Organization: Easily organize photos by location.
- Memories: Relive your travels and experiences through geotagged photos.
- Sharing: Share your travel photos with location information on social media.
However, be mindful of privacy concerns when sharing geotagged photos publicly.
18. How to Back Up Your iPhone Photos
Backing up your iPhone photos is crucial to prevent data loss. Here are some reliable methods:
- iCloud: Automatically back up your photos to the cloud.
- Google Photos: Store unlimited photos in high quality.
- External Hard Drives: Manually back up photos to a physical storage device.
Choose a backup method that suits your needs and ensure your precious memories are safe.
19. Mastering Composition Techniques on iPhone
Effective composition is key to creating stunning iPhone photos. Here are some essential techniques:
- Rule of Thirds: Divide your frame into nine equal parts and place key elements along the lines or intersections.
- Leading Lines: Use lines to guide the viewer’s eye through the photo.
- Symmetry: Create balanced and harmonious compositions with symmetrical elements.
- Framing: Use elements in the foreground to frame the main subject.
- Negative Space: Use empty space to create a sense of balance and draw attention to the subject.
20. Utilizing HDR Mode for Optimal iPhone Photography
HDR (High Dynamic Range) mode is a valuable tool for iPhone photography, especially in challenging lighting conditions. Here’s how it works:
- Captures Multiple Exposures: HDR mode captures multiple photos at different exposure levels.
- Combines Images: It then combines these images to create a single photo with a wider dynamic range.
- Enhanced Detail: HDR mode reveals more detail in both highlights and shadows, resulting in more balanced images.
Use HDR mode in scenes with high contrast or uneven lighting for optimal results.
21. Exploring the World of Filters on iPhone
Filters can add creative flair to your iPhone photos. Here are a few tips for using them effectively:
- Subtlety: Use filters sparingly to avoid over-processing.
- Consistency: Maintain a consistent style by using similar filters across your photos.
- Experimentation: Try different filters to find the perfect look for your images.
Experiment with different filters to find the perfect look for your images.
22. The Importance of White Balance in iPhone Photography
White balance ensures that colors are accurately represented in your photos. Here’s why it matters:
- Accurate Colors: Correct white balance ensures that colors look natural and true to life.
- Mood: White balance can affect the mood of your photos, from warm and inviting to cool and dramatic.
- Consistency: Consistent white balance ensures that your photos look cohesive.
Adjust white balance settings to match the lighting conditions for optimal results.
23. How to Use the iPhone Camera in Manual Mode
Taking control of your iPhone camera with manual mode can unlock new creative possibilities. Here’s how:
- Third-Party Apps: Use third-party apps like Camera+ or ProCamera to access manual controls.
- Adjust Settings: Manually adjust ISO, shutter speed, and focus to fine-tune your images.
- Experimentation: Experiment with different settings to learn how they affect your photos.
24. Understanding Metering Modes in iPhone Photography
Metering modes determine how your iPhone measures light in a scene. Here are the main metering modes:
- Evaluative Metering: Measures light across the entire scene.
- Center-Weighted Metering: Emphasizes the center of the scene.
- Spot Metering: Measures light at a specific point in the scene.
Choose the metering mode that best suits the scene you’re photographing.
25. Mastering Focus Techniques on iPhone
Sharp focus is crucial for creating compelling iPhone photos. Here are some tips for mastering focus:
- Tap to Focus: Tap on the screen to focus on a specific area.
- Focus Lock: Press and hold on the screen to lock focus.
- Manual Focus: Use manual focus for precise control.
Utilize these techniques to ensure your photos are sharp and clear.
26. The Art of Storytelling Through iPhone Photography
iPhone photography is a powerful medium for storytelling. Here’s how to tell compelling stories through your photos:
- Capture Moments: Focus on capturing authentic and meaningful moments.
- Create Context: Include elements that provide context and tell a story.
- Evoke Emotion: Use composition, lighting, and color to evoke emotion.
Tell stories that resonate with viewers and leave a lasting impression.
27. Ethical Considerations in iPhone Photography
As an iPhone photographer, it’s important to be mindful of ethical considerations:
- Respect Privacy: Avoid photographing people without their consent.
- Be Truthful: Don’t manipulate photos to misrepresent reality.
- Obtain Permissions: Get necessary permissions when photographing private property.
Uphold ethical standards to ensure your photography is responsible and respectful.
28. Exploring iPhone Photography Communities
Connecting with other iPhone photographers can provide inspiration, feedback, and support. Here are some communities to explore:
- Online Forums: Participate in online photography forums and discussions.
- Social Media Groups: Join iPhone photography groups on Facebook and other platforms.
- Local Meetups: Attend local photography meetups and workshops.
Connect with fellow photographers and share your passion for iPhone photography.
29. Future Trends in iPhone Photography
The future of iPhone photography is bright, with exciting trends on the horizon:
- Computational Photography: Advanced algorithms will enhance image quality and capabilities.
- Augmented Reality: AR features will integrate seamlessly with photography.
- Advanced Sensors: New sensor technology will improve low-light performance and dynamic range.
Stay informed about these trends to stay ahead of the curve in iPhone photography.
30. Frequently Asked Questions
-
How do I stretch a photo on an iPhone?
To stretch a photo on an iPhone, use the crop feature in the Photos app or third-party apps like Image Size. Note that the Photos app primarily crops and adjusts, and doesn’t actually extend dimensions.
-
Which app stretches the image?
Apps like Image Size or PhotoRoom have “Resize” features that allow you to stretch an image by independently adjusting the width and height.
-
Which tool is used to stretch the image?
Resizing applications like Image Size, PhotoRoom, or Canva are commonly used. These tools let you input custom sizes or use preset dimensions.
-
Which command will you use to stretch an image?
Use the “Resize” command in apps like Image Size or the “Resize Image” option in PhotoRoom to alter the width and height.
-
Is there a way to resize an image on my iPhone without it losing its quality?
Yes, it is possible to resize an image on an iPhone without significantly compromising quality, especially with slight adjustments and with certain apps. However, extreme shrinking or enlarging can affect clarity.
-
Can you resize many photos at once on your iPhone?
Yes, some apps allow batch resizing. These applications let you set sizes for multiple photos simultaneously, saving time.
We at dfphoto.net encourage you to experiment and explore the endless possibilities of iPhone photography. For more tips, tutorials, and inspiration, visit our website and join our vibrant community of photographers!
Address: 1600 St Michael’s Dr, Santa Fe, NM 87505, United States. Phone: +1 (505) 471-6001. Website: dfphoto.net.