Storing your photos on iCloud ensures they’re safe, accessible, and optimized for space. At dfphoto.net, we understand the importance of preserving your precious memories while managing your device’s storage efficiently. Our guide provides expert insights and practical steps to maximize your iCloud experience, ensuring your photos are always at your fingertips with additional photo storage and management tips.
1. Understanding iCloud Photo Storage
iCloud Photo Storage is Apple’s cloud-based service designed to seamlessly sync and store your photos and videos across all your Apple devices. By leveraging iCloud, you not only safeguard your memories but also optimize storage space on your iPhone, iPad, and Mac. Let’s dive into the specifics of how this works.
1.1. What is iCloud Photos?
iCloud Photos is a service that automatically uploads and stores your entire photo and video library in iCloud, ensuring they are accessible on any device where you’re signed in with the same Apple ID. This service keeps your media synchronized, so any edits, deletions, or additions made on one device are reflected across all your devices.
According to Apple’s official documentation, iCloud Photos uses advanced storage technology to efficiently manage your media, storing full-resolution originals in the cloud while offering device-optimized versions to save space.
1.2. Benefits of Using iCloud Photos
There are multiple advantages to using iCloud Photos:
- Data Security: Your photos and videos are securely stored in iCloud, protecting them from loss or damage due to device failure or theft.
- Cross-Device Accessibility: Access your entire photo library from any Apple device, including iPhones, iPads, Macs, and even on the web via iCloud.com.
- Storage Optimization: The “Optimize Storage” feature helps free up space on your devices by storing smaller, device-optimized versions of your photos while keeping the full-resolution originals in iCloud.
- Automatic Syncing: Any changes you make to your photos, such as edits, deletions, or organization, are automatically synced across all your devices.
- Easy Sharing: Easily share photos and videos with friends and family through iCloud Photo Sharing or Shared Albums.
1.3. How iCloud Photos Differs from My Photo Stream
It’s important to distinguish iCloud Photos from the older “My Photo Stream” feature. My Photo Stream was a free service that automatically uploaded your most recent photos to iCloud and sent them to your other devices. However, it had several limitations:
| Feature | iCloud Photos | My Photo Stream |
|---|---|---|
| Storage | Stores all photos and videos in iCloud, counting towards your iCloud storage limit. | Stores only recent photos temporarily and does not count towards your iCloud storage limit. |
| Syncing | Syncs edits, deletions, and organization across all devices. | Only uploads new photos; edits and deletions are not synced. |
| Video Support | Supports both photos and videos. | Only supports photos. |
| Live Photos Support | Supports Live Photos. | Does not support Live Photos. |
| Storage Duration | Photos and videos are stored indefinitely as long as you have enough iCloud storage. | Photos are stored for 30 days. |
| Device Compatibility | Works seamlessly across all Apple devices and on the web via iCloud.com. | Primarily designed for syncing photos between Apple devices. |
iCloud Photos is the more comprehensive and integrated solution, offering a seamless experience for managing and accessing your entire photo and video library across all your Apple devices.
2. Setting Up iCloud Photos
Setting up iCloud Photos is a straightforward process. Here’s a step-by-step guide to get you started:
2.1. Enabling iCloud Photos on Your iPhone or iPad
-
Open Settings: Tap the Settings app on your iPhone or iPad.
-
Tap Your Name: At the top of the Settings menu, tap your name to access your Apple ID settings.
-
Tap iCloud: Select iCloud from the list of options.
-
Tap Photos: Find and tap the Photos option.
-
Toggle iCloud Photos On: Switch the toggle next to “Sync this iPhone” (or “iCloud Photos” in older iOS versions) to the ON position.
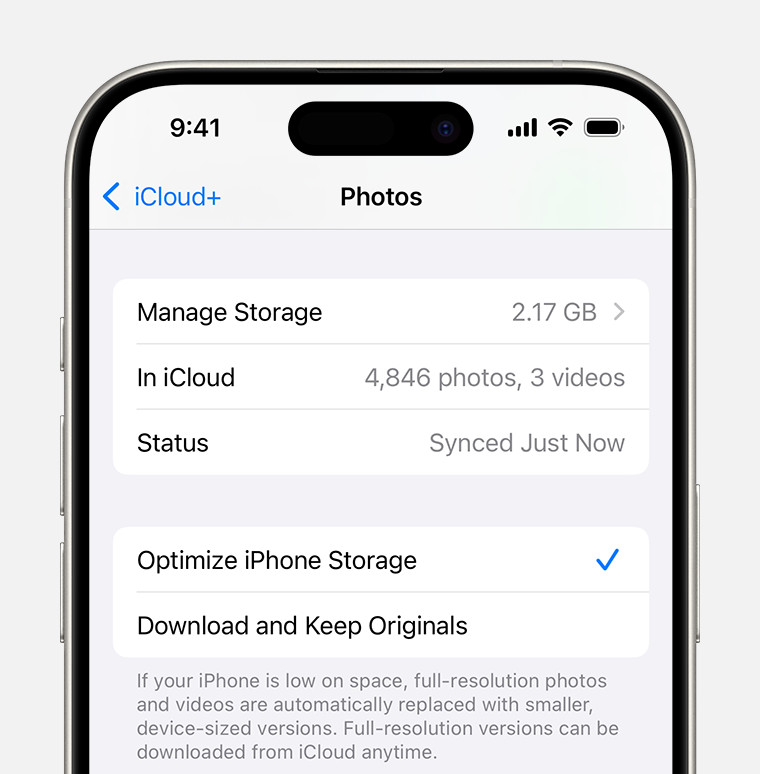 iCloud Photos section of iCloud settings showing status and photo storage options
2.2. Choosing Storage Optimization Settings
After enabling iCloud Photos, you have two options for how your photos and videos are stored:
- Optimize iPhone Storage: This option stores full-resolution originals in iCloud and keeps smaller, device-optimized versions on your iPhone or iPad. This helps free up space on your device, especially if you have a large photo library.
- Download and Keep Originals: This option keeps the full-resolution versions of all your photos and videos on your device, which can consume a significant amount of storage.
To choose your preferred setting:
- In the Photos settings (Settings > Your Name > iCloud > Photos), select either “Optimize iPhone Storage” or “Download and Keep Originals.”
It’s generally recommended to choose “Optimize iPhone Storage” to save space on your device while still having access to your entire photo library.
2.3. Enabling iCloud Photos on Your Mac
- Open System Preferences: Click the Apple menu in the top-left corner of your screen and select “System Preferences.”
- Click Apple ID: In System Preferences, click on “Apple ID.” If you’re using macOS Mojave or earlier, click on “iCloud.”
- Select Photos: In the Apple ID settings, check the box next to “Photos” to enable iCloud Photos.
- Choose Storage Options: Click the “Options” button next to Photos to choose your storage settings. You can select “Optimize Mac Storage” to save space on your Mac or “Download Originals to this Mac” to keep full-resolution versions on your computer.
2.4. Verifying Sync Status
After enabling iCloud Photos on your devices, it may take some time for your photos and videos to upload to iCloud, depending on the size of your library and the speed of your internet connection. To check the sync status:
- On iPhone or iPad: Open the Photos app, scroll to the bottom, and look for a status message. It will indicate whether your photos are still uploading or if the library is up to date.
- On Mac: Open the Photos app, click on the “Photos” tab in the menu bar, and select “Preferences.” In the iCloud tab, you can see the sync status and manage your storage options.
3. Managing Your iCloud Storage
Effectively managing your iCloud storage is essential to ensure you have enough space for your photos, videos, and other important data. Apple provides 5 GB of free iCloud storage, but for most users, this is insufficient. Let’s explore how to check your storage usage and manage your plan.
3.1. Checking Your iCloud Storage Usage
-
On iPhone or iPad:
-
Open the Settings app.
-
Tap your name at the top.
-
Tap iCloud.
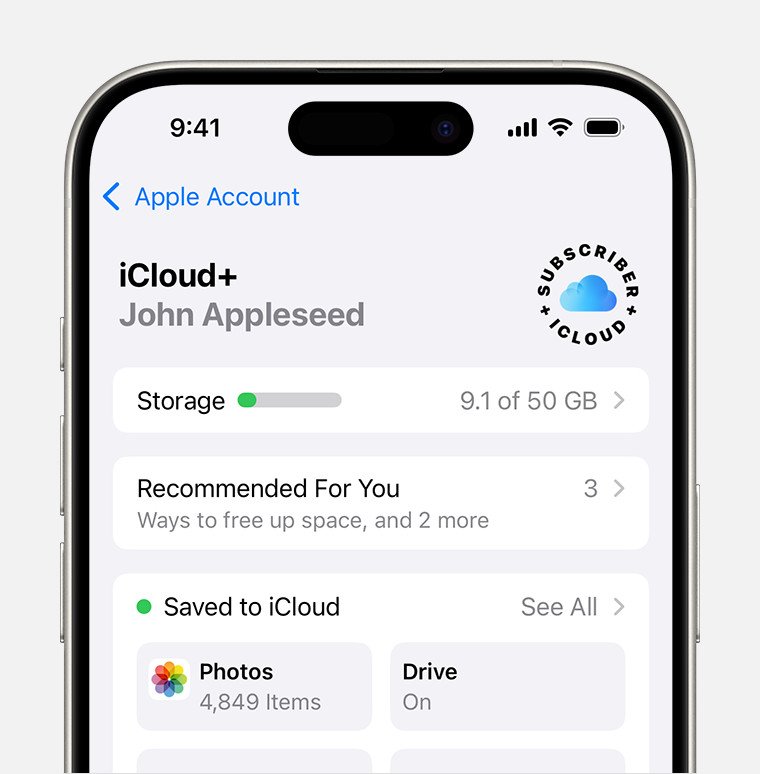 iCloud storage section of Settings showing recommendations and app options
 -
You’ll see a bar graph showing how much storage you’ve used and what’s consuming the most space.
-
Tap “Manage Account Storage” for a more detailed breakdown.
-
-
On Mac:
- Open System Preferences.
- Click Apple ID.
- Click iCloud.
- Click “Manage…” in the lower-right corner to see a detailed breakdown of your storage usage.
3.2. Understanding iCloud Storage Plans and Pricing
Apple offers several iCloud storage plans to suit different needs:
| Plan | Storage | Monthly Price (USD) |
|---|---|---|
| Free | 5 GB | $0.00 |
| iCloud+ with Single | 50 GB | $0.99 |
| iCloud+ with Family | 200 GB | $2.99 |
| iCloud+ with Family | 2 TB | $9.99 |
| iCloud+ with Family | 6 TB | $29.99 |
| iCloud+ with Family | 12 TB | $59.99 |
The iCloud+ plans come with additional features like Private Relay, Hide My Email, and custom email domains.
3.3. Upgrading or Downgrading Your iCloud Storage Plan
- On iPhone or iPad:
- Open the Settings app.
- Tap your name at the top.
- Tap iCloud.
- Tap “Manage Account Storage.”
- Tap “Change Storage Plan.”
- Choose your desired storage plan and follow the prompts to confirm your purchase.
- On Mac:
- Open System Preferences.
- Click Apple ID.
- Click iCloud.
- Click “Manage…” in the lower-right corner.
- Click “Change Storage Plan…”
- Choose your desired storage plan and follow the prompts to confirm your purchase.
3.4. Tips for Optimizing iCloud Storage Usage
- Delete Unnecessary Photos and Videos: Regularly review your photo library and delete any duplicates, blurry shots, or unwanted videos.
- Disable iCloud Backup for Large Apps: In the iCloud settings, you can choose which apps to back up to iCloud. Consider disabling backup for apps that consume a lot of storage but don’t contain critical data.
- Use iCloud Drive Wisely: iCloud Drive is great for storing documents and files, but be mindful of the size of the files you store there.
- Offload Unused Apps: iOS has a feature that automatically offloads apps you haven’t used in a while, freeing up storage space. You can re-download the apps later if needed.
- Compress Large Videos: Consider compressing large video files before uploading them to iCloud to save storage space.
4. Organizing Your Photos in iCloud Photos
Organizing your photos in iCloud Photos helps you easily find and manage your memories. Apple provides several tools and features for organizing your photo library.
4.1. Using Albums to Group Photos
Albums are a great way to group photos based on events, trips, people, or any other criteria you choose.
- Creating a New Album on iPhone or iPad:
- Open the Photos app.
- Tap the “Albums” tab at the bottom.
- Tap the “+” button in the top-left corner and select “New Album.”
- Give your album a name and tap “Save.”
- Select the photos and videos you want to add to the album and tap “Done.”
- Creating a New Album on Mac:
- Open the Photos app.
- Click the “+” button in the top-right corner and select “Album.”
- Give your album a name and press Enter.
- Drag and drop photos and videos into the album.
4.2. Creating Smart Albums
Smart Albums automatically organize photos based on criteria you define, such as date, location, keywords, or people. This feature is available on Mac:
- Open the Photos app on your Mac.
- Click “File” in the menu bar, then select “New Smart Album.”
- Give your Smart Album a name.
- Set the criteria for the Smart Album using the drop-down menus. For example, you can create a Smart Album that includes all photos taken in Santa Fe, NM.
- Click “OK” to create the Smart Album.
4.3. Using Keywords and Captions
Adding keywords and captions to your photos can make them easier to find and organize.
- Adding Keywords and Captions on iPhone or iPad:
- Open the Photos app.
- Select the photo you want to edit.
- Swipe up on the photo to reveal the information panel.
- Tap “Add a Caption” to add a description.
- To add keywords, you can use third-party apps like “HashPhotos” or “Metapho,” which allow you to add and manage keywords for your photos.
- Adding Keywords and Captions on Mac:
- Open the Photos app.
- Select the photo you want to edit.
- Click the “Info” button in the toolbar (or press Command + I).
- Add a caption in the “Description” field.
- Add keywords in the “Keywords” field. You can add multiple keywords by separating them with commas.
4.4. Facial Recognition and People Albums
iCloud Photos uses facial recognition to identify people in your photos and group them into “People” albums.
- Enabling Facial Recognition:
- Facial recognition is enabled by default in iCloud Photos. However, if you want to reset or retrain facial recognition:
- On Mac: Open the Photos app, click “Photos” in the menu bar, select “Preferences,” and go to the “General” tab. Click “Reset Suggested Names” to start over.
- Facial recognition is enabled by default in iCloud Photos. However, if you want to reset or retrain facial recognition:
- Confirming and Naming Faces:
- Open the Photos app and go to the “Albums” tab.
- Scroll down to the “People” album.
- iCloud Photos will suggest faces it has recognized. Confirm the identities and give each person a name.
- As you confirm more faces, iCloud Photos will become more accurate at identifying people in your photos.
5. Sharing Photos from iCloud Photos
Sharing photos from iCloud Photos is simple and convenient, whether you want to share with friends, family, or on social media.
5.1. Using Shared Albums
Shared Albums allow you to share photos and videos with specific people, and they can add their own photos and comments.
- Creating a Shared Album on iPhone or iPad:
- Open the Photos app.
- Tap the “Albums” tab at the bottom.
- Tap the “+” button in the top-left corner and select “New Shared Album.”
- Give your album a name and tap “Next.”
- Enter the names or email addresses of the people you want to invite and tap “Create.”
- Select the photos and videos you want to add to the album and tap “Done.”
- Creating a Shared Album on Mac:
- Open the Photos app.
- Click the “+” button in the top-right corner and select “Shared Album.”
- Give your album a name and click “Create.”
- Enter the email addresses of the people you want to invite and click “Create.”
- Drag and drop photos and videos into the album.
- Inviting People to a Shared Album:
- After creating a Shared Album, you can invite more people by:
- On iPhone or iPad: Open the Shared Album, tap the “People” button at the bottom, and tap “Invite People.”
- On Mac: Open the Shared Album, click the “People” button in the toolbar, and click “Invite People.”
- After creating a Shared Album, you can invite more people by:
- Managing Shared Album Settings:
- You can control who can add photos and videos to the Shared Album and who can view it.
- On iPhone or iPad: Open the Shared Album, tap the “People” button, and adjust the settings for “Subscribers Can Post” and “Public Website.”
- On Mac: Open the Shared Album, click the “People” button, and adjust the settings for “Subscribers Can Post” and “Public Website.”
- You can control who can add photos and videos to the Shared Album and who can view it.
5.2. Sharing Photos via iCloud Link
You can share photos and videos by creating an iCloud Link, which allows anyone with the link to view the media.
- Creating an iCloud Link on iPhone or iPad:
- Open the Photos app.
- Select the photos and videos you want to share.
- Tap the “Share” button.
- Select “Copy iCloud Link.”
- Share the link via text message, email, or any other messaging app.
- Creating an iCloud Link on Mac:
- Open the Photos app.
- Select the photos and videos you want to share.
- Click the “Share” button in the toolbar.
- Select “iCloud Link.”
- Click “Copy Link” and share the link.
5.3. Sharing Directly to Social Media
iCloud Photos integrates with social media platforms, allowing you to share photos directly to Facebook, Instagram, Twitter, and more.
- Sharing to Social Media on iPhone or iPad:
- Open the Photos app.
- Select the photos and videos you want to share.
- Tap the “Share” button.
- Select the social media app you want to use.
- Follow the prompts to post your photos and videos.
- Sharing to Social Media on Mac:
- Open the Photos app.
- Select the photos and videos you want to share.
- Click the “Share” button in the toolbar.
- Select the social media app you want to use.
- Follow the prompts to post your photos and videos.
5.4. Controlling Sharing Permissions and Privacy
When sharing photos from iCloud Photos, it’s important to be aware of the sharing permissions and privacy settings.
- Shared Albums: You can control who can view and contribute to Shared Albums.
- iCloud Links: Anyone with the iCloud Link can view the photos and videos, so be cautious about who you share the link with. You can also set an expiration date for the link to limit access.
- Social Media: Be mindful of your privacy settings on social media platforms and who can see your posts.
6. Troubleshooting Common iCloud Photos Issues
While iCloud Photos is generally reliable, you may encounter some issues from time to time. Here are some common problems and how to troubleshoot them.
6.1. Photos Not Syncing
If your photos aren’t syncing between your devices and iCloud, try these steps:
- Check Your Internet Connection: Make sure you have a stable Wi-Fi or cellular data connection.
- Check iCloud Status: Visit the Apple System Status page to see if there are any known issues with iCloud Photos.
- Sign Out and Back In: Sign out of iCloud on your device and then sign back in. This can sometimes resolve syncing issues.
- On iPhone or iPad: Open the Settings app, tap your name, scroll down, and tap “Sign Out.”
- On Mac: Open System Preferences, click Apple ID, and select “Sign Out.”
- Restart Your Device: Restart your iPhone, iPad, or Mac.
- Ensure Enough iCloud Storage: Make sure you have enough available storage in iCloud. If you’re running out of space, consider upgrading your storage plan or deleting unnecessary files.
- Check Date and Time Settings: Ensure your device’s date and time settings are correct. Incorrect date and time settings can interfere with syncing.
6.2. Storage Full Issues
If you’re receiving “Storage Full” messages, try these solutions:
- Optimize iPhone Storage: Enable the “Optimize iPhone Storage” feature in the Photos settings.
- Delete Unnecessary Photos and Videos: Regularly review your photo library and delete any duplicates, blurry shots, or unwanted videos.
- Back Up and Delete: Back up your photos and videos to an external drive or another cloud storage service, then delete them from your device and iCloud to free up space.
- Upgrade Your iCloud Storage Plan: Consider upgrading to a larger iCloud storage plan if you need more space.
6.3. Problems with Shared Albums
If you’re experiencing issues with Shared Albums, try these steps:
- Check iCloud Status: Visit the Apple System Status page to see if there are any known issues with iCloud Photos.
- Resend Invitations: If someone isn’t receiving invitations to a Shared Album, try resending the invitation.
- Remove and Re-add: If someone is having trouble accessing a Shared Album, remove them from the album and then re-add them.
- Check Sharing Settings: Make sure the sharing settings for the album are configured correctly.
6.4. Recovering Deleted Photos
If you accidentally delete photos from iCloud Photos, you can recover them from the “Recently Deleted” album.
- On iPhone or iPad:
- Open the Photos app.
- Tap the “Albums” tab at the bottom.
- Scroll down to the “Recently Deleted” album.
- Select the photos you want to recover and tap “Recover.”
- On Mac:
- Open the Photos app.
- Click “Recently Deleted” in the sidebar.
- Select the photos you want to recover and click “Recover.”
Photos and videos remain in the “Recently Deleted” album for 30 days before being permanently deleted.
7. Advanced Tips and Tricks for iCloud Photos
Take your iCloud Photos experience to the next level with these advanced tips and tricks.
7.1. Using iCloud Photos on Windows
You can access your iCloud Photos on a Windows computer using the iCloud for Windows app.
- Download and Install iCloud for Windows: Download the iCloud for Windows app from the Microsoft Store.
- Sign In: Sign in to iCloud for Windows with your Apple ID.
- Enable Photos: Check the box next to “Photos” to enable iCloud Photos.
- Choose Download Location: Choose where you want your iCloud Photos to be downloaded on your computer.
- Access Your Photos: Your iCloud Photos will be downloaded to your computer and can be accessed through File Explorer.
7.2. Using iCloud Photos on Android
While there isn’t an official iCloud Photos app for Android, you can still access your photos and videos through the iCloud website.
- Open a Web Browser: Open a web browser on your Android device.
- Go to iCloud.com: Go to iCloud.com and sign in with your Apple ID.
- Select Photos: Select the “Photos” icon to access your iCloud Photos library.
7.3. Backing Up iCloud Photos to Another Service
To ensure your photos are extra safe, consider backing up your iCloud Photos to another cloud storage service or an external drive.
- Download Your Photos: Download your photos and videos from iCloud Photos to your computer.
- Choose a Backup Service: Choose a cloud storage service like Google Photos, Dropbox, or Amazon Photos, or use an external drive.
- Upload Your Photos: Upload your photos and videos to your chosen backup service or copy them to your external drive.
7.4. Using Third-Party Apps to Enhance iCloud Photos
There are many third-party apps that can enhance your iCloud Photos experience, such as:
- HashPhotos: A powerful photo management app that allows you to add keywords, manage metadata, and organize your photos.
- Metapho: An app that allows you to view and edit the metadata of your photos, including location, date, and time.
- Snapseed: A professional photo editing app that offers a wide range of editing tools and filters.
- Darkroom: A powerful photo editing app with advanced color editing tools and support for RAW images.
8. Optimizing Photos for iCloud
Optimizing your photos before storing them on iCloud can help you save storage space and improve syncing performance.
8.1. Compressing Large Photos
Compressing large photos can significantly reduce their file size without noticeably affecting their quality.
- Using macOS Preview:
- Open the photo in Preview.
- Click “File” in the menu bar, then select “Export.”
- Adjust the “Quality” slider to compress the photo.
- Save the compressed photo.
- Using Third-Party Apps:
- Use a third-party app like “ImageOptim” or “JPEGmini” to compress your photos. These apps use advanced compression algorithms to reduce file size while preserving image quality.
8.2. Converting Photos to JPEG
JPEG is a widely supported image format that offers good compression and image quality. Converting photos from other formats like PNG or TIFF to JPEG can save storage space.
- Using macOS Preview:
- Open the photo in Preview.
- Click “File” in the menu bar, then select “Export.”
- Choose “JPEG” as the format.
- Adjust the “Quality” slider and save the converted photo.
- Using Third-Party Apps:
- Use a third-party app like “XnConvert” or “Adapter” to convert multiple photos to JPEG in batch.
8.3. Editing Photos Before Uploading
Editing your photos before uploading them to iCloud can help you optimize them for storage and sharing.
- Crop Unnecessary Areas: Crop out any unnecessary areas of the photo to reduce its size.
- Adjust Brightness and Contrast: Adjust the brightness and contrast to improve the photo’s overall appearance.
- Remove Blemishes and Imperfections: Remove any blemishes or imperfections from the photo to make it look its best.
8.4. Using HEIF/HEVC for Photos and Videos
HEIF (High Efficiency Image File Format) and HEVC (High Efficiency Video Coding) are modern compression standards that offer better image and video quality at smaller file sizes compared to JPEG and H.264.
- Enabling HEIF/HEVC:
- On iPhone or iPad: Open the Settings app, tap “Camera,” then tap “Formats.” Select “High Efficiency” to use HEIF/HEVC.
- Compatibility:
- HEIF/HEVC is supported by most modern Apple devices and software. However, older devices and software may not support these formats. You can choose to automatically convert HEIF/HEVC files to JPEG/H.264 when transferring them to incompatible devices.
9. iCloud Photos and Professional Photography
iCloud Photos can be a valuable tool for professional photographers, but it’s important to understand its limitations and how to use it effectively.
9.1. Storing RAW Files
iCloud Photos supports RAW files, which are uncompressed image files that contain all the data captured by your camera’s sensor. Storing RAW files in iCloud Photos can be useful for backing up your original images, but it can also consume a significant amount of storage space.
- Consider the Storage Costs: RAW files are much larger than JPEG files, so storing them in iCloud Photos can quickly fill up your storage.
- Use External Drives for Primary Storage: For professional photographers, it’s generally recommended to use external drives or dedicated network-attached storage (NAS) devices for primary storage of RAW files.
- Use iCloud Photos for Backup: Use iCloud Photos as a secondary backup solution for your RAW files, or for storing smaller JPEG versions of your images.
9.2. Integrating iCloud Photos into Your Workflow
You can integrate iCloud Photos into your professional photography workflow in several ways:
- Use iCloud Photos for Quick Access: Use iCloud Photos to quickly access your photos on your iPhone or iPad for editing or sharing on social media.
- Use Shared Albums for Collaboration: Use Shared Albums to share photos with clients or collaborators for feedback and approval.
- Use iCloud Drive for File Sharing: Use iCloud Drive to share large files with clients or collaborators.
9.3. Best Practices for Professional Photographers
Here are some best practices for professional photographers using iCloud Photos:
- Use a Consistent Naming Convention: Use a consistent naming convention for your photo files to make them easier to find and organize.
- Use Keywords and Metadata: Add keywords and metadata to your photos to make them easier to search and filter.
- Back Up Your Photos Regularly: Back up your photos to multiple locations, including iCloud Photos, external drives, and other cloud storage services.
- Consider Using a Dedicated Photo Management Software: Consider using a dedicated photo management software like Adobe Lightroom or Capture One for more advanced organization and editing features.
10. The Future of iCloud Photos
iCloud Photos is constantly evolving, with new features and improvements being added regularly. Here are some potential future developments:
10.1. Enhanced AI and Machine Learning
Apple is investing heavily in AI and machine learning, and we can expect to see these technologies integrated more deeply into iCloud Photos in the future. This could include:
- Improved Facial Recognition: More accurate and sophisticated facial recognition algorithms.
- Automatic Photo Enhancements: AI-powered tools that automatically enhance your photos, such as adjusting the brightness, contrast, and color balance.
- Smart Search: More intelligent search capabilities that allow you to find photos based on objects, scenes, and events.
10.2. Deeper Integration with Other Apple Services
We can expect to see deeper integration between iCloud Photos and other Apple services, such as:
- Apple TV: More seamless integration with Apple TV for viewing your photos and videos on the big screen.
- iCloud Drive: Tighter integration with iCloud Drive for storing and sharing your photos and videos.
- Apple One: Bundling iCloud Photos with other Apple services like Apple Music and Apple TV+ in a single subscription package.
10.3. Improved Collaboration Features
Apple is likely to add more advanced collaboration features to iCloud Photos in the future, such as:
- Real-Time Collaboration: The ability to collaborate on photo albums in real-time with friends and family.
- Shared Editing: The ability to collaboratively edit photos with others.
- Advanced Sharing Permissions: More granular control over sharing permissions, allowing you to specify who can view, edit, and download your photos.
10.4. More Storage Options and Pricing Plans
Apple may introduce new storage options and pricing plans for iCloud Photos in the future to accommodate the growing size of photo and video libraries.
- Tiered Storage Plans: More storage tiers to choose from, allowing users to select the plan that best fits their needs.
- Pay-As-You-Go Storage: A pay-as-you-go storage option that allows users to pay only for the storage they use.
- Family Sharing Improvements: Improvements to Family Sharing that make it easier to share iCloud storage with family members.
In conclusion, mastering iCloud Photos is essential for anyone invested in the Apple ecosystem, especially for photographers looking to safeguard and access their work. At dfphoto.net, our aim is to provide you with the knowledge and resources to make the most of this powerful tool. Whether you are an amateur enthusiast or a seasoned professional, understanding the intricacies of iCloud Photos will undoubtedly enhance your photographic journey.
For more in-depth tutorials, stunning photo galleries, and a vibrant community of photographers, visit dfphoto.net today and elevate your passion for photography. Your journey to photographic excellence starts here. Address: 1600 St Michael’s Dr, Santa Fe, NM 87505, United States. Phone: +1 (505) 471-6001. Website: dfphoto.net. Discover your potential today.
FAQ: iCloud Photo Storage
1. How do I enable iCloud Photos on my iPhone?
To enable iCloud Photos, go to Settings > [Your Name] > iCloud > Photos and toggle “Sync this iPhone” to the ON position.
2. What does “Optimize iPhone Storage” mean?
“Optimize iPhone Storage” means that full-resolution photos and videos are stored in iCloud, while smaller, device-optimized versions are stored on your iPhone to save space.
3. How much iCloud storage do I need for my photos?
The amount of iCloud storage you need depends on the size of your photo and video library. Check your current storage usage in Settings > [Your Name] > iCloud > Manage Account Storage. Upgrade if necessary.
4. Can I access my iCloud Photos on a non-Apple device?
Yes, you can access your iCloud Photos on non-Apple devices by signing in to iCloud.com through a web browser.
5. How do I share photos with family using iCloud?
You can share photos with family by creating a Shared Album in the Photos app and inviting family members to join.
6. What happens if I delete a photo from iCloud Photos?
When you delete a photo from iCloud Photos, it is moved to the “Recently Deleted” album, where it remains for 30 days before being permanently deleted.
7. How do I recover a deleted photo from iCloud?
To recover a deleted photo, go to the “Recently Deleted” album in the Photos app, select the photo, and tap “Recover.”
8. Is iCloud Photos a backup solution?
Yes, iCloud Photos can be considered a backup solution as it stores your photos and videos in the cloud, protecting them from loss or damage due to device failure or theft.
9. How do I stop photos from automatically uploading to iCloud?
To stop photos from automatically uploading to iCloud, go to Settings > [Your Name] > iCloud > Photos and toggle “Sync this iPhone” to the OFF position.
10. Can I use iCloud Photos with multiple Apple IDs?
No, you can only use iCloud Photos with one Apple ID at a time. Each Apple ID has its own separate iCloud storage and photo library.
