Storing photos on your iPhone can quickly fill up your device’s storage. At dfphoto.net, we’ll guide you through effective strategies to manage and optimize your photo storage, ensuring you never miss capturing a precious moment. Learn about iCloud Photos, storage optimization, and other tips to keep your iPhone photo library organized and accessible.
1. Why Is iPhone Photo Storage Important?
Effectively managing your iPhone photo storage is crucial for several reasons.
Your iPhone photo storage matters because it directly impacts your ability to capture memories, maintain device performance, and access your photos seamlessly. Understanding how to optimize and manage your photo storage ensures you never miss a moment, keeps your device running smoothly, and provides easy access to your visual memories.
1.1. Capturing Memories
- Never Miss a Moment: By managing storage, you ensure you never encounter a “Storage Full” message when trying to capture a spontaneous, once-in-a-lifetime event.
- High-Quality Photos and Videos: Sufficient storage allows you to shoot in high resolution, preserving the details of your memories.
1.2. Device Performance
- Optimal Speed and Functionality: A full storage can slow down your iPhone. Managing photo storage ensures your device runs smoothly.
- Prevents Freezing and Crashing: Freeing up space reduces the risk of your iPhone freezing or crashing, especially when using other apps.
1.3. Accessibility and Organization
- Easy Access: Properly stored photos are easier to find and share.
- Organization: Managing storage often involves organizing your photos, making it simpler to locate specific images.
1.4. Backup and Security
- Redundancy: Storing photos in iCloud or other services provides a backup, protecting against data loss if your iPhone is lost, stolen, or damaged.
- Peace of Mind: Knowing your memories are safe and accessible gives you peace of mind.
1.5. Cost Efficiency
- Avoid Upgrading Prematurely: Efficient storage management can delay the need to purchase a new iPhone with more storage, saving you money.
- Optimize iCloud Storage: Understanding how to use iCloud Photos effectively can help you optimize your storage plan and avoid unnecessary costs.
2. What Are The iPhone Photo Storage Options?
Several options are available for storing your photos on an iPhone, each with its own benefits.
iPhone users have several storage options, each offering unique advantages. These include iCloud Photos for seamless syncing and accessibility, local storage on the device for quick access, external storage solutions for physical backups, and third-party cloud services for added flexibility. Understanding these options helps users choose the best strategy for their needs.
2.1. iCloud Photos
- Seamless Integration: iCloud Photos seamlessly syncs your photos and videos across all your Apple devices.
- Storage Optimization: You can choose to optimize iPhone storage, keeping high-resolution originals in iCloud and smaller, device-optimized versions on your iPhone.
- Accessibility: Access your entire photo library from any device with your Apple ID.
2.2. Local Storage
- Quick Access: Photos stored directly on your iPhone are quickly accessible without needing an internet connection.
- Privacy: Local storage can be more private since your photos are not stored on external servers.
- Limited Capacity: Limited by the iPhone’s storage capacity, which can fill up quickly.
2.3. External Storage Devices
- Physical Backup: External hard drives or SSDs provide a physical backup of your photos.
- Large Capacity: Store large volumes of photos and videos without relying on cloud services.
- Portability: Easily transfer photos between devices.
2.4. Third-Party Cloud Services
- Flexibility: Services like Google Photos, Dropbox, and Amazon Photos offer additional storage options.
- Cross-Platform Compatibility: Access your photos from various devices, regardless of the operating system.
- Additional Features: Many services offer features like automatic organization, facial recognition, and enhanced sharing options.
2.5. NAS (Network-Attached Storage)
- Centralized Storage: Store and access photos from a central location on your home network.
- Backup and Redundancy: Many NAS devices offer RAID configurations for data redundancy.
- Accessibility: Access photos from multiple devices on your network.
3. How To Check Your iPhone Storage?
Knowing how to check your iPhone storage is the first step in managing it effectively.
Checking your iPhone storage is the first step to effective management. Navigate to Settings > General > iPhone Storage to see a detailed breakdown of used and available space. This allows you to identify which apps and files are consuming the most storage, helping you make informed decisions about what to delete or offload.
3.1. Step-by-Step Guide
- Open Settings: Tap the Settings app on your iPhone.
- Go to General: Scroll down and tap on “General.”
- Select iPhone Storage: In the General settings, tap “iPhone Storage.”
- Review Storage Usage: The screen displays a bar graph showing used and available storage, followed by a list of apps and the storage each uses.
3.2. Interpreting the Results
- Storage Bar: The colored bar at the top shows how your storage is allocated (e.g., photos, apps, media).
- App List: Below the bar, a list of apps shows the amount of storage each app uses. Apps using the most storage are listed first.
- Recommendations: Apple provides recommendations for optimizing storage, such as offloading unused apps or enabling iCloud Photos.
3.3. Understanding Categories
- Photos: This category includes all photos and videos stored on your device.
- Apps: Lists the storage used by each app installed on your iPhone.
- Media: Includes music, movies, podcasts, and other media files.
- Mail: Storage used by your email accounts, including attachments.
- iOS: The space occupied by the operating system.
3.4. Taking Action
- Identify Large Files: Look for apps or files consuming significant storage.
- Delete Unnecessary Content: Remove apps, photos, or videos you no longer need.
- Offload Unused Apps: Use the “Offload Unused Apps” feature to remove apps you rarely use while preserving their data.
4. How To Store Photos In iPhone Using iCloud Photos?
iCloud Photos is a seamless way to store and access your photos across all your Apple devices.
Storing photos in iCloud Photos is a seamless way to keep your memories safe and accessible across all your Apple devices. By enabling iCloud Photos, your photos and videos are automatically uploaded to iCloud, where they’re securely stored and synchronized. This ensures that any changes you make on one device are reflected on all others.
4.1. Enabling iCloud Photos
- Open Settings: Tap the Settings app on your iPhone.
- Tap Your Name: At the top of the Settings menu, tap your name (Apple ID, iCloud, Media & Purchases).
- Select iCloud: Tap on “iCloud.”
- Tap Photos: In the iCloud settings, tap “Photos.”
- Turn on iCloud Photos: Toggle the switch to enable iCloud Photos.
4.2. Optimizing Storage
- Choose Optimize iPhone Storage: In the Photos settings, select “Optimize iPhone Storage.” This option stores full-resolution photos in iCloud while keeping smaller, device-optimized versions on your iPhone.
- Understand the Trade-Off: While this saves space, accessing the original, high-resolution photos requires an internet connection.
4.3. Managing iCloud Storage
- Check iCloud Storage: Go to Settings > Your Name > iCloud > Manage Account Storage to see how much iCloud storage you’re using.
- Upgrade If Needed: If you’re running out of space, consider upgrading your iCloud storage plan. Apple offers various plans to suit different needs.
4.4. Benefits of iCloud Photos
- Automatic Backup: Your photos and videos are automatically backed up to iCloud.
- Synchronization: Changes made on one device are instantly synced to all your devices.
- Accessibility: Access your photos from any device with your Apple ID.
4.5. Considerations
- Internet Connection: Accessing full-resolution photos requires a stable internet connection.
- Privacy: Be aware of Apple’s privacy policies regarding iCloud storage.
- Cost: iCloud storage plans come at a recurring cost, depending on the amount of storage you need.
5. How To Optimize iPhone Photo Storage?
Optimizing your iPhone photo storage can free up space without sacrificing your memories.
Optimizing your iPhone photo storage is essential for maintaining device performance and ensuring you never run out of space. By using features like “Optimize iPhone Storage” in iCloud Photos, regularly deleting unnecessary photos and videos, and compressing large files, you can significantly reduce the amount of storage your photos consume.
5.1. Using “Optimize iPhone Storage”
- Enable iCloud Photos: First, ensure iCloud Photos is enabled in Settings > Your Name > iCloud > Photos.
- Select Optimize iPhone Storage: Choose “Optimize iPhone Storage” to store full-resolution photos in iCloud and smaller, device-optimized versions on your iPhone.
5.2. Regularly Deleting Unnecessary Photos and Videos
- Review Your Library: Periodically review your photo library and delete duplicate or unwanted photos and videos.
- Use the “Recently Deleted” Album: Photos and videos deleted from your library are moved to the “Recently Deleted” album for 30 days before being permanently deleted. Empty this album to free up space immediately.
5.3. Compressing Photos and Videos
- Use Third-Party Apps: Apps like Image Size or Compressor can reduce the file size of your photos and videos without significant loss of quality.
- Adjust Camera Settings: Lower the resolution or frame rate in your camera settings to capture smaller files.
5.4. Offloading Unused Apps
- Identify Unused Apps: Go to Settings > General > iPhone Storage to see a list of apps and their storage usage.
- Offload or Delete: Offload apps you rarely use to free up storage while preserving their data, or delete them entirely if you no longer need them.
5.5. Backing Up and Removing Photos
- Back Up to External Storage: Transfer photos and videos to an external hard drive or SSD.
- Delete from iPhone: After backing up, delete the photos and videos from your iPhone to free up space.
5.6. Using Live Photos Wisely
- Disable Live Photos: Live Photos take up more storage than regular photos. Consider disabling this feature or using it sparingly.
- Convert to Still Photos: Convert existing Live Photos to still photos to reduce their file size.
6. How To Manage Photos On iPhone?
Effective photo management on your iPhone keeps your library organized and accessible.
Managing photos on your iPhone involves organizing, editing, and sharing your images efficiently. Use the built-in Photos app to create albums, utilize smart albums for automatic organization, and take advantage of editing tools to enhance your photos. Regularly backing up your library ensures your memories are safe and accessible across all your devices.
6.1. Organizing Photos into Albums
- Create Albums: Use the Photos app to create albums for different events, trips, or themes.
- Add Photos: Add relevant photos to each album to keep your library organized.
6.2. Using Smart Albums
- Automatic Organization: Smart Albums automatically organize photos based on criteria like date, location, or keywords.
- Utilize Keywords: Add keywords to your photos to make them easier to find and organize.
6.3. Editing Photos Directly on Your iPhone
- Built-In Tools: Use the Photos app’s built-in editing tools to adjust exposure, contrast, and color.
- Third-Party Apps: For more advanced editing, use apps like Adobe Lightroom Mobile or VSCO.
6.4. Sharing Photos
- iCloud Photo Sharing: Create shared albums to share photos with friends and family.
- Social Media: Share photos directly to social media platforms like Instagram, Facebook, or Twitter.
6.5. Regularly Backing Up Your Photo Library
- iCloud Backup: Enable iCloud Backup to automatically back up your photos and other data.
- External Storage: Regularly back up your photo library to an external hard drive or SSD for added security.
6.6. Cleaning Up Duplicate Photos
- Use Third-Party Apps: Apps like Gemini Photos or Remo Duplicate Photos Remover can help you identify and delete duplicate photos.
- Manual Review: Periodically review your library to identify and delete any duplicate or unwanted photos.
7. What Are The Best Practices For Storing Photos?
Following best practices ensures your photos are safe, organized, and accessible.
Following best practices for photo storage ensures your memories are safe, well-organized, and easily accessible. This includes backing up your photos regularly using multiple methods, organizing your library with descriptive filenames and metadata, and utilizing cloud services for added security and accessibility.
7.1. Backing Up Photos Regularly
- Multiple Backups: Use multiple backup methods, such as iCloud, external hard drives, and cloud services.
- Automated Backups: Set up automated backups to ensure your photos are regularly backed up without manual intervention.
7.2. Organizing Your Photo Library
- Descriptive Filenames: Use descriptive filenames that include the date, location, and event.
- Metadata: Add metadata such as keywords, captions, and location information to your photos.
7.3. Utilizing Cloud Services
- iCloud Photos: Use iCloud Photos for seamless syncing and accessibility across Apple devices.
- Third-Party Services: Consider using third-party cloud services like Google Photos or Dropbox for additional backup and storage options.
7.4. Archiving Old Photos
- Move to External Storage: Move old or rarely accessed photos to external storage devices to free up space on your iPhone and cloud storage.
- Create a Digital Archive: Organize your archived photos into folders or albums for easy retrieval.
7.5. Protecting Your Photos
- Privacy Settings: Adjust privacy settings to control who can access your photos on cloud services and social media.
- Password Protection: Use strong passwords and enable two-factor authentication to protect your accounts.
7.6. Regularly Reviewing and Cleaning Your Library
- Delete Unnecessary Photos: Periodically review your photo library and delete duplicate, blurry, or unwanted photos.
- Organize Albums: Keep your albums organized and up-to-date.
8. What Are The Common Mistakes To Avoid When Storing Photos?
Avoiding common mistakes can prevent data loss and ensure your photos are properly stored.
Avoiding common mistakes in photo storage is crucial for preventing data loss and maintaining an organized library. This includes relying solely on one storage method, neglecting regular backups, ignoring storage limits, and failing to organize your photos properly.
8.1. Relying Solely on One Storage Method
- Diversify Your Backups: Use multiple storage methods to protect against data loss.
- Cloud and Local Storage: Combine cloud storage with local backups for added security.
8.2. Neglecting Regular Backups
- Set a Schedule: Establish a regular backup schedule and stick to it.
- Automate Backups: Use automated backup tools to ensure your photos are regularly backed up without manual intervention.
8.3. Ignoring Storage Limits
- Monitor Usage: Regularly monitor your storage usage and upgrade your plan if needed.
- Optimize Storage: Use storage optimization tools to reduce the amount of space your photos consume.
8.4. Failing to Organize Photos
- Create Albums: Organize your photos into albums based on events, dates, or themes.
- Use Metadata: Add metadata such as keywords, captions, and location information to your photos.
8.5. Not Deleting Unnecessary Photos
- Review Regularly: Periodically review your photo library and delete duplicate, blurry, or unwanted photos.
- Empty “Recently Deleted”: Remember to empty the “Recently Deleted” album to permanently remove photos from your device.
8.6. Ignoring Privacy Settings
- Review Settings: Review the privacy settings on your cloud storage and social media accounts.
- Control Access: Control who can access your photos and personal information.
9. How To Transfer Photos From iPhone To External Storage?
Transferring photos to external storage is a great way to free up space on your iPhone and create a physical backup.
Transferring photos from your iPhone to external storage is a great way to free up space and create a secure backup. Use methods like connecting your iPhone to a computer via USB, using iCloud for Windows, or employing third-party apps to efficiently transfer your photos.
9.1. Using a Computer via USB
- Connect Your iPhone: Connect your iPhone to your computer using a USB cable.
- Unlock Your iPhone: Unlock your iPhone and trust the computer if prompted.
- Access Photos:
- Windows: Open File Explorer and find your iPhone under “This PC.” Navigate to the “Internal StorageDCIM” folder.
- Mac: Open the Photos app. Your iPhone should appear in the sidebar under “Devices.”
- Copy Photos: Select the photos you want to transfer and copy them to a folder on your external hard drive.
- Eject Your iPhone: Safely eject your iPhone from your computer once the transfer is complete.
9.2. Using iCloud for Windows
- Download iCloud for Windows: Download and install iCloud for Windows from the Apple website.
- Sign In: Sign in with your Apple ID and password.
- Enable iCloud Photos: Make sure iCloud Photos is enabled in the iCloud settings.
- Set Download Location: Choose a download location on your external hard drive.
- Download Photos: iCloud for Windows will automatically download your iCloud Photos to the specified location.
9.3. Using Third-Party Apps
- Install App: Install a third-party app like iMazing or AnyTrans on your computer.
- Connect Your iPhone: Connect your iPhone to your computer using a USB cable.
- Transfer Photos: Use the app to transfer photos to your external hard drive.
9.4. Using AirDrop (for Macs)
- Enable AirDrop: Enable AirDrop on both your iPhone and Mac.
- Select Photos: Select the photos you want to transfer on your iPhone.
- Share via AirDrop: Tap the Share button and choose AirDrop.
- Select Your Mac: Select your Mac from the list of available devices.
- Save to External Drive: On your Mac, save the photos directly to your external hard drive.
9.5. Tips for Efficient Transfer
- Transfer in Batches: Transfer photos in smaller batches to avoid errors or slowdowns.
- Verify Transfer: After transferring, verify that all photos have been successfully copied to your external hard drive.
- Delete from iPhone: Once you’ve verified the transfer, delete the photos from your iPhone to free up space.
10. What Are The Best Apps For Managing iPhone Photos?
Several apps can help you manage your iPhone photos more effectively.
Managing iPhone photos is made easier with the right apps. Adobe Lightroom Mobile offers advanced editing and organization tools, while Google Photos provides unlimited cloud storage and smart organization features. Other notable apps include VSCO for stylish filters and editing, and Gemini Photos for cleaning up duplicates.
10.1. Adobe Lightroom Mobile
- Advanced Editing: Offers professional-grade editing tools for adjusting exposure, color, and detail.
- Organization: Provides robust organization features, including albums, keywords, and ratings.
- Cloud Sync: Syncs your photos across all your devices via Adobe Creative Cloud.
10.2. Google Photos
- Unlimited Storage: Offers free, unlimited storage for photos (with some compression).
- Smart Organization: Automatically organizes your photos using AI-powered features like facial recognition and location tagging.
- Sharing: Makes it easy to share photos with friends and family.
10.3. VSCO
- Stylish Filters: Offers a wide range of stylish filters and presets for enhancing your photos.
- Editing Tools: Provides basic editing tools for adjusting exposure, contrast, and color.
- Community: Connect with other photographers and share your photos.
10.4. Gemini Photos
- Duplicate Finder: Identifies and helps you delete duplicate photos to free up storage space.
- Smart Selection: Uses smart algorithms to suggest which photos to delete.
- Easy Cleanup: Simplifies the process of cleaning up your photo library.
10.5. Flic
- Organization: Helps you organize your photos by swiping left or right to delete or keep them.
- Fast Review: Provides a fast and efficient way to review and clean up your photo library.
- Gesture-Based: Uses simple gestures to manage your photos.
10.6. Snapseed
- Professional Tools: Offers a wide range of professional-grade editing tools.
- User-Friendly: Easy-to-use interface for both beginners and advanced users.
- Free: Completely free to use with no ads or in-app purchases.
11. How Does Location Services Affect Photo Storage?
Location services can significantly impact your photo storage and privacy.
Location services play a significant role in photo storage by embedding geographical data into your images. While this geotagging feature can help organize and locate photos, it also raises privacy concerns. Understanding how to manage location settings for your photos ensures you balance convenience with privacy protection.
11.1. Geotagging Photos
- Location Data: When location services are enabled, your iPhone automatically adds location data to your photos, including latitude, longitude, and altitude.
- Organization: Geotagging can help you organize your photos by location, making it easier to find photos from specific places.
11.2. Storage Impact
- Metadata: Location data adds metadata to your photos, which slightly increases their file size.
- Minimal Impact: The impact on storage is minimal, as location data typically accounts for a small fraction of the overall file size.
11.3. Privacy Concerns
- Sharing Location: When you share photos with geotagging enabled, you also share your location data, which can reveal where you live, work, or travel.
- Privacy Risks: This information could be used to track your movements or compromise your security.
11.4. Managing Location Settings
- Disable Location Services: You can disable location services for the Camera app in Settings > Privacy > Location Services.
- Remove Location Data: You can remove location data from individual photos before sharing them.
- Adjust Settings: Adjust the settings to only allow location access while using the app.
11.5. Benefits of Geotagging
- Organization: Geotagging can help you organize your photos by location, making it easier to find photos from specific places.
- Memories: Location data can enhance your memories by reminding you of where you took each photo.
11.6. Tips for Balancing Privacy and Convenience
- Review Settings: Regularly review your location settings and adjust them as needed.
- Remove Data Before Sharing: Remove location data from photos before sharing them online or with others.
- Use Location Sparingly: Only enable location services for the Camera app when you need them.
12. How To Secure Your Stored Photos?
Securing your stored photos is essential for protecting your privacy and memories.
Securing your stored photos is essential for protecting your privacy and cherished memories. Use strong, unique passwords for your accounts, enable two-factor authentication for added security, and encrypt sensitive data. Regularly review and adjust privacy settings to control who can access your photos.
12.1. Using Strong Passwords
- Unique Passwords: Use strong, unique passwords for your Apple ID, iCloud, and other accounts.
- Password Manager: Consider using a password manager to generate and store your passwords securely.
12.2. Enabling Two-Factor Authentication
- Added Security: Enable two-factor authentication for your Apple ID to add an extra layer of security.
- Verification Code: When you sign in on a new device, you’ll need to enter a verification code sent to your trusted devices.
12.3. Encrypting Sensitive Data
- FileVault: Use FileVault on your Mac to encrypt the data on your hard drive, including your photo library.
- Third-Party Apps: Consider using third-party apps to encrypt individual photos or folders.
12.4. Regularly Reviewing Privacy Settings
- Cloud Services: Review the privacy settings on your cloud storage accounts and adjust them as needed.
- Social Media: Control who can access your photos on social media platforms.
12.5. Backing Up Your Photos Securely
- Encrypted Backups: Encrypt your backups to protect your data from unauthorized access.
- Secure Storage: Store your backups in a secure location, such as a locked safe or a password-protected hard drive.
12.6. Being Careful When Sharing Photos
- Remove Metadata: Remove location data and other metadata from photos before sharing them online or with others.
- Use Secure Sharing Methods: Use secure sharing methods, such as encrypted email or file transfer services.
13. What To Do When iCloud Photo Storage Is Full?
When your iCloud photo storage is full, you have several options to free up space or upgrade your storage plan.
When your iCloud photo storage is full, you have several options to manage your photos effectively. Delete unnecessary photos and videos, optimize your storage settings, or upgrade to a larger iCloud storage plan. Additionally, consider transferring photos to external storage to free up space in the cloud.
13.1. Deleting Unnecessary Photos and Videos
- Review Your Library: Periodically review your photo library and delete duplicate, blurry, or unwanted photos and videos.
- Empty “Recently Deleted”: Remember to empty the “Recently Deleted” album to permanently remove photos from your device.
13.2. Optimizing Storage Settings
- Enable “Optimize iPhone Storage”: In Settings > Your Name > iCloud > Photos, select “Optimize iPhone Storage” to store full-resolution photos in iCloud and smaller, device-optimized versions on your iPhone.
- Reduce Video Resolution: Lower the resolution or frame rate of your videos to reduce their file size.
13.3. Upgrading Your iCloud Storage Plan
- Check Current Usage: Go to Settings > Your Name > iCloud > Manage Account Storage to see how much iCloud storage you’re using.
- Upgrade Plan: If you’re running out of space, consider upgrading your iCloud storage plan. Apple offers various plans to suit different needs.
13.4. Transferring Photos to External Storage
- Back Up to External Drive: Transfer photos and videos to an external hard drive or SSD.
- Delete from iCloud: After backing up, delete the photos and videos from iCloud to free up space.
13.5. Using Third-Party Cloud Services
- Google Photos: Use Google Photos to store your photos and videos. Google Photos offers free storage for compressed photos.
- Dropbox or Amazon Photos: Consider using other cloud services like Dropbox or Amazon Photos for additional storage options.
13.6. Archiving Old Photos
- Move to External Storage: Move old or rarely accessed photos to external storage devices to free up space in iCloud.
- Create a Digital Archive: Organize your archived photos into folders or albums for easy retrieval.
14. How To Take Better Photos With Your iPhone?
Taking better photos with your iPhone involves understanding basic photography principles and utilizing your device’s features.
Taking better photos with your iPhone involves mastering fundamental techniques like composition, lighting, and focus. Utilize built-in features such as HDR and Portrait mode, and explore third-party apps for enhanced control. Regular practice and experimentation will help you capture stunning images with your iPhone.
14.1. Understanding Composition
- Rule of Thirds: Use the rule of thirds to create balanced and visually appealing photos.
- Leading Lines: Use leading lines to guide the viewer’s eye through the photo.
- Symmetry and Patterns: Look for symmetry and patterns to create visually striking images.
14.2. Mastering Lighting
- Golden Hour: Shoot during the golden hour (early morning or late afternoon) for warm, soft light.
- Avoid Harsh Light: Avoid shooting in direct sunlight, which can create harsh shadows and overexposed areas.
- Use Fill Flash: Use fill flash to brighten shadows and balance the exposure.
14.3. Focusing Techniques
- Tap to Focus: Tap on the screen to focus on a specific subject.
- Lock Focus: Press and hold on the screen to lock the focus and exposure.
- Manual Focus: Use third-party apps to access manual focus controls.
14.4. Utilizing iPhone Features
- HDR Mode: Use HDR mode to capture more detail in high-contrast scenes.
- Portrait Mode: Use Portrait mode to create photos with a shallow depth of field.
- Live Photos: Capture moments with motion and sound using Live Photos.
14.5. Exploring Third-Party Apps
- Camera Apps: Use third-party camera apps like Halide or ProCamera for more control over your camera settings.
- Editing Apps: Use editing apps like Adobe Lightroom Mobile or VSCO to enhance your photos.
14.6. Practice and Experimentation
- Regular Practice: Practice taking photos regularly to improve your skills.
- Experiment with Settings: Experiment with different settings and techniques to find what works best for you.
- Learn from Others: Study the work of other photographers and learn from their techniques.
15. How To Share Photos From iPhone?
Sharing photos from your iPhone is easy and versatile, with several options available.
Sharing photos from your iPhone is easy and versatile, offering multiple options to connect with friends, family, and social media. Use built-in features like AirDrop for quick transfers to nearby Apple devices, iCloud Photo Sharing for collaborative albums, and direct sharing to social media platforms.
15.1. Using AirDrop
- Quick Transfer: Use AirDrop to quickly transfer photos to nearby Apple devices.
- Enable AirDrop: Enable AirDrop on both your iPhone and the receiving device.
- Select Photos: Select the photos you want to share and tap the Share button.
- Choose AirDrop: Choose AirDrop and select the receiving device.
15.2. Using iCloud Photo Sharing
- Shared Albums: Create shared albums to share photos with friends and family.
- Invite Others: Invite others to view and contribute to the album.
- Collaborative: Everyone can add photos and videos to the shared album.
15.3. Sharing Directly to Social Media
- Select Photos: Select the photos you want to share and tap the Share button.
- Choose Platform: Choose the social media platform you want to share to, such as Instagram, Facebook, or Twitter.
- Add Captions: Add captions and hashtags to your photos before posting.
15.4. Sending via Email or Messaging Apps
- Select Photos: Select the photos you want to share and tap the Share button.
- Choose Method: Choose Email or a messaging app like iMessage, WhatsApp, or Telegram.
- Send Photos: Send the photos to your desired recipients.
15.5. Creating a Link to Share
- iCloud Link: Create an iCloud link to share a group of photos with anyone.
- Copy Link: Copy the link and share it via email, messaging apps, or social media.
- Temporary Access: The link provides temporary access to the photos, which can be revoked at any time.
15.6. Using Third-Party Apps
- Sharing Apps: Use third-party apps like Dropbox or Google Photos to share photos.
- Create Links: Create links to share photos with others, even if they don’t have the app installed.
- Control Access: Control who can access your photos and set expiration dates for the links.
FAQ: How To Store Photos In iPhone?
1. How do I check my iPhone storage to see how much space my photos are taking up?
Go to Settings > General > iPhone Storage. The bar graph at the top shows how your storage is allocated, including the space used by photos and videos.
2. What is iCloud Photos, and how does it help with iPhone photo storage?
iCloud Photos is a service that automatically syncs your photos and videos across all your Apple devices. It can also optimize storage by keeping full-resolution originals in iCloud and smaller, device-optimized versions on your iPhone.
3. How do I enable iCloud Photos on my iPhone?
Tap Settings > Your Name > iCloud > Photos, and then toggle the switch to enable iCloud Photos.
4. What does “Optimize iPhone Storage” mean in iCloud Photos settings?
“Optimize iPhone Storage” means that full-resolution photos and videos are stored in iCloud, while smaller, device-optimized versions are kept on your iPhone to save space.
5. How do I manage my iCloud storage if it’s full?
Delete unnecessary photos and videos, optimize your storage settings, upgrade to a larger iCloud storage plan, or transfer photos to external storage.
6. Can I transfer photos from my iPhone to an external hard drive?
Yes, you can connect your iPhone to your computer via USB, use iCloud for Windows, or use third-party apps to transfer photos to an external hard drive.
7. What are some common mistakes to avoid when storing photos on my iPhone?
Relying solely on one storage method, neglecting regular backups, ignoring storage limits, and failing to organize your photos properly are common mistakes.
8. Are there any apps that can help me manage my iPhone photos more effectively?
Yes, apps like Adobe Lightroom Mobile, Google Photos, VSCO, and Gemini Photos can help you manage your iPhone photos more effectively.
9. How does enabling location services affect my photo storage and privacy?
Enabling location services geotags your photos, adding location data to them. While this can help with organization, it also raises privacy concerns, as sharing these photos reveals your location.
10. How can I secure my stored photos on my iPhone?
Use strong passwords, enable two-factor authentication, encrypt sensitive data, and regularly review your privacy settings to secure your stored photos.
For more in-depth guides, tips, and inspiration on photography, visit dfphoto.net.
Address: 1600 St Michael’s Dr, Santa Fe, NM 87505, United States. Phone: +1 (505) 471-6001. Website: dfphoto.net.
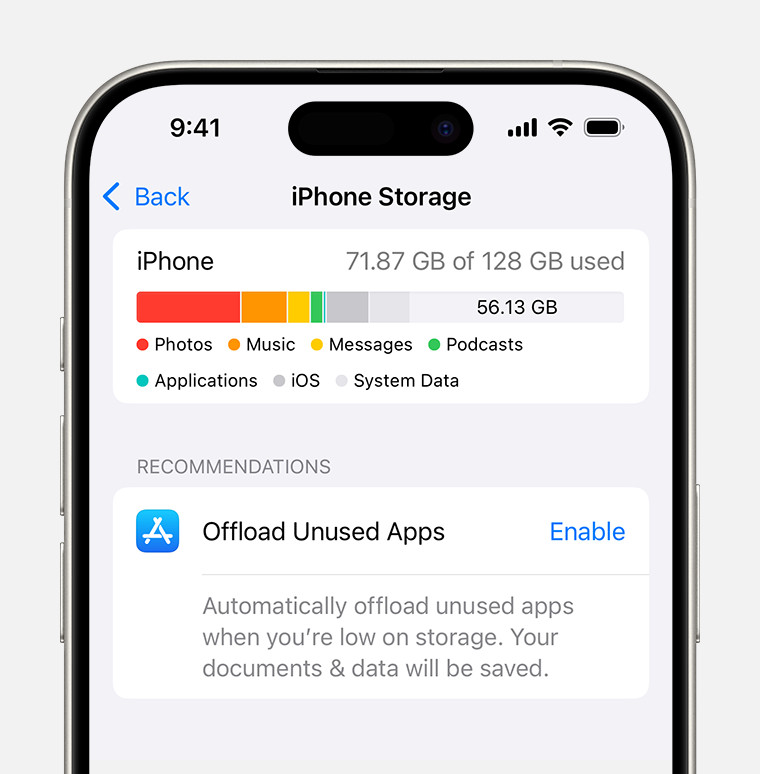 iPhone storage section of Settings displaying a recommendation to Offload Unused Apps
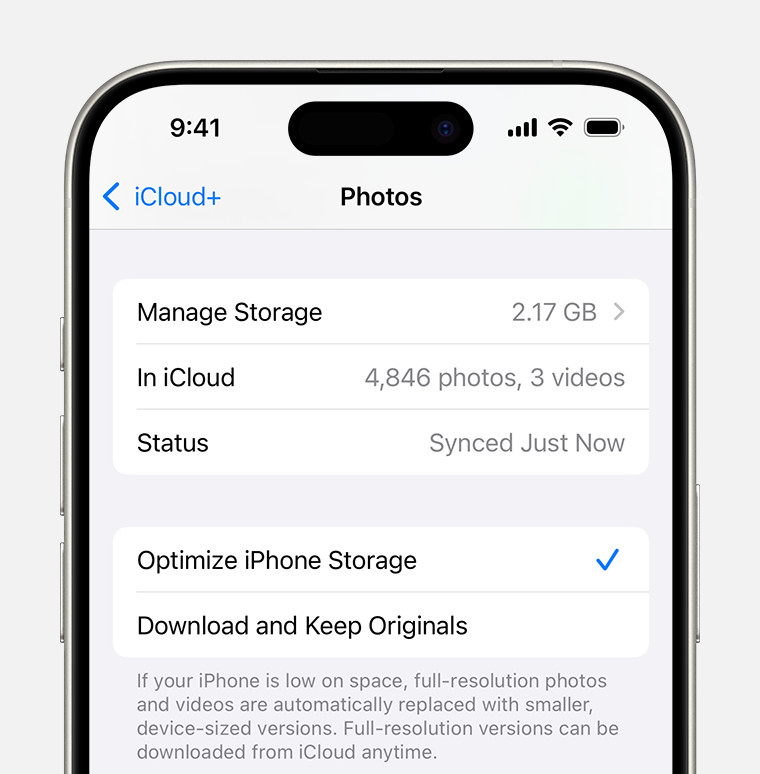 iCloud Photos section of iCloud settings showing status and photo storage options