Managing your digital photos across devices is convenient, but sometimes you need to take control of Google Photos syncing. Whether you’re concerned about storage limits, data usage, or simply need a break from constant uploads, stopping Google Photos from syncing on your desktop is straightforward. This guide provides five simple methods to halt the synchronization process, giving you the flexibility to manage your photos as you see fit.
Solution 1: Temporarily Pause Google Drive Sync
The quickest way to stop Google Photos upload temporarily is by pausing Google Drive sync. This option halts all syncing activities, including Google Photos, allowing you to regain control without disconnecting or quitting the application entirely. It’s ideal for situations where you need a temporary break from syncing, and plan to resume later.
On Windows PC:
Step 1: Locate the Backup and Sync app icon in your system tray (usually in the bottom-right corner of your screen). Click on the icon to open the Backup and Sync menu. Select the three dots (ellipses) menu, and then click “Pause”.
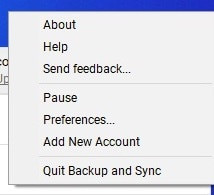 Pause Google Drive Sync on Windows
Alt: Pause option highlighted in the Google Backup and Sync menu on Windows taskbar.
If syncing is already paused, you will see a “Resume” option instead, indicating that you can restart the sync process whenever you’re ready.
On Apple Mac:
Step 1: Find the Backup and Sync app icon in your macOS menu bar (usually at the top-right corner of your screen). Click the icon to open the menu. Select the three dots (ellipses) menu, and then select “Pause” to stop Google Drive sync, which will also stop Google Photos upload.
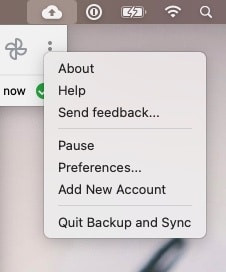 Pause Google Drive Sync on Mac
Alt: Pause button selected in the Google Backup and Sync dropdown menu on macOS.
Solution 2: Disconnect Your Google Account
For a more definitive stop to Google Photos syncing, disconnecting your Google Account from the Backup and Sync app is an effective method. This action severs the link between your computer and Google Drive, immediately ceasing photo uploads. This is useful when you want to ensure no further syncing occurs until you actively reconnect your account.
On Windows PC:
Step 1: Right-click the Backup and Sync app icon in the taskbar, select the ellipses menu, and choose “Preferences”.
 Open Preferences in Backup and Sync on Windows
Alt: Preferences option in the Google Backup and Sync menu on Windows.
Step 2: In the Preferences window, navigate to the “Settings” tab.
Step 3: Click the “Disconnect Account” option.
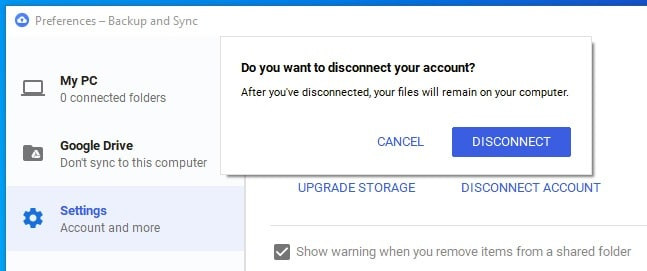 Disconnect Account in Backup and Sync Settings Windows
Alt: Disconnect Account button in the Settings tab of Google Backup and Sync preferences.
Step 4: Confirm your decision to disconnect your account when prompted.
On Apple Mac:
Step 1: Click the Backup and Sync app icon in the macOS menu bar, select the ellipses menu, and choose “Preferences”.
 Access Preferences on Mac Backup and Sync
Alt: Preferences selected from the Google Backup and Sync menu on macOS.
Step 2: Go to the “Settings” tab and click “Disconnect Account”. Confirm again to disconnect your Google Account from Backup and Sync and stop Google Photos upload.
Solution 3: Quit the Backup and Sync Application
Closing the Backup and Sync application is another straightforward way to immediately halt Google Photos syncing. Quitting the app terminates its background processes, preventing any further uploads until you relaunch it. This method is suitable for quickly stopping sync when you plan to restart it later but want to ensure it’s not running in the interim.
On Windows PC:
To quit Backup and Sync, click the app icon in the taskbar, select the ellipses menu, and then select “Quit”.
Pause Google Drive Sync on Windows
Alt: Quit option highlighted in the Google Backup and Sync menu on Windows.
This action closes the application completely, and Google Photos sync will remain stopped until you manually reopen the Backup and Sync app.
On Apple Mac:
Step 1: Click the Backup and Sync app icon in the macOS menu bar, select the ellipses menu, and select “Quit Backup and Sync” to cancel Google Photos upload.
Pause Google Drive Sync on Mac
Alt: Quit Backup and Sync selected in the dropdown menu on macOS.
Solution 4: Uninstall the Backup and Sync Application
For a more permanent solution to stop Google Photos syncing, uninstalling the Backup and Sync application is the most decisive action. Removing the application eliminates the syncing capability altogether, ensuring no automatic uploads occur. This is ideal if you no longer wish to use Backup and Sync, or prefer to manage your Google Photos uploads manually through the web interface.
On Windows PC:
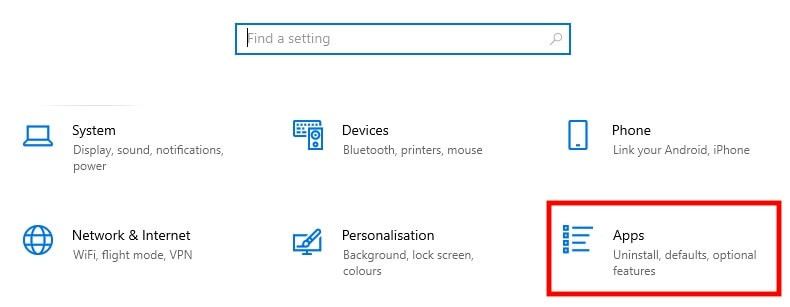
Step 1: Click the Windows “Start” menu and then click on “Settings” (the gear icon).
 Access Windows Settings for Uninstall
Alt: Settings icon in the Windows Start Menu.
Step 2: In the Settings window, click on “Apps”.
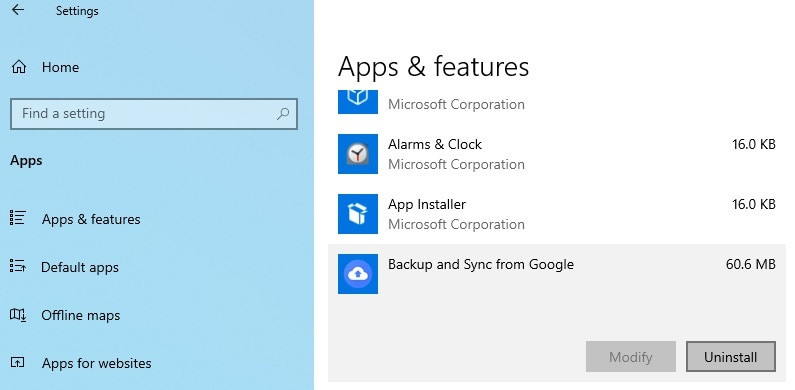
Step 3: Scroll through the list of installed applications to find “Backup and Sync from Google”. Click on it.
 Locate Backup and Sync in Apps Windows Settings
Alt: Backup and Sync from Google highlighted in the Apps & features list in Windows Settings.
Step 4: Click the “Uninstall” button and confirm your decision when prompted.
On Apple Mac:
Step 1: Open macOS “Finder” and click on “Applications” in the sidebar.
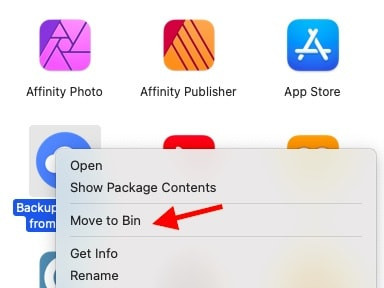
Step 2: Locate the “Backup and Sync” app icon. Drag the icon to the “Trash” or “Bin” icon in the Dock. Alternatively, you can right-click (or two-finger tap) the app icon and select “Move to Trash”.
 Move Backup and Sync to Trash on Mac
Alt: Backup and Sync app icon being dragged to the Trash icon on macOS Dock.
Step 3: To complete the uninstallation, click on the “Trash” or “Bin” icon in the Dock and select “Empty Trash”.
 Empty Trash on Mac to Uninstall App
Alt: Empty Trash option highlighted in the macOS Trash menu.
Solution 5: Disable Photo Upload and Sync within Preferences
For granular control over what gets synced, you can adjust the Backup and Sync preferences to specifically prevent photos from uploading to Google Photos. This allows you to keep the application running for other Google Drive syncing purposes while ensuring your photos are not automatically uploaded. This method is ideal for users who want to manage specific folder syncing and exclude photos.
On Windows PC:
Step 1: Click the Backup and Sync app icon in the taskbar, select the ellipses menu, and choose “Preferences”.
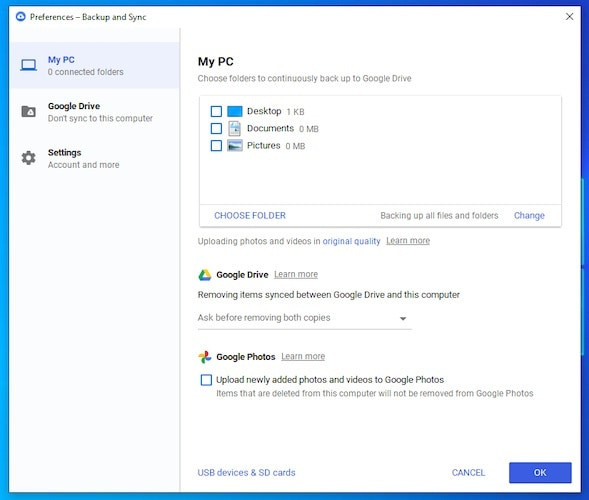
Step 2: In the Preferences window, under “My PC”, uncheck “Pictures” and any other relevant folders you don’t want to sync photos from. Additionally, under “Google Photos”, uncheck “Upload newly added photos”.
 Deselect Photos Sync in Backup and Sync Preferences Windows
Alt: Pictures folder and Upload newly added photos options unchecked in Google Backup and Sync preferences on Windows.
On Apple Mac:
Step 1: Click the Backup and Sync app icon in the macOS menu bar, select the ellipses menu, and choose “Preferences”.
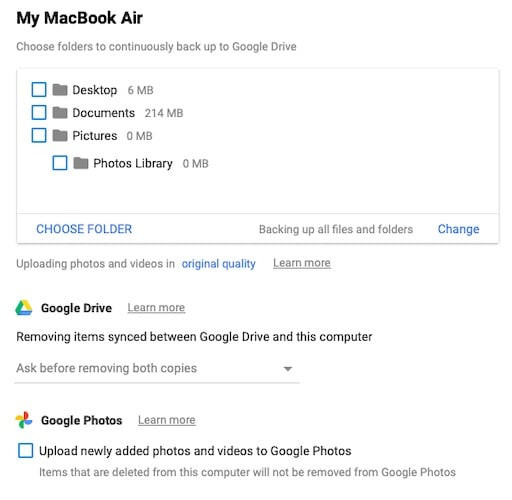
Step 2: Uncheck “Pictures”, “Photo Library”, and any other relevant folders under “Choose folders to sync from My Mac”. Also, uncheck the option to “Upload newly added photos to Google Photos” under “Google Photos”.
 Deselect Photo Library Sync in Backup and Sync Preferences Mac
Alt: Photo Library and Upload newly added photos options deselected in Google Backup and Sync preferences on macOS.
By unchecking these options, you effectively stop Google Photos upload from your chosen folders while still utilizing Backup and Sync for other files if needed.
Choose the method that best suits your needs to manage your Google Photos syncing effectively. Whether you need a temporary pause or a permanent stop, these solutions provide you with the control you need over your photo backups.