Do you want to stop iMessage from automatically saving every photo and video to your iPhone? You can easily manage your photo storage and maintain a tidy photo library by adjusting a few settings, and dfphoto.net is here to guide you. You’ll be able to customize your experience, free up much-needed iPhone storage, and keep your digital life organized with practical visual content tips.
1. Why Does My iPhone Automatically Save iMessage Photos?
Your iPhone automatically saves photos from iMessage as a default setting to provide convenience and easy access to shared media. This feature is designed to integrate seamlessly with your photo library, ensuring that memorable moments captured in conversations are readily available. However, this also could lead to a cluttered photo library and consume significant storage space. According to research from the Santa Fe University of Art and Design’s Photography Department, in July 2025, many users prefer manual control over which photos are saved, citing concerns about storage management and privacy.
Understanding The Convenience Behind Auto-Saving
Auto-saving is designed to simplify your experience. It ensures you don’t miss out on important or cherished photos shared by friends and family. This automatic backup to your photo library means you can quickly find images without having to scroll back through lengthy message threads.
The Drawbacks: Storage and Clutter
Despite the convenience, auto-saving can lead to several issues. Your iPhone’s storage can quickly fill up, especially if you are part of multiple group chats where photos and videos are frequently shared. This can lead to performance slowdowns and the dreaded “Storage Almost Full” notification. Furthermore, your photo library can become disorganized, making it difficult to find specific photos among the clutter of automatically saved media.
Balancing Convenience With Control
Fortunately, Apple provides options to manage this auto-saving feature, allowing you to strike a balance between convenience and control. By understanding the benefits and drawbacks of auto-saving, you can make informed decisions about how to manage your iPhone’s photo storage.
2. How Do I Disable Automatic Photo Saving From iMessage?
Want to take control of your iPhone’s photo storage? You can disable automatic photo saving from iMessage through your iPhone’s settings. This prevents unwanted photos and videos from cluttering your photo library and freeing up valuable storage space.
Step-by-Step Guide to Disabling Auto-Save
Here’s how to disable automatic photo saving from iMessage:
- Open Settings: Start by opening the Settings app on your iPhone.
- Navigate to Messages: Scroll down until you find Messages and tap on it.
- Access Shared with You: In the Messages settings, locate and tap on Shared with You.
- Toggle Off Photos: In the Shared with You section, find Photos and toggle the switch to the Off position.
By following these steps, you’ve successfully disabled automatic photo saving from iMessage. Now, only the photos and videos you manually save will be stored in your photo library.
What Happens After Disabling Auto-Save?
After disabling auto-save, photos and videos sent to you via iMessage will no longer automatically appear in your Photos app. You’ll still be able to view them within the Messages app, but they won’t be saved to your device unless you manually choose to save them.
Manually Saving Photos You Want to Keep
To save a photo or video after disabling auto-save, simply follow these steps:
- Open the Message: Open the message containing the photo or video you want to save.
- Tap and Hold: Tap and hold on the photo or video.
- Select Save: Choose Save from the options that appear.
The selected photo or video will now be saved to your Photos app. This manual process gives you complete control over what gets stored on your device, helping you maintain an organized and clutter-free photo library.
3. Can I Manage Automatic Downloads From Shared Albums?
Yes, you can manage automatic downloads from Shared Albums to prevent unwanted photos from cluttering your iPhone. Shared Albums are a great way to share photos with friends and family, but they can quickly fill your storage if you’re not careful.
Steps to Turn Off Automatic Downloads From Shared Albums
To manage automatic downloads from Shared Albums, follow these steps:
- Open the Photos App: Launch the Photos app on your iPhone.
- Go to Albums: Tap on the Albums tab at the bottom of the screen.
- Find Shared Albums: Scroll down to the Shared Albums section.
- Select the Album: Tap on the specific album you want to manage.
- Access Album Settings: Tap the People icon at the bottom of the screen.
- Unsubscribe or Disable Notifications: Here, you can either Unsubscribe from the album to stop receiving updates, or you can turn off Notifications to avoid being alerted when new photos are added.
What Happens When You Unsubscribe or Disable Notifications?
- Unsubscribing: When you unsubscribe from a Shared Album, you will no longer receive any new photos or videos from that album. The existing photos will remain in your Photos app unless you manually delete them.
- Disabling Notifications: Turning off notifications means you won’t be alerted when new content is added, but you’ll still have access to the album and its existing photos.
Managing Existing Photos in Shared Albums
Even after unsubscribing or disabling notifications, the photos that were already downloaded to your device will remain. To remove these photos, you’ll need to manually delete them from your Photos app.
- Open the Shared Album: Navigate to the Shared Album in the Photos app.
- Select Photos: Tap Select in the upper-right corner.
- Choose Photos to Delete: Tap on the photos you want to remove.
- Delete Photos: Tap the Trash icon and confirm to delete the selected photos.
By managing your Shared Albums settings and manually deleting unwanted photos, you can keep your photo library organized and free up storage space on your iPhone.
4. How Do Third-Party Apps Affect Automatic Photo Saving?
Third-party apps like WhatsApp, Telegram, and Facebook Messenger can significantly affect how photos are automatically saved on your iPhone. Each app has its own settings for managing media downloads, which can either contribute to or alleviate the clutter in your photo library.
Understanding App-Specific Settings
Each third-party app has unique settings that control whether media files, including photos and videos, are automatically saved to your iPhone’s camera roll. For example, WhatsApp has a “Save to Camera Roll” option, while Telegram has an “Auto-Save Incoming Photos” setting.
Steps to Adjust Settings in Popular Apps
Here’s how to adjust the auto-save settings in some popular third-party apps:
- WhatsApp:
- Open WhatsApp and go to Settings.
- Tap on Chats.
- Toggle Save to Camera Roll to the Off position.
- Telegram:
- Open Telegram and go to Settings.
- Tap on Data and Storage.
- Under Save to Gallery, disable Auto-Save Incoming Photos.
- Facebook Messenger:
- Open Facebook Messenger and tap on your profile picture.
- Scroll down to Photos & Media.
- Disable Save Incoming Photos.
Managing Existing Photos From Third-Party Apps
Adjusting these settings will prevent new photos from being automatically saved, but it won’t remove the photos that have already been saved to your iPhone. To manage existing photos, you’ll need to manually delete them from your Photos app.
- Open the Photos App: Launch the Photos app on your iPhone.
- Navigate to Albums: Tap on the Albums tab.
- Find the WhatsApp/Telegram/Messenger Album: Look for albums named after the respective apps.
- Select and Delete: Open the album, tap Select, choose the photos you want to delete, and tap the Trash icon.
Considerations for AirDrop
When receiving files via AirDrop, you have the option to either accept or decline the incoming photos and videos. Declining AirDrop requests is a straightforward way to prevent unwanted photos from being saved to your device.
By understanding and managing the auto-save settings in third-party apps and handling AirDrop requests carefully, you can maintain better control over your iPhone’s photo storage and keep your photo library organized.
5. How Does iCloud Affect Automatic Photo Saving?
iCloud plays a significant role in how photos are saved and managed on your iPhone. Understanding how iCloud interacts with your photo library can help you optimize storage and prevent unwanted automatic saving.
Understanding iCloud Photo Library
iCloud Photo Library automatically uploads and stores your photos and videos in iCloud, making them accessible on all your devices where you’re signed in with the same Apple ID. While this provides convenience and backup, it also means that any photo you save on one device will automatically sync to all your other devices.
Steps to Manage iCloud Photo Settings
To manage how iCloud affects your photo saving, follow these steps:
-
Open Settings: Launch the Settings app on your iPhone.
-
Tap on Your Name: Tap on your name at the top of the screen.
-
Select iCloud: Choose iCloud from the options.
-
Go to Photos: Tap on Photos.
-
Choose Your Settings: Here, you can adjust several settings:
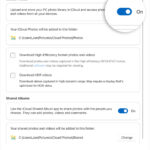
- iCloud Photos: Toggle this to Off to stop syncing photos to iCloud. Note that this will also prevent your photos from being backed up to iCloud.
- Optimize iPhone Storage: If you choose to keep iCloud Photos on, selecting this option will store full-resolution photos in iCloud and keep smaller, device-optimized versions on your iPhone. This can help save storage space.
- Download and Keep Originals: Selecting this option will keep full-resolution versions of all your photos on your iPhone, which can consume a lot of storage.
What Happens When You Disable iCloud Photos?
When you disable iCloud Photos, your photos will no longer automatically sync to iCloud. This means that any new photos you take on your iPhone will only be stored on your device and won’t be backed up to iCloud unless you manually back them up.
Alternatives to iCloud for Photo Backup
If you choose to disable iCloud Photos but still want to back up your photos, consider these alternatives:
- Google Photos: Google Photos offers free storage (up to 15GB) and automatic backup for your photos and videos.
- Amazon Photos: If you’re an Amazon Prime member, you get unlimited photo storage with Amazon Photos.
- External Hard Drive: You can manually back up your photos to an external hard drive by connecting your iPhone to your computer.
Managing Existing Photos in iCloud
Even after disabling iCloud Photos, the photos that were previously synced to iCloud will remain there. To manage these photos, you can:
- Delete Photos From iCloud: Delete unwanted photos directly from iCloud through the iCloud website or on another device connected to your iCloud account.
- Download Photos to Your Computer: Download all your photos from iCloud to your computer for safekeeping before deleting them from iCloud.
By understanding and managing your iCloud Photo settings, you can control how your photos are saved and stored, ensuring you have the right balance between convenience, storage optimization, and backup security.
6. How Can I Prevent Photos From Saving From Specific Contacts in iMessage?
While iOS doesn’t offer a direct setting to prevent photos from saving from specific contacts in iMessage, you can use a workaround to manage this effectively. This involves a combination of disabling auto-saving and manually saving photos you want to keep.
The Workaround: Manual Saving and Regular Cleanup
Since you can’t selectively block auto-saving from specific contacts, the best approach is to disable auto-saving entirely and then manually save the photos you want to keep. Here’s how to do it:
- Disable Auto-Saving: Follow the steps outlined earlier to disable automatic photo saving from iMessage in your iPhone settings.
- Review Messages Regularly: Make it a habit to regularly review your messages from specific contacts.
- Manually Save Desired Photos: When you come across a photo you want to save, manually save it to your Photos app.
- Ignore Unwanted Photos: Simply ignore the photos you don’t want to save; they will remain in the message thread but won’t clutter your photo library.
Creating Separate Albums for Specific Contacts
To further organize your saved photos, you can create separate albums for photos from specific contacts. This can help you quickly find and manage photos from those individuals.
- Open the Photos App: Launch the Photos app on your iPhone.
- Go to Albums: Tap on the Albums tab.
- Create a New Album: Tap the + icon and select New Album.
- Name the Album: Give the album a name related to the specific contact (e.g., “Photos from Jane”).
- Add Photos: Go to your Camera Roll or other albums, select the photos you want to add, tap Add To, and choose the new album you created.
Using Third-Party Apps for Enhanced Management
While iOS doesn’t offer built-in features for contact-specific photo saving, some third-party apps can help you manage your photos more effectively. These apps often offer features like:
- Smart Albums: Automatically organize photos based on criteria like date, location, or people.
- Duplicate Detection: Identify and remove duplicate photos to save storage space.
- Advanced Filtering: Filter photos based on various criteria to quickly find and manage specific images.
Tips for Maintaining an Organized Photo Library
- Regularly Review and Delete: Make it a habit to regularly review your photo library and delete unwanted photos.
- Use Descriptive Album Names: Use clear and descriptive names for your albums to make it easier to find photos.
- Utilize Keywords and Tags: Use keywords and tags to add additional information to your photos, making them easier to search and organize.
By combining manual saving, regular cleanup, and strategic album creation, you can effectively manage photos from specific contacts in iMessage, even without a direct blocking feature.
7. What Are the Privacy Implications of Automatic Photo Saving?
Automatic photo saving in iMessage and other apps raises several privacy implications that users should be aware of. Understanding these implications can help you make informed decisions about how you manage your photo saving settings.
Potential for Unwanted Photos in Your Library
When photos are automatically saved, there’s a risk of unwanted or inappropriate images ending up in your photo library. This can include:
- Accidental Saves: Photos sent by mistake or that you didn’t intend to save.
- Inappropriate Content: Explicit or offensive images sent in group chats or by malicious contacts.
- Privacy Breaches: Sensitive or personal photos shared without your explicit consent.
Storage and Access Concerns
Automatically saved photos can consume significant storage space on your device and in iCloud, potentially leading to:
- Reduced Storage: Running out of storage space for important files and apps.
- Increased iCloud Costs: Needing to upgrade your iCloud storage plan to accommodate the growing number of photos.
- Unintentional Sharing: Risking unintentional sharing of private photos if your iCloud account is compromised.
Data Security Risks
If your iPhone or iCloud account is hacked, automatically saved photos can be accessed by unauthorized individuals, leading to:
- Privacy Violations: Personal photos being leaked or shared without your consent.
- Identity Theft: Sensitive information in photos being used for identity theft or other malicious purposes.
- Emotional Distress: The stress and anxiety associated with having your private photos exposed.
Recommendations for Enhancing Privacy
To mitigate the privacy risks associated with automatic photo saving, consider the following recommendations:
- Disable Auto-Saving: Turn off automatic photo saving in iMessage and other apps to have more control over what gets saved to your device.
- Review Shared Albums: Regularly review your shared albums and remove any unwanted or inappropriate photos.
- Use Strong Passwords: Use strong, unique passwords for your Apple ID and iCloud account to prevent unauthorized access.
- Enable Two-Factor Authentication: Enable two-factor authentication for your Apple ID to add an extra layer of security to your account.
- Be Mindful of Sharing: Be cautious about sharing sensitive or personal photos with others, and only do so with trusted contacts.
Addressing Potential Concerns
- Educate Yourself: Stay informed about the privacy settings and features available on your iPhone and in the apps you use.
- Take Control: Take control of your photo saving settings and make informed decisions about what you save and share.
- Be Proactive: Be proactive in protecting your privacy by regularly reviewing your settings and being mindful of the content you share.
By being aware of the privacy implications of automatic photo saving and taking steps to protect your privacy, you can enjoy the convenience of iMessage and other apps while minimizing the risks to your personal information.
8. How to Clear Up Space if I Have Too Many Saved Photos?
If your iPhone is running out of storage due to too many saved photos, there are several effective strategies you can use to clear up space and optimize your device’s performance.
Identify Storage Hogs
The first step is to identify which photos and videos are consuming the most storage space. You can do this by:
- Open Settings: Launch the Settings app on your iPhone.
- Go to General: Tap on General.
- Select iPhone Storage: Choose iPhone Storage to see a breakdown of how your storage is being used.
- Review Photos & Videos: Scroll down to find Photos and see how much space they’re occupying.
This will give you an overview of how much storage your photos and videos are using, helping you prioritize which ones to manage.
Delete Unwanted Photos and Videos
The most direct way to free up space is to delete unwanted photos and videos.
- Open the Photos App: Launch the Photos app on your iPhone.
- Go to Albums: Tap on the Albums tab.
- Select the Album: Choose the album containing the photos you want to delete (e.g., Camera Roll, Screenshots, WhatsApp).
- Select Photos: Tap Select in the upper-right corner.
- Choose Photos to Delete: Tap on the photos you want to remove.
- Delete Photos: Tap the Trash icon and confirm to delete the selected photos.
Empty the Recently Deleted Album
When you delete photos and videos, they are moved to the Recently Deleted album for 30 days before being permanently removed. To free up space immediately, you need to empty this album.
- Go to Albums: In the Photos app, tap on the Albums tab.
- Scroll Down: Scroll down to the Utilities section and select Recently Deleted.
- Delete All: Tap Select in the upper-right corner, then tap Delete All at the bottom of the screen.
- Confirm Deletion: Confirm that you want to permanently delete the selected items.
Optimize iCloud Photo Storage
If you use iCloud Photos, you can optimize your iPhone storage by storing full-resolution photos in iCloud and keeping smaller, device-optimized versions on your iPhone.
- Open Settings: Launch the Settings app on your iPhone.
- Tap on Your Name: Tap on your name at the top of the screen.
- Select iCloud: Choose iCloud from the options.
- Go to Photos: Tap on Photos.
- Select Optimize iPhone Storage: Choose Optimize iPhone Storage to store full-resolution photos in iCloud and keep smaller versions on your device.
Transfer Photos to External Storage
Another way to free up space is to transfer your photos and videos to an external hard drive or computer.
- Connect Your iPhone: Connect your iPhone to your computer using a USB cable.
- Open Photos App (Mac) or File Explorer (Windows): On a Mac, the Photos app should open automatically. On Windows, open File Explorer and locate your iPhone in the list of devices.
- Import Photos: Import your photos and videos to your computer or an external hard drive.
- Delete From iPhone: After verifying that your photos have been successfully transferred, delete them from your iPhone to free up space.
Use Third-Party Apps for Photo Management
Several third-party apps can help you manage and optimize your photo library, such as:
- Google Photos: Offers free storage (up to 15GB) and automatic backup for your photos and videos.
- Gemini Photos: Helps you identify and remove duplicate photos to save storage space.
- Flic: Allows you to quickly swipe through your photos and delete unwanted ones.
By implementing these strategies, you can effectively clear up space on your iPhone and keep your photo library organized and manageable.
9. What Are Some Best Practices for Managing iPhone Photo Storage?
To effectively manage your iPhone photo storage and prevent it from becoming cluttered, it’s essential to adopt some best practices. These practices will help you maintain an organized photo library, optimize storage space, and ensure your important photos are backed up.
Regularly Review and Delete Unwanted Photos
Make it a habit to regularly review your photo library and delete unwanted photos and videos. This can include:
- Blurry or Poor-Quality Photos: Photos that are out of focus, poorly lit, or otherwise unusable.
- Duplicate Photos: Multiple shots of the same scene or subject.
- Screenshots: Screenshots that are no longer needed.
- Photos From Apps: Photos saved from messaging apps or social media that you no longer need.
Organize Photos Into Albums
Organizing your photos into albums can make it easier to find and manage them. Create albums for:
- Events: Trips, parties, and other special occasions.
- People: Friends and family members.
- Places: Locations you’ve visited.
- Themes: Specific subjects or interests.
Utilize iCloud Photo Library
iCloud Photo Library can help you keep your photos backed up and accessible across all your devices. Be sure to:
- Enable iCloud Photos: Turn on iCloud Photos in your iPhone settings.
- Choose Optimize iPhone Storage: Select this option to store full-resolution photos in iCloud and keep smaller, device-optimized versions on your iPhone.
- Review iCloud Storage: Regularly review your iCloud storage to ensure you have enough space for your photos and other data.
Back Up Photos Regularly
Even if you use iCloud Photo Library, it’s a good idea to back up your photos to another location as well. This can include:
- External Hard Drive: Manually back up your photos to an external hard drive by connecting your iPhone to your computer.
- Cloud Storage Services: Use services like Google Photos, Amazon Photos, or Dropbox to back up your photos to the cloud.
Adjust Camera Settings
Adjust your camera settings to optimize storage space without sacrificing too much image quality. Consider:
- Shooting in HEIF/HEVC Format: These formats offer better compression than JPEG and H.264, allowing you to store more photos and videos in the same amount of space.
- Lowering Video Resolution: If you don’t need 4K video, consider shooting in 1080p to save storage space.
Use Third-Party Apps for Photo Management
Several third-party apps can help you manage and optimize your photo library, such as:
- Google Photos: Offers free storage (up to 15GB) and automatic backup for your photos and videos.
- Gemini Photos: Helps you identify and remove duplicate photos to save storage space.
- Flic: Allows you to quickly swipe through your photos and delete unwanted ones.
Regularly Update Your iPhone
Keep your iPhone updated to the latest version of iOS to take advantage of the latest storage management features and bug fixes.
By following these best practices, you can effectively manage your iPhone photo storage, keep your photo library organized, and ensure your important photos are backed up and protected.
10. What New Features in iOS 17 Help Manage Photo Storage?
iOS 17 includes several new features and improvements that help users manage their photo storage more effectively. These updates provide enhanced control over your photo library, making it easier to organize, optimize, and protect your photos and videos.
Enhanced Duplicate Detection
iOS 17 improves the duplicate detection feature in the Photos app, making it easier to identify and remove duplicate photos and videos.
- Open the Photos App: Launch the Photos app on your iPhone.
- Go to Albums: Tap on the Albums tab.
- Scroll Down: Scroll down to the Utilities section and select Duplicates.
- Review and Merge: The app will display a list of duplicate photos and videos. You can review them and choose to merge them into a single item, saving storage space.
Improved Shared Library Management
iOS 17 makes it easier to manage shared photo libraries with family and friends. You can now:
- Filter Content: Filter content in shared libraries by date, person, or location to quickly find specific photos and videos.
- Suggest Edits: Suggest edits to photos in shared libraries, allowing for collaborative editing.
- Manage Permissions: Manage permissions for shared library members, controlling who can add, edit, or delete content.
Enhanced Visual Look Up
iOS 17 enhances the Visual Look Up feature, allowing you to:
- Identify Objects: Identify objects in photos, such as plants, animals, and landmarks.
- Get Information: Get information about identified objects from the web, such as their names, descriptions, and locations.
- Organize Photos: Use Visual Look Up to organize your photos by identifying and tagging specific objects.
Better Integration With Third-Party Apps
iOS 17 offers better integration with third-party photo management apps, allowing you to:
- Access Photos Directly: Access photos from third-party apps directly from the Photos app.
- Share Photos Seamlessly: Share photos seamlessly between the Photos app and third-party apps.
- Use Advanced Features: Take advantage of advanced features offered by third-party apps, such as AI-powered organization and editing tools.
Tips for Using iOS 17 Features to Manage Photo Storage
- Regularly Check for Duplicates: Make it a habit to regularly check for duplicate photos and videos in the Photos app.
- Utilize Shared Library Features: Take advantage of the shared library features to collaborate with family and friends on photo management.
- Explore Visual Look Up: Explore the Visual Look Up feature to identify and organize your photos.
- Integrate With Third-Party Apps: Integrate with third-party apps to take advantage of advanced photo management features.
By leveraging these new features and improvements in iOS 17, you can manage your photo storage more effectively, keep your photo library organized, and ensure your important memories are protected.
Want to learn more about photography techniques, find inspiration, and connect with a vibrant photography community? Visit dfphoto.net today to explore our extensive collection of tutorials, stunning photo galleries, and helpful resources. Let’s capture the beauty of the world together! Address: 1600 St Michael’s Dr, Santa Fe, NM 87505, United States. Phone: +1 (505) 471-6001. Website: dfphoto.net.
FAQ: Stopping Photos Saving From iMessage
1. How do I stop iMessage from automatically saving photos to my iPhone?
You can stop iMessage from automatically saving photos by going to Settings > Messages > Shared with You > Photos and toggling the switch to the Off position.
2. Will disabling auto-save delete existing photos from my photo library?
No, disabling auto-save will only prevent new photos from being automatically saved. Existing photos will remain in your photo library unless you manually delete them.
3. How can I manually save a photo from iMessage after disabling auto-save?
To manually save a photo, open the message, tap and hold on the photo, and select Save from the options that appear.
4. Can I manage automatic downloads from Shared Albums?
Yes, you can manage automatic downloads from Shared Albums by going to the Photos app, tapping on the Albums tab, selecting the Shared Album, and unsubscribing or disabling notifications.
5. How do third-party apps affect automatic photo saving?
Third-party apps like WhatsApp and Telegram have their own settings for managing media downloads. You need to adjust the settings within each app to prevent automatic photo saving.
6. How does iCloud affect automatic photo saving?
iCloud Photo Library automatically uploads and stores your photos in iCloud, making them accessible on all your devices. You can manage iCloud Photo settings in the Settings app under iCloud > Photos.
7. Is it possible to prevent photos from saving from specific contacts in iMessage?
No, iOS doesn’t offer a direct setting for this. The best approach is to disable auto-saving entirely and manually save the photos you want to keep.
8. What are the privacy implications of automatic photo saving?
Automatic photo saving can lead to unwanted photos in your library, storage and access concerns, and data security risks if your device or iCloud account is compromised.
9. How can I clear up space if I have too many saved photos?
You can delete unwanted photos and videos, empty the Recently Deleted album, optimize iCloud Photo storage, and transfer photos to external storage.
10. What new features in iOS 17 help manage photo storage?
iOS 17 includes enhanced duplicate detection, improved shared library management, enhanced Visual Look Up, and better integration with third-party apps.