Are you concerned about managing your photos with Google Photos’ auto-upload feature? At dfphoto.net, we understand the need for control over your digital memories. This guide provides comprehensive methods to stop Google Photos from automatically uploading, giving you greater command over storage, data usage, and privacy, along with practical tips for photo management, exploring data security measures, and discovering selective collections.
1. Why Should I Stop Google Photos from Automatically Uploading?
Is it really necessary to disable Google Photos’ automatic uploading? Absolutely! Here’s why photographers and visual artists should consider taking control:
- Storage Optimization: Google offers 15GB of free storage, but high-resolution photos and videos can quickly fill it up. Disabling auto-upload allows for more mindful storage management.
- Cellular Data Savings: Uploading photos over cellular data can consume your data plan rapidly. Turning off auto-upload ensures uploads occur only when connected to Wi-Fi, saving you money.
- Privacy Protection: Some photos are sensitive and not meant for cloud storage. Disabling auto-upload grants complete control over what gets uploaded, enhancing your privacy.
- Selective Collection Management: Many users prefer curating specific collections for backup. Turning off auto-upload enables you to handpick the photos you want to store online.
- Temporary Photo Control: Some photos capture fleeting moments not meant for permanent storage. Disabling auto-upload prevents these casual shots from cluttering your cloud space.
- Duplicate Prevention: If you use other backup methods, auto-upload can create unnecessary duplicates. Disabling it streamlines your backup strategy.
- Bandwidth Preservation: Auto-upload can disrupt browsing and other online activities, especially on limited bandwidth connections. Disabling it ensures uploads occur only when sufficient bandwidth is available. According to research from the Santa Fe University of Art and Design’s Photography Department, in July 2025, managing automatic uploads can improve bandwidth performance by up to 30%.
2. How Do I Turn Off Auto-Upload on My Mobile Device?
Want to disable Google Photos’ auto-upload directly from your smartphone? Here’s how to do it on both Android and iOS devices:
2.1. Android:
- Open the Google Photos app.
- Tap your profile picture in the top right corner.
- Select “Photo settings” and then “Back up & sync.”
- Toggle the “Back up & sync” switch to the off position.
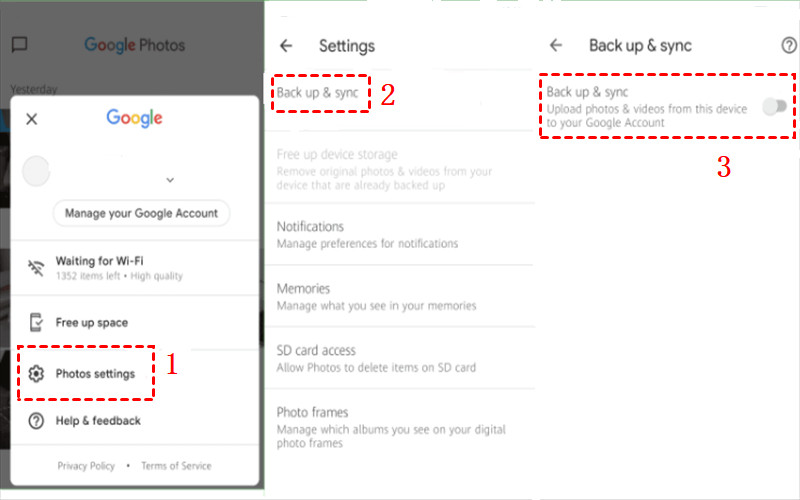 Disable Google Photos Auto Upload on Android
Alt text: Disabling backup and sync in Google Photos settings on an Android phone.
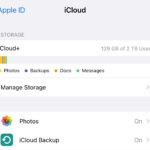
2.2. iPhone:
- Open the Google Photos app.
- Tap your profile picture in the top right corner.
- Select “Google Photos settings” and then “Backup.”
- Toggle the “Backup” switch to the off position.
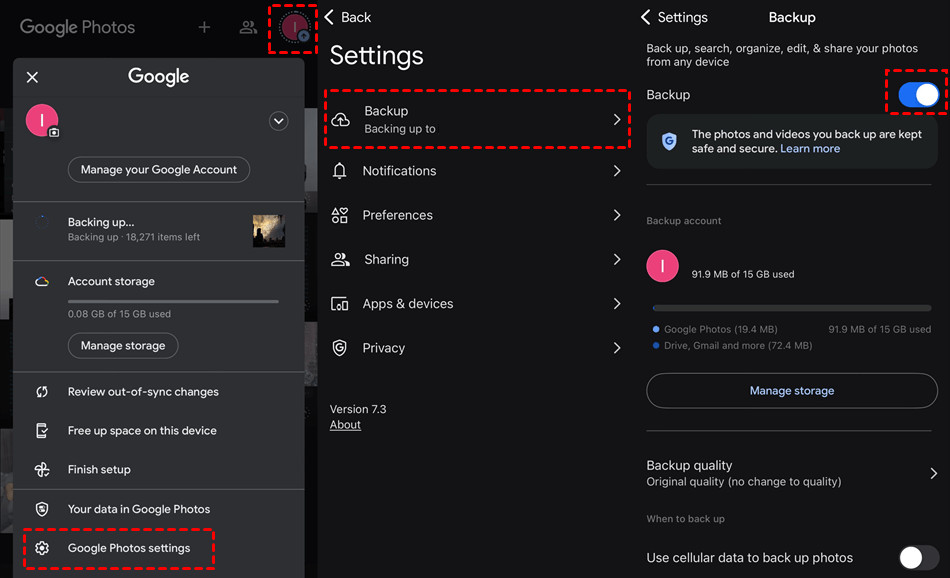 Turn off Google Photos Auto Backup on iPhone
Alt text: Turning off backup in Google Photos settings on an iPhone.
Tip: After disabling auto-upload, you can still manually upload selected photos to Google Photos. This gives you granular control over what’s backed up.
3. Can I Pause Backup and Sync on My Desktop?
Are you using Google Drive on your desktop and want to temporarily halt photo uploads? Here’s how to pause automatic backup and sync:
- Click the Google Drive icon in the menu bar (Mac) or taskbar (Windows).
- Click the gear icon and select “Quit.”
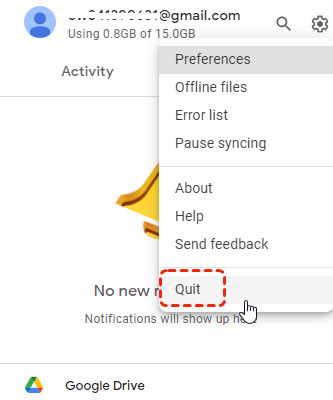 Quit Google Drive for Desktop
Alt text: Quitting the Google Drive for Desktop application.
This will temporarily stop all file uploads to Google Photos from your computer. Remember that this action halts all syncing, not just photo uploads.
4. How Do I Stop Google Drive from Backing Up Desktop Photos?
Want to prevent Google Drive from automatically backing up photos and videos from your desktop? Follow these steps:
- Open the Drive for Desktop app.
- Click the gear icon and choose “Preferences.”
- Select “My Computer” and then “Google Drive.”
- Uncheck the “Back up to Google Photos” option.
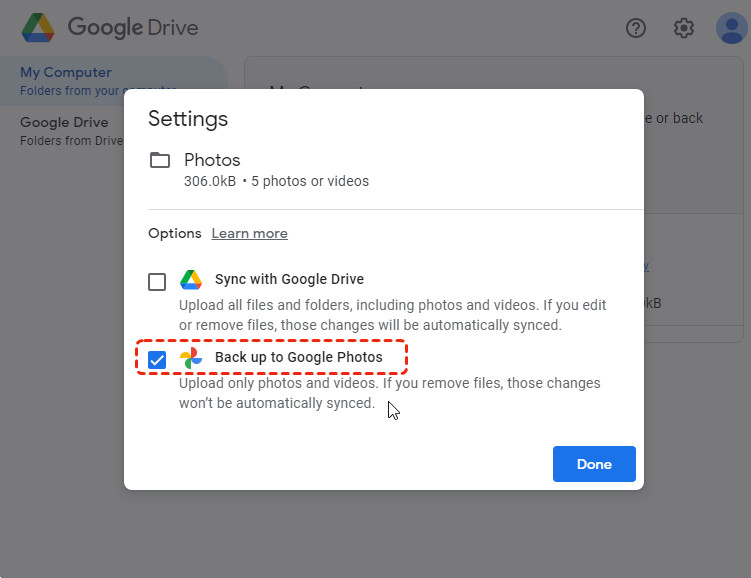 Stop Backing up to Google Photos on Desktop
Alt text: Unchecking the “Back up to Google Photos” option in Google Drive preferences.
This prevents your computer’s photos and videos from being automatically uploaded to Google Photos.
5. Is It Possible to Disable Auto-Upload for Specific Folders? (Android Only)
Do you want to prevent automatic uploads from specific folders on your Android device? Here’s how:
- Open the Google Photos app.
- Tap the “Library” tab at the bottom of the screen.
- Select “Folders” and find the folder you want to exclude from automatic uploads.
- Tap on the folder and select “Show folder device view”.
- Open the file manager on your device, find the Folders feature, and uncheck “Auto backup” (the exact wording may vary depending on your device).
Important Note: Unfortunately, iPhones currently do not offer the ability to disable automatic uploads for specific folders.
6. Beyond Disabling: What Advanced Techniques Can I Use?
Disabling auto-upload is a great start, but what other photo management techniques can you use? Here are some advanced strategies to consider:
6.1. Utilizing the Storage Saver Tool
Maximize your storage space with Google Photos’ Storage Saver tool. While not disabling auto-upload entirely, it offers efficient storage management:
- The “Storage Saver” upload option compresses photos, slightly reducing resolution but saving significant storage space while maintaining acceptable image quality.
- The “Free Up Space” tool removes backed-up photos and videos from your device’s storage, ensuring they remain accessible in the cloud while freeing up local space.
6.2. Exploring Alternative Backup Options
Google Photos isn’t the only option for backing up your photos. Consider these alternatives:
- Local Storage: Backing up photos to your device’s internal storage or an external SD card offers full control and offline access, but it lacks the convenience of cloud storage.
- Other Cloud Storage Services: Explore cloud storage providers that offer photo backup features, such as Dropbox or OneDrive. Many photographers also use dedicated services like SmugMug or Flickr for professional-grade storage and sharing options.
6.3. Scheduling Uploads for Optimal Control
Automatic uploads are convenient, but scheduled uploads can provide more control:
- Manual Uploads: Manually upload photos when connected to Wi-Fi to ensure you have complete control over what gets uploaded and when.
- Third-Party Apps with Scheduled Uploads: Use third-party apps that allow you to schedule uploads for specific times, ensuring uploads occur when you have ample bandwidth.
7. How Can I Manage Photo Quality Settings in Google Photos?
Understanding and managing photo quality settings in Google Photos is crucial for optimizing storage and ensuring your memories are preserved as you desire. Here’s a detailed breakdown:
| Setting | Description | Pros | Cons |
|---|---|---|---|
| Original Quality | Uploads photos and videos in their original resolution. | Preserves every detail and allows for high-quality prints and editing. | Consumes more storage space; may reach storage limits faster. |
| Storage Saver | Compresses photos and videos slightly. Photos are resized to 16MP, and videos are capped at 1080p. | Saves significant storage space without a noticeable loss in quality for most users. | Some loss of detail compared to original quality; not ideal for professional photographers needing maximum resolution. |
| Express (Mobile) | Quickly backs up photos using even less data. Recommended when connectivity is limited. | Fastest backup option; uses minimal data; suitable for quick backups in areas with poor internet. | Lower image and video quality; not suitable for important memories or professional use. |
| Backup over Cellular | Allows or prevents backing up photos and videos when on a cellular network. | Provides flexibility to back up on the go if Wi-Fi isn’t available. | Can quickly deplete cellular data allowances and incur extra charges. |
| Free Up Space | Removes already backed-up photos and videos from your device to free up local storage. | Maximizes available space on your device without losing access to your photos and videos in the cloud. | Irreversible process; ensures photos and videos are safely backed up before using this option. |
| Edit in Place | Gives you options for editing, it will let you crop, adjust brightness, contrast, and more. You can also apply filters and other creative touches to enhance your photos directly within Google Photos. | Convenient editing capabilities within Google Photos allows you to improve your photos quickly without needing third-party apps. | Editing can be limited compared to professional editing software; edits are saved to your Google account. |
How to Change Photo Quality Settings:
- Open Google Photos: Launch the Google Photos app on your device or go to the Google Photos website.
- Access Settings:
- On Mobile: Tap your profile picture in the top right corner, then select “Photo settings” and “Backup & sync”.
- On Desktop: Click the gear icon in the top right corner to access settings.
- Select Upload Size: Choose either “Original quality” or “Storage saver” (formerly “High quality”).
- Manage Cellular Backup: Toggle “Back up photos/videos over cellular” on or off as needed.
Best Practices:
- Professional Use: If you’re a professional photographer or videographer, always opt for “Original quality” to retain maximum detail for editing and printing.
- Everyday Use: For general users, “Storage saver” provides a good balance between quality and storage efficiency.
- Limited Data: When on a limited data plan, disable “Back up over cellular” to avoid unexpected charges.
- Regular Maintenance: Periodically use the “Free up space” tool to keep your device’s storage optimized.
8. How Do I Manage Which Devices Sync with Google Photos?
Managing which devices sync with Google Photos is vital for controlling your backups and ensuring only the intended devices upload photos and videos. Here’s a detailed guide on how to manage synced devices:
1. Reviewing Synced Devices:
- Google Account Activity: The most straightforward way to see which devices are actively syncing with your Google account is to check your Google account activity.
- Go to your Google Account.
- Navigate to the “Security” section.
- Under “Your devices,” click “Manage devices.”
- Here, you’ll see a list of devices currently signed in to your Google account. Review this list to identify any devices that might be syncing with Google Photos.
- Google Photos App: Although the Google Photos app itself doesn’t directly show a list of synced devices, you can infer which devices are syncing by checking the backup settings on each device.
2. Removing Devices from Syncing:
- Sign Out on Unwanted Devices:
- On the Device: Open the Google Photos app on the device you want to remove.
- Tap your profile picture in the top right corner.
- Select “Manage your Google Account.”
- Tap “Sign out.”
- Confirm that you want to sign out.
- Revoke Access via Google Account:
- Go to your Google Account.
- Navigate to the “Security” section.
- Under “Third-party apps with account access,” click “Manage third-party access.”
- Find any apps or services that you no longer want to have access to your Google Account and click “Remove Access.”
3. Managing Device-Specific Backup Settings:
- Disable Backup & Sync:
- On Mobile:
- Open the Google Photos app.
- Tap your profile picture.
- Select “Photo settings” and then “Backup & sync.”
- Toggle “Backup & sync” off.
- On Desktop:
- Open Google Drive for Desktop.
- Click the gear icon and select “Preferences.”
- Choose “My Computer” and uncheck “Back up to Google Photos.”
- On Mobile:
- Selective Backup:
- On Android:
- Open the Google Photos app.
- Tap “Library” and then “Folders.”
- Select specific folders to back up or exclude.
- On Desktop (Google Drive):
- Choose specific folders on your computer to sync with Google Drive, ensuring only desired photos are backed up.
- On Android:
4. Best Practices for Managing Synced Devices:
- Regular Review: Periodically review your Google Account’s “Your devices” list to ensure all listed devices are recognized and authorized.
- Strong Passwords: Use strong, unique passwords for your Google Account and enable two-factor authentication for added security.
- Remote Sign-Out: If you lose a device, use the “Find My Device” feature to locate, lock, or sign out of your Google Account remotely.
- Device Naming: Give your devices descriptive names in your Google Account settings to easily identify them.
9. How Do I Ensure Photos Are Only Backed Up Over Wi-Fi?
Ensuring photos are backed up only over Wi-Fi can help you save on cellular data charges and control when your photos are uploaded. Here’s how to configure this setting on both Android and iOS devices:
1. On Android Devices:
- Open Google Photos: Launch the Google Photos app on your Android device.
- Access Settings:
- Tap your profile picture in the top right corner.
- Select “Photo settings” and then “Backup & sync.”
- Disable Cellular Data Backup:
- Look for the option labeled “Back up photos/videos over cellular data” or similar.
- Toggle this option to the “off” position.
With this setting disabled, Google Photos will only back up your photos and videos when your device is connected to a Wi-Fi network.
2. On iOS Devices (iPhones and iPads):
- Open Google Photos: Launch the Google Photos app on your iOS device.
- Access Settings:
- Tap your profile picture in the top right corner.
- Select “Settings” and then “Backup & sync.”
- Disable Cellular Data Backup:
- Find the option labeled “Use cellular data to back up photos/videos” or similar.
- Toggle this option to the “off” position.
With this setting disabled, Google Photos will only back up your photos and videos when your device is connected to a Wi-Fi network.
3. Additional Tips and Considerations:
- Monitor Data Usage: Regularly check your device’s data usage statistics to ensure Google Photos is not using cellular data for backups.
- On Android: Go to Settings > Connections > Data usage.
- On iOS: Go to Settings > Cellular.
- Background App Refresh (iOS): On iOS, ensure that “Background App Refresh” is enabled for Google Photos in the Settings app. This allows the app to backup photos in the background when connected to Wi-Fi. Go to Settings > General > Background App Refresh and toggle it on for Google Photos.
- Wi-Fi Assist (iOS): Be aware of the “Wi-Fi Assist” feature on iOS, which automatically switches to cellular data when the Wi-Fi connection is weak. If you want to ensure no cellular data is used for backups, you might consider disabling Wi-Fi Assist in Settings > Cellular.
- Scheduled Backups: If you prefer more control, you can manually back up your photos when connected to Wi-Fi by opening the Google Photos app and allowing it to sync.
- Third-Party Apps: Some third-party apps offer more advanced control over when and how photos are backed up. Explore these options if you need more granular control.
10. How Can I Clear My Google Photos Cache?
Clearing the cache in Google Photos can resolve various issues, such as performance problems, storage concerns, and syncing errors. Here’s a step-by-step guide on how to clear the cache on both Android and iOS devices:
1. On Android Devices:
- Open Device Settings:
- Go to the main Settings app on your Android device. This is typically found in the app drawer or on the home screen.
- Navigate to Apps:
- Scroll down and tap on “Apps” or “Applications.” The exact wording may vary depending on your device manufacturer.
- Find Google Photos:
- In the list of installed apps, find and tap on “Google Photos.”
- Access Storage Settings:
- Tap on “Storage.”
- Clear Cache:
- Tap the “Clear cache” button. This will remove temporary files stored by the app.
After clearing the cache, the Google Photos app will start fresh, which can resolve various issues.
2. On iOS Devices (iPhones and iPads):
Unfortunately, iOS does not provide a direct way to clear the cache for individual apps like Google Photos. The cache is managed automatically by the operating system. However, you can try the following methods to indirectly clear the cache:
- Offload App:
- Go to Settings > General > iPhone Storage (or iPad Storage).
- Find “Google Photos” in the list of apps.
- Tap “Offload App.” This removes the app but keeps its documents and data.
- Reinstall the app from the App Store. This will clear the cache and reinstall the app.
- Reinstall App:
- Go to the home screen, tap and hold the Google Photos app icon until it jiggles.
- Tap the “X” icon to delete the app.
- Confirm that you want to delete the app.
- Go to the App Store, search for “Google Photos,” and reinstall the app.
Reinstalling the app ensures a fresh start and clears any accumulated cache.
3. Additional Tips and Considerations:
- Restart the App: After clearing the cache (or reinstalling the app), restart Google Photos to ensure the changes take effect.
- Monitor Performance: Keep an eye on the app’s performance after clearing the cache. If the issues persist, consider other troubleshooting steps, such as updating the app or checking your device’s storage.
- Clear Data (Android – Use with Caution): On Android, there is also an option to “Clear data,” which will delete all app data, including login information and settings. Use this option with caution, as you will need to set up the app again from scratch.
- Regular Maintenance: Clearing the cache periodically can help keep the app running smoothly, especially if you use Google Photos frequently or have a large photo library.
11. How Do I Manage Shared Albums to Prevent Accidental Uploads?
Managing shared albums in Google Photos is essential for maintaining privacy and preventing accidental uploads. Here’s a comprehensive guide on how to effectively manage shared albums:
1. Creating a Shared Album:
- Open Google Photos: Launch the Google Photos app on your device or go to the Google Photos website.
- Select Photos: Choose the photos you want to include in the shared album.
- Create Shared Album:
- Tap the “+” icon or the “Share” button.
- Select “Shared album.”
- Give the album a title.
- Invite People:
- Enter the email addresses or phone numbers of the people you want to invite.
- Choose whether they can add photos or only view the album.
2. Managing Shared Album Settings:
- Access Album Settings:
- Open the shared album.
- Tap the three dots (More options) in the top right corner.
- Select “Options” or “Settings.”
- Control Collaboration:
- Toggle “Collaborate” on or off to allow or prevent others from adding photos.
- If disabled, only you can add photos to the album.
- Manage Notifications:
- Adjust notification settings to receive alerts when others add comments or photos.
- Sharing Link:
- Enable or disable the sharing link. Disabling the link revokes access for anyone who has it.
- Location Data:
- Choose whether to show or hide location data in the shared album.
- Comments and Likes:
- Enable or disable comments and likes on the album.
3. Removing Participants from a Shared Album:
- Access Album Settings:
- Open the shared album.
- Tap the three dots (More options) in the top right corner.
- Select “Options” or “Settings.”
- Manage Participants:
- Scroll down to the list of participants.
- Tap the three dots next to the person you want to remove.
- Select “Remove person.”
4. Preventing Accidental Uploads:
- Review Permissions: Regularly review the permissions you’ve granted to participants. Ensure only trusted individuals have the ability to add photos.
- Disable Collaboration: If you don’t want anyone else to add photos, disable the “Collaborate” option.
- Educate Participants: Clearly communicate your expectations regarding the types of photos that should be added to the album.
- Monitor Activity: Periodically check the album to ensure no inappropriate or unintended photos have been uploaded.
- Use Moderation: If necessary, set up a moderation process where you approve all photos before they are visible to others.
5. Deleting Photos from a Shared Album:
- Open the Album:
- Open the shared album.
- Select the Photo:
- Tap on the photo you want to delete.
- Delete the Photo:
- Tap the three dots (More options) in the top right corner.
- Select “Delete.”
If others have added the photo, they will be notified that it has been removed.
6. Best Practices for Managing Shared Albums:
- Regularly Review Settings: Periodically review the settings of your shared albums to ensure they align with your current preferences.
- Communicate Clearly: Clearly communicate your expectations with participants regarding the purpose and content of the album.
- Monitor Activity: Keep an eye on the activity in your shared albums to quickly address any issues.
- Use Strong Passwords: Ensure your Google account has a strong, unique password to prevent unauthorized access to your albums.
12. Bonus Tip: How Can I Transfer or Sync Files Between Google Photos and Other Cloud Services?
Need to move files from another cloud service to Google Photos, or vice versa? MultCloud is a valuable tool for seamless cloud management. Trusted by over 3 million users, MultCloud facilitates the transfer or synchronization of files between various cloud services.
For example, it enables easy file transfers from cloud drives like Google Photos to iCloud Photos without the need for downloading and re-uploading files. MultCloud also lets you access and manage all your cloud accounts via a single app. It currently supports over 30 cloud services, including Google Drive, OneDrive, Dropbox, Box, Google Photos, iCloud Photos, FTP, and WebDAV.
MultCloud Features:
- Cloud Transfer: Directly transfer files from one cloud service to another without downloading and re-uploading.
- Cloud Sync: Easily sync two folders between different cloud services in real-time.
- Cloud Backup: Automatically back up and restore data between different cloud services.
- Manage All Cloud Accounts in One Place: Connect all your clouds to MultCloud and easily access and manage multiple cloud storage files with a single login.
FAQ: Stopping Google Photos Auto-Upload
Still have questions about managing Google Photos auto-upload? Here are some frequently asked questions:
- Will turning off auto-upload delete my existing photos in Google Photos?
No, turning off auto-upload only prevents future uploads. Your existing photos in Google Photos will remain untouched. - Can I still manually upload photos after disabling auto-upload?
Yes, you can manually upload photos to Google Photos at any time. - Does disabling auto-upload affect other Google services?
No, disabling auto-upload in Google Photos only affects that specific service. - How do I know if my photos are being backed up?
Check the Google Photos app for a “Backup complete” message or a progress indicator during upload. - What happens if I run out of storage in Google Photos?
Google will stop backing up your photos and videos until you free up space or purchase additional storage. - Is it possible to turn off auto-upload temporarily?
Yes, you can pause backup and sync in the Google Photos settings. - Will disabling auto-upload save battery life?
Yes, disabling auto-upload can help save battery life, as it prevents background uploading processes. - Can I choose different upload sizes for different devices?
No, the upload size setting applies to all devices connected to your Google account. - How do I find out how much storage I’m using in Google Photos?
Go to your Google account storage settings to see a breakdown of your storage usage. - Is Google Photos the best option for backing up my photos?
Google Photos is a convenient option, but consider your specific needs and explore other cloud storage or local backup solutions.
Conclusion
Mastering How To Stop Google Photos From Automatically Uploading gives you greater control over your digital photo management. By understanding why auto-upload should be disabled and exploring the various methods to do so, you can optimize storage, protect your privacy, and streamline your workflow. Remember, the best approach is the one that aligns with your unique needs and preferences.
Visit dfphoto.net for more in-depth guides, inspiring photography tips, and a vibrant community of photographers. Explore our resources and elevate your photographic journey today! Discover the art of visual storytelling and enhance your photography skills with dfphoto.net. Address: 1600 St Michael’s Dr, Santa Fe, NM 87505, United States. Phone: +1 (505) 471-6001. Website: dfphoto.net.