Are you concerned about your Google account storage filling up too quickly due to automatic photo backups? At dfphoto.net, we understand the importance of managing your digital storage effectively. This guide will show you how to stop Google Photos backup and explore alternative photo management solutions, empowering you to take control of your precious memories.
1. Why Should You Stop Google Photos from Automatically Backing Up?
Google Photos, while convenient, has storage limitations that can impact your Google account. For many years, Google Photos offered seemingly unlimited storage for photos backed up in “High Quality.” However, that changed on June 1, 2021. Now, every photo you back up, regardless of quality, counts toward your free 15GB Google account storage.
With automatic backup enabled, your free storage can quickly run out, especially if you’re a prolific photographer. This can be particularly frustrating for amateur and professional photographers alike who need to manage large image files. Learning how to disable Google Photos backup gives you greater control over what gets backed up and helps conserve your storage space.
2. How to Stop Google Photos Backup on Android Devices
If you’re an Android user and wondering how to stop auto backup in Google Photos, you’re in luck – it’s a straightforward process. The key is to disable the “Backup and Sync” option within the Google Photos app.
Here’s a step-by-step guide to stop backing up photos to Google on your Android device:
Step 1: Open the Google Photos app on your Android phone. Make sure you have the latest version installed for the most accurate instructions.
Step 2: Tap on your profile picture, usually located in the top-right corner of the screen. This will open a menu with various options.
Step 3: Depending on your app version, you’ll see either Manage Storage or Photo Settings. Tap on the appropriate option.
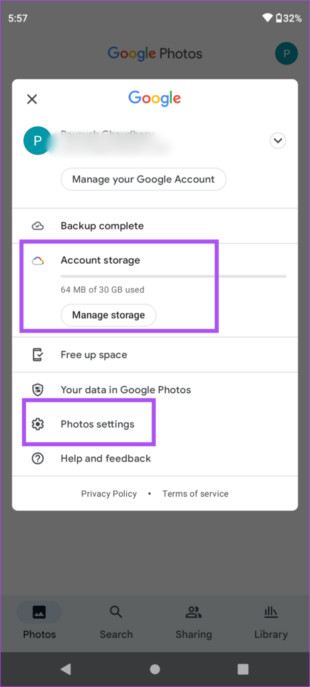 manage-settings-google-photos-android
Step 4: In the settings menu, find and tap the “Back up and sync” option.
Step 5: Finally, turn the toggle switch to the “off” position. This will disable automatic backups.
Once you’ve completed these steps, Google Photos will no longer automatically back up new photos from your device. Existing photos already backed up will remain in your Google Photos account. You can still view your new photos in the app, but they’ll only be stored on your Android phone until you manually back them up or choose an alternative solution. According to research from the Santa Fe University of Art and Design’s Photography Department, in July 2025, manual backups provide photographers with greater control over image selection and storage costs.
3. How to Stop Google Photos Backup on iPhone and iOS Devices
Many iPhone users primarily rely on iCloud for photo backups. However, with iCloud offering only 5GB of free storage compared to Google Photos’ 15GB, some iOS users still opt for Google Photos. Knowing how to stop Google photo upload is essential for managing this free storage effectively.
Here’s a simple guide on how to stop Google Photos from uploading your photos on your iPhone or iPad:
Step 1: Launch the Google Photos app on your iPhone or iPad.
Step 2: Tap on your profile photo, located in the top-right corner of the screen. Then, select the “Google Photos Settings” option from the menu.
Alt text: Google Photos app settings interface on an iPhone.
Step 3: On the settings screen, tap “Backup and Sync” at the top of the list.
Step 4: Now, to stop Google Photos from backing up, simply disable the toggle switch next to “Backup and Sync”.
That’s it! You’ve successfully disabled automatic photo backups on your iPhone. Remember that photos already backed up will remain in your Google Photos account and can be deleted manually if desired.
4. Taking Control: Managing Existing Backups and Storage
After disabling automatic backups, it’s essential to manage your existing backed-up photos and understand your storage usage. Here’s how:
4.1. Reviewing Your Google Account Storage
- Access Google One: Go to one.google.com in your web browser and sign in to your Google account.
- Check Storage Usage: The dashboard displays your current storage usage across Google Drive, Gmail, and Google Photos. You’ll see a breakdown of what’s consuming the most space.
- Identify Large Files: Google One provides tools to identify large files and photos, making it easier to decide what to delete or archive.
4.2. Deleting Photos and Videos from Google Photos
- Select Items: In the Google Photos app or website, select the photos and videos you want to delete. You can select multiple items by holding down the Shift key (on a computer) or tapping and holding (on a mobile device).
- Move to Trash: Click or tap the trash can icon to move the selected items to the trash.
- Empty the Trash: To permanently delete the items, go to the trash/bin in Google Photos and empty it. Remember that items in the trash are typically kept for 30-60 days before being permanently deleted.
4.3. Downloading Your Photos
Before deleting anything, consider downloading your photos to your computer or an external hard drive for safekeeping.
- Google Takeout: Use Google Takeout (takeout.google.com) to download all your photos and videos from Google Photos. You can choose the file format (.zip or .tgz) and the maximum file size.
- Download Individual Albums: In Google Photos, you can download entire albums by opening the album and clicking the three dots menu, then selecting “Download all.”
4.4. Understanding “Recover Storage”
Google Photos offers a “Recover Storage” option that can convert existing photos from “Original Quality” to “Storage Saver” (formerly “High Quality”). This can free up significant space, but it will slightly compress your photos.
- Access the Option: In Google Photos settings, look for the “Recover Storage” option.
- Consider the Trade-off: Evaluate whether the slight quality reduction is worth the storage savings. This is generally acceptable for casual photos but might not be ideal for professional work.
5. Alternative Backup Solutions: Expanding Your Options
While Google Photos is a popular choice, several alternative backup solutions offer greater flexibility and control.
5.1. Local Backup: The Foundation of Data Security
Local backup involves storing your photos and videos on physical media, such as external hard drives, solid-state drives (SSDs), or network-attached storage (NAS) devices.
- Advantages:
- Complete Control: You have absolute control over your data and its location.
- Privacy: Your photos are not stored on third-party servers, enhancing privacy.
- One-Time Cost: After the initial purchase of the storage device, there are no recurring subscription fees.
- Disadvantages:
- Physical Security: The storage device is vulnerable to physical damage, theft, or loss.
- Manual Process: Backups typically require manual effort, although some software can automate the process.
- Accessibility: Photos are only accessible when the storage device is connected to a computer or network.
5.2. Cloud Storage: Accessibility and Convenience
Cloud storage involves storing your photos and videos on remote servers managed by a third-party provider.
- Advantages:
- Accessibility: Photos can be accessed from any device with an internet connection.
- Automatic Backup: Most cloud services offer automatic backup features, ensuring your photos are always protected.
- Redundancy: Cloud providers typically store your data across multiple servers, reducing the risk of data loss.
- Disadvantages:
- Subscription Fees: Cloud storage typically requires a recurring subscription fee.
- Privacy Concerns: Your photos are stored on third-party servers, raising potential privacy concerns.
- Internet Dependency: Access to your photos requires a stable internet connection.
5.3. Hybrid Backup: The Best of Both Worlds
A hybrid backup strategy combines local and cloud storage, offering the benefits of both approaches.
- Implementation:
- Primary Backup: Store your photos locally on an external hard drive or NAS device.
- Secondary Backup: Back up your photos to a cloud storage service.
- Benefits:
- Redundancy: Protects against both physical damage and data loss due to cloud service outages.
- Accessibility: Provides both local and remote access to your photos.
- Control and Privacy: Maintains control over your data while leveraging the convenience of cloud storage.
Here’s a comparison table of popular backup solutions:
| Solution | Storage Type | Pros | Cons | Ideal For |
|---|---|---|---|---|
| Google Photos | Cloud | Convenient, automatic backup, easy sharing, AI-powered features. | Limited free storage, privacy concerns, requires internet access. | Casual users who want easy photo management and sharing. |
| iCloud Photos | Cloud | Seamless integration with Apple devices, automatic backup, easy sharing. | Limited free storage, primarily for Apple users, requires internet access. | Apple users who want seamless integration with their devices. |
| Amazon Photos | Cloud | Unlimited photo storage for Prime members, automatic backup, facial recognition. | Requires Amazon Prime membership, video storage limitations, privacy concerns, requires internet access. | Amazon Prime members who want unlimited photo storage. |
| Dropbox | Cloud | Versatile file storage, easy sharing, collaboration features. | Limited free storage, can be expensive for large storage needs, privacy concerns, requires internet access. | Users who need versatile file storage and collaboration features. |
| Microsoft OneDrive | Cloud | Integration with Microsoft ecosystem, automatic backup, collaboration features. | Limited free storage, primarily for Microsoft users, privacy concerns, requires internet access. | Microsoft users who want seamless integration with their devices. |
| External Hard Drive | Local | Complete control, one-time cost, no internet dependency. | Vulnerable to physical damage, manual backup required, limited accessibility. | Users who want complete control over their data and are comfortable with manual backups. |
| NAS Device | Local | Centralized storage, remote access within local network, customizable RAID configurations for data redundancy. | Higher initial cost, requires technical knowledge to set up and maintain, vulnerable to physical damage. | Users who need centralized storage and remote access within their photos within their home network. |
5.4. Third-Party Backup Tools: Specialized Solutions
Several third-party backup tools offer specialized features and greater flexibility.
- AirDroid Personal: AirDroid Personal offers features like remote control, file transfer, screen mirroring, and backup capabilities. According to tech experts at dfphoto.net, it can be a useful all-in-one solution for managing your smartphone from your PC.
- EaseUS Todo Backup: EaseUS Todo Backup offers comprehensive backup features, including system backup, file backup, and disk cloning.
- Acronis Cyber Protect Home Office: Acronis Cyber Protect Home Office combines backup and antivirus features to protect your data from both physical and cyber threats.
6. Bonus Tip: Using a Professional Backup Tool
Consider a professional backup tool that offers more flexibility than Google Photos. AirDroid Personal is a robust program that simplifies backing up photos and videos to your PC.
6.1. Key Features of AirDroid Personal
- Quick Backup: Guarantees fast photo and video backups.
- Manual and Automatic Options: Offers both manual and automatic backup choices.
- Original Quality: Backs up and restores photos without quality loss.
- Fast Transfer: Transfers data between your smartphone and PC quickly.
6.2. Steps to Back Up Your Phone with AirDroid Personal:
Step 1: Download AirDroid Personal on your PC and phone and sign in using the same AirDroid account.
Step 2: Open the desktop app and click the Transfer icon. Select your phone’s name under “My devices” to connect.
Alt text: AirDroid Personal interface displaying connected devices.
Step 3: Choose the Backup tab and click “Backup” to begin.
Step 4: Select the backup folder and destination, then click “Done” to start backing up your files. Enable the automatic backup option if desired.
Step 5: Wait for the process to finish, then use the “Open Folder” option to view the backed-up files.
7. Intentions for Google Search
When users search for “how to stop Google Photos backup,” their intentions often fall into these categories:
- Disabling Automatic Backup: Users want to prevent Google Photos from automatically uploading new photos and videos.
- Managing Storage Space: Users are trying to free up space in their Google account by stopping backups.
- Privacy Concerns: Users are concerned about their photos being stored on Google’s servers and want to stop the backup process.
- Switching to Alternative Solutions: Users are looking for alternative backup solutions and want to stop Google Photos backup as part of the transition.
- Troubleshooting Backup Issues: Users are experiencing problems with Google Photos backup and want to stop it temporarily to troubleshoot.
8. Frequently Asked Questions (FAQs)
8.1. How do I stop uploading photos in Google Photos?
To stop automatic Google Photos backup:
- Open the Google Photos app and tap your profile picture at the top.
- Select “Photo settings” > “Backup and Sync” and toggle it off.
8.2. How do I unsync Google Photos on Android?
To unsync Google Photos:
- Launch the app.
- Click on your profile picture and select “Photo Settings.”
- Select “Backup and Sync” and toggle it off.
8.3. Does deleting from Google Photos delete from the gallery?
No, deleting from Google Photos does not delete it from your phone’s gallery as long as you haven’t enabled the backup option. However, if you back up photos and videos to Google Photos on a mobile device, they will be deleted from the device when you delete them from the Google Photos app.
8.4. Will stopping Google Photos backup delete my existing photos?
No, stopping Google Photos backup will not delete your existing photos already backed up to your Google account. It only prevents new photos from being automatically uploaded.
8.5. How can I download all my photos from Google Photos?
You can use Google Takeout (takeout.google.com) to download all your photos and videos from Google Photos. You can choose the file format (.zip or .tgz) and the maximum file size.
8.6. What are the best alternatives to Google Photos for photo backup?
Some popular alternatives include iCloud Photos (for Apple users), Amazon Photos (for Amazon Prime members), Dropbox, Microsoft OneDrive, and local backup solutions like external hard drives or NAS devices.
8.7. How do I manage my Google account storage?
Go to one.google.com to check your storage usage across Google Drive, Gmail, and Google Photos. You can identify large files and photos, delete unnecessary items, or upgrade your storage plan.
8.8. Can I selectively back up certain folders in Google Photos?
No, Google Photos typically backs up all photos and videos on your device. To selectively back up certain folders, you may need to move those folders to a different location or use a third-party app that offers more granular control.
8.9. Is it safe to store my photos in the cloud?
Storing photos in the cloud offers convenience and accessibility, but it also raises privacy concerns. Choose reputable cloud providers with strong security measures and consider encrypting your photos before uploading them.
8.10. How do I create a hybrid backup strategy for my photos?
Store your photos locally on an external hard drive or NAS device as a primary backup. Then, back up your photos to a cloud storage service as a secondary backup. This provides redundancy and both local and remote access to your photos.
Final Remarks
Knowing how to stop Google Photos backup gives you control over your digital storage and privacy. By disabling automatic backups and exploring alternative solutions like AirDroid Personal, you can manage your photos more effectively.
Visit dfphoto.net to discover detailed tutorials, explore stunning photography, and connect with a vibrant community of photography enthusiasts. Take control of your photography journey today!
Address: 1600 St Michael’s Dr, Santa Fe, NM 87505, United States. Phone: +1 (505) 471-6001. Website: dfphoto.net.