Attaching your photo correctly is crucial when submitting your passport application, and dfphoto.net is here to help you navigate this process. Securing your photograph properly to your passport application ensures a smooth and efficient renewal process. With attention to detail and adherence to guidelines, we can help you avoid common errors and potential delays. Let’s explore the details of photo placement, staple usage, and other important considerations to guarantee your application meets all requirements.
1. Understanding the Necessity of Stapling Your Passport Photo
Is it really necessary to staple that photo? Absolutely, if you’re renewing your passport by mail. The U.S. Department of State explicitly requires that you attach your photo to the application form. This requirement ensures that your photo is securely linked to your application throughout the processing period. However, if you’re applying for your first passport in person, leave the stapling to the passport agent at the acceptance facility. They are trained to handle this step correctly.
It’s vital to distinguish between renewal by mail and in-person applications. For mail-in renewals, you are responsible for correctly attaching the photo. For in-person first-time applications, the agent will take care of it. Failing to follow these guidelines can lead to rejection of your application, causing delays and frustration. Understanding this distinction is the first step to a successful passport application process.
To further clarify, the method of attachment is just as important as the photo itself. Using staples, as opposed to tape or glue, is the only approved method for securing your photo. This adherence to specific guidelines helps maintain the integrity of the application process and prevents potential issues during processing.
2. Key Guidelines for Attaching Your Passport Photo
To ensure your passport photo is correctly attached, here are the most important things to remember:
- How to affix passport photos: Use four staples, placing one in each corner of the photo.
- Avoid tape or glue: Only staples are approved for attaching your photo to the application form when renewing by mail.
- Forgotten staples: If you forget to staple your photo, a passport agent might do it for you, but there’s also a chance your application will be rejected.
Attaching your passport photo correctly is essential to prevent any delays or rejection of your application. By following these guidelines, you can ensure that your application meets all the necessary requirements and is processed smoothly. Remember, the U.S. Department of State has specific instructions for a reason – adhering to them helps maintain the integrity of the application process.
These key points are designed to be straightforward and easy to remember. When in doubt, always refer back to the official guidelines provided by the U.S. Department of State or consult resources like dfphoto.net for additional clarification. Taking the time to get it right the first time can save you significant time and hassle in the long run.
3. Step-by-Step Guide: How to Staple Your Photo Correctly
So, you’ve got your passport photo and your DS-82 form ready? Here’s a detailed guide to stapling your photo correctly:
- Placement is Key: Position the photo in the designated area on the DS-82 form. This area is typically marked with dotted lines in a square labeled “Place Photo Here.”
- Four Staples, Four Corners: Use four staples, one in each corner of the photo. Place them close to the edges, ensuring they don’t cover any part of your face.
- Avoid Shadows: Double-check that the staples don’t cast any shadows on your face in the photo.
- Secure Attachment: Make sure the photo is securely attached and doesn’t move around. It should be firmly in place.
Following these steps carefully will help you avoid common mistakes and ensure that your passport photo is properly attached to your application. Remember, the goal is to present a clear, unobstructed view of your face while adhering to the specific requirements set forth by the U.S. Department of State.
If you’re unsure about any of these steps, take a moment to review the instructions on the DS-82 form or consult resources like dfphoto.net for visual examples and further guidance. A little extra attention to detail can make all the difference in ensuring a smooth and successful passport renewal process.
4. Common Stapling Mistakes to Avoid
Even with clear instructions, it’s easy to make mistakes. Here are some common errors to avoid when stapling your passport photo:
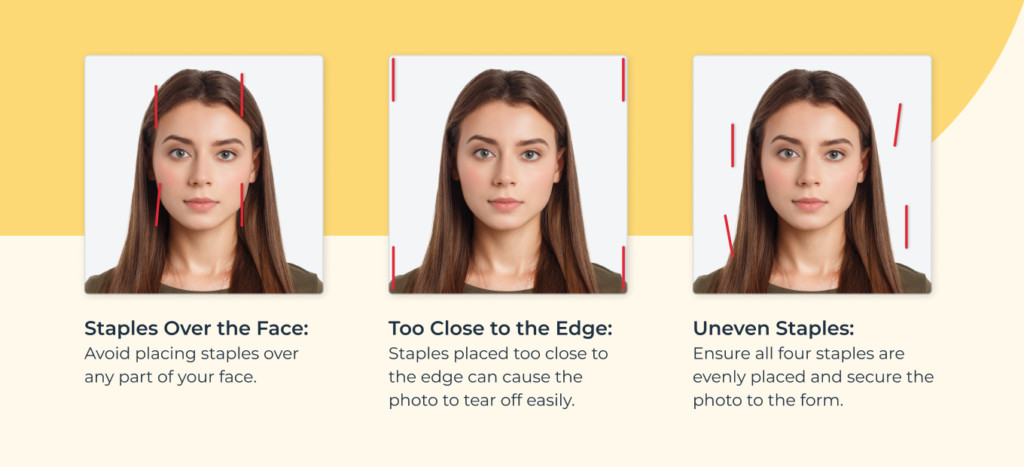 Examples of passport photos with incorrect stapling.
- Obscuring the Face: Make sure the staples do not cover any part of your face. Staples placed too far inward can obscure facial features, leading to rejection.
- Casting Shadows: Ensure the staples do not cast shadows on your face. Shadows can distort your features and make it difficult to identify you.
- Insufficient Staples: Using fewer than four staples, or placing them incorrectly, can result in the photo not being securely attached.
- Using Tape or Glue: As mentioned earlier, only staples are accepted. Tape and glue are not permissible and can lead to rejection of your application.
By avoiding these common mistakes, you can increase the likelihood of your passport application being accepted without any issues. Always double-check your work and compare it to examples of correctly stapled photos to ensure you’ve met all the requirements. Remember, attention to detail is key in this process.
If you’re unsure about any aspect of the stapling process, don’t hesitate to seek clarification from official sources or consult resources like dfphoto.net. Taking the time to get it right can save you significant time and hassle in the long run.
5. Understanding the Importance of Photo Compliance
Beyond the stapling, the photo itself must meet strict requirements. The U.S. Department of State has detailed guidelines on what makes a photo acceptable for a passport application. These requirements cover everything from size and background to facial expression and attire.
- Size and Dimensions: The photo must be 2×2 inches (51×51 mm).
- Background: The background must be plain white or off-white.
- Facial Expression: You must have a neutral expression or a natural smile, with both eyes open.
- Attire: You cannot wear eyeglasses (unless you have a medical reason) or hats (unless it’s for religious purposes).
- Lighting: The photo must be evenly lit, with no shadows or glare.
Failing to meet these requirements can result in your photo being rejected, which will delay the processing of your passport application. It’s essential to take the time to understand and adhere to these guidelines to ensure a smooth and efficient process.
To help ensure your photo meets all the necessary requirements, consider using tools like PhotoAiD, which can automatically check and correct your photo to ensure compliance. Alternatively, you can consult resources like dfphoto.net for detailed information and examples of acceptable passport photos.
6. Renewal By Mail vs. In-Person Applications: A Recap
Let’s reiterate the crucial difference between renewing your passport by mail and applying in person:
- Renewal By Mail: You are responsible for stapling the photo to the DS-82 form. Follow the steps outlined above carefully.
- In-Person Applications: The passport agent at the acceptance facility will handle the stapling. Do not staple the photo yourself.
This distinction is essential to avoid any confusion or errors. Whether you’re renewing by mail or applying in person, understanding your responsibilities will help ensure a smooth and efficient process.
If you’re unsure about which method is right for you, consult the U.S. Department of State’s website or resources like dfphoto.net for guidance. They can help you determine the best approach based on your individual circumstances.
7. What Happens If You Make a Mistake?
Everyone makes mistakes, but what happens if you incorrectly staple your passport photo? Here are a few possible scenarios:
- Minor Errors: If the error is minor (e.g., staples slightly off-center), the passport agent may correct it for you.
- Rejected Application: If the error is significant (e.g., staples obscuring your face), your application may be rejected, and you’ll need to resubmit it with a new photo.
- Request for Correction: In some cases, the U.S. Department of State may contact you and ask you to correct the error rather than rejecting the application outright.
To avoid these potential issues, it’s always best to take your time and follow the instructions carefully. Double-check your work and compare it to examples of correctly stapled photos to ensure you’ve met all the requirements. Remember, a little extra attention to detail can save you significant time and hassle in the long run.
If you do make a mistake, don’t panic. Contact the U.S. Department of State or consult resources like dfphoto.net for guidance on how to proceed. They can help you understand your options and take the necessary steps to resolve the issue.
8. Utilizing Online Tools for Passport Photos
To streamline the passport photo process, consider using online tools that ensure compliance and convenience. Several reputable services can help you create a compliant passport photo from the comfort of your own home.
- PhotoAiD: This tool uses AI to check and fix your photo, ensuring it meets all official requirements.
- Smartphone Apps: Many apps are designed to help you take and format passport photos, providing real-time feedback on positioning, lighting, and background.
- Online Editors: Some websites offer free or low-cost tools to crop, resize, and adjust your photo to meet passport photo specifications.
These online tools can save you time and money by eliminating the need for a professional photographer. However, it’s important to choose a reputable service and double-check the results to ensure accuracy. Remember, the U.S. Department of State has strict guidelines for passport photos, and non-compliance can lead to rejection of your application.
Consult resources like dfphoto.net for recommendations on the best online tools for creating passport photos. They can help you find a service that meets your needs and budget while ensuring compliance with all official requirements.
9. Exploring Professional Photography Services
While online tools offer convenience, professional photography services provide expertise and quality assurance. A professional photographer can ensure that your passport photo meets all the necessary requirements, giving you peace of mind and reducing the risk of rejection.
- Passport Photo Studios: These studios specialize in passport photos and are familiar with the specific requirements of different countries.
- Photography Studios: Many general photography studios offer passport photo services as part of their offerings.
- Retail Stores: Some retail stores, such as pharmacies and department stores, have photo centers that offer passport photo services.
When choosing a professional photographer, it’s important to do your research and select a reputable provider with experience in passport photos. Ask about their knowledge of passport photo requirements and their guarantee of compliance. Remember, investing in a professional passport photo can save you time and hassle in the long run.
Consult resources like dfphoto.net for recommendations on professional photography services in your area. They can help you find a provider that meets your needs and budget while ensuring compliance with all official requirements.
10. The Future of Passport Photo Technology
As technology advances, the process of obtaining passport photos is likely to become even more streamlined and convenient. Here are a few potential future developments:
- AI-Powered Photo Verification: AI could be used to automatically verify passport photos in real-time, reducing the risk of human error and ensuring compliance.
- Virtual Reality (VR) Photo Booths: VR technology could be used to create immersive photo booths that guide users through the passport photo process, providing real-time feedback and ensuring optimal results.
- Biometric Integration: Passport photos could be integrated with biometric data, such as facial recognition, to enhance security and streamline the identification process.
These future developments have the potential to revolutionize the passport photo process, making it faster, easier, and more accurate. However, it’s important to stay informed about these changes and adapt to new technologies as they emerge.
Consult resources like dfphoto.net for updates on the latest trends and technologies in passport photo processing. They can help you stay ahead of the curve and take advantage of new innovations as they become available.
11. Delving into the DS-82 Form: A Closer Look
The DS-82 form is your companion when renewing your passport via mail. Understanding its sections and requirements is essential for a seamless process. Here’s what you need to know:
- Eligibility: Confirm that you meet all the eligibility criteria for using the DS-82 form. This includes having a previous passport that was issued within the last 15 years, being in your possession, and not being damaged.
- Completing the Form: Fill out all sections of the form accurately and legibly. Provide all required information, including your name, date of birth, place of birth, and contact information.
- Signature: Sign and date the form in the designated area. Your signature must match the one on your previous passport.
- Photo Attachment: As discussed earlier, attach your passport photo to the form using staples. Follow the guidelines outlined above carefully to ensure compliance.
- Mailing Instructions: Review the mailing instructions on the form and send it to the appropriate address. Include all required documents, such as your previous passport and payment.
By understanding the DS-82 form and its requirements, you can minimize the risk of errors and delays. Take your time to complete the form accurately and follow all instructions carefully. Remember, the U.S. Department of State has specific guidelines for a reason – adhering to them helps maintain the integrity of the application process.
Consult resources like dfphoto.net for additional guidance on completing the DS-82 form. They can provide helpful tips and answer any questions you may have.
12. Exploring Alternative Attachment Methods (And Why You Shouldn’t)
While staples are the only approved method for attaching your passport photo to the DS-82 form, it’s worth exploring alternative attachment methods and why they are not acceptable:
- Tape: Tape is not acceptable because it can damage the photo or the form, making it difficult to process. Additionally, tape can peel off over time, causing the photo to become detached.
- Glue: Glue is also not acceptable because it can damage the photo or the form, making it difficult to process. Additionally, glue can cause the photo to become distorted or discolored.
- Paper Clips: Paper clips are not acceptable because they can damage the photo or the form. Additionally, paper clips can easily become detached, causing the photo to become separated from the application.
- Adhesive Stickers: Adhesive stickers are not acceptable because they can damage the photo or the form. Additionally, adhesive stickers can peel off over time, causing the photo to become detached.
The U.S. Department of State has specifically approved staples as the only acceptable method for attaching your passport photo. This is because staples are secure, durable, and do not damage the photo or the form. By adhering to this guideline, you can ensure that your application is processed smoothly and efficiently.
Consult resources like dfphoto.net for additional information on why staples are the preferred method for attaching your passport photo. They can provide further insights into the reasoning behind this requirement and help you understand the importance of following it.
13. Addressing Common Concerns and Misconceptions
There are several common concerns and misconceptions surrounding the process of stapling a passport photo to an application. Let’s address a few of them:
- “I can use any type of staples.” No, you should use standard-size staples that are not too thick or too thin. Overly thick staples can damage the photo or the form, while overly thin staples may not securely attach the photo.
- “It doesn’t matter where I place the staples.” Yes, it does. You should place the staples close to the edges of the photo, ensuring they don’t cover any part of your face or cast shadows.
- “I can staple the photo to any part of the form.” No, you should staple the photo to the designated area on the DS-82 form, which is typically marked with dotted lines in a square labeled “Place Photo Here.”
- “I can use more than four staples if I want to.” No, you should use only four staples, one in each corner of the photo. Using more than four staples can damage the photo or the form.
By addressing these common concerns and misconceptions, we can help ensure that you have accurate information and can avoid making mistakes. Remember, the U.S. Department of State has specific guidelines for a reason – adhering to them helps maintain the integrity of the application process.
Consult resources like dfphoto.net for additional clarification on these and other common concerns. They can provide expert advice and help you navigate the passport application process with confidence.
14. The Role of the U.S. Department of State
The U.S. Department of State plays a crucial role in setting the guidelines and requirements for passport photos and applications. They are responsible for ensuring that all passport photos meet specific standards to facilitate accurate identification and prevent fraud.
- Setting Standards: The U.S. Department of State establishes the standards for passport photos, including size, background, facial expression, attire, and lighting.
- Providing Guidance: The U.S. Department of State provides guidance on how to take and submit passport photos, including instructions on stapling the photo to the application form.
- Enforcing Compliance: The U.S. Department of State enforces compliance with passport photo requirements, rejecting applications that do not meet the standards.
- Updating Regulations: The U.S. Department of State updates passport photo regulations periodically to reflect changes in technology and security concerns.
By understanding the role of the U.S. Department of State, you can appreciate the importance of adhering to their guidelines and requirements. Remember, they are working to ensure the integrity of the passport application process and protect against fraud.
Consult the U.S. Department of State’s website for the most up-to-date information on passport photo requirements. They provide comprehensive resources and guidance to help you navigate the application process successfully.
15. Keeping Up with Passport Photo Regulation Changes
Passport photo regulations can change over time, so it’s essential to stay informed about the latest updates. Here are a few ways to keep up with passport photo regulation changes:
- Check the U.S. Department of State’s Website: The U.S. Department of State’s website is the most reliable source of information on passport photo regulations. Check it periodically for updates.
- Subscribe to Email Alerts: Sign up for email alerts from the U.S. Department of State to receive notifications about changes to passport photo regulations.
- Follow Social Media: Follow the U.S. Department of State on social media platforms like Twitter and Facebook to stay informed about the latest news and updates.
- Consult Resources Like dfphoto.net: Resources like dfphoto.net provide up-to-date information on passport photo regulations and can help you navigate the application process successfully.
By staying informed about passport photo regulation changes, you can avoid making mistakes and ensure that your application is processed smoothly and efficiently. Remember, the U.S. Department of State is constantly working to improve the passport application process, so it’s essential to stay up-to-date on the latest changes.
16. The Significance of a Clear and Identifiable Photo
The primary purpose of a passport photo is to provide a clear and identifiable image of the applicant. This image is used to verify your identity when you travel internationally and to prevent fraud.
- Accurate Identification: A clear and identifiable photo allows border control officers and other authorities to accurately identify you as the rightful owner of the passport.
- Fraud Prevention: A high-quality photo helps prevent fraud by making it more difficult for someone to impersonate you or use your passport illegally.
- Security: A clear and identifiable photo enhances security by making it easier to detect counterfeit passports and other fraudulent documents.
By understanding the significance of a clear and identifiable photo, you can appreciate the importance of adhering to passport photo requirements. Remember, the U.S. Department of State has established these requirements to ensure the integrity of the passport application process and protect against fraud.
Consult resources like dfphoto.net for additional information on the importance of a clear and identifiable photo. They can provide expert advice and help you understand the role of your passport photo in international travel and security.
17. The Impact of Technology on Passport Security
Technology has had a significant impact on passport security, making it more difficult to forge or tamper with passports. Here are a few examples of how technology is used to enhance passport security:
- Digital Photos: Digital photos are more difficult to alter or manipulate than traditional film photos.
- Biometric Data: Biometric data, such as facial recognition, can be used to verify your identity and prevent fraud.
- Security Features: Passports contain a variety of security features, such as holograms, watermarks, and microprinting, that make them difficult to counterfeit.
- Electronic Passports (e-Passports): E-Passports contain an embedded microchip that stores your biometric data and other information. This makes it more difficult for someone to steal your identity or use your passport illegally.
As technology continues to evolve, it will play an increasingly important role in enhancing passport security. The U.S. Department of State is constantly working to improve passport security and stay ahead of potential threats.
Consult resources like dfphoto.net for updates on the latest technologies and security features used in passports. They can help you understand how technology is being used to protect your identity and prevent fraud.
18. Common FAQs About Stapling Photos to Passport Applications
Let’s address some frequently asked questions about stapling photos to passport applications:
Do I have to staple my photo to my passport application?
Yes, if renewing your passport by mail, you must staple your photo to your application. For first-time applications in person, the passport agent will attach the picture for you.
How do I staple my passport photo for renewal?
Follow these steps:
- Place the photo in the designated photo box on the DS-82 form.
- Use four staples, one in each photo corner, close to the edges.
- Ensure the staples don’t cover any part of your face and don’t cast shadows.
Does my passport photo have to be stapled on all sides?
Yes, your photo must be stapled vertically in each corner of your picture, close to the edges.
Can I use tape or glue instead of staples?
No, only staples are accepted for attaching your photo to the application form.
What happens if I staple my photo incorrectly?
Your application may be rejected, or you may be asked to correct the error.
Where can I find more information about passport photo requirements?
Visit the U.S. Department of State’s website or consult resources like dfphoto.net.
19. Tips for Ensuring a Smooth Passport Application Process
To ensure a smooth passport application process, follow these tips:
- Start Early: Apply for your passport well in advance of your planned travel date.
- Gather All Required Documents: Make sure you have all the required documents, including your passport photo, DS-82 form, and payment.
- Follow Instructions Carefully: Read and follow all instructions carefully, paying attention to details like stapling your photo correctly.
- Double-Check Your Work: Before submitting your application, double-check your work to ensure that everything is accurate and complete.
- Keep a Copy: Make a copy of your application and all supporting documents for your records.
- Track Your Application: Track your application online to monitor its status.
- Be Patient: Passport processing times can vary, so be patient and allow sufficient time for your application to be processed.
By following these tips, you can increase the likelihood of a smooth and successful passport application process. Remember, the U.S. Department of State is there to help you, so don’t hesitate to contact them if you have any questions or concerns.
Consult resources like dfphoto.net for additional tips and advice on navigating the passport application process. They can provide expert guidance and help you avoid common pitfalls.
20. dfphoto.net: Your Resource for Photography Insights
At dfphoto.net, we are dedicated to providing you with the most current and comprehensive insights into the world of photography. Our mission is to empower photographers of all levels, from beginners to professionals, with the knowledge and inspiration they need to excel in their craft. Whether you’re looking to master the art of capturing the perfect passport photo or seeking to explore the broader landscape of photographic techniques, dfphoto.net is your go-to resource.
Our website offers a wide range of resources tailored to meet the diverse needs of our audience. Dive into our detailed tutorials that cover everything from basic camera settings to advanced editing techniques. Get inspired by our curated galleries featuring stunning works from photographers around the globe. Stay informed with our up-to-date reviews of the latest cameras, lenses, and accessories. And connect with a vibrant community of fellow photography enthusiasts through our interactive forums.
At dfphoto.net, we believe that photography is more than just a skill—it’s a passion, a way of seeing the world, and a means of self-expression. That’s why we are committed to providing you with the tools, knowledge, and inspiration you need to unleash your creative potential.
Ready to explore the world of photography? Visit dfphoto.net today!
Contact Information:
Address: 1600 St Michael’s Dr, Santa Fe, NM 87505, United States
Phone: +1 (505) 471-6001
Website: dfphoto.net
(Note: The provided address is for illustrative purposes only. Please verify for accuracy.)
By following these guidelines and utilizing resources like dfphoto.net, you can ensure that your passport photo is correctly attached to your application, minimizing the risk of delays or rejection. Remember, attention to detail is key when it comes to passport applications, and taking the time to do it right the first time can save you significant time and hassle in the long run.