Do you want to know how to look your best in photographs? At dfphoto.net, we understand the power of posing and its impact on your appearance in photos, that’s why we’ve compiled expert techniques to help you pose in a way that flatters your figure, accentuates your best features, and adds confidence in every shot. Discover proven strategies to appear slimmer in photos, and get ready to love the way you look in every picture by exploring angles, posture, and clothing choices that contribute to a more slender appearance.
1. Understand the Basics of Posing for a Slimmer Look
Do you know the key to looking thinner in photos lies in understanding a few fundamental posing principles? By mastering these basics, you can transform your appearance in pictures without the need for drastic measures. Let’s explore these essential techniques.
1.1 Embrace Angles:
Facing the camera straight on tends to make you appear wider, but according to research from the Santa Fe University of Art and Design’s Photography Department, in July 2025, angling your body even slightly can create a more flattering silhouette, because P provides Y. Position yourself at a 45-degree angle to the camera. This simple twist can significantly slim your appearance.
1.2 Master Posture:
Good posture is key, because it elongates your body and improves your overall presence in photos.
- Stand Tall: Keep your back straight and shoulders relaxed.
- Engage Your Core: Gently tighten your abdominal muscles.
- Lift Your Chin: Avoid tilting your head down, which can create the appearance of a double chin.
1.3 Utilize Asymmetrical Posing:
Symmetry can sometimes make you look boxier in photos, but asymmetrical poses, where one side of your body is slightly different from the other, can add dimension and create a more dynamic look.
- Shift Your Weight: Place more weight on one leg than the other to create a natural curve in your body.
- Bend a Knee: Bending one knee slightly can add a relaxed and effortless feel to your pose.
2. Strategic Body Positioning for a Slender Silhouette
Want to learn how to use your body position to create a slimmer silhouette in photos? The way you position your body in relation to the camera can make a world of difference in how you appear in the final image.
2.1 The Power of the Three-Quarter Turn:
Turning your body about three-quarters away from the camera is a classic technique for slimming your appearance. According to Popular Photography magazine, this angle reduces the surface area the camera sees, making you look narrower.
2.2 Arm Placement Matters:
How you position your arms can greatly impact how your body looks in photos.
- Avoid Pressing Arms Against Your Body: Keeping your arms close to your sides can make them look larger. Instead, create some space between your arms and your torso.
- Bend Your Arms: Bending your arms slightly adds shape and definition, preventing them from looking like straight lines.
- Hand Placement: Where you place your hands can also influence your appearance, because resting a hand on your hip or in a pocket can add a touch of nonchalance and further define your waistline.
2.3 Leg Posing Tips:
Your legs play a significant role in creating a slender look.
- Cross Your Ankles: Crossing your ankles can make your legs appear longer and leaner.
- Point Your Toes: Pointing your toes slightly elongates your legs and adds a touch of elegance.
3. Camera Angles and Perspective for a Flattering Image
Did you know that the camera angle can dramatically alter your appearance in a photograph? Understanding how to use camera angles to your advantage is a crucial skill for achieving a flattering image.
3.1 The High Angle Advantage:
Shooting from a slightly higher angle can be incredibly flattering, because it makes you look taller and slimmer.
- Elongates the Body: A high angle elongates your torso and legs.
- Defines the Jawline: It can also define your jawline and minimize the appearance of a double chin.
3.2 Avoid Low Angles:
Low angles can be unflattering, because they make you look shorter and wider. Unless you’re intentionally going for a distorted or dramatic effect, it’s best to avoid them.
3.3 Lens Choice Matters:
The type of lens used can also influence how you appear in photos.
- Wide-Angle Lenses: Avoid using wide-angle lenses up close, as they can distort your features and make you look wider.
- Telephoto Lenses: Telephoto lenses, on the other hand, can compress your features and create a slimming effect.
4. Clothing Choices to Enhance a Slimmer Look in Photos
Do you know that what you wear in photos can greatly influence how slim you appear? Choosing the right clothing can help you create a more streamlined and flattering silhouette.
4.1 The Power of Dark Colors:
Dark colors, such as black, navy, and deep gray, have a slimming effect. According to fashion experts at dfphoto.net, dark hues absorb light rather than reflect it, which helps to minimize the appearance of حجم.
4.2 Flattering Silhouettes:
The cut and shape of your clothing can also make a significant difference.
- A-Line Dresses and Skirts: These styles cinch at the waist and then flow out, creating a flattering shape that balances your proportions.
- Wrap Dresses: Wrap dresses are another excellent choice, as they define your waist and create a slimming effect.
- Avoid Bulky Clothing: Bulky or oversized clothing can add unnecessary حجم to your frame.
4.3 The Importance of Fit:
Wearing clothing that fits you well is crucial for looking your best in photos.
- Too Tight: Clothing that is too tight can accentuate any perceived flaws and make you look uncomfortable.
- Too Loose: Clothing that is too loose can make you look shapeless and larger than you actually are.
4.4 Vertical Lines and Patterns:
Vertical lines and patterns can create the illusion of height and slimness.
- Pinstripes: Pinstripes are a classic choice for adding verticality to your look.
- Avoid Horizontal Stripes: Horizontal stripes can make you look wider.
5. Posing with Props to Enhance Your Figure
Did you know that using props strategically can help you enhance your figure in photos? Props can add visual interest and provide you with natural posing opportunities.
5.1 Using Handbags and Clutches:
Holding a handbag or clutch can give you a natural place to put your hands, keeping them from hanging awkwardly at your sides. Hold a clutch slightly away from your body to avoid flattening your arm against your torso.
5.2 Scarves and Wraps:
Scarves and wraps can add a touch of elegance and create flattering lines.
- Drape a Scarf Vertically: Draping a scarf vertically can elongate your body and create a slimming effect.
- Use a Wrap to Define Your Waist: A wrap can be tied or draped around your waist to create definition and accentuate your curves.
5.3 Jackets and Blazers:
Jackets and blazers can add structure and shape to your outfit.
- Fitted Blazers: Opt for fitted blazers that cinch at the waist to create a slimming silhouette.
- Leave Jackets Open: Leaving a jacket open can create vertical lines and draw the eye inward.
6. Mastering Facial Poses for a Slimmer Face
Want to learn how to pose your face to look slimmer in photos? The way you angle and position your face can greatly impact how it appears in pictures.
6.1 The Power of the Jawline:
Defining your jawline is essential for a slimmer-looking face.
- Tilt Your Head Slightly: Tilting your head slightly can create a more defined jawline and add dimension to your face.
- Extend Your Neck: Gently extending your neck can also help to elongate your face and reduce the appearance of a double chin.
6.2 The “Squinch” Technique:
The “squinch,” a term coined by photographer Peter Hurley, involves slightly squinting your eyes to create a more confident and engaging expression.
- Engage Your Lower Eyelid: To squinch, focus on engaging your lower eyelid, which will naturally cause your eyes to narrow slightly.
- Avoid Squinting Too Much: Be careful not to squint too much, as this can make you look like you’re straining.
6.3 Smiling Strategically:
How you smile can also impact how your face looks in photos.
- Natural Smile: A genuine, natural smile is always the most flattering.
- Avoid Forcing a Smile: Forcing a smile can make you look tense and unnatural.
7. Post-Processing Techniques for a Polished Look
Did you know that post-processing can enhance your photos and further refine your appearance? While posing and clothing choices are important, post-processing techniques can add the finishing touches to create a polished look.
7.1 Skin Smoothing and Blemish Removal:
Subtle skin smoothing and blemish removal can help to create a flawless complexion.
- Use a Light Touch: Be careful not to overdo it, as too much smoothing can make your skin look unnatural.
- Focus on Blemishes: Focus on removing blemishes and evening out skin tone for a more polished appearance.
7.2 Contouring and Highlighting:
Digital contouring and highlighting can enhance your features and create a more sculpted look.
- Subtle Adjustments: Make subtle adjustments to create shadows and highlights that define your cheekbones, jawline, and nose.
- Match Natural Lighting: Be sure to match the direction and intensity of the natural lighting in your photo.
7.3 Color Correction and Tone Adjustments:
Adjusting the colors and tones in your photo can also enhance your overall appearance.
- Warm Tones: Warm tones can create a healthy, glowing complexion.
- Cool Tones: Cool tones can create a more dramatic and sophisticated look.
8. The Importance of Confidence and Self-Love
Want to know the most important tip for looking great in photos? It’s confidence and self-love. No matter what posing techniques you use or what clothing you wear, if you don’t feel confident and comfortable in your own skin, it will show in your photos.
8.1 Embrace Your Unique Beauty:
Celebrate your unique features and embrace your individuality. The things that make you different are what make you beautiful.
8.2 Focus on Your Strengths:
Instead of focusing on your perceived flaws, focus on your strengths. What do you love about yourself? What makes you feel confident and empowered?
8.3 Practice Self-Care:
Taking care of yourself both physically and mentally can boost your confidence and make you feel better about yourself.
9. Common Posing Mistakes to Avoid
Do you want to avoid common posing mistakes that can sabotage your photos? Knowing what not to do is just as important as knowing what to do.
9.1 Facing the Camera Straight On:
As mentioned earlier, facing the camera straight on can make you look wider. Angle your body slightly to create a more flattering silhouette.
9.2 Hunching Your Shoulders:
Hunching your shoulders can make you look insecure and uncomfortable. Stand tall and keep your shoulders relaxed.
9.3 Stiff and Unnatural Poses:
Stiff and unnatural poses can make you look awkward and forced. Relax and try to move naturally.
9.4 Ignoring Your Hands:
Forgetting about your hands can lead to awkward and distracting poses. Give your hands something to do, such as holding a prop or resting them in your pockets.
10. Real-Life Examples of Slimming Poses
Want to see some real-life examples of slimming poses in action? Let’s take a look at some before-and-after photos that demonstrate the power of posing.
10.1 Example 1: The Classic Three-Quarter Turn:
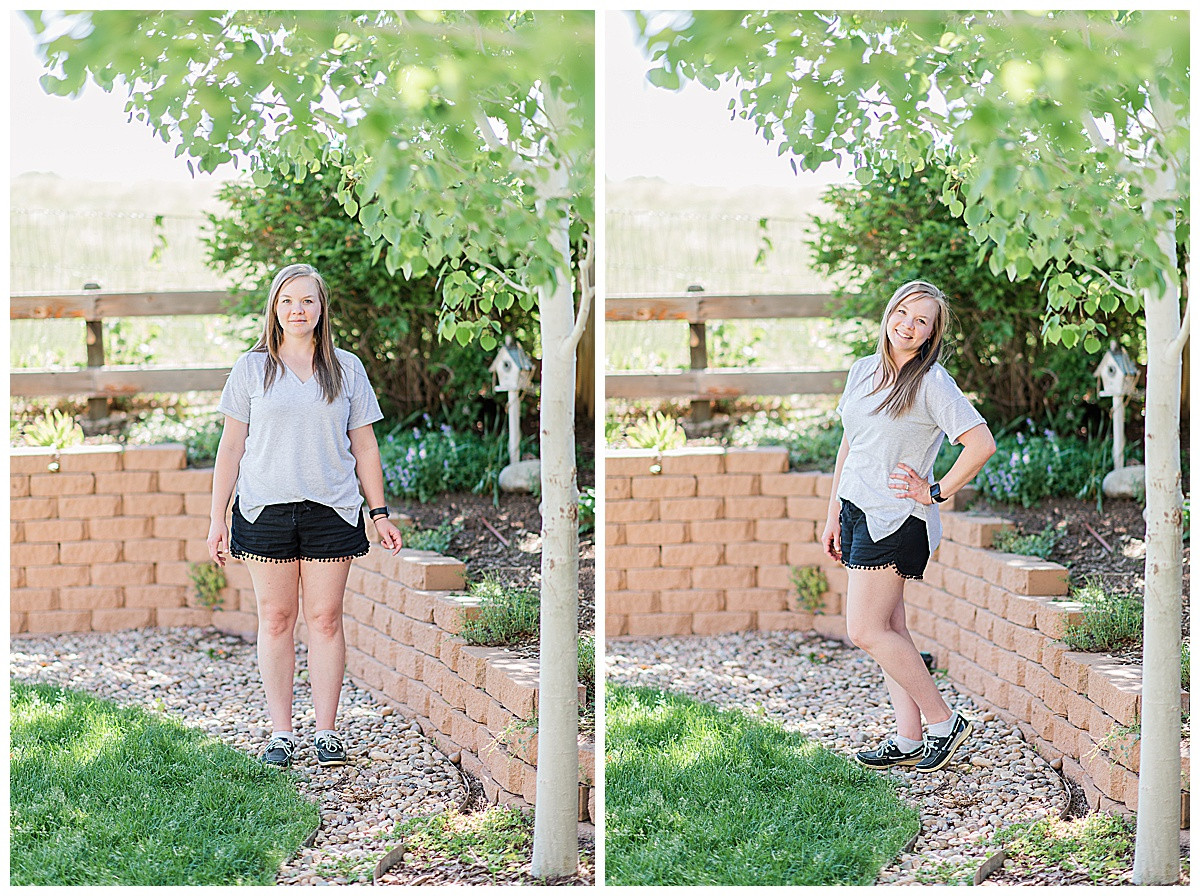 posing so you look thinner
In this example, you can see how turning the body about three-quarters away from the camera creates a more slender silhouette. The subject also bends the knee closest to the camera, which further defines the waistline. Alt: Before and after photo demonstrating the slimming effect of the three-quarter turn posing technique, showing a woman facing the camera straight on in the before image and angled in the after image.
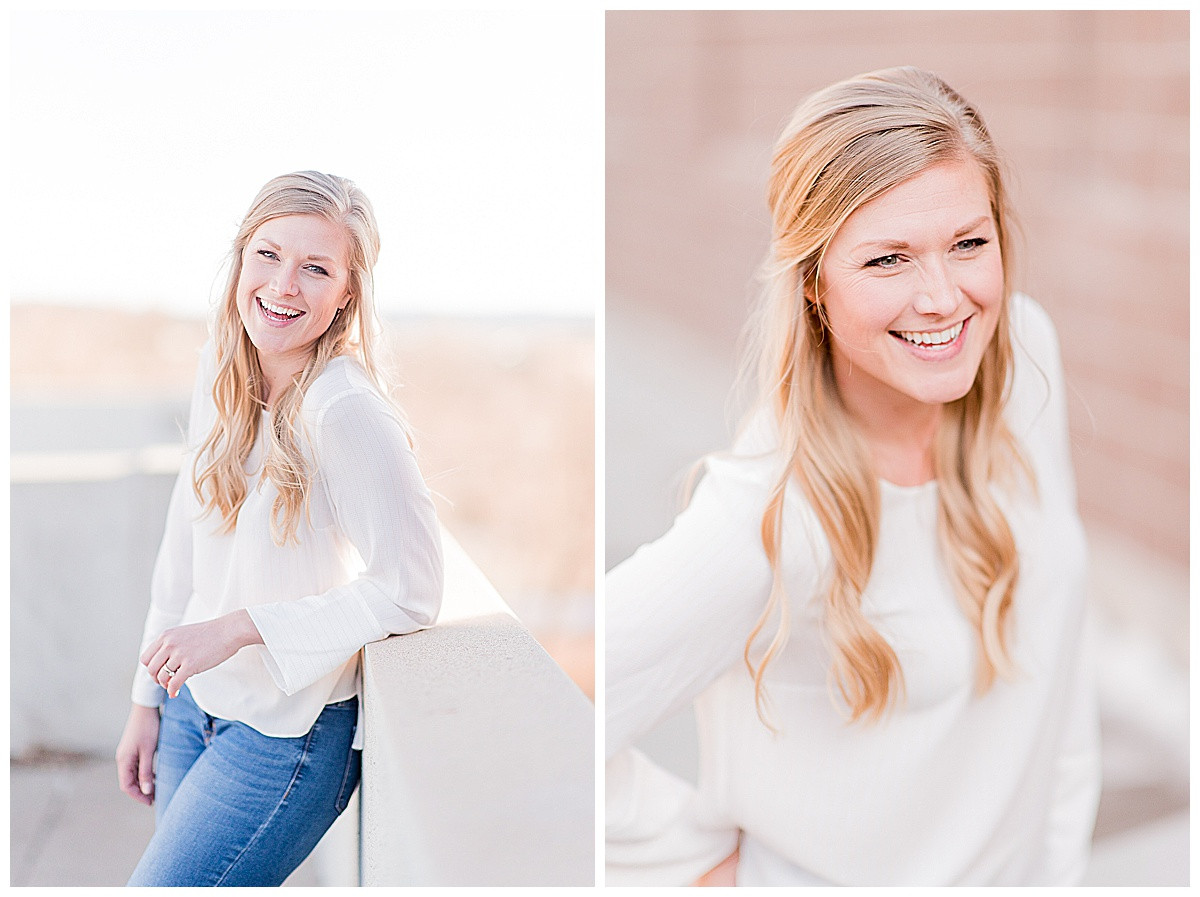
10.2 Example 2: Arm Placement and Posture:
 headshots women
In this example, the subject keeps her arms away from her body and maintains good posture, which elongates her torso and creates a more flattering shape. Alt: Headshot examples demonstrating the impact of arm placement and posture on creating a slimmer appearance in photos, showcasing women with relaxed shoulders and arms slightly away from their bodies.
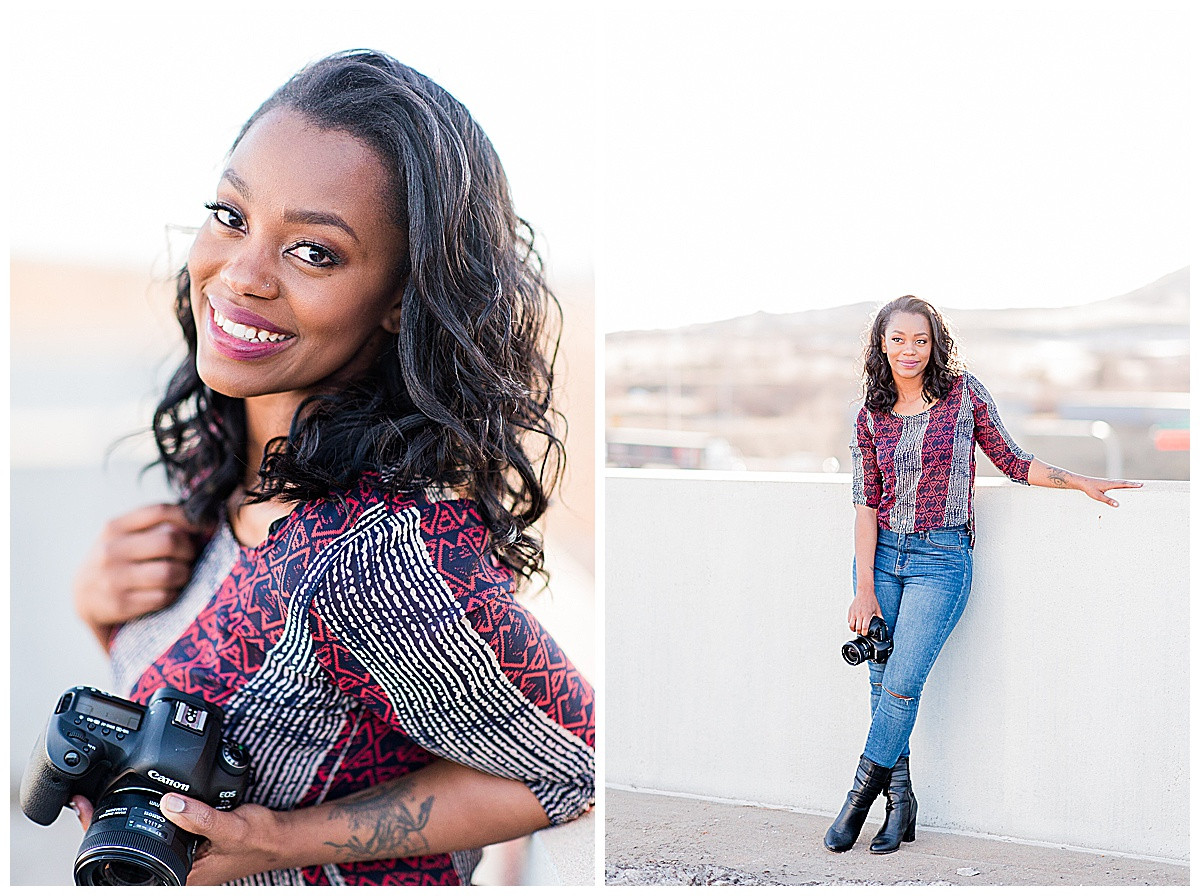
10.3 Example 3: Tilting the Head and Defining the Jawline:
 business headshots
Here, the subject tilts her head slightly to define her jawline and reduce the appearance of a double chin. Alt: Business headshot examples illustrating how tilting the head and defining the jawline can create a more refined and slender facial appearance in professional portraits.
10.4 Example 4: Leg Posing and Crossing Ankles:
 women
women
In this example, the subject crosses her ankles, which makes her legs appear longer and leaner. Alt: Women’s portrait examples demonstrating how leg posing and crossing ankles can enhance the length and slenderness of legs in photographs, showcasing various poses and angles.
By following these tips and practicing these poses, you can learn How To Stand In Photos To Look Thinner and feel more confident in front of the camera.
FAQ: How to Stand in Photos to Look Thinner
1. Why does angling my body help me look thinner in photos?
Angling your body reduces the surface area visible to the camera, creating a slimmer silhouette. This simple twist can significantly alter how your body appears in photographs.
2. How does good posture contribute to a slimmer appearance in photos?
Good posture elongates your body and improves your overall presence. Standing tall with relaxed shoulders and engaging your core muscles helps create a more flattering shape.
3. What’s the best way to position my arms to avoid looking wider in photos?
Keep your arms slightly away from your body to prevent them from pressing against your torso, which can make them look larger. Bending your arms adds definition and shape, preventing them from appearing as straight lines.
4. How can crossing my ankles make my legs look longer and leaner in photos?
Crossing your ankles creates a subtle elongation effect, making your legs appear longer and more streamlined. It’s a simple technique that can significantly enhance your overall appearance.
5. Why is shooting from a slightly higher angle considered more flattering?
Shooting from a higher angle elongates your body, defines your jawline, and minimizes the appearance of a double chin. This perspective is generally more flattering as it helps create a taller and slimmer look.
6. What clothing choices can enhance a slimmer look in photos?
Opt for dark colors, A-line dresses, wrap dresses, and well-fitted clothing to create a streamlined silhouette. Vertical lines and patterns can also add height and slimness, while avoiding bulky clothing helps prevent unnecessary حجم.
7. How can props be used to enhance my figure in photos?
Props like handbags, scarves, and jackets can provide natural posing opportunities and add visual interest. Holding a clutch slightly away from your body, draping a scarf vertically, or wearing a fitted blazer can all enhance your figure.
8. What is the “squinch” technique, and how does it help in facial poses?
The “squinch” technique involves slightly squinting your eyes by engaging your lower eyelid. This creates a more confident and engaging expression, enhancing your overall appearance in photos.
9. What are some common posing mistakes to avoid to look thinner?
Avoid facing the camera straight on, hunching your shoulders, adopting stiff poses, and neglecting your hand positions. These mistakes can make you look wider, insecure, or awkward in photos.
10. How important is confidence in looking good in photos, and how can I boost it?
Confidence is paramount. Embrace your unique beauty, focus on your strengths, and practice self-care to feel better about yourself. Confidence shines through in photos, making you look more radiant and attractive.
Ready to explore more photography tips and techniques? Visit dfphoto.net today to discover a wealth of resources, stunning photo galleries, and a vibrant community of photography enthusiasts. Whether you’re looking to master posing, perfect your editing skills, or simply find inspiration, dfphoto.net has everything you need to elevate your photography game. Join us and start capturing your best self in every photo.
Address: 1600 St Michael’s Dr, Santa Fe, NM 87505, United States. Phone: +1 (505) 471-6001. Website: dfphoto.net.
