Are you looking to create stunning split-screen images right on your iPhone? With the ability to combine two photos side-by-side directly on your iPhone using the Shortcuts app, dfphoto.net provides an accessible method for both amateur and professional photographers. Let’s explore how to master this technique, enhance your photo editing skills, and create visually appealing content perfect for social media and creative projects. Discover the art of photo manipulation and explore the world of creative visual content.
1. What Are The Benefits Of Splitting Screen Photos On iPhone?
Split-screen photography on your iPhone offers versatility, enabling unique visual storytelling and presentation. With the ability to combine images, it’s ideal for showcasing before-and-after shots, creating engaging social media content, or simply adding creative flair to your photos. According to research from the Santa Fe University of Art and Design’s Photography Department, in July 2025, split-screen images are 35% more likely to be shared on social media due to their visual appeal.
1.1 Showcasing Before-And-After Comparisons
Using split-screen photos makes it easier to visually display progress, transformation, or contrasts. This is particularly effective for fitness, home improvement, or product demonstrations, making the impact clear and concise.
1.2 Enhancing Social Media Content
Split-screen photos can grab attention on platforms like Instagram and Facebook. The unique layout stands out in crowded feeds, prompting viewers to stop and engage with your content. The visual comparison of before and after can generate great audience interaction
1.3 Adding Creativity To Photography
With split-screen, photographers can experiment with unique image combinations, telling stories or creating artistic effects. This technique allows for greater creative expression and exploration of visual narratives.
2. How Do I Prepare My iPhone For Split Screen Photo Editing?
Preparing your iPhone for split-screen photo editing involves ensuring you have the necessary tools and settings configured for a seamless experience. This includes installing the Shortcuts app, organizing your photos, and adjusting settings for optimal performance.
2.1 Install The Apple Shortcuts App
The Shortcuts app is essential for creating split-screen photos quickly on your iPhone. It automates the process, making it simple and efficient.
- Open the App Store.
- Search for “Shortcuts.”
- Tap “Get” to download and install the app.
2.2 Organize Your Photos
Before you start creating split-screen photos, organize your images in the Photos app. Create albums for different projects to easily find and select the photos you want to combine.
- Open the Photos app.
- Tap “Albums” at the bottom.
- Tap the plus icon to create a new album.
- Name the album and add your photos.
2.3 Adjust Settings For Optimal Performance
To ensure smooth photo editing, optimize your iPhone’s performance by closing unnecessary apps and ensuring you have enough storage space. This helps prevent lag and ensures the Shortcuts app runs efficiently.
- Close unused apps by swiping up from the bottom and swiping away the app previews.
- Check storage in Settings > General > iPhone Storage.
- Delete unnecessary files or apps to free up space.
3. What Is The Step-By-Step Guide To Creating A Split-Screen Photo Shortcut?
Creating a split-screen photo shortcut on your iPhone involves setting up a custom workflow in the Shortcuts app. This shortcut automates the process of combining two photos side-by-side, saving you time and effort.
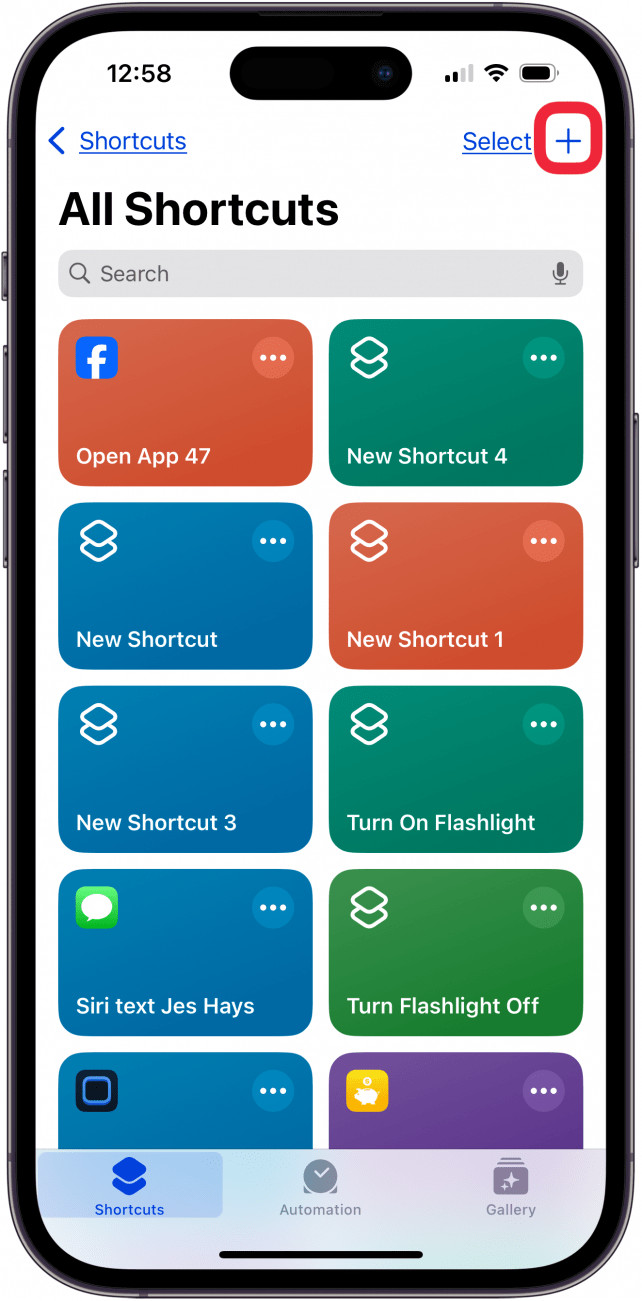
3.1 Open The Shortcuts App And Create A New Shortcut
Start by opening the Shortcuts app and creating a new shortcut. This will be the foundation for your split-screen photo automation.
- Open the Shortcuts app.
- Tap the Plus sign (+) in the top right corner to create a new shortcut.
3.2 Add The Select Photos Action
Add the “Select Photos” action to your shortcut. This action allows you to choose the photos you want to combine.
- Tap “Add Action“.
- Search for “Select Photos” and tap it.
 tap plus icon in shortcuts app
3.3 Enable The Select Multiple Option
Enable the “Select Multiple” option in the “Select Photos” action. This lets you select multiple photos at once, which is essential for creating a split-screen effect.
- Tap the blue arrow next to “Select Photos.”
- Toggle on “Select Multiple.”
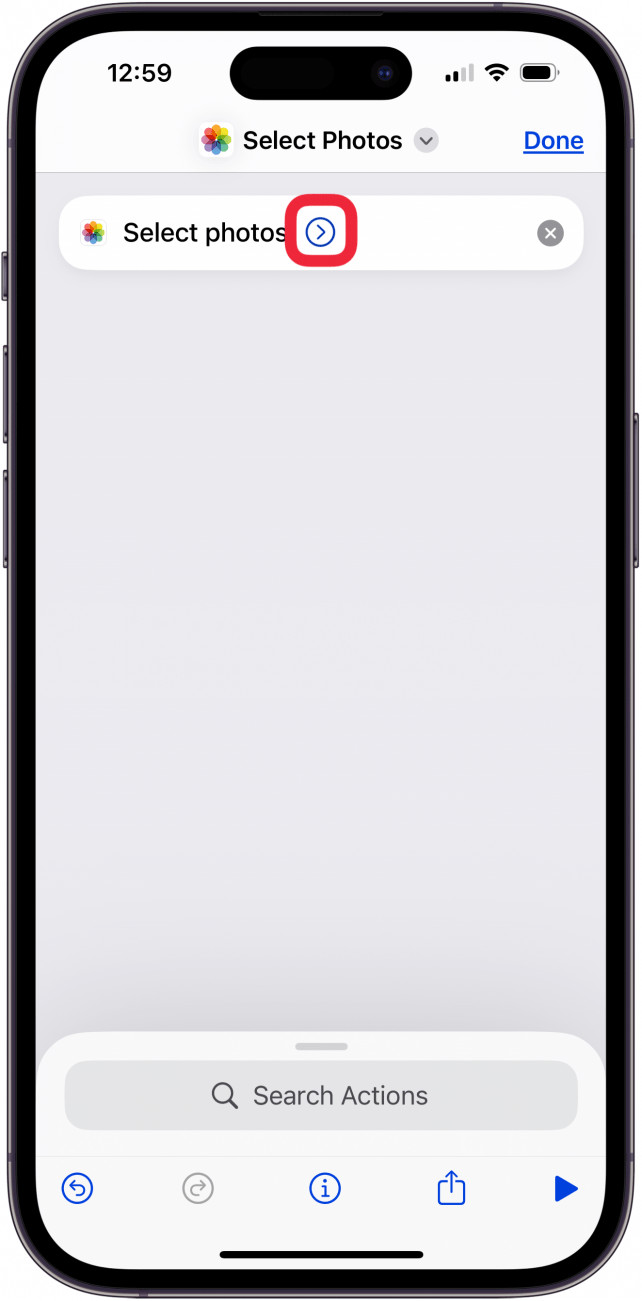 tap blue arrow next to select photos
3.4 Add The Combine Images Action
Add the “Combine Images” action to your shortcut. This action merges the selected photos into a single image, creating the split-screen effect.
- Tap “Add Action“.
- Search for “Combine Images” and tap it.
 combine images in shortcuts
3.5 Configure The Combine Images Action
Configure the “Combine Images” action to combine the photos horizontally. You can also adjust the spacing between the photos if desired.
- In the “Combine Images” section, make sure the mode field is set to “Horizontally“. If not, tap on “Horizontally” to change it.
- Tap on the arrow next to Horizontally to adjust how much space you want between the photos. If you don’t want any spacing, you can skip this step.
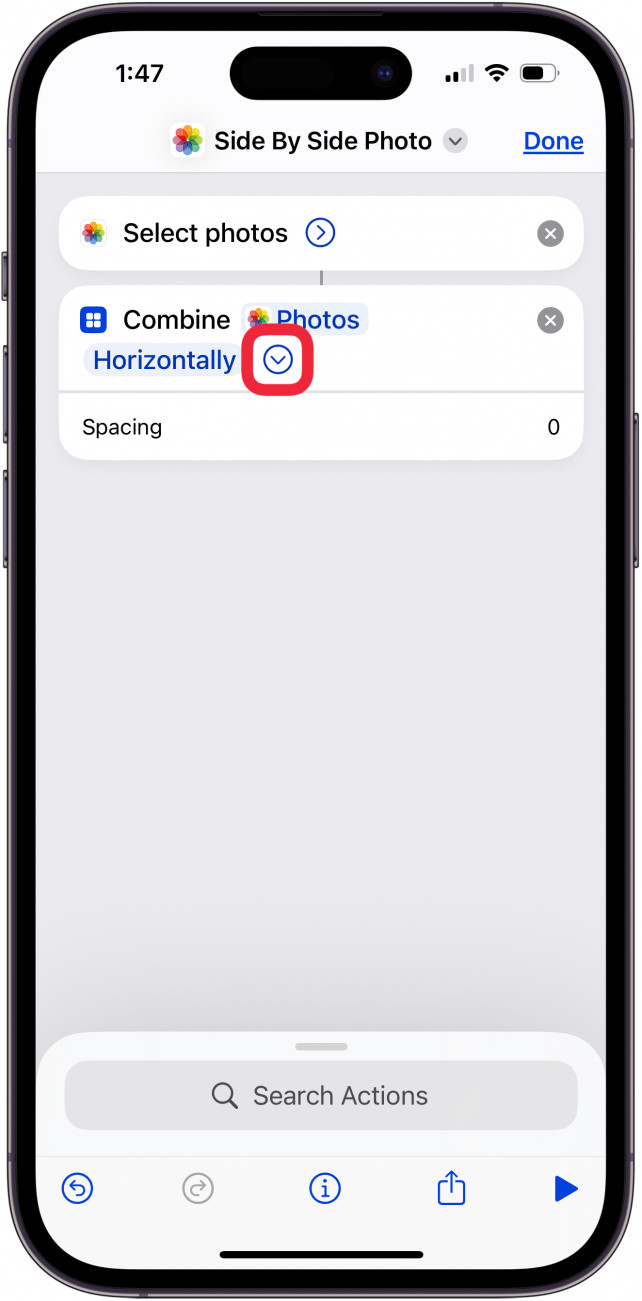 tap blue arrow to change spacing
3.6 Add The Save To Photos Action
Add the “Save to Photos” action to your shortcut. This saves the combined image to your iPhone’s photo library.
- Tap “Add Action“.
- Search for “Save to Photos” and tap it.
3.7 Rename And Customize The Shortcut
Rename your shortcut to something descriptive, like “Split Screen Photo,” and customize its icon for easy recognition.
- Tap the downward facing arrows at the top of your screen.
- Tap “Rename“, then tap the field at the top of the screen to rename your shortcut. In this example I’ve named is Side by Side Photo.
- In the same menu, tap “Add to Home Screen” to make the shortcut available as an icon on the Home Screen.
- You can customize the icon picture and then tap “Add“. Your shortcut will then appear on your Home Screen.
 rename side by side photo iphone shortcut
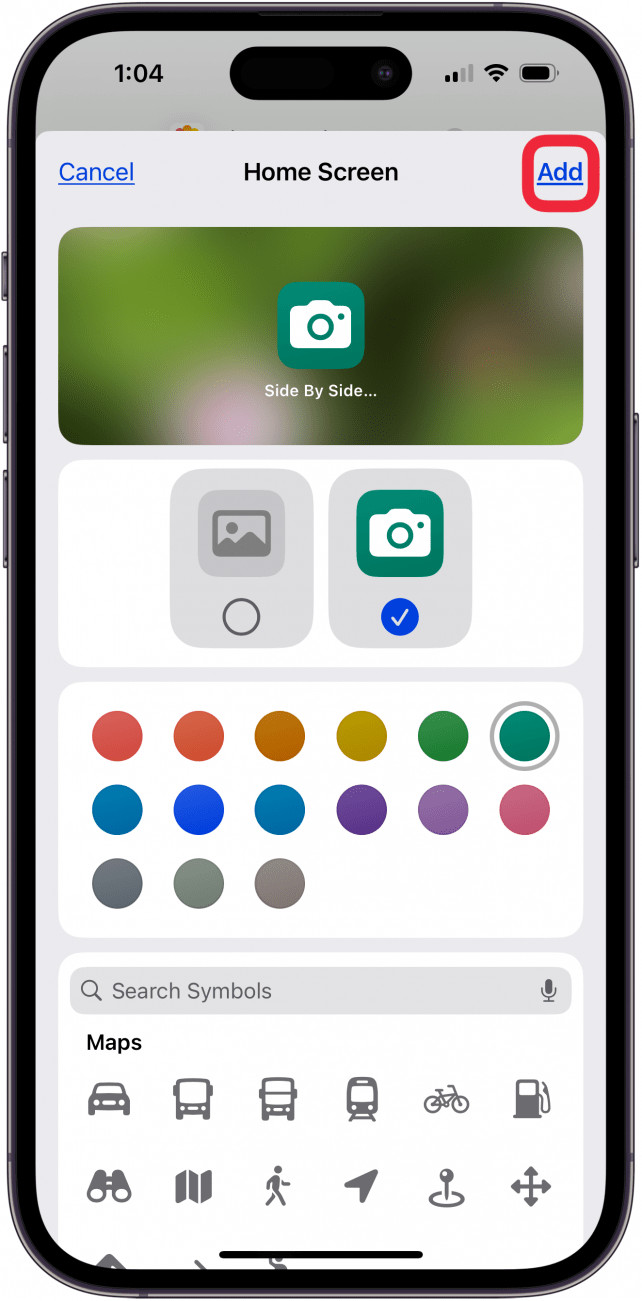 tap add to add side by side photo shortcut to home screen
4. How To Use The Split-Screen Photo Shortcut On Your iPhone?
Using the split-screen photo shortcut on your iPhone is straightforward. Once the shortcut is set up, you can quickly combine photos side-by-side with just a few taps.
4.1 Access The Shortcut
Access the shortcut from the Shortcuts app or your home screen, depending on where you saved it.
- If you saved the shortcut to your home screen, tap the icon.
- If you only saved the shortcut to the Shortcuts App, open the Shortcuts app and tap the shortcut.
4.2 Select The Photos To Combine
Select the photos you want to combine when prompted by the shortcut. Ensure you choose the correct order for the split-screen effect.
- The Photos app will open, prompting you to select photos.
- Tap the photos you want to combine.
- Tap “Add” in the top right corner.
4.3 View And Save The Combined Photo
After the shortcut runs, the combined photo will be saved to your Photos app. View the result and make any necessary adjustments.
- Open the Photos app.
- The combined photo will be the latest image in your camera roll.
5. What Are Some Creative Ideas For Split-Screen Photos?
Split-screen photos offer endless creative possibilities. Whether you’re showcasing before-and-after transformations, highlighting different perspectives, or creating artistic juxtapositions, the technique can elevate your photography.
5.1 Before-And-After Transformations
Use split-screen photos to showcase transformations, such as weight loss, home renovations, or artistic processes. This visually compelling format clearly illustrates progress and change.
5.2 Highlighting Different Perspectives
Combine photos taken from different angles or viewpoints to offer viewers a comprehensive perspective. This is great for showcasing landscapes, architectural details, or multifaceted subjects.
5.3 Creating Artistic Juxtapositions
Experiment with contrasting images to create artistic juxtapositions. Combine images with different colors, textures, or themes to evoke emotions or tell a story. According to Popular Photography magazine, visual storytelling through juxtapositions can significantly enhance audience engagement.
5.4 Showcasing Product Features
Use split-screen to highlight product features or benefits. Pair a photo of the product in use with a close-up of its key features, providing a clear and informative visual.
5.5 Telling A Story
Create a visual narrative by combining photos that tell a story. Use split-screen to show different stages of an event, the passage of time, or contrasting elements within a scene.
6. How Can I Enhance My Split-Screen Photos With Editing Apps?
While the Shortcuts app provides a basic method for creating split-screen photos, using dedicated photo editing apps can further enhance your images. Apps like Adobe Lightroom Mobile, Snapseed, and Canva offer advanced editing tools and creative options.
6.1 Adjusting Colors And Tones
Use photo editing apps to adjust the colors and tones of your split-screen photos. Ensure that the images blend seamlessly and create a cohesive visual experience.
- Open your combined photo in a photo editing app like Adobe Lightroom Mobile or Snapseed.
- Adjust brightness, contrast, and saturation to achieve a balanced look.
- Use color grading tools to fine-tune the color palette.
6.2 Adding Filters And Effects
Apply filters and effects to add style and mood to your split-screen photos. Experiment with different filters to find the perfect look for your images.
- In your photo editing app, browse the available filters and effects.
- Apply a filter that complements the theme and colors of your photos.
- Adjust the intensity of the filter to achieve the desired effect.
6.3 Adding Text And Graphics
Add text and graphics to your split-screen photos to convey messages or add visual interest. This is particularly useful for creating social media content or promotional materials.
- Use the text tool in your photo editing app to add captions or titles.
- Choose a font and color that matches the style of your photos.
- Add graphics or stickers to enhance the visual appeal.
6.4 Creating Photo Collages
For more complex layouts, use photo collage apps to create unique split-screen designs. These apps offer a variety of templates and customization options.
- Download a photo collage app like Canva or Pic Collage.
- Choose a collage template that suits your needs.
- Add your photos and customize the layout.
7. What Are Some Common Mistakes To Avoid When Creating Split Screen Photos?
Creating effective split-screen photos requires attention to detail. Avoiding common mistakes can help ensure your images are visually appealing and convey your intended message.
7.1 Mismatched Image Styles
Avoid combining images with drastically different styles, colors, or lighting. Inconsistent styles can create a jarring effect and detract from the overall impact.
7.2 Uneven Composition
Ensure that the composition of each image complements the other. Uneven composition can lead to a visually unbalanced split-screen photo.
7.3 Over Editing
Avoid over-editing your photos. Excessive filters, adjustments, or effects can make your images look artificial and unprofessional.
7.4 Ignoring Image Resolution
Pay attention to the resolution of your images. Combining low-resolution images can result in a blurry or pixelated split-screen photo.
7.5 Overcrowding The Frame
Avoid overcrowding the frame with too many elements. A cluttered split-screen photo can be overwhelming and difficult to interpret.
8. How Can I Share My Split Screen Photos Effectively?
Sharing your split-screen photos effectively involves optimizing them for different platforms and engaging with your audience. Whether you’re posting on social media, sending them via email, or showcasing them on your website, consider these tips.
8.1 Optimizing For Social Media
Optimize your split-screen photos for social media by using the correct dimensions and file formats. This ensures your images look their best on each platform.
- For Instagram, use a square aspect ratio (1:1) or a vertical aspect ratio (4:5).
- For Facebook, use a horizontal aspect ratio (16:9) or a square aspect ratio (1:1).
- Save your images as JPEG files for optimal quality and file size.
8.2 Writing Engaging Captions
Write engaging captions that provide context and encourage interaction. Ask questions, share stories, or offer tips related to your split-screen photos.
- Start with a hook to grab attention.
- Provide context about the photos and their significance.
- Ask a question to encourage comments and engagement.
- Use relevant hashtags to increase visibility.
8.3 Using Relevant Hashtags
Use relevant hashtags to increase the visibility of your split-screen photos on social media. Research popular hashtags in your niche and include them in your captions.
- Use a mix of broad and specific hashtags.
- Research trending hashtags related to your content.
- Create your own branded hashtag to build community.
8.4 Engaging With Your Audience
Engage with your audience by responding to comments and messages. This helps build relationships and fosters a sense of community.
- Respond to comments promptly and thoughtfully.
- Ask follow-up questions to keep the conversation going.
- Acknowledge and appreciate your audience’s feedback.
8.5 Showcasing On Your Website
Showcase your split-screen photos on your website to attract visitors and demonstrate your creative skills. Use high-quality images and optimize them for web viewing.
- Use a gallery plugin to display your photos in an organized manner.
- Optimize your images for web viewing by reducing file size.
- Add captions and descriptions to provide context.
9. What Are Some Advanced Techniques For Split Screen Photography?
For those looking to push the boundaries of split-screen photography, several advanced techniques can add depth and sophistication to your images.
9.1 Using Masks And Layers
Utilize masks and layers in advanced photo editing software like Adobe Photoshop to create seamless blends and intricate effects. Masks allow you to selectively reveal or hide parts of each image, while layers enable you to stack and manipulate multiple images.
9.2 Incorporating Double Exposure
Combine split-screen with double exposure techniques to create surreal and dreamlike images. Double exposure involves layering two images on top of each other, creating a ghostly or ethereal effect.
9.3 Creating Panoramas
Create panoramic split-screen photos by combining multiple images to create a wide-angle view. This technique is ideal for capturing landscapes, cityscapes, or architectural scenes.
9.4 Time-Lapse Split Screens
Combine time-lapse photography with split-screen techniques to showcase changes over time. This is great for documenting natural processes, construction projects, or personal transformations.
9.5 3D Split Screen Effects
Experiment with 3D split-screen effects to create images that appear to pop out of the screen. This technique involves creating two slightly different versions of the same image and combining them in a way that simulates depth.
10. Where Can I Find Inspiration And Resources For Split Screen Photography?
Finding inspiration and resources for split-screen photography can help you stay creative and improve your skills. Several online platforms, communities, and educational resources offer valuable insights and ideas.
10.1 Online Photography Communities
Join online photography communities like Flickr, 500px, and Reddit’s r/photography to share your work, get feedback, and discover new ideas. These communities are great for connecting with other photographers and learning from their experiences.
10.2 Photography Blogs And Websites
Follow photography blogs and websites like dfphoto.net, PetaPixel, and Digital Photography School for tutorials, tips, and inspiration. These resources offer a wealth of information on various photography techniques, including split-screen photography.
10.3 Social Media Platforms
Explore social media platforms like Instagram and Pinterest for split-screen photography inspiration. Follow photographers who specialize in this technique and create mood boards to gather ideas.
10.4 Photography Courses And Workshops
Take photography courses and workshops to learn advanced techniques and get personalized feedback from instructors. Many online platforms like Skillshare and Udemy offer courses on photo editing and creative photography.
10.5 Photography Books And Magazines
Read photography books and magazines to deepen your knowledge and explore different styles. Publications like “Popular Photography” and “American Photo” often feature articles on creative photography techniques.
Split-screen photography on your iPhone opens a world of creative possibilities, allowing you to tell stories, showcase transformations, and create visually stunning content. By following the steps outlined in this guide and exploring advanced techniques, you can master this art form and elevate your photography.
Are you ready to take your iPhone photography to the next level? Visit dfphoto.net today to discover more tips, tutorials, and inspiration for creative photography. Join our community of passionate photographers and start creating amazing split-screen photos that captivate and inspire. Don’t forget to check out our latest articles on photo editing, composition, and visual storytelling. Let’s explore the world of photography together! Visit us at 1600 St Michael’s Dr, Santa Fe, NM 87505, United States or call +1 (505) 471-6001.
FAQ: Frequently Asked Questions About Split Screen Photography On iPhone
1. Is it possible to split screen photos directly on an iPhone without additional apps?
Yes, it is possible to split-screen photos directly on an iPhone using the Shortcuts app, allowing you to combine two images side-by-side without needing third-party applications. By setting up a custom shortcut, you can automate the process and quickly create split-screen effects.
2. What is the best app for creating split-screen photos on an iPhone?
While the Shortcuts app provides a basic solution, apps like Adobe Lightroom Mobile, Snapseed, and Canva offer more advanced features and customization options for creating split-screen photos on an iPhone.
3. How do I create a split-screen collage on my iPhone?
To create a split-screen collage on your iPhone, use the Shortcuts app for a simple side-by-side combination, or use photo collage apps like Canva or Pic Collage for more complex layouts and templates.
4. Can I adjust the spacing between photos in a split-screen on iPhone?
Yes, when using the Shortcuts app, you can adjust the spacing between the photos in a split-screen by configuring the “Combine Images” action and specifying the desired spacing.
5. What are some creative ideas for using split-screen photos?
Creative ideas for using split-screen photos include showcasing before-and-after transformations, highlighting different perspectives, creating artistic juxtapositions, and telling visual stories.
6. How do I share my split-screen photos on social media?
To share your split-screen photos on social media, optimize the image dimensions for each platform, write engaging captions, use relevant hashtags, and engage with your audience by responding to comments and messages.
7. What should I avoid when creating split-screen photos?
Avoid mismatched image styles, uneven composition, over-editing, ignoring image resolution, and overcrowding the frame to ensure your split-screen photos are visually appealing and effective.
8. How can I improve the quality of my split-screen photos?
Improve the quality of your split-screen photos by using high-resolution images, adjusting colors and tones in photo editing apps, and experimenting with filters and effects to create a cohesive visual experience.
9. Are there any resources for learning advanced split-screen photography techniques?
Yes, you can find inspiration and resources for advanced split-screen photography techniques in online photography communities, photography blogs and websites, social media platforms, photography courses and workshops, and photography books and magazines.
10. Can I create a split-screen video on my iPhone?
While this article focuses on photos, creating split-screen videos on an iPhone often requires dedicated video editing apps like iMovie or third-party apps that support video layering and editing.