Are you looking for the best way How To Shrink Photos For A Locket to perfectly fit your cherished memories inside? This comprehensive guide from dfphoto.net will walk you through every step, from selecting the right photo to the final fitting, ensuring your precious moments are beautifully displayed. We’ll provide expert advice and tips to help you create stunning locket photos that you’ll treasure forever.
Table of Contents
- Choosing the Right Photo
- Measuring Your Locket
- Printing Locket Photos from Your Phone
- Trimming and Fitting Your Locket Photo Prints
- Creative Ideas for Locket Photos
- FAQ
1. How Do I Choose the Right Photo for My Locket?
The right photo captures a special memory or a loved one’s essence. When choosing the right photo for your locket, select a clear, well-lit photo where the subject’s face is easily identifiable, ensuring it fits the locket’s shape and size.
1.1 Consider the Photo’s Clarity and Lighting
A clear, well-lit photo ensures the subject is easily recognizable, even in a small locket photo. Choose a photo that isn’t too dark or blurry, as these imperfections will be amplified when the image is reduced. According to the Santa Fe University of Art and Design’s Photography Department, in July 2025, well-lit photographs maintain clarity and detail even when scaled down.
1.2 Optimize for the Locket’s Shape
The shape of your locket—be it heart, oval, or round—influences how the photo is cropped and displayed. Consider how the photo will fit within the locket’s shape to ensure the most important aspects aren’t lost.
- Heart-shaped lockets: Be mindful of the pointed top and how it might affect the composition.
- Oval lockets: Ensure the subject fits well within the elongated shape.
- Round lockets: Center the subject to avoid cutting off important features.
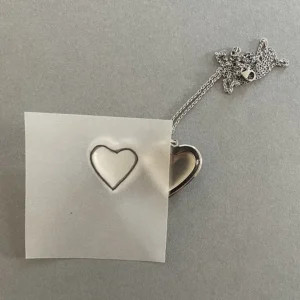
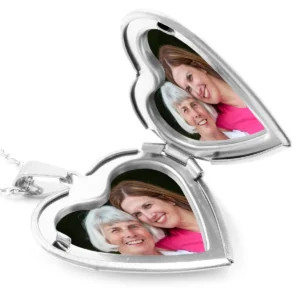 Heart Shaped Locket Photos
1.3 Focus on Close-Up Shots
Close-up shots highlight the subject’s features, making them ideal for lockets. Choose images where the faces are clearly visible and not too distant, ensuring the person is easily recognizable.
1.4 Avoid Busy Backgrounds
Simple backgrounds prevent distractions and keep the focus on the subject. Select photos with minimal background clutter to ensure the subject remains the focal point.
1.5 Consider Two-Sided Lockets
If your locket holds two photos, consider complementary images or splitting one photo into two. This allows you to tell a story or include multiple loved ones.
- Two separate photos: Choose two distinct images that hold special meaning.
- One photo split: Crop a single image to feature different aspects of the subject.
1.6 Ensure Sufficient Background
Sufficient background around the subject’s face allows for flexible cropping. This ensures that the subject remains centered even after trimming the photo to fit the locket.
1.7 Prioritize Image Quality
High-resolution images produce the best results when printed in miniature. Even smartphone photos can work if they have enough megapixels to maintain clarity when reduced.
1.8 Keep Important Elements Away From Edges
Important parts of the photo should be away from the edges to prevent them from being trimmed off. This ensures that key features remain visible.
1.9 Use Photos with Two Subjects Close Together
If including two people, make sure their heads are close together. This ensures both faces are visible and not cut off during cropping.
1.10 Avoid Large Group Photos
Large group photos are not ideal for lockets due to the limited space. Save group photos for larger prints or photo cards.
2. How Do I Measure My Locket for the Right Sized Photos?
Accurate measurements are essential for creating locket photos that fit perfectly. Measure your locket precisely to ensure your photos fit snugly, enhancing the locket’s beauty and sentimental value.
2.1 Understand Locket Photo Sizes
Locket photo sizes vary, but most range from 15 to 25mm x 15 to 25mm. Measure your specific locket to determine the exact dimensions needed.
2.2 Utilize Paper Templates
Some lockets come with paper templates to guide photo sizing. Use this template to accurately measure the photo area and trim your photo accordingly.
 locket photo template
2.3 Measure Without a Template
If your locket lacks a template, measure the photo area directly. Measure the width and height in millimeters for precision.
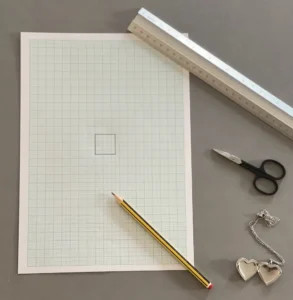
2.4 Create Your Own Template
Creating your own template ensures accuracy when cutting the photo. Use graph paper, a ruler, and tracing paper to create a custom template that matches your locket’s shape and size.
- Graph paper: Use graph paper to draw a precise square or rectangle matching the locket’s dimensions.
- Tracing paper: Sketch the locket’s shape on tracing paper and transfer it to the graph paper.
- Sharp scissors: Cut out the template using sharp, curved nail scissors for clean edges.
2.5 Add Rim Allowance
If your locket has a rim, account for it in your measurements. Add half the rim’s width to each side of the photo area to ensure a snug fit.
2.6 Use Millimeters for Accuracy
Millimeters provide the most accurate measurements for locket photos. Convert centimeters or inches to millimeters to ensure precision. Remember that 1 centimeter equals 10 millimeters and 1 inch equals approximately 25.4 millimeters.
2.7 Tools for Measuring
Gather the necessary tools to ensure accurate measurements. A ruler, pencil, tracing paper, graph paper, and sharp scissors are essential for creating a custom template.
2.8 Measuring a Locket with a Rim
For lockets with rims, measure the photo area and add half the rim’s width to each dimension. The rim typically adds about 2mm to each side, so add 1mm to each dimension.
2.9 Use PostSnap’s Locket Photo Creator
PostSnap’s locket photo creator allows you to enter the exact dimensions of your locket’s photo area. This generates a square or rectangular photo that can be trimmed to fit.
2.10 Sketch the Locket Shape
Sketch the locket’s shape on tracing paper to guide your cutting. Place the tracing paper over the locket and carefully sketch the shape of the rim or photo area.
3. How To Print Locket Photos From Your Phone?
Printing locket photos from your phone is now easier than ever. Utilize specialized apps and services that simplify the process, ensuring your photos are perfectly sized and printed for your locket.
3.1 Use Online Photo Services
Online photo services like PostSnap specialize in printing locket photos. These services allow you to upload photos, enter dimensions, and receive perfectly sized prints.
3.2 Navigate to Locket Photo Options
Find the locket photo printing option on your chosen service’s website. This section provides all the tools and settings needed to create custom-sized photos.
3.3 Enter Dimensions
Input the width and height dimensions you measured in millimeters. Double-check your measurements to avoid errors.
3.4 Choose Print Options
Select your preferred print options, such as color or black and white, and gloss or matte finish. Matte finishes generally work better in lockets.
3.5 Upload Your Photo
Upload the photo you’ve chosen for your locket. Ensure the photo is high-resolution for the best print quality.
3.6 Crop Your Photo
Use the cropping tool to adjust the photo’s composition. Move the red crop box to ensure the subject is properly framed.
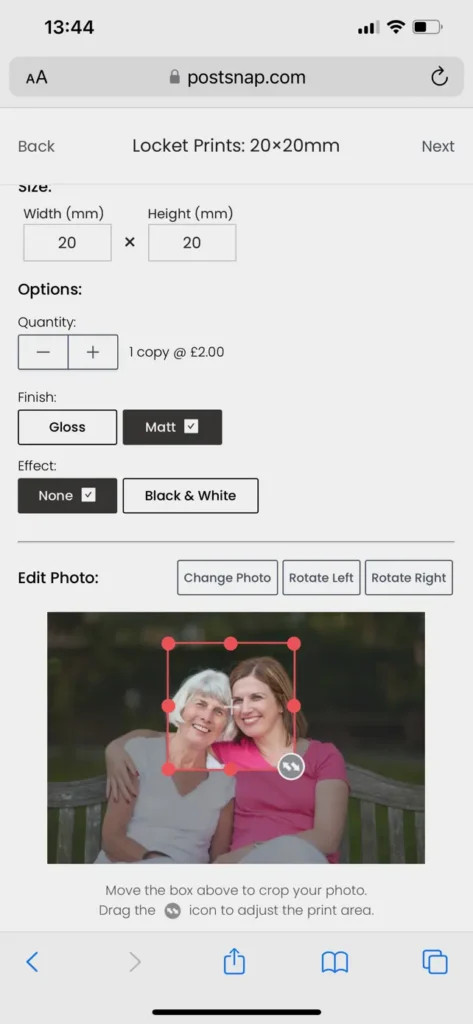 Photo cropped to fit locket necklace
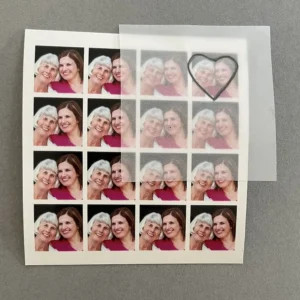
3.7 Enable Tiling
Enable the tiling option to multiply your image across the print. This provides multiple copies of your cropped photo, allowing for experimentation with sizing and trimming.
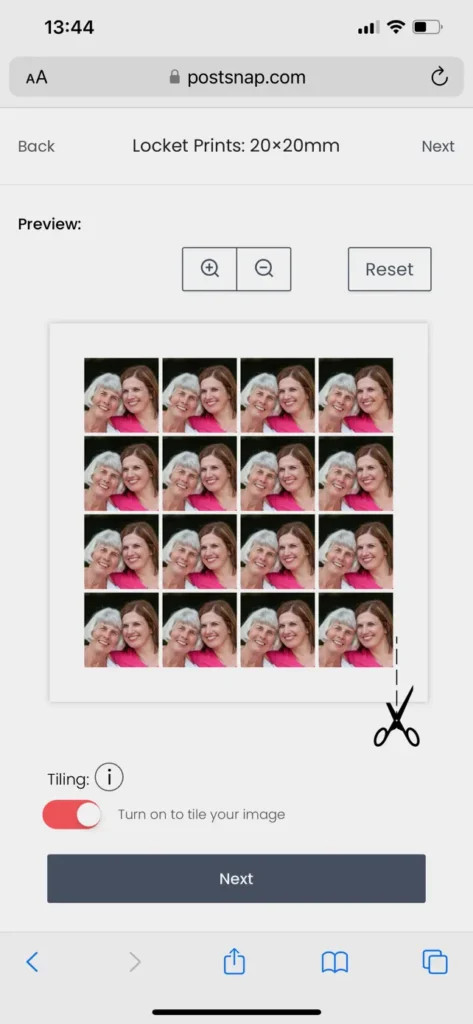 Locket Photo Tiled
3.8 Preview Your Image
Preview your image to ensure it looks correct before printing. This allows you to make any necessary adjustments.
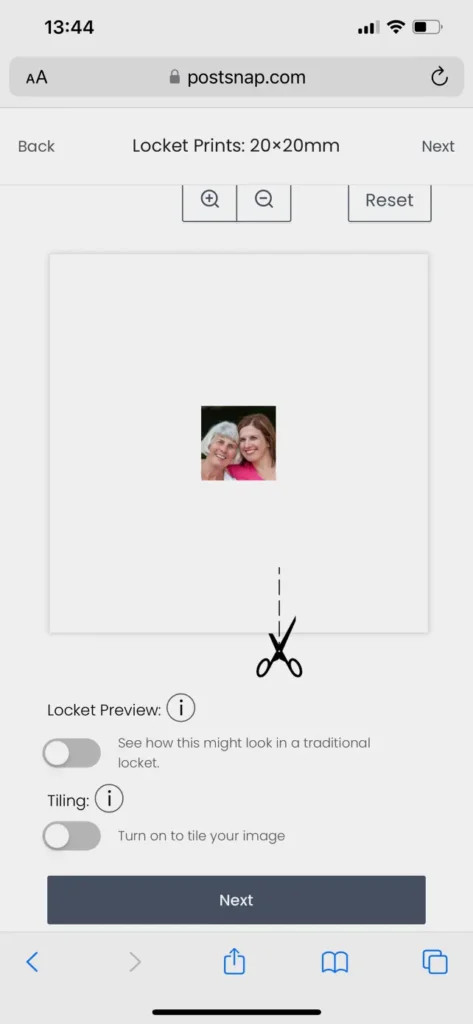 Locket photo preview on iPhone
3.9 Approve and Order
Approve your print and proceed to checkout. Ensure all details are correct before placing your order.
3.10 Trim Upon Arrival
Remember that the printed photos will be square or rectangular. Trim your photo print to its final shape and size once it arrives.
4. How Do I Trim and Fit Your Locket Photo Prints to Fit Your Pendant?
Proper trimming and fitting are crucial for achieving a professional look. Follow these steps to trim and fit your locket photos perfectly, ensuring they look beautiful inside your pendant.
4.1 Use Your Template
Use the template you created to trace the shape onto your photo. This ensures an accurate cut that matches the locket’s shape.
 locket sketch using tracing paper
 locket heart tracing
4.2 Trace the Shape
Place your template over one of your tiled photos and trace around it with a pencil. This creates a faint but exact trim line.
4.3 Use Sharp Scissors
Sharp, curved nail scissors provide clean edges when cutting curved shapes. These scissors allow for precise trimming.
4.4 Trim Evenly
Trim evenly from all sides to keep the subject centered. This ensures that the subject remains the focal point of the photo.
4.5 Experiment with Copies
Use the tiled copies to experiment with sizing. This allows you to adjust the trim until you achieve the perfect fit.
4.6 Insert the Photo
Insert the trimmed photo into your locket. Gently press around the edges using pointed or slanted tweezers until it fits beneath the lip of the locket.
4.7 Secure the Photo
The rim should hold the photo in place. If not, use a small amount of glue to secure the photo.
4.8 Use Tweezers
Pointed tweezers are ideal for positioning the photo. They allow you to handle the photo without damaging it.
4.9 Apply Glue Sparingly
Apply a small amount of glue to the back of the print. This ensures the photo stays in place without creating a mess.
4.10 Re-trim if Necessary
If the photo is too large, carefully re-trim small slivers off the edges. This ensures a smooth fit without folds or creases.
5. What Are Some Creative Ideas for Locket Photos?
Beyond traditional portraits, explore creative ways to personalize your locket. These ideas add a unique touch, making your locket even more special and meaningful.
5.1 Include Pet Photos
Pet photos are a heartwarming addition to any locket. Choose a photo of your beloved pet to keep them close to your heart.
5.2 Use Milestone Photos
Milestone photos capture significant moments in life. Include photos from graduations, weddings, or other important events.
5.3 Incorporate Travel Memories
Travel memories add a sense of adventure to your locket. Use photos from your favorite trips to reminisce about special experiences.
5.4 Create a Collage
A collage combines multiple images into one. Create a mini-collage of your favorite photos to fit inside your locket.
5.5 Add a Handwritten Note
A handwritten note adds a personal touch. Scan a small, meaningful note and include it in your locket.
5.6 Feature Artistic Designs
Artistic designs can add a unique flair. Include miniature paintings, drawings, or graphic designs in your locket.
5.7 Include Inspirational Quotes
Inspirational quotes provide daily motivation. Print a small, meaningful quote to keep in your locket.
5.8 Combine Photos and Text
Combine photos with text for a creative twist. Add names, dates, or short messages to personalize your locket.
5.9 Showcase Hobbies
Showcase your hobbies with related photos. Include images of your favorite activities, such as painting, hiking, or playing music.
5.10 Create a Themed Locket
Create a themed locket based on a specific interest or event. This could include photos from a particular holiday, season, or hobby.
6. Frequently Asked Questions (FAQ)
6.1 What is the standard size for locket photos?
There’s no one-size-fits-all standard; locket photo sizes typically range from 15 to 25mm x 15 to 25mm. Accurate measurement of your specific locket is critical for perfect fit.
6.2 How do I measure my locket without a template?
Measure the width and height of the photo area directly in millimeters. If there’s a rim, add half the rim’s width to each side for a precise fit.
6.3 Can I print locket photos from my phone?
Absolutely. Use online services like PostSnap to upload your photo, enter the dimensions, and choose print options for convenient mobile printing.
6.4 What if my locket has a unique shape?
Create a custom template using graph paper, tracing paper, a ruler, and sharp scissors. Sketch the locket’s shape and use it to guide your photo trimming.
6.5 How do I keep the subject centered when trimming the photo?
Trim evenly from all sides to ensure the subject remains the focal point. Use tiled copies from your print to experiment with the perfect fit.
6.6 What type of glue is best for securing locket photos?
Use a small amount of photo glue or glue dots to secure the photo without damaging it. Apply sparingly to the back of the print.
6.7 What should I do if the photo doesn’t fit after trimming?
Re-trim small slivers off the edges until it fits smoothly without folds or creases. Take your time and use sharp scissors for clean cuts.
6.8 How can I ensure my locket photo is high quality?
Choose a high-resolution image for the best print quality. Ensure the photo is well-lit and clear for optimal results.
6.9 Can I include two photos in a single locket?
Yes, for lockets with two photo slots, you can choose two separate photos or split one image into two. Get creative with your selections to tell a story.
6.10 Where can I find inspiration for unique locket photo ideas?
Explore creative ideas such as including pet photos, milestone memories, travel snapshots, handwritten notes, or artistic designs to personalize your locket.
By following these detailed steps, you can confidently shrink photos for a locket and create a cherished keepsake. For more tips, inspiration, and resources, visit dfphoto.net and explore our extensive collection of photography guides and tutorials.
Ready to create your perfect locket photo? Visit dfphoto.net today to discover more helpful guides, stunning photography inspiration, and connect with a vibrant community of photography enthusiasts. Elevate your skills, explore new techniques, and capture the world through your lens with dfphoto.net!
Address: 1600 St Michael’s Dr, Santa Fe, NM 87505, United States
Phone: +1 (505) 471-6001
Website: dfphoto.net
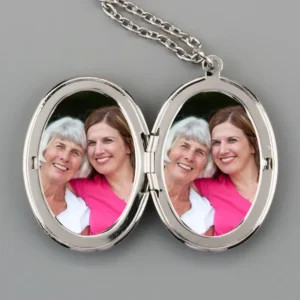 Oval shaped locket with photos