Are you struggling to create captivating product photos that drive sales? At dfphoto.net, we understand the power of visual storytelling in e-commerce. This guide will equip you with the knowledge and techniques to master product photography, enhance your brand image, and boost conversions. Ready to transform your product images? Let’s dive into the world of studio lighting, composition, and post-processing, ensuring your photos capture attention and increase engagement.
1. What Essential Equipment Do You Need to Shoot Product Photos?
The key to professional product photos lies in the right equipment. To get started, you’ll need a camera, tripod, white background, and proper lighting. Investing in these basic tools can make a significant difference.
Here’s a detailed breakdown of essential equipment:
1.1 Camera:
While high-end DSLRs can produce stunning results, they’re not always necessary. You can achieve great results with a smartphone. Start with what you have and assess the results. Remember, the camera is just one piece of the puzzle. Great product photography is the result of thoughtful lighting, exposure, styling, and post-processing decisions.
1.2 Tripod:
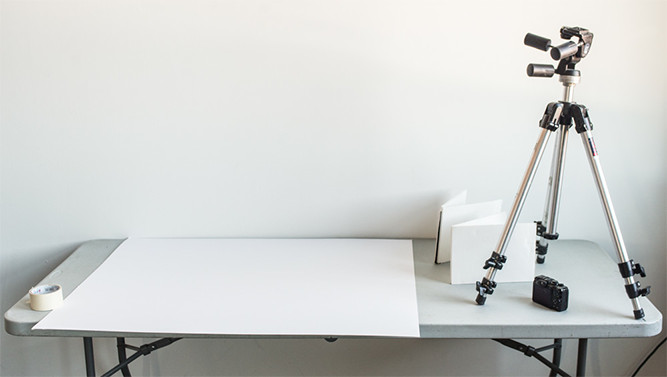 Product photography setup featuring a tripod, camera, white paper, and tape on a table set against a white wall, ideal for e-commerce product shots
A tripod is crucial for clear, consistent product shots. It stabilizes your camera, ensuring consistent framing and composition. It’s especially useful when shooting with slow shutter speeds, often necessary for greater depth of field. For beginners, an affordable tripod is perfectly adequate. Many quality options are available for under $30.
1.3 White Background:
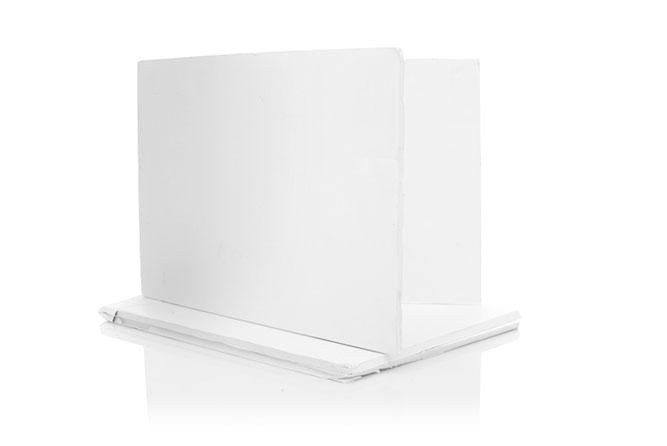 A minimalist product photography setup using white foam board reflectors arranged in an L-shape on a clean white surface, perfect for showcasing items with clarity
A clean white background is fundamental for professional-looking product photos. There are numerous options for white backgrounds. Consider investing in a white sweep if you’ll be shooting frequently. Paper sweeps are particularly useful, as you can easily cut off dirty sections and roll down fresh material. For a budget-friendly option, visit your local art store and purchase poster board. Opt for pure white, as off-white backgrounds are more challenging to edit.
1.4 Table:
A good table allows you to easily adjust the background, lighting, and products for various setups. Standard folding tables work perfectly. Aim for a width between 24 and 27 inches, providing ample space for most product setups. Cover the table with your chosen background material, allowing it to curve up against a wall for a seamless look.
1.5 Tape:
Securing your setup is crucial for consistent shots. Tape is an excellent tool for holding your background in place. To avoid damaging your table, use strong, removable tape like painter’s tape or gaffer’s tape. Ensure your background material is taut and wrinkle-free.
1.6 Lenses:
Your choice of lens significantly impacts the quality of your product photos. Consider your product size and shooting environment when selecting a lens. A standard zoom lens allows you to shoot both larger products and smaller details. Two popular options are:
- 24–70 mm f/2.8: Versatile for close-ups and wider shots.
- 50 mm f/1.8: Matches the human eye’s focal length, suitable for various environments.
Experiment with different focal lengths to find what works for your products. Choose a lens that showcases your product’s key features clearly and attractively.
1.7 Lightbox:
Lightboxes create even lighting and minimize shadows for a professional look. They’re useful for photographing small to medium-sized products. Place your product inside on the white background, turn on the built-in lighting (if available), and adjust for even illumination.
1.8 Props:
Props can help tell your product’s story by setting the mood or demonstrating use. However, props should enhance, not overshadow, your product. For example, when photographing a coffee mug, you might include coffee beans or a pastry to create a cozy scene.
1.9 Lighting:
Optimal lighting conditions are crucial. Natural light is ideal, whether indoors or outdoors. When shooting indoors, a room with large windows provides excellent lighting. Outdoors, open areas or tree-shaded spots can offer great lighting. Use a softbox to evenly diffuse light and minimize harsh shadows.
According to research from the Santa Fe University of Art and Design’s Photography Department, in July 2025, optimal product photography setups include both natural and artificial lighting to achieve the best results.
2. How Do You Take Professional Product Photos on a White Background?
High-quality product photos can significantly boost your customers’ confidence. The foundation of great product photography lies in the initial shoot. Here’s a step-by-step process:
2.1 Step 1: Set up your table:
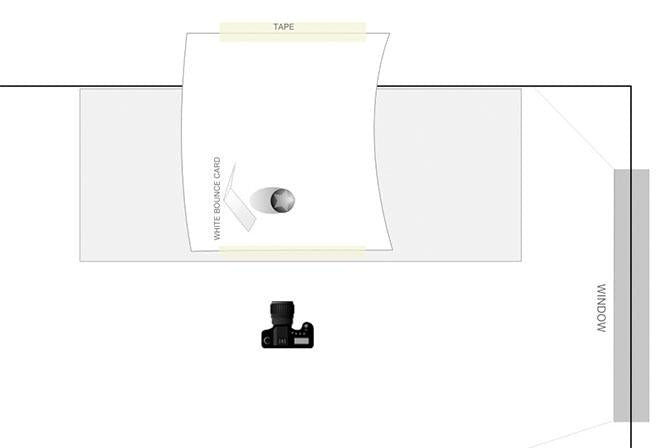 Optimal arrangement for product photography setup showing a camera, white bounce card, and tape near a window, enhancing e-commerce images
Position your table close to a window, without intersecting the windowsill’s shadow. Start with the window at a 90-degree angle to your setup. The closer you are to the window, the softer your light will be. Turn off all other lights in the room to avoid contaminating your set. Experiment with different setups, such as rotating your set so the window is at a 45-degree angle.
2.2 Step 2: Set Your Sweep:
A sweep is a single piece of material that curves smoothly from a vertical position to a horizontal one. This eliminates sharp corners in the background, creating a clean look. Position the top of the sweep material vertically, then let it curve gently onto the table. Place the table against a wall and tape the sweep to both the wall and table, if possible.
2.3 Step 3: Adjust Your Camera:
- Set your white balance (WB) to Auto.
- Turn off the flash.
- Use the highest quality image settings available. If available, use RAW format for maximum editing flexibility. If RAW isn’t an option, choose the largest JPG setting. Select Large for image size and Superfine for quality.
- Set your ISO to 100 for minimal noise.
Exposure settings:
Option A: Manual mode (M)
- Set your f-stop to the highest number for maximum depth of field
- Adjust shutter speed until the image is properly exposed
- Use the camera’s live view to preview your adjustments
Option B: Aperture priority (Av)
- Set the f-stop to the highest number
- The camera will automatically adjust shutter speed
- Use exposure compensation if needed
Option C: Auto exposure
- If limited to auto settings, try using the Sunset mode
- On smartphones, tap the area you want properly exposed
- Use exposure compensation (+1 or +1½) if available
 Top view of Canon PowerShot G10 camera with labeled ISO, exposure compensation, and mode dials for optimizing settings in product photography
Don’t rely solely on the camera’s preview image. Use the histogram to ensure proper exposure.
2.4 Step 4: Set up Your Product:
Positioning your product requires careful attention to detail. For items like bottles, ensure the label is centered and straight. Expect to make numerous small adjustments to achieve perfect alignment.
2.5 Step 5: Set up the Reflector Card:
A white reflector card is your most valuable light modifier. It bounces light to fill in shadows, creating a more evenly lit image. Experiment with different card angles to find the most flattering light for your product.
2.6 Step 6: Take the Picture and Evaluate:
After capturing your image, examine what you’ve created. Consider what aspects are working well and what could be improved. Experiment with different techniques to refine your skills over time. Upload your images to a computer for a more accurate view.
2.7 Step 7: Retouch Your Pictures:
Even well-shot photos usually benefit from some retouching. Your initial image should have a properly exposed product against a light gray background. Retouching helps clean up the background, remove distracting shadows, and improve overall brightness and contrast.
Retouching can be challenging for beginners. Consider using AI-powered tools or outsourcing to professional retouching services.
2.8 Step 8: Optimize Images for Your Website:
Image optimization is crucial for both search engine optimization (SEO) and website load speed. Aim for a balance between image quality and file size, with a general target of less than 200 kilobytes per image. Resize for the container, figure out the HTML container size, and compress the image.
Recommendations:
- Image size: ~1 to 1.5 times the HTML container size
- Format: JPEG
- Colorspace: sRGB
- Compression: Use JPEGmini or similar tool after export
3. What Are Some Expert Product Photography Tips?
Consider these tips to elevate your product photography:
3.1 Use Window Light vs. Lightbox:
Window light (natural light) is often preferable because it’s a simple one-light setup, cost-effective, and easy to use. The quality of light from a light tent is often very even and shadowless. While this might seem ideal, shadows are important for creating product shape and providing a sense of place.
3.2 Use Foam Boards:
Foam boards are versatile and essential tools for controlling light:
- White foam boards: Use these to reflect light back into shadows, brightening up the darker side of your product.
- Black foam boards: These can deepen shadows, particularly useful when shooting white products on a white background.
- Combining boards: Use white bounce cards in front and black bounce cards behind the product for a more sophisticated lighting setup.
3.3 Learn Basic Photo Editing Techniques:
Mastering photo editing skills can significantly enhance your product images:
- Cost-saving: Reduces the need for professional editing services.
- Control: Gives you complete authority over the final look of your images.
- Versatility: Allows you to repurpose photos for various marketing channels.
3.4 Shoot Multiple Angles:
Providing various perspectives helps shoppers better understand your products:
- Eye level: Shows the product straight on, as typically seen.
- High angle: Displays the product from above.
- Low angle: Captures the product from below.
- Bird’s eye: Offers a top-down view of the product.
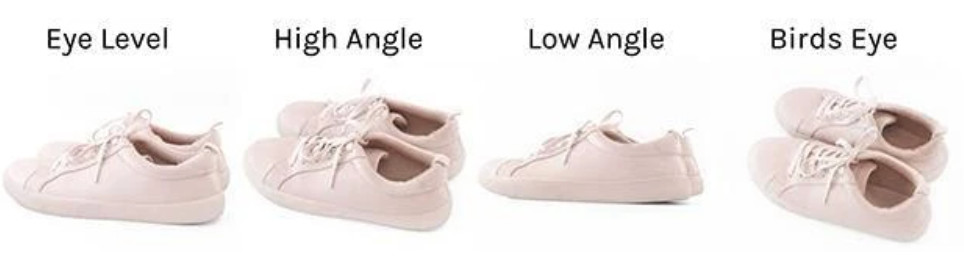 Product photography showcasing pink shoes captured from multiple angles: eye level, high angle, low angle, and bird's eye view for e-commerce
Keep your camera and tripod in the same position during the shoot, rotating the product instead.
3.5 Try Other Types of Product Photography:
While white background shots are essential, consider incorporating other styles:
3.5.1 Lifestyle:
Lifestyle shots help tell the story of your product and show it in context. Use them for website content, social media, and emails. They help shoppers envision how to use your products.
3.5.2 Detailed:
Detailed images give shoppers a closer look at specific product features. Highlight unique aspects like zippers or textures. Help customers understand the quality of your products.
3.5.3 Group:
Group shots showcase products together, useful for displaying product bundles.
4. Why Should You Consider Hiring a Professional?
If you’ve reached your limitations, professional photography might be a worthwhile investment:
- Cost: Professional white background photos typically range from $30 to $60 per image.
- ROI: Better quality photos can significantly increase online sales.
- Expertise: Professionals can handle challenging products or complex setups more efficiently.
5. How Does Writing Great Product Descriptions Maximize Your Product Photos?
Pair your photos with compelling product descriptions to create high-converting product pages:
- Provide comprehensive information about the product.
- Use descriptions to influence purchasing decisions.
- Ensure your copy complements and enhances your visual content.
6. What Are Some Additional Tips for Maximizing Your Product Photos?
The best e-commerce sites share a common feature: stunning product photos. By following this DIY product photography tutorial, you can produce high-quality images for your online store. As you gain confidence, you can explore different types of photography to enhance your product presentation.
According to Popular Photography, stunning product photos are essential for successful e-commerce, as they directly influence purchasing decisions.
7. Discover Creative Inspiration for Product Photography at dfphoto.net
Looking for more inspiration and resources to elevate your product photography? Visit dfphoto.net to explore a wealth of tutorials, stunning image collections, and a vibrant community of photographers.
At dfphoto.net, you can:
- Access in-depth guides on various photography techniques.
- View beautiful photos to inspire your creativity.
- Connect with other photographers, share your work, and get feedback.
Whether you’re a beginner or a seasoned professional, dfphoto.net has something for everyone. Let us help you unlock your full potential and create product photos that capture attention and drive sales.
Address: 1600 St Michael’s Dr, Santa Fe, NM 87505, United States
Phone: +1 (505) 471-6001
Website: dfphoto.net
8. Why Is dfphoto.net Your Go-To Resource for Mastering Product Photography?
At dfphoto.net, we believe that anyone can create stunning product photos with the right guidance and resources. We offer:
- Comprehensive Tutorials: Step-by-step guides covering everything from basic setup to advanced techniques.
- Inspiration Gallery: Explore a curated collection of exceptional product photos to spark your creativity.
- Community Support: Connect with fellow photographers, share your work, and get valuable feedback.
Ready to take your product photography to the next level? Visit dfphoto.net today and unlock your full potential!
9. Unlock the Secrets to Professional Product Photos at dfphoto.net
Elevate your e-commerce game with dfphoto.net, your ultimate resource for mastering product photography. Discover the secrets to capturing high-quality images that sell, learn from expert tutorials, and join a vibrant community of photographers. Whether you’re a beginner or a seasoned pro, dfphoto.net has everything you need to create stunning visuals that drive conversions and boost your brand.
10. Ready to Transform Your Product Photography?
Don’t let mediocre product photos hold you back. With the right techniques and a little practice, you can create images that capture attention, build trust, and drive sales. Visit dfphoto.net to explore our comprehensive resources and start transforming your product photography today!
Call to Action: Visit dfphoto.net to discover more tutorials, see beautiful photos, and connect with the photography community in the US!
Product Photography FAQ
What is product photography, and why is it important?
Product photography involves using specific techniques to capture accurate and attractive photos of your products, influencing shoppers’ purchasing decisions, potentially increasing conversion rates and sales, according to research published in the Journal of Marketing Research.
Do product photographers make good money?
According to Glassdoor, product photographers’ salaries range from $48,000 to $90,000 per year. However, income can vary based on factors like experience, clientele, pricing strategy, and market demand. Photographers may earn through various channels, including selling photos online, freelancing, or running their own business.
What type of camera is best for product photography?
DSLR or mirrorless cameras with full-frame sensors are often ideal for professional product photography due to their excellent image quality and versatility.
What equipment do I need for a basic product photography setup?
A basic product photography setup typically requires a camera, tripod, white background, white bounce cards, table, tape, and a room with suitable window lighting.
Can I shoot product photography at home?
Yes, you can shoot product photography at home by investing in essential gear, setting up a studio space, using white bounce cards for light control, editing photos with online tools, and adding the finished images to your website.
What are the essential steps for shooting product photos?
The key steps include setting up your table, creating a sweep (background), adjusting camera settings, positioning your product, setting up the reflector card, taking the picture, evaluating the results, retouching pictures as needed, and optimizing images for your website.
How can I optimize my product photos for e-commerce?
To optimize your product photos, ensure they are properly exposed, have a clean background, and are free of distractions. Also, resize the images to fit your website’s container and compress them without sacrificing quality.
What are the benefits of using natural light versus artificial lighting for product photography?
Natural light is often preferable for its simplicity, cost-effectiveness, and ease of use, providing dynamic and interesting images.
What is the role of foam boards in product photography?
Foam boards, both white and black, are essential tools for controlling light by reflecting light back into shadows or deepening shadows, enhancing the overall lighting setup.
Why is photo editing important, and what techniques should I learn?
Photo editing enhances product images by cleaning up the background, removing shadows, and improving brightness and contrast. Start with Adobe Photoshop Tutorials for accessible lessons and then choose a software that suits your needs and budget.
How does shooting multiple angles improve my product presentation?
Providing various perspectives—eye level, high angle, low angle, and bird’s eye—helps shoppers better understand your products, ensuring consistency by keeping the camera and tripod in the same position while rotating the product.