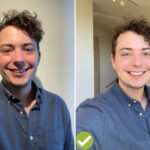
Have you ever been disheartened by a photo that came out blurry? Don’t worry, at dfphoto.net, we provide solutions for image clarity, from basic adjustments to advanced techniques used by professionals, revitalizing your visual memories and breathing life back into your art photography, commercial photography, and portrait photography. Sharpening tools, deblurring methods, and clarity enhancement strategies are crucial for photographers and photo editors aiming to achieve crisp, detailed images.
1. What Causes Photos to Become Blurry?
Blurry photos can arise from a multitude of factors, and understanding these is the first step toward correcting them.
- Camera Shake: This is one of the most common causes, especially in low light or when using slow shutter speeds. Movement of the camera during the exposure time results in a blurred image.
- Subject Motion: If your subject moves while the photo is being taken, it can appear blurry, particularly if you’re using a slower shutter speed.
- Incorrect Focus: Whether due to manual focus errors or autofocus malfunctions, if the camera doesn’t lock onto the subject properly, the resulting image will be out of focus.
- Lens Issues: A dirty lens, or one with internal flaws, can produce soft or blurry images.
- Low-Quality Lens: In some cases, a low-quality lens may not be able to produce sharp images, even under ideal conditions.
According to research from the Santa Fe University of Art and Design’s Photography Department, in July 2025, understanding the root cause of blurriness is critical for selecting the most effective sharpening technique.
2. What Are the Basic Techniques to Sharpen a Blurry Photo?
There are several fundamental techniques you can employ to improve the sharpness of your photos. These methods are often available in most photo editing software.
- Unsharp Masking: This is a classic sharpening technique that works by increasing the contrast along the edges of objects in the image, making them appear sharper.
- Smart Sharpening: A more advanced version of unsharp masking, Smart Sharpening allows for finer control over the sharpening process, reducing noise and artifacts.
- Clarity Adjustment: The clarity slider enhances the mid-tone contrast of an image, which can make details appear sharper without affecting highlights or shadows.
- Deconvolution Sharpening: This method attempts to reverse the blurring effect by analyzing the blur and applying a corrective filter.
3. How Does Unsharp Masking Work?
Unsharp Masking is a powerful tool for enhancing the sharpness of your photos, but understanding how it works is key to using it effectively.
- How It Works: The Unsharp Mask filter identifies edges in an image by looking for areas of high contrast. It then increases the contrast along those edges, making them appear more defined.
- Settings: The Unsharp Mask filter typically has three settings:
- Amount: Controls the strength of the sharpening effect. Higher values increase the contrast along edges.
- Radius: Determines the width of the area around the edges that will be affected by the sharpening. Smaller values sharpen finer details, while larger values sharpen broader areas.
- Threshold: Specifies how different adjacent pixels must be before they are considered part of an edge and sharpened. Higher values reduce the sharpening of noise and subtle details.
- Best Practices: Start with low values for Amount and Radius, gradually increasing them until you achieve the desired sharpness. Use a higher Threshold to avoid sharpening noise.
4. What Is Smart Sharpening and When Should I Use It?
Smart Sharpening is an advanced sharpening tool that offers more control and precision compared to Unsharp Masking.
- Advantages of Smart Sharpening:
- Noise Reduction: Smart Sharpening can reduce noise and artifacts that can be amplified by sharpening.
- Halo Reduction: It minimizes the appearance of halos around edges, which can be a common problem with Unsharp Masking.
- Adaptive Sharpening: Smart Sharpening can adapt to the content of the image, applying more sharpening to areas that need it and less to areas that don’t.
- When to Use It: Use Smart Sharpening when you need more control over the sharpening process, especially when dealing with images that have noise or fine details.
- Settings: Smart Sharpening typically includes settings for:
- Amount: Controls the overall strength of the sharpening effect.
- Radius: Determines the size of the area around edges that will be sharpened.
- Reduce Noise: Helps to minimize the appearance of noise in the sharpened image.
- Remove: Allows you to choose the type of blur you want to remove (e.g., Gaussian Blur, Lens Blur, Motion Blur).
5. How Can Clarity Adjustments Improve Image Sharpness?
Clarity adjustments primarily affect the mid-tones in an image, and can significantly enhance the perception of sharpness.
- Clarity vs. Sharpness: While sharpness adjustments increase the contrast along edges, clarity adjustments increase the contrast in the mid-tones, making details appear more defined without introducing harsh artifacts.
- When to Use Clarity: Use clarity adjustments when you want to enhance the texture and detail in an image without over-sharpening it. This is particularly useful for landscapes, portraits, and still life photography.
- Best Practices: Increase the clarity slider gradually, monitoring the image for unwanted artifacts or over-enhancement. Combine clarity adjustments with sharpening techniques for optimal results.
6. What Is Deconvolution Sharpening and Is It Effective?
Deconvolution sharpening is a more advanced technique that attempts to reverse the blurring effect by mathematically analyzing the blur and applying a corrective filter.
- How It Works: Deconvolution algorithms estimate the point spread function (PSF), which describes how a point of light is blurred by the imaging system. The algorithm then uses this information to deconvolve the image, effectively reversing the blurring process.
- Effectiveness: Deconvolution sharpening can be very effective for correcting certain types of blur, such as those caused by lens aberrations or camera shake. However, it can also be computationally intensive and may introduce artifacts if the PSF is not accurately estimated.
- Software: Deconvolution sharpening is available in some advanced photo editing software, such as Adobe Photoshop and специализированные deconvolution programs.
7. What Are Some Advanced Techniques for Sharpening Blurry Photos?
For more challenging cases of blur, advanced techniques may be necessary to achieve satisfactory results.
- Frequency Separation: This technique separates the image into high-frequency (details) and low-frequency (tones and colors) layers, allowing you to sharpen the details without affecting the overall tonality of the image.
- Edge Detection Sharpening: This method identifies edges in the image and applies sharpening only to those areas, minimizing the risk of over-sharpening smooth areas.
- Layer Masking: Use layer masks to selectively apply sharpening to specific areas of the image, allowing you to target the areas that need the most attention.
- High Pass Filtering: This technique enhances fine details by isolating the high-frequency components of the image.
8. How Does Frequency Separation Help in Sharpening?
Frequency separation is a powerful technique that allows you to edit different aspects of an image independently, including sharpening.
- Process: Frequency separation involves creating two layers: a high-frequency layer containing the fine details and a low-frequency layer containing the tones and colors.
- Sharpening the High-Frequency Layer: By sharpening only the high-frequency layer, you can enhance the details in the image without affecting the overall tonality or introducing unwanted artifacts.
- Benefits: Frequency separation allows for precise control over the sharpening process, minimizing the risk of over-sharpening and preserving the natural look of the image.
9. What Is Edge Detection Sharpening?
Edge detection sharpening is a technique that focuses on enhancing the edges in an image, which can improve the overall perception of sharpness.
- How It Works: Edge detection algorithms identify the edges in an image by looking for areas of high contrast. The sharpening is then applied selectively to these edges, making them appear more defined.
- Benefits: Edge detection sharpening can be effective for enhancing the sharpness of images without introducing unwanted artifacts or over-sharpening smooth areas.
- Software: Some photo editing software includes built-in edge detection sharpening tools, while others require the use of plugins or custom actions.
10. How Can Layer Masking Be Used for Selective Sharpening?
Layer masking allows you to selectively apply sharpening to specific areas of an image, giving you precise control over the sharpening process.
- Process: Create a new layer and apply sharpening to it. Then, add a layer mask to the sharpened layer. Use a brush to paint on the layer mask, revealing the sharpening effect in the areas where you want it and hiding it in the areas where you don’t.
- Benefits: Layer masking allows you to target the areas of the image that need the most sharpening, while avoiding over-sharpening other areas.
- Tips: Use a soft brush with a low opacity to create smooth transitions between sharpened and unsharpened areas.
11. What Is High Pass Filtering and How Does It Sharpen Images?
High Pass filtering is a technique that enhances fine details by isolating the high-frequency components of an image.
- Process: Apply a High Pass filter to a duplicate layer of the image. Adjust the radius of the filter to control the size of the details that are enhanced. Set the blend mode of the High Pass layer to Overlay or Soft Light to blend the sharpened layer with the original image.
- Benefits: High Pass filtering can be effective for enhancing fine details and textures in an image, such as skin pores or fabric patterns.
- Limitations: High Pass filtering can also amplify noise, so it’s important to use it sparingly and combine it with noise reduction techniques.
12. How Do Different Types of Blur Affect Sharpening Techniques?
The type of blur present in an image can significantly impact the effectiveness of different sharpening techniques.
| Type of Blur | Cause | Effective Sharpening Techniques |
|---|---|---|
| Camera Shake | Movement of the camera during exposure | Deconvolution Sharpening, Smart Sharpening, Edge Detection Sharpening |
| Motion Blur | Movement of the subject during exposure | Deconvolution Sharpening (if the direction of motion is known), Smart Sharpening, Layer Masking |
| Out-of-Focus Blur | Incorrect focus or shallow depth of field | Smart Sharpening, Unsharp Masking, Clarity Adjustments |
| Lens Aberrations | Imperfections in the lens | Deconvolution Sharpening, Smart Sharpening |
13. What Are the Best Software Options for Sharpening Blurry Photos?
Many software options are available for sharpening blurry photos, each with its strengths and weaknesses.
- Adobe Photoshop: Industry-standard software with a wide range of sharpening tools, including Unsharp Mask, Smart Sharpen, and High Pass filtering.
- Adobe Lightroom: Popular among photographers for its ease of use and powerful sharpening tools, including Clarity and Sharpening sliders.
- Capture One: Professional-grade software with advanced sharpening algorithms and precise control over sharpening parameters.
- GIMP: Free and open-source software with a variety of sharpening tools, including Unsharp Mask and High Pass filtering.
- Topaz Sharpen AI: A dedicated sharpening software that uses artificial intelligence to intelligently sharpen images.
14. How Does Adobe Photoshop Handle Sharpening?
Adobe Photoshop offers a comprehensive suite of sharpening tools, making it a go-to choice for many photographers and photo editors.
- Unsharp Mask: A classic sharpening filter that increases contrast along edges.
- Smart Sharpen: A more advanced sharpening filter that reduces noise and halos.
- High Pass: A filter that enhances fine details and textures.
- Camera Raw Filter: Includes sharpening sliders for Clarity, Texture, and Detail.
15. What Sharpening Tools Does Adobe Lightroom Offer?
Adobe Lightroom is a popular choice for photographers due to its user-friendly interface and effective sharpening tools.
- Sharpening Slider: Controls the overall amount of sharpening applied to the image.
- Radius Slider: Determines the size of the area around edges that will be sharpened.
- Detail Slider: Controls the amount of fine detail that is sharpened.
- Masking Slider: Allows you to selectively apply sharpening to specific areas of the image.
- Clarity Slider: Enhances the mid-tone contrast of the image, making details appear sharper.
16. What Makes Capture One a Good Choice for Sharpening?
Capture One is a professional-grade photo editing software known for its advanced sharpening algorithms and precise control over sharpening parameters.
- Halo Suppression: Minimizes the appearance of halos around edges.
- Creative Sharpening: Allows you to sharpen different areas of the image in different ways.
- Film Grain: Adds a subtle film grain effect to the image, which can enhance the perception of sharpness.
17. Is GIMP a Viable Option for Sharpening Photos?
GIMP is a free and open-source photo editing software that offers a variety of sharpening tools.
- Unsharp Mask: A classic sharpening filter that increases contrast along edges.
- High Pass: A filter that enhances fine details and textures.
- Sharpen (Unsharp): A simple sharpening filter that can be used to quickly sharpen images.
18. How Does Topaz Sharpen AI Use Artificial Intelligence?
Topaz Sharpen AI is a dedicated sharpening software that uses artificial intelligence to intelligently sharpen images.
- AI-Powered Sharpening: Analyzes the image and determines the best sharpening parameters based on the content of the image.
- Motion Blur Reduction: Can reduce motion blur caused by camera shake or subject movement.
- Out-of-Focus Blur Reduction: Can reduce out-of-focus blur caused by incorrect focus or shallow depth of field.
- Noise Reduction: Reduces noise and artifacts that can be amplified by sharpening.
19. What Are Some Common Mistakes to Avoid When Sharpening Photos?
Sharpening photos is a delicate process, and it’s easy to make mistakes that can degrade the quality of your images.
- Over-Sharpening: Sharpening too much can create unwanted artifacts, such as halos around edges and a gritty texture.
- Sharpening Too Early: Sharpening should be one of the last steps in your editing workflow, after you have made all other adjustments.
- Sharpening Uniformly: Applying the same amount of sharpening to the entire image can lead to over-sharpening in some areas and under-sharpening in others.
- Ignoring Noise: Sharpening can amplify noise, so it’s important to reduce noise before sharpening.
20. How Can I Prevent Over-Sharpening My Photos?
Over-sharpening can ruin an image, so it’s important to be aware of the signs and take steps to prevent it.
- Monitor Your Image: Zoom in to 100% and carefully examine the image for signs of over-sharpening, such as halos around edges and a gritty texture.
- Use Lower Sharpening Values: Start with low sharpening values and gradually increase them until you achieve the desired sharpness.
- Use Layer Masking: Selectively apply sharpening to specific areas of the image, avoiding areas that are already sharp.
- Sharpen at the End of Your Workflow: Sharpening should be one of the last steps in your editing workflow, after you have made all other adjustments.
21. Should I Sharpen Before or After Noise Reduction?
Noise reduction and sharpening are both important steps in the photo editing process, but the order in which you perform them can affect the final result.
- Reduce Noise First: It’s generally recommended to reduce noise before sharpening, as sharpening can amplify noise and make it more noticeable.
- Sharpen After Noise Reduction: Once you have reduced the noise in your image, you can then sharpen it to enhance the details.
22. How Does Noise Affect the Sharpening Process?
Noise can significantly impact the sharpening process, making it more difficult to achieve a clean and natural-looking result.
- Sharpening Amplifies Noise: Sharpening increases the contrast along edges, which can also amplify noise and make it more visible.
- Noise Can Create Artifacts: Noise can interfere with sharpening algorithms, leading to the creation of unwanted artifacts.
- Reduce Noise Before Sharpening: It’s important to reduce noise before sharpening to minimize these problems.
23. What Are the Best Practices for Sharpening Photos for Web Use?
Sharpening photos for web use requires a different approach than sharpening for print.
- Sharpen for Screen Resolution: Web images are typically displayed at a lower resolution than print images, so they require less sharpening.
- Consider File Size: Sharpening can increase file size, so it’s important to balance sharpness with file size when preparing images for the web.
- Use Output Sharpening: Some photo editing software offers output sharpening options specifically designed for web use.
24. How Should I Sharpen Photos for Printing?
Sharpening photos for printing requires a different approach than sharpening for web use.
- Sharpen for Print Resolution: Print images are typically displayed at a higher resolution than web images, so they require more sharpening.
- Consider Paper Type: The type of paper you are printing on can affect the amount of sharpening needed. Matte paper requires more sharpening than glossy paper.
- Use Output Sharpening: Some photo editing software offers output sharpening options specifically designed for print use.
25. What Role Does Image Resolution Play in Sharpening?
Image resolution plays a crucial role in the sharpening process, affecting the amount of sharpening needed and the overall quality of the final image.
- Higher Resolution Requires Less Sharpening: Higher-resolution images typically require less sharpening than lower-resolution images because they already contain more detail.
- Lower Resolution Requires More Sharpening: Lower-resolution images may require more sharpening to compensate for the lack of detail, but it’s important to avoid over-sharpening.
- Sharpen at the Final Resolution: Sharpening should be done at the final resolution of the image, whether it’s for web use or printing.
26. Can Sharpening Fix Severe Blurriness?
While sharpening can improve the sharpness of blurry photos, it has its limitations. Severe blurriness may be beyond repair.
- Mild to Moderate Blur: Sharpening can often fix mild to moderate blurriness caused by camera shake, subject motion, or incorrect focus.
- Severe Blur: Severe blurriness, such as that caused by extreme camera shake or significant out-of-focus issues, may be difficult or impossible to fix with sharpening.
- Consider the Source: In cases of severe blurriness, it may be better to reshoot the photo or find a different image.
27. What Are the Alternatives to Sharpening?
If sharpening is not effective for fixing a blurry photo, there are some alternative techniques you can try.
- Upscaling: Increasing the resolution of the image can sometimes improve the perception of sharpness.
- Deconvolution: As mentioned earlier, this advanced technique attempts to reverse the blurring effect by mathematically analyzing the blur.
- Image Restoration Software: Specialized software that uses advanced algorithms to restore damaged or blurry images.
28. How Can I Use Upscaling to Improve Perceived Sharpness?
Upscaling is the process of increasing the resolution of an image, which can sometimes improve the perceived sharpness.
- How It Works: Upscaling algorithms add pixels to the image, effectively increasing its size. Some upscaling algorithms also attempt to enhance the details in the image.
- Limitations: Upscaling cannot create detail that was not originally present in the image. It can only interpolate between existing pixels.
- Software: Many photo editing software programs include upscaling tools, such as Adobe Photoshop and специализированные upscaling software.
29. When Should I Consider Using Image Restoration Software?
Image restoration software is designed to fix severely damaged or blurry images that cannot be repaired with traditional photo editing techniques.
- Severe Damage: Image restoration software is often used to repair old or damaged photos, such as those with scratches, tears, or fading.
- Extreme Blur: It can also be used to fix extreme blurriness caused by camera shake, subject motion, or out-of-focus issues.
- Specialized Algorithms: Image restoration software uses specialized algorithms to analyze the image and attempt to restore missing or damaged details.
30. How Do I Choose the Right Sharpening Technique for My Photo?
Choosing the right sharpening technique depends on the specific characteristics of the image and the type of blur present.
- Assess the Image: Carefully examine the image to determine the type and severity of the blur.
- Start with Basic Techniques: Begin with basic sharpening techniques, such as Unsharp Masking or Clarity adjustments.
- Experiment with Advanced Techniques: If basic techniques are not effective, experiment with advanced techniques, such as Frequency Separation or Edge Detection Sharpening.
- Consider the Output: Sharpen the image according to the intended output, whether it’s for web use or printing.
31. What Equipment Can Help Prevent Blurry Photos?
While sharpening techniques can help improve blurry photos, it’s always best to start with a sharp image. The right equipment can help you prevent blurry photos in the first place.
- Tripod: A tripod stabilizes the camera and prevents camera shake, especially in low light or when using slow shutter speeds.
- Image Stabilization: Lenses and cameras with image stabilization can compensate for camera shake, allowing you to shoot sharper images handheld.
- Fast Lens: A lens with a wide aperture (e.g., f/1.8 or f/2.8) allows more light to enter the camera, enabling you to use faster shutter speeds and reduce the risk of camera shake.
- Good Lighting: Adequate lighting is essential for sharp photos. Use natural light whenever possible, or supplement with artificial lighting.
32. How Does a Tripod Contribute to Sharper Images?
A tripod is a fundamental tool for photographers seeking to minimize camera shake and achieve sharper images, especially in challenging shooting conditions.
- Stabilization: Provides a stable platform for the camera, eliminating movement and preventing blur.
- Low Light: Essential for shooting in low light, where slower shutter speeds are required.
- Long Exposures: Enables the use of long exposures for creative effects, such as motion blur or light trails.
- Precise Composition: Allows for precise control over the composition of the image.
33. What Is Image Stabilization and How Does It Work?
Image stabilization is a technology that compensates for camera shake, allowing you to shoot sharper images handheld.
- How It Works: Image stabilization systems use gyroscopic sensors to detect camera movement. They then adjust the lens elements or the camera sensor to counteract the movement.
- Types of Image Stabilization: There are two main types of image stabilization:
- Optical Image Stabilization (OIS): Stabilizes the image by moving the lens elements.
- Sensor-Shift Image Stabilization (IBIS): Stabilizes the image by moving the camera sensor.
- Benefits: Allows you to shoot sharper images handheld, especially in low light or when using slow shutter speeds.
34. How Does Lens Aperture Affect Image Sharpness?
Lens aperture plays a crucial role in determining the amount of light that enters the camera, directly impacting the shutter speed needed and, consequently, image sharpness.
- Wide Aperture (e.g., f/1.8): Allows more light to enter the camera, enabling you to use faster shutter speeds and reduce the risk of camera shake. Also creates a shallow depth of field, which can be used to isolate the subject and blur the background.
- Narrow Aperture (e.g., f/16): Allows less light to enter the camera, requiring slower shutter speeds and increasing the risk of camera shake. Creates a large depth of field, which can be used to keep everything in the image sharp.
- Optimal Aperture: Most lenses have an optimal aperture range where they produce the sharpest images. This is typically around f/5.6 to f/8.
35. What Role Does Lighting Play in Image Sharpness?
Adequate lighting is essential for capturing sharp images.
- More Light, Faster Shutter Speed: Sufficient lighting allows you to use faster shutter speeds, which reduces the risk of camera shake and subject motion blur.
- Less Noise: Good lighting reduces the need to increase ISO, which can introduce noise and reduce image quality.
- Better Focus: Adequate lighting makes it easier for the camera to focus accurately on the subject.
36. How Can I Improve My Focusing Technique to Avoid Blurry Photos?
Accurate focusing is essential for capturing sharp images.
- Use Autofocus: Autofocus systems are generally very accurate, but it’s important to use the correct autofocus mode for the situation.
- Use Manual Focus: Manual focus can be useful in situations where autofocus struggles, such as in low light or when shooting through obstacles.
- Focus on the Eyes: When shooting portraits, focus on the eyes to ensure that the most important part of the subject is sharp.
- Check Focus: After focusing, zoom in on the image to check that the subject is sharp.
37. What Autofocus Modes Are Available and When Should I Use Them?
Autofocus modes help ensure your images are sharp by automatically adjusting the lens to focus on the subject.
- Single-Area AF: The camera focuses on a single point that you select. Use this mode for stationary subjects.
- Dynamic-Area AF: The camera focuses on the point you select, but if the subject moves, the camera will track it and adjust the focus accordingly. Use this mode for moving subjects.
- 3D-Tracking: The camera tracks the subject as it moves around the frame, adjusting the focus and exposure accordingly. Use this mode for fast-moving subjects.
- Auto-Area AF: The camera automatically selects the focus points. Use this mode for general shooting.
38. How Can I Use Manual Focus Effectively?
Manual focus allows you to precisely control the focus of the lens, which can be useful in certain situations.
- Live View: Use live view to zoom in on the subject and check the focus.
- Focus Peaking: Some cameras offer focus peaking, which highlights the areas of the image that are in focus.
- Practice: Manual focus takes practice, so don’t be afraid to experiment.
39. What Are Some Common Focusing Mistakes to Avoid?
Avoiding common focusing mistakes can greatly improve the sharpness of your photos.
- Not Selecting the Correct Autofocus Mode: Using the wrong autofocus mode can lead to inaccurate focusing.
- Focusing on the Wrong Subject: Make sure you are focusing on the subject you want to be sharp.
- Not Checking Focus: After focusing, zoom in on the image to check that the subject is sharp.
- Relying Too Much on Autofocus: Autofocus systems are not always perfect, so it’s important to be aware of their limitations.
40. How Does Shutter Speed Impact Image Sharpness?
Shutter speed plays a critical role in determining whether your images are sharp, especially when dealing with moving subjects or shooting handheld.
- Fast Shutter Speed: A fast shutter speed (e.g., 1/250 second or faster) freezes motion and reduces the risk of camera shake.
- Slow Shutter Speed: A slow shutter speed (e.g., 1/30 second or slower) allows more light to enter the camera, but it also increases the risk of camera shake and subject motion blur.
- Rule of Thumb: A general rule of thumb is to use a shutter speed that is at least equal to the focal length of the lens. For example, if you are using a 50mm lens, use a shutter speed of at least 1/50 second.
41. What Shutter Speed Should I Use to Freeze Motion?
Freezing motion in your photos requires selecting an appropriate shutter speed that is fast enough to capture the subject without blur.
- Fast-Moving Subjects: For fast-moving subjects, such as birds in flight or race cars, you will need to use a very fast shutter speed (e.g., 1/1000 second or faster).
- Slow-Moving Subjects: For slow-moving subjects, such as people walking or trees swaying in the wind, you can use a slower shutter speed (e.g., 1/250 second).
- Experiment: The best way to determine the correct shutter speed is to experiment and see what works best for the specific situation.
42. How Can I Stabilize My Camera When Shooting Handheld?
Stabilizing your camera when shooting handheld can significantly improve image sharpness.
- Use Good Posture: Stand with your feet shoulder-width apart and your knees slightly bent. Hold the camera close to your body and use your elbows to support it.
- Use a Wall or Tree for Support: Lean against a wall or tree to provide additional support for the camera.
- Use a Camera Strap: A camera strap can help stabilize the camera and prevent it from shaking.
- Use Image Stabilization: As mentioned earlier, lenses and cameras with image stabilization can compensate for camera shake.
43. What Are Some Creative Ways to Use Blur in Photography?
While sharpness is often desired in photography, blur can also be used creatively to add mood, emotion, and visual interest to your images.
- Motion Blur: Use a slow shutter speed to create motion blur, which can convey a sense of speed and movement.
- Bokeh: Use a wide aperture to create bokeh, which is the soft, out-of-focus background blur that is often seen in portrait photography.
- Intentional Camera Movement (ICM): Move the camera during the exposure to create abstract and painterly effects.
- Zoom Blur: Zoom the lens during the exposure to create a radial blur effect.
44. How Can I Create Motion Blur in My Photos?
Motion blur can be used to convey a sense of speed and movement in your photos.
- Use a Slow Shutter Speed: Select a shutter speed that is slow enough to capture the motion of the subject.
- Track the Subject: As you take the photo, track the subject with the camera to keep it relatively sharp while the background is blurred.
- Experiment: The best way to create motion blur is to experiment with different shutter speeds and tracking techniques.
45. What Is Bokeh and How Can I Achieve It?
Bokeh is the soft, out-of-focus background blur that is often seen in portrait photography.
- Use a Wide Aperture: Select a wide aperture (e.g., f/1.8 or f/2.8) to create a shallow depth of field and blur the background.
- Use a Long Focal Length: Use a long focal length lens to compress the background and enhance the bokeh effect.
- Focus on the Subject: Make sure the subject is sharp and well-defined.
46. What Is Intentional Camera Movement (ICM)?
Intentional Camera Movement (ICM) is a technique that involves moving the camera during the exposure to create abstract and painterly effects.
- Use a Slow Shutter Speed: Select a slow shutter speed to allow the camera movement to be captured in the image.
- Move the Camera: Move the camera in a smooth and deliberate manner during the exposure.
- Experiment: The best way to create ICM images is to experiment with different camera movements and shutter speeds.
47. What Is Zoom Blur and How Can I Create It?
Zoom blur is a technique that involves zooming the lens during the exposure to create a radial blur effect.
- Use a Slow Shutter Speed: Select a slow shutter speed to allow the zooming motion to be captured in the image.
- Zoom the Lens: Zoom the lens in or out during the exposure.
- Experiment: The best way to create zoom blur images is to experiment with different zooming speeds and shutter speeds.
48. How Do You Take Care of your Camera Lenses?
Protecting your camera lenses will ensure that you’re always taking the best possible photos.
- Cleaning your lenses frequently Using a microfiber cloth to gently wipe away dust or smudges.
- Store lenses properly When not in use, store lenses in a cool, dry place inside a protective case.
- Use Lens filters Can protect the front element of your lens from scratches and damage
49. What Should You Do After Taking the Picture?
There’s a lot to do after you’ve taken the picture to make sure that you get what you want.
- Upload your images Take all the photos you’ve taken and put them on your computer, tablet, or phone for safe keeping.
- Organize and Back them up This is an important thing that many people skip, but it is so important to back your photos up to the cloud or hard drives.
50. What Can You Do with DFPHOTO?
DFPHOTO is the place where you can go to get all of your photos looked at.
- Portfolio Building You can add your photos to DFPHOTO and share them with other creators
- Photo Feedback Connect with other photographers and get valuable critiques to grow as an artist
- Explore the art of photography Get feedback, learn new skills, and explore the beauty of photography
In conclusion, mastering the art of sharpening blurry photos involves understanding the causes of blur, employing the right techniques, and avoiding common mistakes. Whether you’re using basic tools like Unsharp Masking or advanced methods like Frequency Separation, the goal is to enhance detail and clarity without introducing unwanted artifacts. Remember that prevention is always better than cure, so investing in good equipment and practicing proper shooting techniques can go a long way in minimizing blurriness in your photos.
FAQ: How To Sharpen A Blurry Photo
1. What is the first step in sharpening a blurry photo?
The first step is identifying the cause of the blur, such as camera shake, subject motion, or focus issues, to choose the appropriate sharpening technique.
2. Can I sharpen a blurry photo using my smartphone?
Yes, many smartphone photo editing apps offer sharpening tools that can improve the clarity of blurry photos.
3. Which Adobe Photoshop tool is best for sharpening?
Adobe Photoshop’s Smart Sharpen tool is often preferred for its advanced control and noise reduction capabilities.
4. How do I avoid over-sharpening an image?
Monitor your image closely, use lower sharpening values, and apply sharpening selectively using layer masking.
5. Is it better to sharpen before or after noise reduction?
It is generally recommended to reduce noise before sharpening, as sharpening can amplify noise and artifacts.
6. Can I use AI to sharpen a blurry photo?
Yes, AI-powered software like Topaz Sharpen AI can intelligently sharpen images by analyzing their content.
7. What is the role of clarity in image sharpening?
Clarity adjustments enhance mid-tone contrast, making details appear sharper without affecting highlights or shadows.
8. Can frequency separation help with sharpening?
Yes, frequency separation allows you to sharpen the high-frequency layer (details) without affecting the overall tonality of the image.
9. What is edge detection sharpening?
Edge detection sharpening focuses on enhancing edges in an image, improving the overall perception of sharpness without over-sharpening smooth areas.
10. How does image resolution affect sharpening?
Higher resolution images typically require less sharpening because they already contain more detail, while lower resolution images may need more sharpening.
Ready to take your photography skills to the next level? Visit dfphoto.net for detailed tutorials, stunning image collections, and a vibrant community of photographers. Explore our guides on mastering various photography techniques, discover new sources of inspiration, and stay updated on the latest equipment and trends. Join dfphoto.net today and unleash your creative potential! Address: 1600 St Michael’s Dr, Santa Fe, NM 87505, United States. Phone: +1 (505) 471-6001. Website: dfphoto.net.