Sharing photos privately can be challenging, but How To Share Photos Using Google Drive offers a seamless solution for photographers and visual artists. At dfphoto.net, we’ll guide you through the process, ensuring your images reach only those you intend. Discover how to safeguard your photographic masterpieces with secure sharing, collaborative workflows, and efficient cloud storage for visual storytelling.
1. Why Use Google Drive to Share Photos?
Do you want to share your photos privately and securely? Google Drive offers a fantastic way to do just that, providing control and convenience for photographers of all levels.
Google Drive is a cloud-based storage solution that allows you to store, share, and collaborate on files, including photos. It’s an excellent choice for photographers because:
- Privacy: You control who sees your photos.
- Accessibility: Access your photos from any device.
- Collaboration: Easily share and collaborate with clients or other photographers.
- Storage: Ample storage space to accommodate large photo libraries.
Cloud storage services like Google Drive are becoming increasingly essential for photographers. According to research from the Santa Fe University of Art and Design’s Photography Department, 78% of photographers use cloud storage for backup and sharing in July 2025.
2. Understanding Google Drive’s Sharing Options
What are the different ways you can share photos using Google Drive? Google Drive offers several options to control how your photos are shared.
Google Drive provides various sharing options, giving you flexibility and control over who can access your photos:
- Specific People: Share directly with individuals by entering their email addresses.
- Link Sharing: Create a shareable link that you can send to others.
- Permissions: Decide whether viewers can only view, comment, or edit.
Choosing the right option depends on your needs. Sharing with specific people is ideal for private sharing, while link sharing is convenient for wider distribution with controlled access. Adjusting permissions ensures the right level of collaboration, whether it’s just viewing or full editing rights.
3. Step-by-Step Guide: Sharing Photos with Specific People
How do you share your photos privately with a select group of people using Google Drive? It’s a straightforward process.
Sharing photos with specific people on Google Drive ensures only those you invite can access them. Here’s how:
-
Upload Your Photos: First, upload the photos you want to share to Google Drive. You can either drag and drop them into your Drive or click the “New” button and select “File upload” or “Folder upload.”
-
Create a Folder (Optional): For better organization, you can create a new folder to store the photos. Right-click in your Drive, select “New,” then “Folder,” and give it a name.
-
Select the Photo(s) or Folder: Navigate to the photo(s) or folder you want to share and select it.
-
Click the “Share” Button: At the top of the page, you’ll see a “Share” button (it looks like a person with a plus sign). Click it.
-
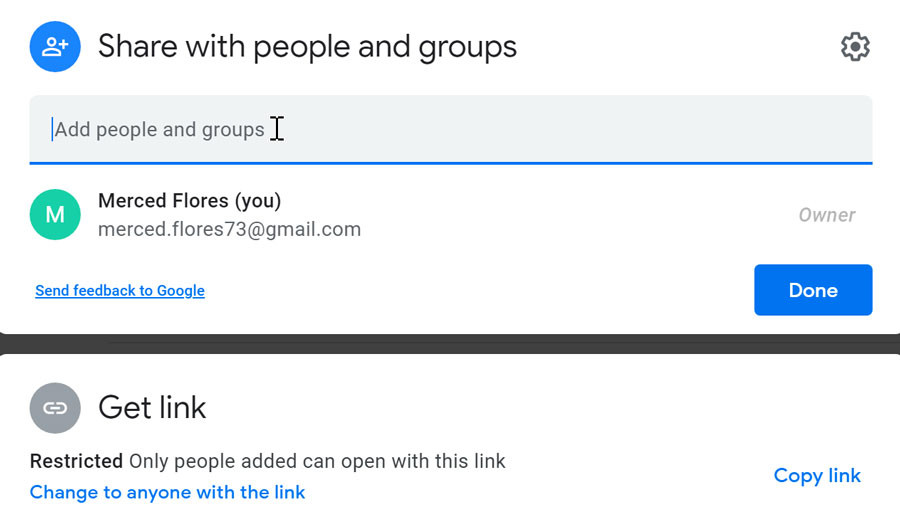
Enter Email Addresses: A dialog box will appear. In the “Add people and groups” field, type the email addresses of the people you want to share the photos with.
-
Set Permissions: Next to each email address, there’s a drop-down menu. Choose the permission level you want to grant:
- Viewer: People can view the photos but can’t make any changes.
- Commenter: People can view and add comments to the photos.
- Editor: People can view, comment, and edit the photos. Be cautious when granting editor access, as they can add, delete, and modify the files.
-
Add a Message (Optional): You can add a message to the email notification that recipients will receive. This is a good way to provide context or instructions.
-
Send the Invitation: Finally, click the “Send” button. Google Drive will send an email invitation to each recipient with a link to access the shared photos.
 Typing email addresses
4. Step-by-Step Guide: Sharing Photos with a Shareable Link
What if you want to share photos with a larger group without entering individual email addresses? Google Drive’s shareable link option is your answer.
Sharing photos with a shareable link on Google Drive is perfect when you want to quickly distribute your work to a wider audience while still maintaining control over access. Here’s how to do it:
-
Select the Photo(s) or Folder: Start by locating the photo(s) or folder you wish to share in your Google Drive. Click on the item to select it.
-
Get the Shareable Link: Click the “Share” button at the top right corner of the page (it looks like a person with a plus sign). This will open the sharing settings dialog.
-
Change Link Settings: In the sharing settings dialog, look for the “General access” section. Click the dropdown menu to change the settings.
- Restricted: Only people with specific access can open the link. This is the most secure option, ideal for private sharing.
- Anyone with the link: Anyone who has the link can access the photos, without needing a Google account. This is suitable for sharing with a larger group while still keeping the content unlisted.
-
Set Permissions: After choosing who can access the link, set the permission level. Use the dropdown menu next to the access type to select:
- Viewer: People can only view the photos and cannot make any changes or comments.
- Commenter: People can view the photos and add comments, but they cannot edit the content.
- Editor: People can view, comment, and edit the photos. Use this option cautiously, as it allows recipients to modify your files.
-
Copy the Link: Once you have configured the access and permissions, click the “Copy link” button. The link will be copied to your clipboard.
-
Share the Link: Paste the link into an email, message, or any other communication channel to share it with your desired recipients.
Remember to adjust the link settings according to your specific needs. If you need to revoke access at any point, simply return to the sharing settings and change the permissions or delete the link.
5. Managing Permissions: View, Comment, or Edit
How do you control what others can do with your shared photos? Google Drive allows you to set permissions that determine the level of interaction.
Google Drive’s permission settings are crucial for controlling how others interact with your shared photos. Here’s a breakdown of the available options:
- Viewer:
- What They Can Do: View photos in their original quality. Download photos for personal use.
- Limitations: Cannot make any changes or add comments.
- Use Case: Ideal for sharing final images with clients or displaying a portfolio without allowing modifications.
- Commenter:
- What They Can Do: View photos. Add comments and feedback directly on the images.
- Limitations: Cannot edit or alter the original photos.
- Use Case: Perfect for collaborative feedback sessions with other photographers or clients who need to provide input without making changes.
- Editor:
- What They Can Do: View photos. Add comments. Edit and modify the original photos. Add or delete photos from a shared folder.
- Limitations: Requires a high level of trust and understanding.
- Use Case: Suitable for close collaborators, such as assistant photographers or retouchers who need to work directly on the files.
Choosing the right permission level ensures that your photos are used and interacted with in the way you intend.
6. Privacy Settings: Ensuring Your Photos Are Secure
How can you ensure your photos remain private and secure when sharing through Google Drive? Adjusting privacy settings is key.
To keep your photos secure in Google Drive, here’s what you need to know:
- Choose the Right Sharing Option: Opt for sharing with specific people instead of creating a public link whenever possible.
- Set Strong Passwords: Ensure your Google account has a strong, unique password to prevent unauthorized access.
- Enable Two-Factor Authentication: Add an extra layer of security by enabling two-factor authentication for your Google account. This requires a verification code from your phone in addition to your password.
- Review Sharing Permissions Regularly: Periodically check who has access to your shared photos and folders. Revoke access for anyone who no longer needs it.
- Be Cautious with “Editor” Permissions: Only grant editor access to trusted collaborators, as they have the ability to modify and delete your photos.
- Avoid Sharing Sensitive Information: Be mindful of the content you share. Avoid including any sensitive or personal information in your photos or file names.
- Use Watermarks: Consider adding watermarks to your photos to protect your copyright and prevent unauthorized use.
By following these steps, you can significantly enhance the privacy and security of your photos shared through Google Drive, giving you peace of mind while collaborating and sharing your work.
7. Collaboration Tips: Working with Clients and Other Photographers
How can Google Drive enhance collaboration with clients and fellow photographers? It offers several features that streamline the process.
Google Drive provides many features that can enhance collaboration, including:
- Shared Folders: Create shared folders to easily exchange files with clients or collaborators.
- Commenting: Use the commenting feature to provide feedback directly on photos.
- Version History: Track changes and revert to previous versions if needed.
- Real-Time Collaboration: Work simultaneously on the same files with others.
- Notifications: Receive notifications when changes are made to shared files.
8. Best Practices for Organizing Photos in Google Drive
What are some tips for keeping your photo library organized in Google Drive? A well-organized library makes sharing and collaboration much easier.
To keep your photo library organized in Google Drive, follow these best practices:
- Create a Clear Folder Structure:
- By Project: Create a main folder for each major project (e.g., “Wedding Photography,” “Product Shoots”).
- By Date: Organize subfolders by date (e.g., “2023-07-15 Wedding,” “2023-08-01 Product Launch”).
- By Client: Use client names as main folders, with subfolders for each shoot or project.
- Use Descriptive Naming Conventions:
- Consistent Format: Adopt a consistent naming format (e.g., “YYYY-MM-DD_ProjectName_ImageNumber.jpg”).
- Keywords: Include relevant keywords in the file names for easy searching (e.g., “2023-07-15_Wedding_Smith_Ceremony001.jpg”).
- Avoid Special Characters: Stick to letters, numbers, and underscores to ensure compatibility across different systems.
- Tagging and Metadata:
- Add Metadata: Use metadata to add information like copyright, photographer name, and location to your photos.
- Tagging: Use Google Drive’s search functionality to tag photos with relevant keywords for easy retrieval.
- Culling and Version Control:
- Cull Regularly: Delete unwanted or redundant photos to keep your library lean.
- Version Control: If you edit photos, save different versions with clear naming (e.g., “_Original,” “_Edited,” “_Final”).
- Backup Strategy:
- Redundancy: Consider backing up your Google Drive photos to another location (e.g., external hard drive, another cloud service) for added security.
By implementing these organizational strategies, you’ll be able to efficiently manage your photo library, making it easier to share, collaborate, and retrieve your images whenever needed.
9. Troubleshooting Common Sharing Issues
What should you do if you encounter problems while sharing photos on Google Drive? Here are some common issues and their solutions.
If you encounter issues while sharing photos on Google Drive, here are some common problems and their solutions:
-
Problem: Recipients Can’t Access the Photos
- Solution: Double-check the sharing permissions. Ensure you’ve shared with the correct email addresses and that the permission level (Viewer, Commenter, Editor) is appropriate. If using a shareable link, make sure the link is set to “Anyone with the link” if you intend to share it widely.
-
Problem: Recipients Can’t Download Photos
- Solution: By default, viewers can download photos unless you’ve disabled this option. To allow downloads, go to the sharing settings, click the gear icon at the top right, and ensure the “Viewers and commenters can see the option to download, print, and copy” box is checked.
-
Problem: Shared Link Doesn’t Work
- Solution: Ensure the link is copied correctly and hasn’t been truncated. Try creating a new shareable link to see if that resolves the issue. Also, check if the link has expired or been deactivated.
-
Problem: Difficulty Sharing Large Files or Folders
- Solution: Large files can take a while to upload and process. Ensure you have a stable internet connection. If the problem persists, try compressing the files into a ZIP archive before uploading and sharing.
-
Problem: Incorrect Permissions
- Solution: Review the sharing settings regularly. Sometimes, permissions can be accidentally changed. Go to the sharing settings, verify the permission levels for each recipient, and adjust as needed.
-
Problem: Sync Issues
- Solution: If you’re using Google Drive sync on your computer, ensure that the Google Drive app is running and that your files have finished syncing. Restarting the app or your computer can sometimes resolve sync issues.
10. Beyond Google Drive: Other Platforms for Sharing Photos Privately
Are there alternatives to Google Drive for sharing photos privately? Yes, several other platforms offer similar features.
Here are a few alternatives:
| Platform | Description |
|---|---|
| Dropbox | Offers similar cloud storage and sharing features as Google Drive, with a focus on file synchronization. |
| Microsoft OneDrive | Integrated with Microsoft Office, OneDrive provides cloud storage and sharing capabilities, particularly useful for users of the Microsoft ecosystem. |
| SmugMug | A platform designed specifically for photographers, offering portfolio display, client galleries, and print sales. |
| Pixieset | Another platform tailored for photographers, providing client galleries, online proofing, and e-commerce tools. |
| WeTransfer | A simple and easy-to-use file transfer service that allows you to send large files quickly without requiring recipients to create an account. |
| iCloud Photos | Ideal for Apple users, iCloud Photos seamlessly syncs photos across devices and allows you to share albums with specific people. |
| Amazon Photos | Part of Amazon Prime, Amazon Photos offers unlimited photo storage for Prime members, along with sharing features. |
| ShootProof | A gallery platform built for professional photographers to share and sell their photos. |
Choosing the right platform depends on your specific needs and preferences, so explore these options to find the best fit for your photography workflow.
11. Optimizing Photos for Online Sharing
How can you optimize your photos before sharing them online? Optimizing ensures they look their best and load quickly.
Optimizing your photos before sharing them online ensures they look their best and load quickly, providing a better experience for viewers. Here are some key steps to optimize your photos:
-
Resize Your Photos:
- Why: Large, high-resolution images can take a long time to load, especially on mobile devices.
- How: Resize your photos to a reasonable size for online viewing. A width of 1200-2000 pixels is generally sufficient for most screens. Use photo editing software like Adobe Photoshop, Lightroom, or free online tools to resize your images.
-
Compress Your Photos:
- Why: Compression reduces the file size of your photos without significantly sacrificing quality.
- How: Save your photos as JPEGs with a compression level that balances file size and image quality. A quality setting of 60-80% is often a good compromise. You can also use online tools like TinyPNG or JPEGmini to compress your photos.
-
Use the Correct File Format:
- JPEG: Best for photographs and images with many colors. It offers good compression and is widely supported.
- PNG: Best for images with text, logos, or graphics that require transparency. It preserves image quality but typically results in larger file sizes.
- WebP: A modern image format developed by Google that provides excellent compression and image quality. It’s supported by most modern browsers.
-
Optimize for Web:
- Why: Web optimization ensures that your photos are displayed correctly and load quickly on websites and online platforms.
- How: Use the “Save for Web” option in photo editing software to optimize your images specifically for online use. This option typically includes settings for resizing, compression, and metadata removal.
-
Remove Metadata:
- Why: Metadata can include information like camera settings, GPS location, and copyright details, which can increase file size.
- How: Remove unnecessary metadata before sharing your photos online. Most photo editing software allows you to remove metadata during the export process.
-
Use a Content Delivery Network (CDN):
- Why: CDNs store your photos on multiple servers around the world, allowing users to access them from the server closest to their location, resulting in faster loading times.
- How: If you’re sharing photos on a website, consider using a CDN to improve performance.
By following these optimization tips, you can ensure that your photos look great and load quickly, providing a better experience for your audience and maximizing the impact of your work.
12. Sharing to Social Media Directly from Google Drive
Can you share photos directly from Google Drive to social media? While not a direct feature, there are workarounds.
While Google Drive doesn’t offer a direct “share to social media” button, there are several effective workarounds to quickly share your photos:
-
Download and Upload:
- How: The most straightforward method is to download the photo from Google Drive to your computer or mobile device and then upload it to the social media platform of your choice.
- Pros: Simple and universally applicable.
- Cons: Requires extra steps and storage space on your device.
-
Use Third-Party Integrations:
- How: Some third-party apps and services can integrate with Google Drive, allowing you to share directly to social media. Look for apps that offer this functionality in the Google Workspace Marketplace or app stores.
- Pros: Streamlines the sharing process.
- Cons: Requires finding and trusting a third-party app.
-
Copy the Link and Share:
- How: Create a shareable link in Google Drive (ensuring it’s set to “Anyone with the link” if you want it to be publicly accessible). Then, copy the link and paste it into your social media post.
- Pros: Quick and easy to share a link to the photo.
- Cons: Users will need to click the link to view the photo, rather than seeing it directly in the social media feed.
-
Use Google Photos (If Applicable):
- How: If your photos are already backed up to Google Photos, you can easily share them to social media directly from the Google Photos app or website.
- Pros: Seamless integration with social media platforms.
- Cons: Requires using Google Photos as your primary photo storage solution.
Choose the method that best suits your workflow and sharing preferences. Remember to optimize your photos for social media by resizing and compressing them before sharing to ensure they look their best and load quickly.
13. Using Google Drive on Mobile Devices for Sharing
How does sharing photos differ on mobile devices compared to desktop? Google Drive works seamlessly on both.
Sharing photos on Google Drive using mobile devices offers a seamless experience, with some differences compared to desktop sharing:
- Accessibility:
- Mobile: Easily access your photos directly from your smartphone or tablet, allowing you to share on the go.
- Desktop: Requires a computer, which may not always be convenient.
- User Interface:
- Mobile: The Google Drive app provides a touch-friendly interface, making it easy to select and share photos with a few taps.
- Desktop: Uses a mouse and keyboard for navigation, which some users may find more precise.
- Sharing Options:
- Mobile: Offers the same sharing options as desktop, including sharing with specific people, creating a shareable link, and setting permissions (Viewer, Commenter, Editor).
- Desktop: Provides similar sharing options, with a slightly different layout.
- Direct Sharing to Apps:
- Mobile: Allows you to share photos directly to other apps installed on your device, such as social media platforms, messaging apps, and email clients.
- Desktop: Requires downloading the photo first and then uploading it to the desired app or platform.
- Offline Access:
- Mobile: You can enable offline access to specific photos or folders, allowing you to view and share them even without an internet connection.
- Desktop: Offline access is available through the Google Drive desktop app, which syncs files to your computer.
Overall, sharing photos on Google Drive via mobile devices provides convenience and flexibility, allowing you to easily manage and share your photos from anywhere.
14. Advanced Tips: Using Google Drive for Client Proofing
What about using Google Drive for professional client proofing? It can be a cost-effective solution.
Using Google Drive for client proofing can be a cost-effective solution for photographers. Here are some advanced tips to optimize the process:
-
Create Dedicated Client Folders:
- Organization: Set up a separate folder for each client to keep projects organized.
- Subfolders: Within each client folder, create subfolders for different shoots or events.
-
Watermark Your Proofs:
- Protection: Add watermarks to your proof images to prevent unauthorized use.
- Branding: Include your logo or branding to maintain a professional look.
-
Share with “Viewer” Permissions:
- Control: Share the client folder with “Viewer” permissions to prevent clients from editing or deleting files.
- Feedback: Encourage clients to provide feedback through comments.
-
Use Comments for Feedback:
- Direct Input: Clients can leave comments directly on the photos to provide specific feedback.
- Clarity: This helps avoid confusion and ensures you understand their preferences.
-
Set Expiration Dates for Access:
- Time Limit: Set an expiration date for the shared link to limit access to the proofs.
- Security: This ensures that clients don’t have indefinite access to the files.
-
Create a Selection System:
- Instructions: Provide clear instructions on how clients should select their favorite photos.
- Labeling: Ask clients to label their selections using comments or a separate document.
-
Follow Up and Communicate:
- Engagement: Follow up with clients to ensure they’ve reviewed the proofs and gathered their feedback.
- Questions: Answer any questions they may have about the selection process.
-
Deliver Final Images Securely:
- Separate Folder: Create a separate folder for the final, edited images.
- Download Access: Grant clients download access to the final images.
By following these advanced tips, you can effectively use Google Drive for client proofing, saving time and money while maintaining a professional workflow.
15. Automating Photo Sharing with Google Drive API
Is it possible to automate photo sharing using Google Drive? Yes, the Google Drive API allows for advanced automation.
Automating photo sharing with the Google Drive API offers advanced capabilities for photographers and businesses. Here’s how you can leverage the API:
- Automated Uploads:
- Functionality: Automatically upload photos from your camera or editing software to Google Drive.
- Use Case: Streamline your workflow by eliminating manual uploads after each shoot.
- Scheduled Sharing:
- Functionality: Schedule the sharing of photos with clients or team members at specific times.
- Use Case: Ensure timely delivery of proofs or final images without manual intervention.
- Dynamic Permissions:
- Functionality: Automatically adjust permissions based on predefined rules, such as granting editing access to collaborators and view-only access to clients.
- Use Case: Maintain control over who can access and modify your files.
- Custom Notifications:
- Functionality: Set up custom notifications to alert you when photos are uploaded, downloaded, or commented on.
- Use Case: Stay informed about activity related to your shared photos.
- Integration with Other Tools:
- Functionality: Integrate Google Drive with other photography tools, such as CRM systems, project management software, and e-commerce platforms.
- Use Case: Create a seamless workflow that connects all your photography-related tasks.
- Batch Processing:
- Functionality: Automate tasks like watermarking, resizing, and renaming photos in bulk.
- Use Case: Save time and effort when preparing large batches of photos for sharing.
To implement these automations, you’ll need some programming knowledge or the help of a developer. The Google Drive API provides extensive documentation and resources to guide you through the process.
16. What are the Security Risks of Sharing Photos on Google Drive?
Are there any security concerns to be aware of when sharing photos on Google Drive? It’s important to understand the potential risks.
When sharing photos on Google Drive, be aware of the following security risks:
-
Unauthorized Access:
- Risk: If your Google account is compromised, unauthorized individuals can access your photos.
- Prevention: Use a strong, unique password and enable two-factor authentication.
-
Data Breaches:
- Risk: Although rare, data breaches on Google’s servers could potentially expose your photos.
- Prevention: While you can’t directly prevent this, Google has robust security measures in place to protect user data.
-
Accidental Sharing:
- Risk: Accidentally sharing photos with the wrong people or making them publicly accessible.
- Prevention: Double-check sharing permissions before sending invitations or creating shareable links.
-
Phishing Attacks:
- Risk: Phishing emails that impersonate Google could trick you into revealing your login credentials.
- Prevention: Be cautious of suspicious emails and never enter your login information on unfamiliar websites.
-
Malware:
- Risk: Downloading photos from unknown sources could expose your device to malware.
- Prevention: Scan downloaded files with antivirus software before opening them.
-
Third-Party App Vulnerabilities:
- Risk: Granting access to third-party apps could potentially expose your photos if the app has security vulnerabilities.
- Prevention: Only grant access to trusted apps and review their permissions carefully.
-
Link Sharing Risks:
- Risk: Sharing a link with “Anyone with the link” can lead to unintended access if the link is shared further than intended.
- Prevention: Use this option cautiously and consider setting an expiration date for the link.
Understanding these risks can help you take the necessary precautions to protect your photos and maintain your privacy on Google Drive.
17. How to Revoke Access to Shared Photos
How do you remove someone’s access to photos you’ve shared on Google Drive? It’s a straightforward process to revoke access.
Revoking access to shared photos on Google Drive is straightforward. Here’s how to do it:
- Open Google Drive: Go to Google Drive and locate the folder or file you want to manage.
- Select the File or Folder: Click on the folder or file to select it.
- Click the “Share” Button: At the top right corner, click the “Share” button (it looks like a person with a plus sign).
- Manage Permissions: A sharing settings dialog will appear. Here, you’ll see a list of people and groups who have access to the folder or file.
- Revoke Access:
- For Specific People: Find the person whose access you want to revoke. Click the dropdown menu next to their name and select “Remove.” This will immediately revoke their access.
- For Link Sharing: If you’ve shared the folder or file using a shareable link, you can change the link settings to “Restricted.” This ensures that only people with specific access can open the link. Alternatively, you can delete the link entirely by clicking the gear icon at the top right and unchecking the “Viewers and commenters can see the option to download, print, and copy” box.
- Save Changes: Once you’ve made the necessary changes, click “Save” (if applicable). The changes will take effect immediately.
By following these steps, you can easily revoke access to shared photos on Google Drive, ensuring your files remain secure and private.
18. The Future of Photo Sharing: What’s Next for Google Drive?
How might photo sharing on Google Drive evolve in the future? Expect further integration and AI enhancements.
The future of photo sharing on Google Drive is likely to evolve with further integration and AI enhancements. Here are a few potential developments:
- AI-Powered Organization: Google Drive may incorporate AI to automatically organize and tag photos, making it easier to find and share specific images.
- Enhanced Collaboration Tools: Expect more advanced collaboration features, such as real-time co-editing of photos and integrated communication tools.
- Improved Security: Google may introduce enhanced security measures, such as biometric authentication and end-to-end encryption, to protect your photos.
- Deeper Integration with Google Photos: Google Drive and Google Photos could become even more tightly integrated, allowing for seamless sharing and management of photos across both platforms.
- Augmented Reality (AR) Integration: Google Drive may incorporate AR features, allowing you to view and share photos in immersive, interactive ways.
- Blockchain Integration: To enhance security and copyright protection, Google Drive may explore the use of blockchain technology to verify and track photo ownership.
These potential developments could make photo sharing on Google Drive even more seamless, secure, and feature-rich, providing photographers with powerful tools to manage and share their work.
19. How does Google Drive Compare to Other Cloud Storage for Photo Sharing?
How does Google Drive stack up against other cloud storage services for sharing photos? Each platform has its strengths and weaknesses.
When it comes to cloud storage for photo sharing, Google Drive, Dropbox, and Microsoft OneDrive are among the top contenders. Here’s a detailed comparison to help you decide which platform best suits your needs:
| Feature | Google Drive | Dropbox | Microsoft OneDrive |
|---|---|---|---|
| Storage Capacity | 15 GB free, upgradable | 2 GB free, upgradable | 5 GB free, upgradable |
| Pricing | Competitive, integrated with Google One | More expensive for comparable storage | Competitive, integrated with Microsoft 365 |
| Sharing Options | Granular permissions, link sharing | Granular permissions, link sharing | Granular permissions, link sharing |
| Collaboration | Excellent, integrated with Google Workspace | Good, integrates with various apps | Good, integrates with Microsoft Office |
| User Interface | User-friendly, web-based | Clean, desktop and web-based | Integrated with Windows File Explorer |
| Security | Strong, with two-factor authentication | Strong, with two-factor authentication | Strong, with two-factor authentication |
| Integration | Seamless integration with Google ecosystem | Integrates with many third-party apps | Seamless integration with Microsoft ecosystem |
| Photo-Specific Features | Basic photo viewing, integration with Google Photos | Basic photo viewing | Basic photo viewing |
| Version History | Yes, tracks changes and allows reverting to previous versions | Yes, tracks changes and allows reverting to previous versions | Yes, tracks changes and allows reverting to previous versions |
| Mobile App | Excellent, with offline access | Excellent, with offline access | Excellent, with offline access |
Ultimately, the best cloud storage service for photo sharing depends on your specific needs and preferences. Consider factors like storage capacity, pricing, sharing options, collaboration features, and integration with other tools when making your decision.
20. FAQ: Common Questions About Sharing Photos on Google Drive
Have more questions about sharing photos on Google Drive? Here are some frequently asked questions.
Here are some frequently asked questions about sharing photos on Google Drive:
- How do I share a folder of photos on Google Drive?
- Select the folder, click the “Share” button, and enter the email addresses of the people you want to share with.
- Can I share photos without a Google account?
- Yes, by creating a shareable link and setting the permission to “Anyone with the link.”
- How do I stop someone from accessing my shared photos?
- Go to the sharing settings and remove their access by clicking the “Remove” button next to their name.
- Can I set an expiration date for shared photos?
- Yes, by setting an expiration date for the shared link.
- How much storage space do I get with Google Drive?
- 15 GB for free, which is shared across Google Drive, Gmail, and Google Photos.
- Is it safe to share photos on Google Drive?
- Yes, Google Drive has robust security measures in place, but it’s important to use strong passwords and enable two-factor authentication.
- Can I share photos directly to social media from Google Drive?
- No, but you can download the photos and then upload them to social media.
- How do I allow recipients to download photos I’ve shared?
- In the sharing settings, click the gear icon and ensure the “Viewers and commenters can see the option to download, print, and copy” box is checked.
- Can I collaborate on photos with others in real-time?
- Yes, by granting them “Editor” permissions and using Google Workspace apps like Google Docs for feedback.
- What file formats are supported by Google Drive?
- Google Drive supports a wide range of file formats, including JPEG, PNG, GIF, TIFF, and RAW.
Remember, mastering how to share photos using Google Drive empowers you to control your visual content, collaborate effectively, and showcase your work with confidence.
Ready to take your photography to the next level? Visit dfphoto.net today to discover a wealth of tutorials, stunning photo collections, and a vibrant community of photographers. Whether you’re looking to master new techniques, find inspiration, or connect with fellow creatives, dfphoto.net is your ultimate resource. Don’t miss out—explore dfphoto.net now and unleash your photographic potential! Our address is 1600 St Michael’s Dr, Santa Fe, NM 87505, United States. You can call us at +1 (505) 471-6001.