Changing your desktop wallpaper is one of the quickest and easiest ways to personalize your Windows computer and make it truly yours. Whether you want to display cherished memories, showcase your favorite art, or simply create a calming visual environment, setting a photo as your wallpaper is a fantastic option. Windows offers several straightforward methods to achieve this, letting you customize your screen with ease.
Here’s a comprehensive guide on How To Set Photo As Wallpaper on your Windows device, ensuring your digital space reflects your personal style.
Step-by-Step Guide to Setting a Photo as Wallpaper
Windows provides multiple convenient ways to set a photo as your desktop background. Let’s explore the most common and user-friendly methods.
Using the Settings App
The Settings app is the central hub for customizing your Windows experience, and it includes a dedicated section for background personalization. Here’s how to use it to set a photo as wallpaper:
- Open Settings: You can access the Settings app by clicking on the Start Menu and then selecting the gear icon, or by pressing the Windows key + I shortcut.
- Navigate to Personalization: In the Settings app, click on the Personalization category. This section manages various visual aspects of Windows, including backgrounds, colors, and themes.
- Select Background: On the left sidebar of the Personalization settings, choose Background. This will open the background settings panel where you can customize your desktop display.
- Choose “Picture” from the dropdown: Under the “Personalize your background” dropdown menu, select Picture. This option allows you to set a single image as your wallpaper.
- Browse for Your Photo: Click the Browse button located beneath the “Choose your picture” section. This will open a file explorer window.
- Locate and Select Your Photo: Navigate through your folders to find the photo you want to use as your wallpaper. Select the image file and click Choose picture. The selected photo will now be set as your desktop background.
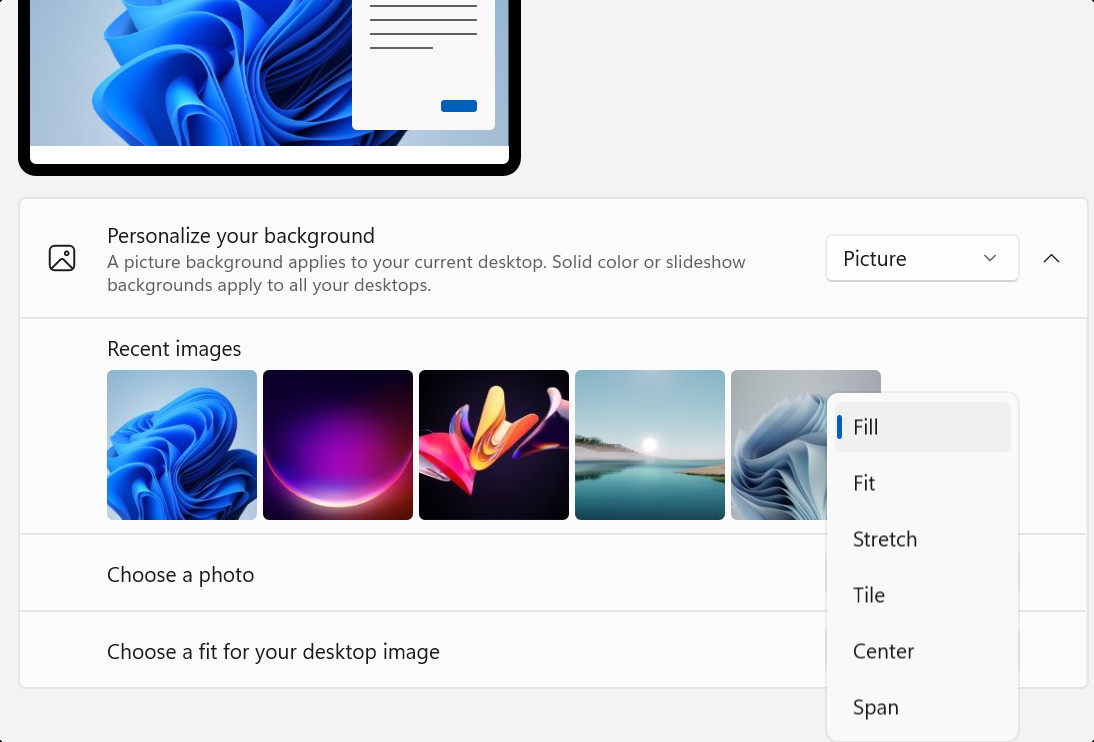 Windows Settings app showing options to configure how desktop wallpaper images are displayed, including Fill, Fit, Stretch, Tile, Center, and Span.
Right-Clicking on the Desktop
For an even quicker method, you can set a photo as wallpaper directly from your desktop using the right-click context menu.
- Right-click on an empty area of your desktop: This will open the desktop context menu.
- Select “Personalize”: In the context menu, click on Personalize. This shortcut will directly open the Personalization settings in the Settings app, specifically the Background section, as described in the previous method.
- Follow steps 4-6 from the “Using the Settings App” method: From here, you can proceed with selecting “Picture,” browsing for your photo, and setting it as wallpaper just as you would through the full Settings app navigation.
Setting from the Photos App
Windows 10 and Windows 11 come with a built-in Photos app that allows you to view and manage your images. You can also set a photo as wallpaper directly from within this app.
- Open the Photos App: Find the Photos app in your Start Menu and open it.
- Locate Your Photo: Use the Photos app to find the image you want to set as wallpaper. You can navigate through your folders or use the app’s search functionality.
- Open the Image: Double-click on the photo to open it in full view within the Photos app.
- Click the “See more” menu: In the top right corner of the Photos app window, you will see a three-dot menu (labeled “See more”). Click on this menu.
- Select “Set as” and then “Background”: In the dropdown menu, hover over Set as, and then click on Background. This action will instantly set the currently viewed photo as your desktop wallpaper.
Exploring Wallpaper Display Options
Once you’ve chosen “Picture” as your background and selected a photo, Windows offers several options to control how the image is displayed on your screen. These “Choose a fit” options are crucial for ensuring your wallpaper looks its best, regardless of the image’s aspect ratio or your screen resolution.
- Fill: This option scales the image to completely cover your screen. To achieve this, it may crop parts of the image that extend beyond the screen’s boundaries. Fill is a good choice when you want the entire screen to be covered without borders, and minor cropping is acceptable.
- Fit: Fit resizes the image to fit within your screen while maintaining its original aspect ratio. This means the entire image will be visible, but if the image’s aspect ratio doesn’t perfectly match your screen’s, you might see black bars on the sides (or top and bottom) to fill the empty space.
- Stretch: Stretch expands the image to completely fill the screen, regardless of its original aspect ratio. This can distort the image if its proportions are significantly different from your screen’s, making objects appear elongated or compressed. It’s generally less preferred unless distortion is not a concern.
- Tile: Tile repeats the image across the screen, creating a tiled pattern. This is particularly useful for smaller images or patterns that look good when repeated. It can add a unique texture to your desktop.
- Center: Center places the image in the exact center of your screen without resizing it. If the image is smaller than your screen resolution, the background around the image will be filled with a solid color (usually black, depending on your theme settings).
- Span: Span is designed for multi-monitor setups. It stretches the image across all your connected displays, creating a panoramic wallpaper experience. This is ideal if you have multiple monitors and want a single, continuous image across them.
Choosing the right fit option depends on your personal preference and the characteristics of the photo you’re using. Experiment with different options to see which one looks best with your chosen image and screen setup.
Wallpaper and Multiple Desktops
Windows allows you to create and manage multiple virtual desktops, helping you organize your applications and tasks. Interestingly, you can also customize the wallpaper for each virtual desktop individually, adding another layer of personalization to your workflow.
To set a different wallpaper for each desktop:
- Follow the steps to set a wallpaper using the Settings app (as described earlier).
- Before selecting “Choose picture,” ensure you are on the specific virtual desktop you want to customize. Windows remembers your wallpaper selection for each desktop.
- Browse and select your desired photo for that desktop.
- Repeat for other virtual desktops if you want to set unique wallpapers for each.
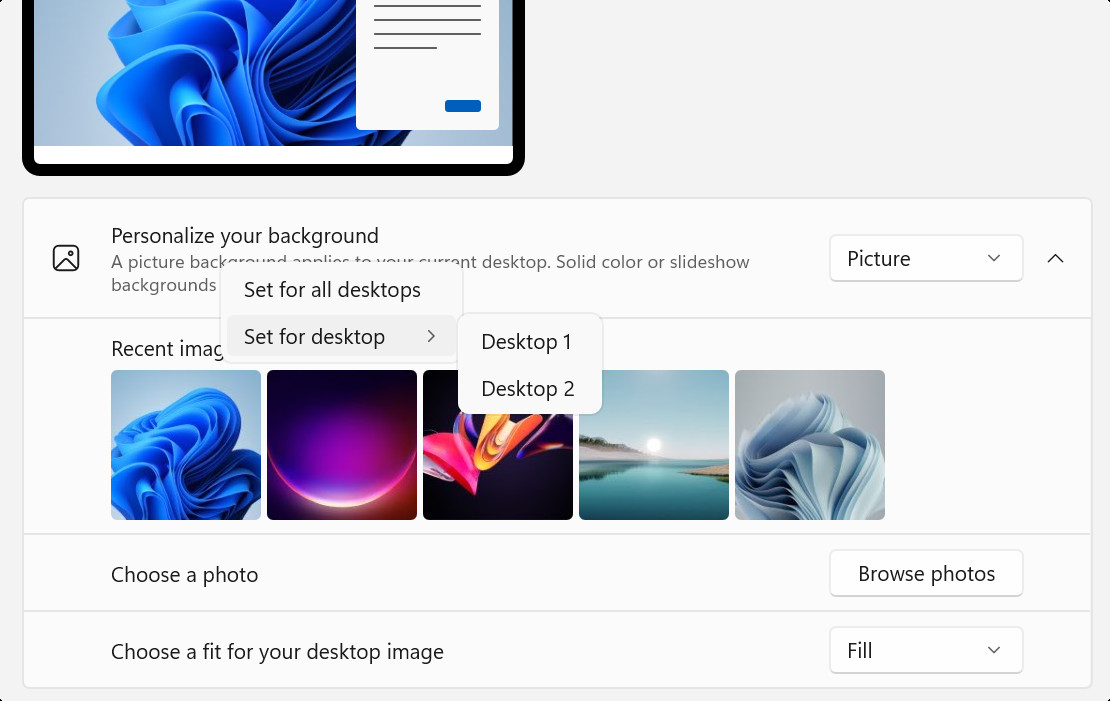 Configuring different desktop backgrounds for multiple desktops in Windows Settings, showing options to set wallpaper for all desktops or individual desktops.
This feature allows for a highly customized experience, where each virtual desktop can have a distinct visual theme, making it easier to distinguish between your workspaces.
Bonus Tip: Enhance Your Wallpaper with the Bing Wallpaper App
For a constantly fresh and inspiring desktop, consider using the Bing Wallpaper app. This free app automatically updates your desktop background daily with the Bing image of the day, showcasing stunning photographs from around the globe. Each image comes with interesting facts and information about the location or subject, making your wallpaper both visually appealing and informative. It’s a great way to keep your desktop looking new and engaging without having to manually change your wallpaper.
Conclusion
Setting a photo as your wallpaper in Windows is a simple yet powerful way to personalize your computing experience. With multiple methods available, from using the Settings app to quick right-clicks and the Photos app integration, customizing your desktop background to reflect your style or mood is easier than ever. Experiment with different photos and display options to create a Windows desktop environment that truly feels like your own.