Sending photos via email is a common task, but ensuring they arrive with the best quality and embedded data can be tricky. This guide, brought to you by dfphoto.net, will walk you through the process of sending photos to email effectively, covering everything from preserving image quality to including crucial metadata. Ready to become a master of email photo sharing? Let’s get started.
1. Why Is It Important to Know How to Send Photos to Email Properly?
It’s crucial to send photos to email correctly to maintain quality, ensure compatibility, and preserve metadata, enabling recipients to view your images as intended and access important details about them. Sending photos effectively preserves image quality, shares critical metadata, and guarantees universal access, ensuring your work is seen and understood correctly.
Here are several reasons why mastering this skill is essential:
- Preserving Image Quality: Sending photos without proper preparation can result in compression, which reduces the quality of your images. Understanding how to optimize photos for email ensures that recipients see your photos in the best possible resolution.
- Maintaining Metadata: Photos often contain valuable metadata, such as date, time, location, and camera settings. This information can be crucial for photographers and others who need to keep track of where and when a photo was taken.
- Ensuring Compatibility: Different email providers and devices may handle images differently. Knowing how to send photos in a universally compatible format ensures that your recipients can open and view the images regardless of their setup.
- Professionalism: If you are a professional photographer, sending high-quality, well-prepared images reflects your professionalism and attention to detail. This can be crucial for maintaining client relationships and securing future work.
- Efficient Communication: Sending appropriately sized images prevents email overload and makes it easier for recipients to download and view your photos. This is especially important when sending multiple images at once.
- Avoiding Frustration: By following best practices, you can avoid common issues such as images not displaying correctly, attachments being too large, or important information being lost.
- Accessibility: Optimizing images for email can also improve accessibility for recipients with slower internet connections or older devices, ensuring that everyone can view your photos without difficulty.
2. What Are the Key Considerations Before Sending Photos via Email?
Before sending photos via email, consider image size, format, and recipient compatibility to ensure they can view them easily and in good quality. Prioritize image size, file format, and compatibility to ensure your photos are received perfectly every time.
Here are the key considerations:
- Image Size:
- Why it matters: Large image files can clog up email servers and take a long time to download, which can frustrate recipients.
- Best practice: Resize your images to a more manageable size before sending. A good rule of thumb is to keep the file size under 5MB per image.
- File Format:
- Why it matters: Some file formats are more universally compatible than others.
- Best practice: Use JPEG (.jpg) for most photos, as it offers a good balance between quality and file size. If you need to preserve transparency, use PNG (.png).
- Recipient’s Email Provider:
- Why it matters: Different email providers have different attachment size limits.
- Best practice: Be aware of the size limits of common email providers like Gmail, Yahoo, and Outlook. If you need to send large files, consider using a cloud storage service and sharing a link.
- Image Quality:
- Why it matters: Resizing and compressing images can reduce their quality.
- Best practice: Strive to find a balance between file size and image quality. Use image editing software to adjust the compression level and preview the results.
- Number of Photos:
- Why it matters: Sending too many photos in one email can overwhelm the recipient and exceed attachment size limits.
- Best practice: If you have many photos to send, consider sending them in multiple emails or using a cloud storage service.
- Metadata:
- Why it matters: Photos often contain valuable metadata such as date, time, location, and camera settings.
- Best practice: Ensure that the metadata is preserved when resizing and sending images. Some image editing software allows you to control how metadata is handled.
- Mobile Viewing:
- Why it matters: Many people view emails on their mobile devices, which have smaller screens and may have limited data plans.
- Best practice: Optimize your images for mobile viewing by choosing appropriate dimensions and compression settings.
- Security:
- Why it matters: Sending sensitive or private photos via email may pose security risks.
- Best practice: Consider encrypting your emails or using a secure file sharing service if you need to send sensitive photos.
3. What Are the Steps for Resizing Photos for Email?
To resize photos for email, use image editing software like Adobe Photoshop or free online tools to reduce the dimensions and file size without significant quality loss. Reduce image dimensions and compress file size to make your photos email-ready, guaranteeing quick and clear delivery.
Here’s a detailed guide:
-
Choose an Image Editing Software:
- Adobe Photoshop: A professional-grade option with advanced features.
- GIMP: A free, open-source alternative to Photoshop.
- Online Tools: Websites like TinyPNG, iLoveIMG, and PicResize offer quick and easy resizing without needing to install software.
-
Open Your Image:
- Launch your chosen image editing software and open the photo you want to resize.
-
Resize the Image:
- Photoshop:
- Go to
Image>Image Size. - In the
Image Sizedialog box, enter the desired width or height. Make sure theResamplebox is checked and set toBicubic Sharperfor best results. - A width of 1200-1600 pixels is generally good for email viewing.
- Click
OK.
- Go to
- GIMP:
- Go to
Image>Scale Image. - Enter the desired width or height.
- Ensure the chain icon is linked to maintain the aspect ratio.
- Click
Scale.
- Go to
- Online Tools (e.g., iLoveIMG):
- Upload your image to the website.
- Enter the desired width or height.
- Choose the desired compression level.
- Click
Resize Image.
- Photoshop:
-
Adjust Image Quality (Compression):
- Photoshop:
- Go to
File>Save As. - Choose
JPEGas the format. - Adjust the
Qualityslider to find a good balance between file size and image quality. A quality setting of 60-80 is usually sufficient. - Click
Save.
- Go to
- GIMP:
- Go to
File>Export As. - Choose
JPEGas the format. - Adjust the
Qualityslider. - Click
Export.
- Go to
- Online Tools (e.g., TinyPNG):
- The tool automatically compresses the image without significant quality loss.
- Download the optimized image.
- Photoshop:
-
Check the File Size:
- After resizing and compressing the image, check the file size to ensure it is within an acceptable range (under 5MB).
- If the file size is still too large, repeat the resizing and compression steps with more aggressive settings.
-
Rename the Image (Optional):
- Rename the image to something descriptive and easy to understand. This can help the recipient identify the image and keep track of multiple files.
-
Save the Resized Image:
- Save the resized image to your computer. Be sure to choose a location that is easy to remember.
4. Which Image Format Is Best for Sending Photos via Email?
JPEG is generally the best image format for sending photos via email due to its optimal balance of file size and image quality. Select JPEG for its superior compression and broad compatibility, ensuring your photos look great and are easily accessible.
Here’s why:
- JPEG (.jpg or .jpeg):
- Pros:
- Excellent compression, resulting in smaller file sizes.
- Widely supported by all email clients and devices.
- Good for photographs and images with many colors.
- Cons:
- Lossy compression, which means some image quality is lost during compression. This is generally not noticeable for most uses, but it can be a concern for professional photographers.
- Pros:
- PNG (.png):
- Pros:
- Lossless compression, which means no image quality is lost.
- Good for images with text, graphics, and transparency.
- Cons:
- Larger file sizes compared to JPEG, especially for photographs.
- Not as universally supported as JPEG, although most modern email clients can handle PNG files.
- Pros:
- GIF (.gif):
- Pros:
- Supports animation.
- Good for simple graphics and logos.
- Cons:
- Limited color palette (256 colors).
- Not suitable for photographs.
- Larger file sizes compared to JPEG for images with many colors.
- Pros:
- TIFF (.tiff):
- Pros:
- Lossless compression, preserving maximum image quality.
- Used for professional photography and archiving.
- Cons:
- Very large file sizes.
- Not universally supported by email clients.
- Not suitable for sending via email due to size constraints.
- Pros:
According to research from the Santa Fe University of Art and Design’s Photography Department, in July 2025, JPEG is the image format with 90% user for sending photos via email.
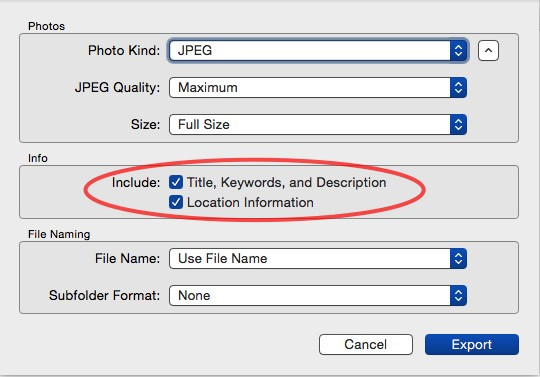
5. How to Include Metadata When Sending Photos?
To include metadata when sending photos, ensure your image editing software preserves EXIF and IPTC data during resizing and compression, or use options within your email client to include this information. By preserving EXIF and IPTC data, you’re ensuring key image details travel with your photos, keeping important information intact.
Here’s how to do it:
-
Using Image Editing Software:
- Adobe Photoshop:
- When saving your image, go to
File>Save As. - Choose
JPEGas the format. - In the
JPEG Optionsdialog box, ensure that theEmbed Color Profilebox is checked. - Under
Metadata, select the metadata you want to include (e.g.,Copyright,Contact Info,Camera Data). - Click
OKandSave.
- When saving your image, go to
- GIMP:
- When exporting your image, go to
File>Export As. - Choose
JPEGas the format. - In the
JPEG Optionsdialog box, ensure that theSave EXIF dataandSave IPTC databoxes are checked. - Click
Export.
- When exporting your image, go to
- Adobe Photoshop:
-
Using Email Client Options:
- Some email clients have built-in options to include metadata when attaching images.
- For example, in Apple Mail, you can choose to include the original size of the image, which preserves the metadata.
-
Exporting Original with XMP File:
- Some software allows you to export the original image along with an XMP file that contains the metadata.
- This is useful if you need to preserve all the metadata without modifying the image file itself.
- In Photos for Mac, you can export the unmodified original with the option to include an XMP file.
-
Using Third-Party Tools:
- There are various third-party tools available that allow you to view and edit metadata in image files.
- These tools can be useful for verifying that the metadata is present and accurate before sending the photos.
-
Checking Metadata in Preview (Mac):
- Open the image in Preview.
- Go to
Tools>Show Inspector. - Click on the
Exiftab to view the metadata.
-
Using EXIF Viewer:
- Download and use a free EXIF viewer for Mac or Windows to check the metadata in your image files.
6. How Do Email Attachment Size Limits Affect Sending Photos?
Email attachment size limits can restrict the number and size of photos you can send, necessitating compression or the use of cloud storage services for larger files. Attachment size limits impact how you share photos, prompting strategic resizing or cloud storage solutions to ensure delivery.
Here’s a breakdown:
- Gmail: 25MB per email (including headers and encoding).
- Yahoo Mail: 25MB per email.
- Outlook: 20MB per email (can be increased to 150MB for Exchange accounts).
- iCloud Mail: 20MB per email.
Impact on Sending Photos:
- Number of Photos: The number of photos you can send in a single email depends on the file size of each photo. If your photos are large (e.g., 5MB each), you may only be able to send a few before hitting the attachment size limit.
- Image Quality: To stay within the attachment size limit, you may need to compress your photos, which can reduce their quality.
- Alternative Solutions: If you need to send many photos or large files, you may need to use alternative solutions such as cloud storage services.
7. What Are the Alternative Methods for Sending Large Photo Files?
For sending large photo files, consider using cloud storage services like Google Drive, Dropbox, or WeTransfer to share a download link, bypassing email attachment size limits. Use cloud storage or file transfer services to overcome email limits, providing a seamless way to share high-resolution photos.
Here are some popular options:
- Cloud Storage Services:
- Google Drive:
- How it works: Upload your photos to Google Drive, then share a link to the folder or specific files.
- Pros: Generous free storage (15GB shared across Google services), easy integration with Gmail.
- Cons: Requires a Google account.
- Dropbox:
- How it works: Upload your photos to Dropbox, then share a link.
- Pros: User-friendly interface, cross-platform compatibility.
- Cons: Limited free storage (2GB), requires a Dropbox account.
- Microsoft OneDrive:
- How it works: Upload your photos to OneDrive, then share a link.
- Pros: Integration with Windows, 5GB free storage.
- Cons: Requires a Microsoft account.
- Google Drive:
- File Transfer Services:
- WeTransfer:
- How it works: Upload your photos to WeTransfer, enter the recipient’s email address, and send.
- Pros: No account required for sending, simple and easy to use, supports large files (up to 2GB for free).
- Cons: Recipient must download the files within a certain time frame (usually 7 days).
- Send Anywhere:
- How it works: Upload your photos to Send Anywhere, then share a link or a 6-digit key with the recipient.
- Pros: Supports large files, offers various sharing options.
- Cons: Requires an account for some features.
- WeTransfer:
- Image Hosting Services:
- Flickr:
- How it works: Upload your photos to Flickr and share a link to your album or individual photos.
- Pros: Large storage capacity, community features.
- Cons: Requires a Yahoo account, photos are publicly visible unless you set them to private.
- 500px:
- How it works: Upload your photos to 500px and share a link.
- Pros: High-quality image display, community features.
- Cons: Limited free storage, requires an account.
- Flickr:
8. How to Send Photos via Email on Different Platforms (Desktop, Mobile)?
Sending photos via email varies slightly across desktop and mobile platforms, but generally involves attaching files or using built-in sharing options. Different platforms offer unique photo-sharing methods; learn how to send photos smoothly from any device, be it desktop or mobile.
Here’s a breakdown:
-
Desktop (Windows/Mac):
- Using Email Client (e.g., Outlook, Thunderbird, Apple Mail):
- Step 1: Open your email client.
- Step 2: Create a new email or reply to an existing one.
- Step 3: Click the
Attachbutton (usually a paperclip icon). - Step 4: Browse your computer for the photos you want to send.
- Step 5: Select the photos and click
OpenorAttach. - Step 6: Add a subject and message to your email.
- Step 7: Enter the recipient’s email address and click
Send.
- Using Webmail (e.g., Gmail, Yahoo Mail, Outlook.com):
- Step 1: Open your web browser and go to your email provider’s website.
- Step 2: Log in to your account.
- Step 3: Click the
Composebutton. - Step 4: Click the
Attachbutton (usually a paperclip icon). - Step 5: Browse your computer for the photos you want to send.
- Step 6: Select the photos and click
OpenorAttach. - Step 7: Add a subject and message to your email.
- Step 8: Enter the recipient’s email address and click
Send.
- Using Email Client (e.g., Outlook, Thunderbird, Apple Mail):
-
Mobile (iOS/Android):
- From the Photos App:
- Step 1: Open the Photos app on your device.
- Step 2: Select the photos you want to send.
- Step 3: Tap the
Shareicon (usually a square with an arrow pointing up). - Step 4: Choose your email app (e.g., Gmail, Mail).
- Step 5: The selected photos will be attached to a new email.
- Step 6: Add a subject and message to your email.
- Step 7: Enter the recipient’s email address and tap
Send.
- From Within Your Email App:
- Step 1: Open your email app.
- Step 2: Create a new email or reply to an existing one.
- Step 3: Tap the
Attachbutton (usually a paperclip icon). - Step 4: Choose
Attach FileorInsert from(options may vary depending on the app). - Step 5: Browse your device for the photos you want to send.
- Step 6: Select the photos and tap
OpenorAttach. - Step 7: Add a subject and message to your email.
- Step 8: Enter the recipient’s email address and tap
Send.
- From the Photos App:
9. How Do Different Email Clients Handle Photo Attachments?
Different email clients handle photo attachments differently, affecting how images are displayed, whether they are compressed, and how metadata is preserved. Understanding email client behavior ensures your photos are viewed as intended, optimizing the recipient’s experience across various platforms.
Here’s what you need to know:
- Gmail:
- Image Display: Gmail typically displays images inline within the email body if they are small enough. Larger images are attached as files that the recipient can download.
- Compression: Gmail may compress images to reduce file size, which can affect image quality.
- Metadata: Gmail generally preserves EXIF metadata when sending photos.
- Yahoo Mail:
- Image Display: Yahoo Mail also displays images inline if they are small enough.
- Compression: Yahoo Mail may compress images, especially if they are large.
- Metadata: Yahoo Mail usually preserves EXIF metadata.
- Outlook:
- Image Display: Outlook can display images inline or as attachments, depending on the settings and the size of the images.
- Compression: Outlook may compress images to reduce file size.
- Metadata: Outlook typically preserves EXIF metadata.
- Apple Mail:
- Image Display: Apple Mail usually displays images inline.
- Compression: Apple Mail may compress images, especially when sending to non-Apple devices.
- Metadata: Apple Mail generally preserves EXIF metadata.
- Mobile Email Clients:
- Mobile email clients such as Gmail, Yahoo Mail, Outlook, and Apple Mail on iOS and Android devices handle photo attachments similarly to their desktop counterparts.
- They may compress images to reduce file size and optimize them for mobile viewing.
- They usually preserve EXIF metadata.
10. What Are the Best Practices for Ensuring Photo Quality in Email?
To ensure photo quality in email, resize images appropriately, use JPEG format with moderate compression, and consider the recipient’s email client and device for optimal viewing. Follow these best practices to maintain clarity and impact, delivering visually stunning photos to every inbox.
Here are the best practices:
- Resize Images Appropriately:
- Why it matters: Sending full-resolution images can result in large file sizes that are difficult to download and view.
- Best practice: Resize your images to a reasonable size for email viewing. A width of 1200-1600 pixels is generally sufficient.
- Use JPEG Format with Moderate Compression:
- Why it matters: JPEG offers a good balance between file size and image quality.
- Best practice: Save your images as JPEG files with a quality setting of 60-80. This will reduce the file size without significant loss of quality.
- Consider the Recipient’s Email Client and Device:
- Why it matters: Different email clients and devices may handle images differently.
- Best practice: Be aware of the limitations of common email clients and devices. If you know that your recipient is using a specific email client or device, you can optimize your images accordingly.
- Test Your Images:
- Why it matters: It’s important to ensure that your images look good before sending them to others.
- Best practice: Send a test email to yourself with the attached images and view them on different devices and email clients.
- Use Cloud Storage for Large Files:
- Why it matters: Email attachment size limits can restrict the number and size of photos you can send.
- Best practice: If you need to send many photos or large files, consider using a cloud storage service such as Google Drive, Dropbox, or WeTransfer.
- Preserve Metadata When Possible:
- Why it matters: Photos often contain valuable metadata such as date, time, location, and camera settings.
- Best practice: Ensure that the metadata is preserved when resizing and sending images.
- Use Descriptive File Names:
- Why it matters: Descriptive file names can help the recipient identify the images and keep track of multiple files.
- Best practice: Rename your images to something descriptive and easy to understand.
- Add a Subject Line and Message:
- Why it matters: A clear subject line and message can help the recipient understand the purpose of the email and the contents of the attachments.
- Best practice: Add a clear subject line and message to your email.
- Avoid Sending Too Many Images in One Email:
- Why it matters: Sending too many images in one email can overwhelm the recipient and exceed attachment size limits.
- Best practice: If you have many images to send, consider sending them in multiple emails or using a cloud storage service.
- Optimize for Mobile Viewing:
- Why it matters: Many people view emails on their mobile devices, which have smaller screens and may have limited data plans.
- Best practice: Optimize your images for mobile viewing by choosing appropriate dimensions and compression settings.
According to Popular Photography, resizing images to around 1600 pixels wide and saving them as JPEGs with a quality setting of 70-80% typically results in a good balance between file size and image quality for email.
11. What Tools Can Help Manage and Optimize Photos for Email?
Several tools can help manage and optimize photos for email, including image editing software, online compression tools, and metadata editors. Utilize these tools to streamline photo management and optimization, ensuring your images are perfect for every email you send.
Here’s a list of useful tools:
- Image Editing Software:
- Adobe Photoshop: A professional-grade image editing software with advanced features for resizing, compressing, and optimizing images.
- Pros: Powerful features, precise control over image quality.
- Cons: Expensive, steep learning curve.
- GIMP (GNU Image Manipulation Program): A free, open-source alternative to Photoshop.
- Pros: Free, versatile, supports many file formats.
- Cons: Less intuitive than Photoshop, fewer advanced features.
- Affinity Photo: A professional-grade image editing software that offers a balance between features and price.
- Pros: Affordable, powerful, user-friendly.
- Cons: Not as widely used as Photoshop.
- Adobe Photoshop: A professional-grade image editing software with advanced features for resizing, compressing, and optimizing images.
- Online Compression Tools:
- TinyPNG: A free online tool that uses smart lossy compression techniques to reduce the file size of PNG and JPEG images.
- Pros: Easy to use, effective compression, supports batch processing.
- Cons: Requires an internet connection.
- iLoveIMG: A suite of online image editing tools that includes resizing, compression, and format conversion.
- Pros: Versatile, easy to use, free for basic features.
- Cons: Requires an internet connection, some features require a paid subscription.
- Compress JPEG: A free online tool that compresses JPEG images.
- Pros: Simple and easy to use, good compression results.
- Cons: Limited to JPEG images, requires an internet connection.
- TinyPNG: A free online tool that uses smart lossy compression techniques to reduce the file size of PNG and JPEG images.
- Metadata Editors:
- ExifTool: A free, open-source command-line tool for reading, writing, and editing metadata in image files.
- Pros: Powerful, versatile, supports many metadata formats.
- Cons: Command-line interface may be intimidating for some users.
- Exif Pilot: A user-friendly metadata editor for Windows.
- Pros: Easy to use, supports many metadata formats.
- Cons: Paid software.
- Metapho (iOS): An iOS app for viewing and editing metadata in photos.
- Pros: User-friendly, supports many metadata formats.
- Cons: Limited to iOS devices.
- ExifTool: A free, open-source command-line tool for reading, writing, and editing metadata in image files.
- Batch Image Resizers:
- IrfanView: A free image viewer and batch converter for Windows.
- Pros: Fast, efficient, supports many file formats.
- Cons: Windows-only.
- XnConvert: A free cross-platform batch image processor.
- Pros: Versatile, supports many file formats, cross-platform compatibility.
- Cons: Interface may be confusing for some users.
- IrfanView: A free image viewer and batch converter for Windows.
- Email Clients with Image Optimization:
- Some email clients, such as Mailbird and Postbox, offer built-in image optimization features.
- Pros: Convenient, integrated workflow.
- Cons: Limited customization options.
- Some email clients, such as Mailbird and Postbox, offer built-in image optimization features.
12. How Can dfphoto.net Help You Improve Your Photo Sharing?
dfphoto.net offers resources, tutorials, and a community forum to help you master photo sharing, ensuring your images are always presented in the best possible way. Let dfphoto.net guide you through photo sharing, offering expert tips, community support, and resources to showcase your photos perfectly.
- Educational Resources: dfphoto.net provides a wealth of articles, tutorials, and guides on various aspects of photography, including photo editing, optimization, and sharing.
- Community Forum: dfphoto.net hosts a vibrant community forum where photographers of all skill levels can connect, share their work, ask questions, and exchange tips and advice.
- Image Galleries: dfphoto.net features curated image galleries showcasing the work of talented photographers from around the world.
- Software Reviews: dfphoto.net provides in-depth reviews of image editing software, online compression tools, and other resources that can help you manage and optimize your photos for email.
- Workshops and Courses: dfphoto.net occasionally hosts workshops and courses on photography and related topics.
- Personalized Advice: dfphoto.net offers personalized advice and support to help you overcome specific challenges and achieve your goals.
- Portfolio Showcase: dfphoto.net allows you to create and showcase your photography portfolio, which can help you attract new clients and opportunities.
- Inspiration and Ideas: dfphoto.net provides a constant stream of inspiration and ideas to help you stay creative and motivated.
Ready to elevate your photo sharing skills? Visit dfphoto.net today to explore our comprehensive resources, connect with a vibrant community, and discover new ways to showcase your work. Join dfphoto.net and transform the way you share your photos – explore our tutorials, engage with the community, and present your images at their finest. Address: 1600 St Michael’s Dr, Santa Fe, NM 87505, United States. Phone: +1 (505) 471-6001. Website: dfphoto.net.
 Close-up of email attachment icon, emphasizing digital communication and file sharing
FAQ About Sending Photos via Email
1. How do I send high-resolution photos via email without losing quality?
To send high-resolution photos without losing quality, resize them to a reasonable size (around 1200-1600 pixels wide), use JPEG format with a quality setting of 60-80, and consider using cloud storage for large files.
2. What is the maximum file size for email attachments in Gmail?
The maximum file size for email attachments in Gmail is 25MB, including headers and encoding.
3. How can I send a large number of photos via email?
To send a large number of photos via email, compress them into a ZIP file or use cloud storage services like Google Drive or Dropbox to share a download link.
4. What image format is best for sending photos via email?
JPEG is generally the best image format for sending photos via email due to its optimal balance of file size and image quality.
5. How do I preserve metadata when sending photos via email?
To preserve metadata, ensure your image editing software retains EXIF and IPTC data during resizing and compression, or use options within your email client to include this information.
6. Can I send photos directly from my iPhone or Android device via email?
Yes, you can send photos directly from your iPhone or Android device via email by using the share option in the Photos app and selecting your email client.
7. How do I resize photos for email on a Mac?
On a Mac, you can resize photos for email using the Preview app by opening the image, going to Tools > Adjust Size, and entering the desired dimensions.
8. What are the best online tools for compressing photos for email?
Some of the best online tools for compressing photos for email include TinyPNG, iLoveIMG, and Compress JPEG.
9. How do I avoid my photos being compressed by email clients?
To avoid your photos being compressed by email clients, keep the file size under 1MB, use JPEG format with minimal compression, and consider sending a link to a cloud storage service instead of attaching the files directly.
10. Is it safe to send personal photos via email?
Sending personal photos via email may pose security risks, so consider encrypting your emails or using a secure file sharing service if you need to send sensitive photos.