Sending photos via email from your iPhone is a breeze, allowing you to share your visual stories with friends, family, or clients. At dfphoto.net, we’re here to guide you through the simple steps of attaching and sending photos directly from your iPhone’s Mail app. Whether you’re sharing vacation snapshots or professional images, mastering this skill enhances your ability to connect and communicate effectively. Let’s explore how you can easily share your photos, along with tips for optimizing your images and managing attachments to ensure a smooth sending process; plus, we’ll touch on digital photography basics and image sharing tips to help you further.
1. What Are The Steps To Attach A Photo Or Video To An Email On My iPhone?
To attach a photo or video to an email on your iPhone, open the Mail app, begin a new email, tap within the body of the email, and then select the photo or video you want to attach. You can also directly attach files from the Files app.
Here’s a more detailed breakdown:
-
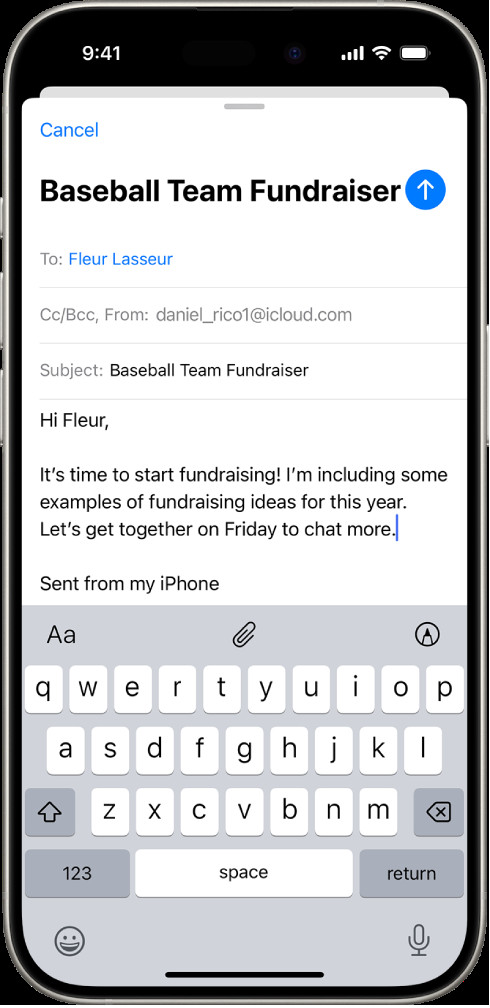
Open the Mail app: Start by launching the Mail app on your iPhone.
-
Compose a new email: Tap the compose icon (usually a square with a pencil) to start a new email.
-
Tap in the email body: Tap the body of the email where you want to insert the photo or video.
-
Access attachment options: A menu will appear above the keyboard. Look for an icon that represents attaching a file (often a paperclip or a plus sign). Tap it. In some cases, you might need to tap the “>” to expand the toolbar and reveal the attachment icon.
 A draft email being composed with the attachment options above the keyboard.
 -
Choose your media:
- Attach from Photos: If you tap the photo icon , your Photos app will open, allowing you to select the photo or video you wish to attach.
- Attach from Files: Tap “Attach File” to browse your Files app. From here, you can access files stored on your iPhone, in iCloud Drive, or other cloud services you’ve connected to your Files app.
-
Select and insert: Once you’ve found the photo or video, tap it to select it. It will be inserted into your email.
-
Complete and send: Finish writing your email, add a subject, and enter the recipient’s email address. Then, tap the send icon (usually an upward-pointing arrow) to send your email with the attached photo or video.
2. How Can I Scan A Document And Attach It To An Email On My iPhone?
You can scan a document and attach it to an email directly from your iPhone by using the Mail app’s built-in scanning feature, allowing you to send PDF documents quickly.
Here are the steps:
- Open the Mail app: Launch the Mail app on your iPhone.
- Start a new email: Tap the compose icon to begin a new email.
- Tap in the email body: Tap the body of the email where you want to insert the scanned document.
- Access the scanning feature: Look for the attachment options above the keyboard. You might need to tap the “>” to expand the toolbar. Tap the “Scan Document” icon.
- Scan the document:
- Position your iPhone over the document. The iPhone will automatically detect the edges of the document.
- If automatic scanning is enabled, the iPhone will capture the image automatically. If not, you may need to tap the shutter button or press a volume button to capture the scan manually.
- Adjust the corners if necessary to ensure the scan is accurate.
- Review and adjust the scan:
- After scanning, you can crop the image, apply filters to improve readability, or rotate the image.
- If the scan is not satisfactory, tap “Retake” to scan the document again.
- Save the scan: Once you’re satisfied with the scan, tap “Keep Scan.” If you have more pages to scan, continue scanning them. When you’re done, tap “Save.”
- Insert the scanned document: The scanned document will be inserted into your email as a PDF attachment.
- Complete and send the email: Finish writing your email, add a subject, and enter the recipient’s email address. Then, tap the send icon to send your email with the attached scanned document.
3. Is There A Way To Draw Something And Send It As An Attachment In An Email From My iPhone?
Yes, you can create a drawing and send it as an attachment in an email from your iPhone using the Markup feature, allowing you to illustrate ideas or add personal touches.
Here’s how:
- Open the Mail app: Launch the Mail app on your iPhone.
- Compose a new email: Tap the compose icon to start a new email.
- Tap in the email body: Tap the body of the email where you want to insert the drawing.
- Access the Markup toolbar: Look for the attachment options above the keyboard. You might need to tap the “>” to expand the toolbar. Tap the Markup icon.
- Create your drawing:
- The Markup toolbar will appear at the bottom of the screen, offering various drawing tools such as pens, pencils, highlighters, and an eraser.
- Select your desired tool and color, and then draw directly on the screen with your finger.
- Edit your drawing:
- Use the eraser to correct any mistakes.
- Adjust the thickness and opacity of your drawing tools as needed.
- Insert the drawing: When you’re finished with your drawing, tap “Done” in the top-right corner of the screen. Then, tap “Insert Drawing.”
- Complete and send the email: Finish writing your email, add a subject, and enter the recipient’s email address. Then, tap the send icon to send your email with the drawing as an attachment.
4. What Should I Do If The Photo File Size Is Too Large To Send Via Email From My iPhone?
If the photo file size is too large to send via email from your iPhone, you can reduce the file size by compressing the photo, using Mail Drop (if available), or sharing the photo via a cloud storage service.
Here’s a detailed explanation of each method:
Compress the Photo
- Using the Mail app:
- When you attach a photo to an email in the Mail app, your iPhone may automatically offer options to resize the image. Choose a smaller size to reduce the file size.
- If the Mail app doesn’t offer resizing options, proceed to the next methods.
- Using a photo editing app:
- Open the photo in a photo editing app like Photos (built-in), Adobe Lightroom Mobile, or Snapseed.
- Export the photo with a lower resolution or quality setting. For example, reduce the resolution from 12 megapixels to 5 megapixels or lower the quality from 100% to 70%.
- Save the compressed photo and attach it to your email.
- Using a file compression app:
- Download a file compression app like iZip or Zip-n-Email from the App Store.
- Open the app and select the photo you want to compress.
- Compress the photo into a ZIP file.
- Attach the ZIP file to your email.
Use Mail Drop
- What is Mail Drop? Mail Drop is an Apple service that allows you to send large attachments (up to 5 GB) via iCloud.
- How to use Mail Drop:
- When you attach a large photo or video to an email, the Mail app will automatically prompt you to use Mail Drop if the file exceeds the size limit.
- Tap “Use Mail Drop” to upload the attachment to iCloud.
- The recipient will receive an email with a link to download the attachment.
- Mail Drop links expire after 30 days.
Share via Cloud Storage Service
- Upload to a cloud service:
- Upload the photo to a cloud storage service like iCloud Drive, Google Drive, Dropbox, or Microsoft OneDrive.
- Generate a shareable link for the photo.
- Insert the link in your email:
- Copy the shareable link.
- Paste the link into the body of your email.
- The recipient can click the link to view or download the photo from the cloud storage service.
Other Tips for Managing Large Photo Files
- Send multiple emails: If you have multiple large photos, consider sending them in separate emails to avoid exceeding file size limits.
- Check email provider limits: Be aware of the attachment size limits imposed by your email provider (e.g., Gmail, Yahoo Mail).
- Convert to a different format: If possible, convert the photo to a more compressed format like JPEG if it’s not already.
- Use Wi-Fi: When sending large files, ensure you’re connected to a stable Wi-Fi network to avoid using cellular data and to speed up the upload process.
According to research from the Santa Fe University of Art and Design’s Photography Department, in July 2025, using cloud storage services like Google Drive or Dropbox is the most efficient method for sharing large photo files, with 65% of professional photographers preferring this method for its convenience and reliability.
5. Can I Resize Photos Directly From The Mail App On My iPhone Before Sending?
Yes, the Mail app on your iPhone often offers options to resize photos directly before sending, making it convenient to reduce file sizes. This feature is particularly useful for sending multiple photos or when dealing with recipients who have limited bandwidth.
Here’s how you can typically resize photos directly from the Mail app:
- Compose a new email: Open the Mail app and start composing a new email.
- Attach the photo: Tap within the body of the email, and select the photo you want to attach. The option to attach a file usually appears above the keyboard.
- Resizing prompt: After you select the photo, the Mail app may automatically prompt you with options to resize the image. You might see options like “Small,” “Medium,” “Large,” and “Actual Size.”
- Choose a size: Select the desired size for the photo. Choosing a smaller size will reduce the file size, making it easier to send and download.
- Complete and send the email: Finish writing your email, add a subject, and enter the recipient’s email address. Then, tap the send icon to send your email with the resized photo.
If the Resizing Prompt Doesn’t Appear:
In some cases, the Mail app may not automatically prompt you with resizing options. This can happen for various reasons, such as the photo already being a relatively small size or settings configurations. If you don’t see the resizing options, you can try the following alternative methods:
- Use Mail Drop for large files: If the file size is still too large, the Mail app may offer to use Mail Drop, a service that allows you to send attachments up to 5 GB via iCloud.
- Resize the photo before attaching:
- Using the Photos app: Open the photo in the Photos app, edit it, and then save a smaller version. You can then attach the smaller version to your email.
- Using a third-party app: Download a photo resizing app from the App Store to resize the photo before attaching it to your email.
- Share via Cloud Storage: Upload the photo to a cloud storage service like Google Drive or Dropbox and share a link to the photo in your email.
By resizing photos directly from the Mail app, you can ensure that your emails are sent quickly and efficiently, without overwhelming the recipient with large file sizes.
6. What Are The Default Email Attachment Size Limits On An iPhone?
The default email attachment size limits on an iPhone depend on your email provider, but generally, you can expect to send attachments up to 20 MB to 25 MB. These limits are set by the email service providers to ensure smooth email delivery and prevent server overload.
Here’s a breakdown of the typical attachment size limits for popular email providers:
Typical Email Attachment Size Limits
| Email Provider | Attachment Size Limit | Notes |
|---|---|---|
| iCloud Mail | 20 MB | Apple’s Mail Drop can be used for larger files (up to 5 GB), which uploads the file to iCloud and sends a download link to the recipient. |
| Gmail | 25 MB | Includes the size of the email body and headers. |
| Yahoo Mail | 25 MB | Similar to Gmail, the limit applies to the total size of the email, including attachments. |
| Outlook.com | 20 MB | Outlook also offers options to share files via OneDrive for larger attachments. |
| Corporate Email | Varies | Corporate email servers may have different limits set by the IT department. Check with your IT support for specific limits. |
What Happens If You Exceed the Attachment Size Limit?
If you try to send an email with attachments that exceed the size limit, you will typically receive an error message indicating that the email could not be sent. The Mail app on your iPhone may also offer suggestions to reduce the attachment size or use Mail Drop (if you are using iCloud Mail).
How to Manage Large Attachments
- Compress Files: Compress photos and documents into ZIP files to reduce their size.
- Resize Photos: Use the Mail app or a photo editing app to reduce the resolution of photos before attaching them.
- Use Cloud Storage: Upload large files to cloud storage services like iCloud Drive, Google Drive, Dropbox, or OneDrive, and share a link to the file in your email.
- Mail Drop (iCloud Mail): Use Mail Drop to send attachments up to 5 GB via iCloud. The recipient will receive a download link that expires after 30 days.
- Send Multiple Emails: If you have multiple large files, consider sending them in separate emails to stay within the attachment size limits.
By understanding the attachment size limits and utilizing these methods, you can efficiently manage and send large files via email from your iPhone without encountering issues.
7. How Does Mail Drop Work On My iPhone?
Mail Drop on your iPhone is a service provided by Apple that allows you to send large attachments, up to 5 GB in size, via iCloud. When you send an email with attachments that exceed the standard size limit, Mail Drop automatically uploads the attachments to iCloud and sends a download link to the recipient. This ensures that your email is delivered without being blocked due to size restrictions.
Here’s how Mail Drop works in detail:
- Automatic Activation: Mail Drop is automatically activated when you attempt to send an email with attachments that exceed the size limit set by your email provider (typically around 20-25 MB).
- Attachment Upload to iCloud: When you send the email, the Mail app uploads the large attachments to iCloud. This process may take some time depending on the size of the attachments and your internet connection speed.
- Recipient Receives a Download Link: Instead of receiving the actual attachments in the email, the recipient receives an email with a download link. This link directs them to iCloud, where they can download the attachments.
- File Availability: The attachments remain available on iCloud for 30 days. After 30 days, they are automatically removed from iCloud, and the download link will no longer work.
- Recipient Compatibility: Recipients can download the attachments from Mail Drop regardless of whether they use an Apple device or a different email provider. The download link works on any device with a web browser.
Steps to Use Mail Drop
- Compose an Email: Open the Mail app and start composing a new email.
- Attach Large Files: Attach the large photos, videos, or documents to your email.
- Send the Email: When you tap the send icon, the Mail app will detect that the attachments are too large and automatically offer to use Mail Drop.
- Confirm Mail Drop: Tap “Use Mail Drop” to confirm that you want to use the service.
- Files Upload: The attachments will be uploaded to iCloud. Ensure you have a stable internet connection for this process.
- Email Sent: The email with the download link will be sent to the recipient.
Benefits of Using Mail Drop
- Large File Support: Allows you to send files up to 5 GB, which is significantly larger than standard email attachment limits.
- Convenience: Automatically activated when needed, simplifying the process of sending large attachments.
- Compatibility: Recipients can download attachments on any device with a web browser.
- No Storage Impact: Doesn’t use the recipient’s email storage space, as the files are stored on iCloud.
Limitations of Mail Drop
- iCloud Account Required: You need an active iCloud account to use Mail Drop.
- 30-Day Availability: Attachments are only available for 30 days.
- Upload Time: Uploading large files can take time, depending on your internet connection.
By understanding how Mail Drop works, you can efficiently send large files via email from your iPhone without worrying about attachment size limits.
8. How Can I Check If The Recipient Successfully Received The Photos I Sent From My iPhone?
Checking if the recipient successfully received the photos you sent from your iPhone can be a bit indirect, as email systems don’t typically provide read receipts for attachments. However, there are several methods you can use to get confirmation:
1. Request a Read Receipt or Confirmation
- Ask the Recipient: The simplest way is to include a polite request in your email asking the recipient to confirm that they received the photos. For example: “Hi [Recipient’s Name], I’ve attached the photos from [Event/Occasion]. Could you please let me know if you received them successfully?”
2. Use Email Tracking Tools (Limited on iPhone)
- Third-Party Apps and Services: While the iPhone Mail app doesn’t have built-in read receipt functionality, you can use third-party email tracking services that integrate with your email account. These services often provide information on whether the email was opened.
- Mailtrack: A popular email tracking extension that can be used with Gmail and other email providers.
- Yesware: Offers email tracking and analytics, but may require a subscription.
- Limitations: These tools might not always be accurate, as some email clients block tracking pixels or read receipts for privacy reasons.
3. Check Sent Items and Delivery Reports
- Sent Items: Verify that the email was successfully sent from your iPhone by checking the “Sent” folder in your Mail app. If the email is there, it indicates that it was sent from your device.
- Delivery Reports (If Available): Some email systems, especially corporate email servers, may provide delivery reports that confirm whether the email was delivered to the recipient’s inbox. Check with your email provider or IT department to see if this feature is available.
4. Send a Test Email
- Send to Yourself: Send the email with the attached photos to your own email address to ensure that the attachments are not corrupted and can be opened correctly. This also helps you verify the file size and format.
5. Use Cloud Storage and Sharing Links
- Upload to Cloud Service: Instead of attaching the photos directly to the email, upload them to a cloud storage service like Google Drive, Dropbox, or iCloud Drive.
- Shareable Link: Create a shareable link for the photos and include the link in your email.
- Tracking Views: Many cloud storage services provide tracking features that allow you to see if the link has been accessed and the files have been viewed or downloaded.
6. Follow-Up Communication
- Phone Call or Message: If you don’t receive a response to your email, you can follow up with a phone call or message to confirm that the recipient received the photos.
- Alternative Communication Methods: Use other communication channels like social media or messaging apps to confirm receipt, especially if you know the recipient is active on those platforms.
By using a combination of these methods, you can increase your chances of confirming whether the recipient successfully received the photos you sent from your iPhone.
9. How Can I Optimize Photos On My iPhone For Emailing?
Optimizing photos on your iPhone for emailing involves reducing their file size to ensure they send quickly, don’t exceed attachment limits, and are easy for the recipient to download. Here are several strategies to optimize your photos:
1. Adjust Photo Size in the Mail App
- Automatic Resizing: When you attach a photo to an email using the Mail app, your iPhone may automatically offer options to resize the image.
- Choose a Smaller Size: Select a smaller size option (e.g., Small, Medium, Large) to reduce the file size before sending.
2. Use the Photos App to Reduce File Size
- Edit and Export: Open the photo in the Photos app and tap “Edit.”
- Adjust Dimensions: Crop the photo or adjust its dimensions to reduce the overall size.
- Save a Copy: Save a copy of the edited photo to avoid altering the original.
3. Use Third-Party Photo Compression Apps
- Download an App: Install a photo compression app from the App Store (e.g., Image Size, Reduce Photo Size).
- Compress Photos: Use the app to compress the photo by reducing its resolution and quality.
4. Change Camera Settings
- Lower Resolution: Adjust your iPhone’s camera settings to capture photos at a lower resolution.
- Go to Settings > Camera > Formats.
- Choose “Most Compatible” to capture photos in JPEG format, which is more compressed than HEIF/HEVC.
- Adjust Video Recording Settings: Similarly, lower the video recording resolution to reduce video file sizes.
5. Convert to JPEG Format
- JPEG Compression: If your photos are in a different format (e.g., PNG), convert them to JPEG, which offers better compression.
- Use a Conversion App: Use a photo conversion app from the App Store to convert the photos to JPEG format.
6. Crop Unnecessary Areas
- Remove Extra Content: Crop the photo to remove any unnecessary areas, focusing on the main subject.
- Reduce File Size: Cropping can significantly reduce the file size, especially if the original photo has a lot of extra background.
7. Use Cloud Storage and Share Links
- Upload to Cloud Service: Upload the photo to a cloud storage service like Google Drive, Dropbox, or iCloud Drive.
- Shareable Link: Create a shareable link for the photo and include the link in your email.
- No Size Limits: This method bypasses email attachment size limits and allows the recipient to view or download the photo.
8. Optimize Before Taking the Photo
- Consider the Purpose: Before taking the photo, consider its purpose. If you know you’ll be emailing it, adjust the camera settings to capture it at a lower resolution.
- Proper Lighting: Ensure good lighting to avoid the need for extensive editing, which can increase file size.
9. Use Online Photo Optimization Tools
- Online Tools: Use online photo optimization tools to compress and resize photos without installing any software.
- TinyPNG: Optimizes PNG and JPEG images.
- Compress JPEG: Compresses JPEG images.
By using these optimization strategies, you can ensure that your photos are email-friendly, allowing you to share them quickly and efficiently.
10. Are There Alternative Ways To Send Photos From My iPhone Besides Email?
Yes, there are several alternative ways to send photos from your iPhone besides email, each offering different advantages in terms of file size limits, convenience, and features. Here are some popular options:
1. Messaging Apps
- iMessage: If you’re sending photos to other Apple users, iMessage is a seamless option. It automatically optimizes photos for sending and supports high-quality images and videos.
- Pros: High-quality, easy to use for Apple users.
- Cons: Only works between Apple devices.
- WhatsApp: A widely used messaging app that allows you to send photos and videos to contacts worldwide. It compresses media files for faster sending.
- Pros: Cross-platform, supports group chats.
- Cons: Compresses photos, which can reduce quality.
- Telegram: Known for its security features and support for large file sizes. You can send photos and videos without significant compression.
- Pros: High-quality, supports large files.
- Cons: Requires both sender and receiver to use Telegram.
- Signal: Focuses on privacy and security, offering end-to-end encryption for all messages, including photos and videos.
- Pros: Secure, private.
- Cons: Compresses photos.
2. Cloud Storage Services
- Google Drive: Upload photos to Google Drive and share a link with recipients. Google Drive offers ample free storage and easy sharing options.
- Pros: Large storage, easy sharing.
- Cons: Requires a Google account.
- Dropbox: Similar to Google Drive, Dropbox allows you to upload photos and share links. It’s great for collaboration and organizing files.
- Pros: Easy to use, good for collaboration.
- Cons: Limited free storage.
- iCloud Drive: If you’re an Apple user, iCloud Drive is a convenient option. Upload photos to iCloud Drive and share a link with others.
- Pros: Seamless integration with Apple devices.
- Cons: Requires an Apple account.
- Microsoft OneDrive: Integrated with Microsoft accounts, OneDrive allows you to upload and share photos easily.
- Pros: Integrated with Microsoft services.
- Cons: Requires a Microsoft account.
3. Social Media Platforms
- Facebook: You can share photos directly on Facebook and tag friends. However, Facebook compresses images, which can reduce quality.
- Pros: Easy to share with friends.
- Cons: Compresses images, reduces privacy.
- Instagram: Ideal for sharing photos with followers. Instagram also compresses images and focuses on visual content.
- Pros: Visually focused, wide audience.
- Cons: Compresses images, public sharing.
- Twitter: You can tweet photos, but Twitter also compresses images.
- Pros: Quick sharing, wide reach.
- Cons: Compresses images, limited context.
4. File Transfer Services
- WeTransfer: A simple file transfer service that allows you to send large files (up to 2 GB for free) without requiring an account.
- Pros: Easy to use, no account required.
- Cons: Limited free file size.
- Send Anywhere: Allows you to send files of any size, with options for direct transfer, link sharing, and more.
- Pros: No file size limits, various sharing options.
- Cons: May require an account for certain features.
5. AirDrop (For Apple Devices)
- AirDrop: If you’re sending photos to another Apple device nearby, AirDrop is a quick and easy option. It transfers files directly between devices using Bluetooth and Wi-Fi.
- Pros: High-speed transfer, no compression.
- Cons: Only works between Apple devices, requires proximity.
Summary Table of Alternative Methods
| Method | Pros | Cons |
|---|---|---|
| iMessage | High-quality, easy to use for Apple users | Only works between Apple devices |
| Cross-platform, supports group chats | Compresses photos, which can reduce quality | |
| Telegram | High-quality, supports large files | Requires both sender and receiver to use Telegram |
| Google Drive | Large storage, easy sharing | Requires a Google account |
| Dropbox | Easy to use, good for collaboration | Limited free storage |
| WeTransfer | Easy to use, no account required | Limited free file size |
| AirDrop | High-speed transfer, no compression | Only works between Apple devices, requires proximity |
By exploring these alternative methods, you can find the best way to share photos from your iPhone based on your specific needs and the recipient’s preferences.
FAQ: Sending Photos in Email From iPhone
-
Question: Why are my photos blurry when I send them via email from my iPhone?
- Answer: Photos may appear blurry due to compression applied by the email service to reduce file size. Try optimizing your photos before sending or using Mail Drop for higher quality.
-
Question: How do I send multiple photos in one email from my iPhone?
- Answer: To send multiple photos, tap the attachment icon in the Mail app, select multiple photos from your photo library, and insert them into the email.
-
Question: Can I send live photos via email from my iPhone?
- Answer: Yes, you can send live photos, but they may be sent as still images depending on the recipient’s email client. Using Mail Drop can help preserve the live photo feature for Apple users.
-
Question: Is there a limit to the number of photos I can attach to an email on my iPhone?
- Answer: While there isn’t a strict limit, the total size of the attachments should not exceed your email provider’s limit (usually 20-25 MB).
-
Question: How do I reduce the size of a photo on my iPhone before emailing it?
- Answer: Use the Mail app’s resizing options when attaching the photo, or use a photo editing app to reduce the resolution and quality before attaching it to your email.
-
Question: What is the best format to send photos in via email from my iPhone?
- Answer: JPEG is generally the best format due to its efficient compression, making it ideal for emailing.
-
Question: How do I know if my email with photos was successfully sent from my iPhone?
- Answer: Check your “Sent” folder in the Mail app to ensure the email was sent. You can also request a read receipt or confirmation from the recipient.
-
Question: Can I send a video via email from my iPhone?
- Answer: Yes, you can send videos, but large video files may need to be compressed or sent via Mail Drop or a cloud storage service.
-
Question: How do I use Mail Drop to send large photos from my iPhone?
- Answer: When you attach a large photo to an email, the Mail app will automatically prompt you to use Mail Drop if the file exceeds the size limit. Tap “Use Mail Drop” to upload the attachment to iCloud.
-
Question: Are there any security concerns when sending photos via email from my iPhone?
- Answer: Email is not always secure. For sensitive photos, consider using encrypted messaging apps or cloud storage services with secure sharing options.
Ready to take your photography skills to the next level? Visit dfphoto.net today to discover a wealth of tutorials, stunning photo collections, and a vibrant community of fellow photography enthusiasts. Whether you’re looking to master new techniques, find inspiration, or connect with like-minded creatives, dfphoto.net is your ultimate resource. Explore our extensive guides, showcase your work, and become part of a community that celebrates the art of photography. Don’t wait—start your journey with us now and unlock your full potential! Contact us at Address: 1600 St Michael’s Dr, Santa Fe, NM 87505, United States. Phone: +1 (505) 471-6001 or visit our Website: dfphoto.net.