Sending photos from your iPhone to email is a straightforward process, perfect for sharing memories with family, collaborating with colleagues, or submitting images for work or personal projects. Whether you need to send a single snapshot or a batch of high-resolution images, your iPhone offers several convenient methods to get the job done. This guide will walk you through the easiest ways to attach and send photos from your iPhone directly to email, ensuring your precious moments are shared effortlessly.
To send photos via email from your iPhone, you primarily use the Mail app, which comes pre-installed on your device. Here’s how you can attach photos to your emails quickly and efficiently:
- Open the Mail App and Start a New Email:
Begin by launching the Mail application on your iPhone. Tap the icon to open it. Once open, start composing a new email by tapping the compose button, usually located at the bottom right corner, resembling a pen and paper or a ‘+’ sign.
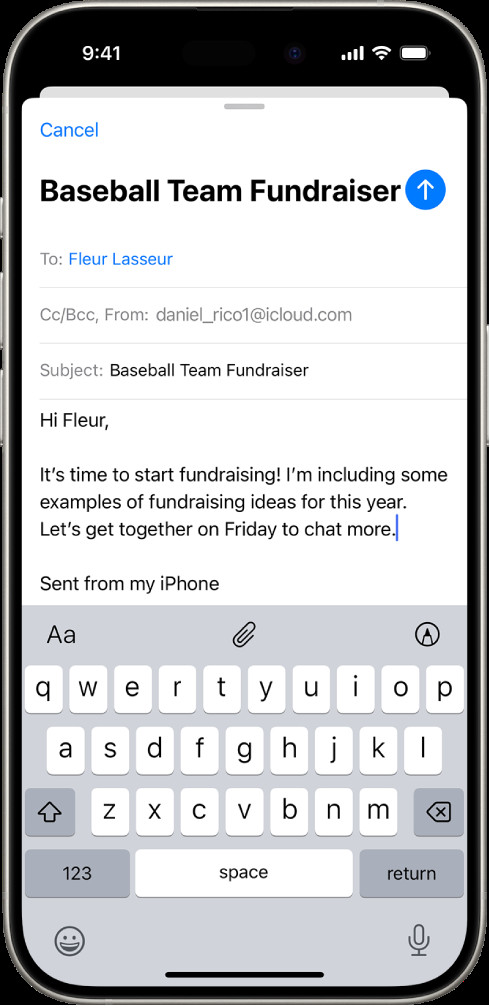 Compose a new email in Mail app on iPhone to attach photos.
-
Access the Attachment Options:
In the body of your email, tap once where you want to insert the photo. Above the keyboard, you will see a toolbar. If the toolbar is collapsed, tap the “Expand Toolbar” button (it looks like an upwards-pointing arrow). Then, tap the “Insert Photo or Video” button, which is usually represented by a photo icon. -
Select Photos to Attach:
After tapping the photo icon, your Photos library will appear. You can browse through your albums or use the “Recents” album to quickly find the photos you wish to send. Tap on each photo you want to attach to select it. A checkmark will appear on the selected photos. You can select multiple photos to send in one email. Once you’ve chosen all the desired photos, tap “Done” in the top right corner. This will attach the selected photos to your email. -
Complete and Send Your Email:
With your photos attached, fill in the recipient’s email address in the “To” field, add a subject if needed, and write your message. Review your email and attachments, and when you are ready, tap the “Send” button, typically an upwards-pointing arrow in the top right corner. Your email with the attached photos will be sent.
Alternative Method: Sending Photos Directly from the Photos App
Another convenient way to email photos is directly from the Photos app. This method is particularly useful when you are already viewing the photos you want to share.
-
Open the Photos App and Select Photos:
Launch the Photos app on your iPhone and navigate to the photo or photos you want to email. You can select multiple photos by tapping “Select” at the top right and then tapping on each photo you wish to include. -
Use the Share Sheet:
Once you have selected your photos, tap the “Share” button at the bottom left corner. It looks like a square with an upward-pointing arrow. This will bring up the Share Sheet. -
Choose the Mail Option:
In the Share Sheet, scroll through the app icons until you find the “Mail” icon. Tap on the “Mail” icon. This will open a new email draft in the Mail app with the selected photos already attached. -
Complete and Send Your Email:
Just like in the previous method, fill in the recipient’s email address, add a subject and message if desired, and then tap “Send” to send your email with the attached photos.
Dealing with Large Photo Files: Mail Drop
Sometimes, you might want to send high-resolution photos or a large number of photos, which can result in a large file size. Email providers often have limits on attachment sizes. If your photos exceed the size limit, your iPhone’s Mail app may automatically offer to use Mail Drop.
Mail Drop is an Apple service that allows you to send large attachments up to 5GB in size. If your attachments are too large for a standard email, Mail Drop will upload them to iCloud and include a link in your email. Recipients can then download the attachments from iCloud. Mail Drop is seamless and you usually don’t need to do anything extra – the Mail app will prompt you if it’s needed when you send your email.
Scanning Documents and Sending via Email
Besides photos, you can also scan documents using your iPhone and send them via email. This is handy for quickly sharing paperwork or documents as PDF files.
-
Scan Document in Mail App:
In a new email in the Mail app, follow steps 1 and 2 from the first method to access the attachment options. This time, instead of choosing the photo icon, tap the “Scan Document” button, which looks like a document icon. -
Scan and Save:
Your iPhone camera will open, ready to scan. Position the document within the frame, and your iPhone will automatically capture the page. You can adjust the corners if needed, retake the scan, or scan additional pages. Once you are satisfied, tap “Save.” The scanned document will be inserted into your email as a PDF attachment. -
Send Your Email:
Complete your email and send it as usual. The recipient will receive the scanned document as a PDF attachment.
Conclusion
Sending photos from your iPhone to email is a simple and versatile way to share visual content. Whether you are attaching photos directly, sharing from the Photos app, using Mail Drop for larger files, or even sending scanned documents, your iPhone provides all the tools you need. By following these steps, you can easily send photos and documents from your iPhone to any email address, ensuring your important visuals are delivered quickly and efficiently.