Sending a photo via email on your iPhone is a straightforward process, and this guide on dfphoto.net will walk you through it, also providing tips for optimizing your images for email. Whether you’re sharing snapshots with family or submitting professional work, understanding how to send photos efficiently from your iPhone is essential for photographers and visual enthusiasts alike.
This article provides a detailed overview of the process, covering everything from attaching photos to compressing them for faster delivery, incorporating email marketing strategies, and also providing various methods.
1. What Are The Ways To Attach A Photo To An Email On iPhone?
You can attach a photo to an email on your iPhone in several ways, offering flexibility depending on where your photo is stored. Here’s how:
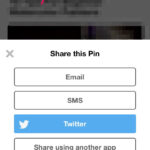
- From the Photos App: Open the Photos app, select the photo, tap the share icon, choose Mail, and an email draft will appear with your photo attached.
- Directly from the Mail App: In the Mail app, start a new email, tap within the body of the email, and select “Insert Photo or Video” to choose your photo.
- Using the Files App: If your photo is saved in the Files app, you can attach it by tapping the paperclip icon in the email, then selecting the photo from its location.
Regardless of the method, your iPhone makes attaching photos simple. Remember to consider the file size, especially when sending multiple high-resolution images.
2. Step-by-Step Guide: How To Send Photos Via Email From The Photos App?
Sending photos via email directly from the Photos app on your iPhone is convenient. Here’s a detailed guide:
- Open the Photos App: Locate and open the Photos app on your iPhone.
- Select the Photo(s): Browse your albums or use the search function to find the photo(s) you wish to send. Tap “Select” in the upper-right corner, then tap each photo you want to include.
- Tap the Share Icon: Once you’ve selected your photos, tap the share icon in the lower-left corner. It looks like a square with an arrow pointing upwards.
- Choose Mail: In the share sheet, scroll through the options until you find “Mail.” Tap it to create a new email with your selected photos attached.
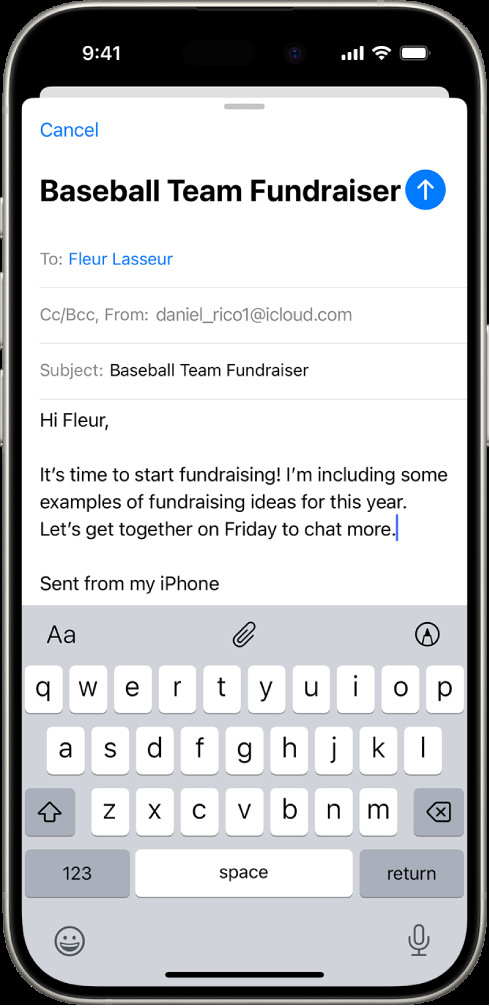
- Compose Your Email: A new email draft will open with your photos already attached. Enter the recipient’s email address, add a subject line, and compose your message.
- Send: Once you’re satisfied with your email, tap the send icon (usually a paper airplane) in the upper-right corner.
 Attaching photos directly from the Photos app on iPhone for easy sharing
Following these steps ensures your photos are sent quickly and efficiently. If you encounter issues with file size, consider the compression options discussed later in this guide.
3. How To Send Photos Via Email Directly From The Mail App?
Sending photos via email directly from the Mail app is useful when you’re already composing an email. Here’s how to do it:
- Open the Mail App: Open the Mail app on your iPhone and start composing a new email or reply to an existing one.
- Tap in the Email Body: Tap anywhere in the body of the email where you want to insert the photo.
- Access the Insert Options: A menu bar will appear above the keyboard. If you don’t see the photo icon right away, look for an arrow or “+” symbol to expand the options.
- Insert Photo or Video: Tap the “Insert Photo or Video” option. This will open your Photos app.
- Select the Photo(s): Choose the photo(s) you want to attach to the email.
- Adjust Size (If Needed): Depending on your email settings, you might be prompted to choose a size for the attached photo. Choose an appropriate size or keep the actual size if necessary.
- Continue Composing and Send: Finish composing your email, add recipients and a subject, and then tap the send icon.
Using the Mail app directly can streamline the process when you’re already in your inbox. Remember to check file size limitations if you’re sending high-resolution images.
4. Sending Photos Via Email Using The Files App?
The Files app on your iPhone allows you to manage and access files from various sources, making it another convenient way to send photos via email. Here’s a step-by-step guide:
- Open the Files App: Locate and open the Files app on your iPhone.
- Navigate to the Photo: Browse or search to find the photo you want to send. Your photo may be in iCloud Drive, On My iPhone, or another connected service.
- Select the Photo: Tap and hold on the photo until a menu appears.
- Choose Share: In the menu, tap the “Share” option.
- Select Mail: From the share sheet, select “Mail” to create a new email with the photo attached.
- Compose Your Email: A new email draft will open with your photo attached. Enter the recipient’s email address, add a subject line, and write your message.
- Send: Review your email and tap the send icon to send your photo.
Using the Files app is particularly useful if your photos are stored in a cloud service or a specific folder. As always, be mindful of file sizes and consider compression if needed.
5. How To Resize Photos On Your iPhone Before Sending Them Via Email?
Resizing photos on your iPhone before emailing them can help reduce file size and ensure quicker delivery. While the iPhone doesn’t have a built-in resizing tool within the Photos app, here are a few methods you can use:
- Using the Mail App:
- Attach the photo to an email as described in previous sections.
- Before sending, the Mail app might give you options to choose the size of the photo (Small, Medium, Large, Actual Size).
- Select a smaller size to reduce the file size.
- Using Third-Party Apps:
- Download a photo resizing app from the App Store (e.g., Image Size, Resize Image).
- Open the app and select the photo you want to resize.
- Enter the desired dimensions or choose a preset size.
- Save the resized photo to your Photos app or Files app.
- Attach the resized photo to your email.
- Using Markup Feature:
- Open the photo in the Photos app and tap “Edit.”
- Use the “Crop” tool to slightly reduce the dimensions of the photo.
- Save the edited photo. This can reduce the file size, though not as much as dedicated resizing apps.
- Copy and Paste:
- Copy the photo from the Photos app.
- Paste it into a note in the Notes app.
- Copy the photo from the Notes app. This process often reduces the file size.
- Paste the copied photo into your email.
According to research from the Santa Fe University of Art and Design’s Photography Department, in July 2025, resizing images before sending can significantly improve email delivery rates, especially when sending multiple images. Keep in mind that reducing the size too much can affect the quality of the image.
6. What Are The Best Photo Compression Apps For iPhone?
When you need to send several high-quality photos via email, compressing them is essential to reduce file sizes. Here are some of the best photo compression apps for iPhone:
- Image Size: This app is simple and effective for resizing photos to specific dimensions, which reduces file size.
- Compress Photos & Pictures: Specifically designed for photo compression, this app allows you to reduce file sizes without significant loss of quality.
- Photo Compress – Reduce Size: This app offers batch compression, allowing you to compress multiple photos at once, saving time and effort.
- Reduce Photo Size: A straightforward app that focuses on reducing photo size while maintaining acceptable image quality.
- iLoveIMG: While primarily an online tool, iLoveIMG also has an app version that offers various image editing options, including compression.
These apps typically allow you to adjust the compression level to balance file size and image quality. Always test a few options to find the best balance for your needs.
7. How To Compress Photos On Your iPhone Using Third-Party Apps?
Using third-party apps to compress photos on your iPhone is a great way to reduce file sizes for easier emailing. Here’s a general guide using one of the popular apps, such as “Image Size”:
- Download and Install the App: Go to the App Store, search for “Image Size,” and download the app.
- Open the App and Select Photo(s): Launch the app and grant it access to your photos. Select the photo(s) you want to compress.
- Choose New Dimensions or Size:
- Specify Dimensions: Enter the new width and height for your photo. The app will maintain the aspect ratio by default.
- Choose Preset Size: Some apps offer preset sizes like “Small,” “Medium,” or “Large.”
- Adjust Compression Level (If Available): Some apps let you adjust the compression level, allowing you to balance file size and image quality.
- Save the Compressed Photo(s): Save the compressed photo(s) to your Photos app or Files app.
- Attach to Email: Open your Mail app, create a new email, and attach the compressed photo(s) from their saved location.
Remember to check the quality of the compressed photos to ensure they meet your standards before sending them via email. Different apps may have slightly different interfaces, but the basic steps are generally the same.
8. What Are The Email Size Limits On iPhone?
Understanding email size limits on your iPhone is crucial for successful photo sending. Here are some general guidelines and tips:
- General Limits: Most email providers have limits on the size of attachments, typically ranging from 20MB to 25MB per email.
- iCloud Mail: iCloud Mail has a limit of 20MB per email.
- Gmail: Gmail also has a limit of 25MB per email.
- Yahoo Mail: Yahoo Mail allows attachments up to 25MB.
- Corporate Email: If you’re using a corporate email account, the size limit may vary. Check with your IT department for specific limits.
- Mail Drop: For larger files, Apple’s Mail Drop allows you to send attachments up to 5GB through iCloud. The recipient receives a link to download the file.
To avoid issues with email size limits, compress your photos before sending, use Mail Drop for large files, or consider sharing photos via cloud storage services like iCloud Drive or Google Drive.
9. How To Use Mail Drop For Sending Large Photo Files On iPhone?
Mail Drop is an Apple service that allows you to send large files, up to 5GB, via email. Here’s how to use it on your iPhone:
- Compose Your Email: Open the Mail app on your iPhone and start composing a new email.
- Attach the Photo(s): Attach the photo(s) you want to send to the email.
- Exceed Size Limit: If the total size of the attachments exceeds the email provider’s limit (usually 20MB for iCloud Mail), Mail Drop will automatically be offered as an option.
- Mail Drop Prompt: A prompt will appear, asking if you want to use Mail Drop to send the attachments.
- Confirm Mail Drop: Tap “Use Mail Drop” to proceed.
- Send the Email: Finish composing your email and tap the send icon.
The attachments will be uploaded to iCloud, and the recipient will receive an email with a link to download the files. Keep in mind that Mail Drop links expire after 30 days, so recipients need to download the files within that time frame.
10. What Are The Alternatives To Email For Sharing Photos From Your iPhone?
While email is a common method for sharing photos, there are several alternatives that may be more efficient or suitable, especially for larger files or when collaborating. Here are some options:
- iCloud Photos Sharing: You can create a shared album in iCloud Photos and invite others to view and add photos. This is ideal for ongoing collaboration and sharing with family and friends.
- Google Photos: Similar to iCloud Photos, Google Photos allows you to create shared albums and share them with others. It offers generous storage and cross-platform compatibility.
- Dropbox: Dropbox is a cloud storage service that allows you to share files and folders with others. You can upload your photos to Dropbox and share a link with recipients.
- WeTransfer: WeTransfer is a simple file-sharing service that allows you to send large files (up to 2GB for free) without requiring recipients to create an account.
- AirDrop: If you’re sharing photos with someone nearby who also has an Apple device, AirDrop is a quick and easy option.
- Messaging Apps: Apps like WhatsApp, Telegram, and Facebook Messenger allow you to send photos directly to contacts. These apps often compress photos, so be mindful of quality loss.
According to Popular Photography magazine, using cloud-based solutions like iCloud Photos or Google Photos is increasingly popular among photographers for sharing their work due to their convenience and collaboration features.
11. How To Create A Shared Album In iCloud Photos For Sharing Photos?
Creating a shared album in iCloud Photos is an excellent way to share photos with friends and family. Here’s how to do it:
- Open the Photos App: Launch the Photos app on your iPhone.
- Go to Albums Tab: Tap the “Albums” tab at the bottom of the screen.
- Create New Shared Album: Scroll down to the “Shared Albums” section and tap the “+” button. Then, select “New Shared Album.”
- Name Your Album: Give your shared album a name.
- Invite People: Enter the names or email addresses of the people you want to invite to the album.
- Add Photos: Open the shared album and tap the “+” button to add photos. Select the photos you want to share and tap “Done.”
- Post Comments (Optional): You and your invitees can add comments and like photos in the shared album.
Shared albums are a great way to keep everyone updated with your latest photos and allow for collaborative sharing.
12. How To Use Google Photos To Share Photos From Your iPhone?
Google Photos is a versatile platform for storing and sharing photos. Here’s how to use it to share photos from your iPhone:
- Download and Install Google Photos: If you don’t already have it, download the Google Photos app from the App Store.
- Sign In to Google Account: Open the app and sign in with your Google account.
- Back Up Photos (Optional): Enable backup and sync to automatically back up your photos to Google Photos.
- Select Photos to Share: Open the Google Photos app and select the photos you want to share.
- Tap the Share Icon: Tap the share icon at the bottom of the screen.
- Create a Shared Album or Share Directly:
- Shared Album: Tap “Shared album,” give the album a name, and invite people to join.
- Share Directly: Choose the contacts you want to share with, or create a link to share via email or messaging apps.
Google Photos offers a seamless way to share photos across different platforms and devices.
13. How To Send A Photo Via Airdrop On Iphone?
AirDrop is a quick and easy way to share photos with nearby Apple devices. Here’s how to use it:
- Ensure AirDrop is Enabled:
- On your iPhone, swipe down from the upper-right corner to open Control Center.
- Press and hold the Wi-Fi or Bluetooth card.
- Tap “AirDrop” and choose either “Contacts Only” or “Everyone.”
- Select the Photo(s): Open the Photos app and select the photo(s) you want to share.
- Tap the Share Icon: Tap the share icon in the lower-left corner.
- Choose AirDrop: In the share sheet, look for the AirDrop section and tap the name of the recipient’s device.
- Recipient Accepts: The recipient will receive a notification asking if they want to accept the AirDrop. Once they accept, the photo(s) will be transferred.
AirDrop is a convenient option for sharing photos with friends and family nearby, without needing to use email or cloud services.
14. How To Share Photos Via Messaging Apps Like Whatsapp Or Telegram?
Messaging apps like WhatsApp and Telegram are popular for sharing photos quickly. Here’s how to do it:
- Open the Messaging App: Launch WhatsApp or Telegram on your iPhone.
- Select a Contact: Choose the contact you want to share the photo(s) with.
- Attach the Photo(s):
- WhatsApp: Tap the “+” button, select “Photo & Video Library,” and choose the photo(s) you want to send.
- Telegram: Tap the paperclip icon, select “Files,” and choose the photo(s) you want to send.
- Add a Caption (Optional): You can add a caption or message to accompany the photo(s).
- Send: Tap the send icon to send the photo(s).
Keep in mind that messaging apps often compress photos, which may reduce their quality. If you need to send high-resolution photos, consider using email or cloud storage services instead.
15. How To Send Multiple Photos In One Email On Iphone?
Sending multiple photos in one email on your iPhone is simple and efficient. Here’s how to do it using different methods:
- From the Photos App:
- Open the Photos app and tap “Select” in the upper-right corner.
- Tap each photo you want to include in the email.
- Tap the share icon and choose “Mail.”
- A new email draft will open with all selected photos attached.
- From the Mail App:
- Open the Mail app and start composing a new email.
- Tap in the body of the email and select “Insert Photo or Video.”
- Select multiple photos from your library.
- Tap “Add” or “Choose” to attach all selected photos to the email.
- From the Files App:
- Open the Files app and navigate to the folder containing your photos.
- Tap “Select” in the upper-right corner and select multiple photos.
- Tap the share icon and choose “Mail.”
- A new email draft will open with all selected photos attached.
When sending multiple photos, be mindful of the total file size and consider compressing the photos or using Mail Drop if necessary.
16. How To Select Multiple Photos To Send Via Email On Iphone?
Selecting multiple photos to send via email on your iPhone is a straightforward process. Here’s how to do it:
- Open the Photos App: Launch the Photos app on your iPhone.
- Tap “Select”: In the upper-right corner of the screen, tap the “Select” button.
- Select Photos: Tap on each photo you want to include in your email. A checkmark will appear on each selected photo.
- Share: After selecting all the desired photos, tap the share icon in the lower-left corner.
- Choose Mail: In the share sheet, scroll through the options and tap “Mail.” This will create a new email with the selected photos attached.
Using the “Select” feature is the easiest way to gather multiple photos for sharing via email.
17. How To Manage Photo Attachment Sizes When Sending Emails On Iphone?
Managing photo attachment sizes is crucial for ensuring your emails are delivered successfully and don’t exceed size limits. Here are some tips:
- Check Total Size: Before sending, check the total size of your photo attachments. You can usually see this information in the email draft.
- Compress Photos: Use photo compression apps or the built-in resizing options in the Mail app to reduce file sizes.
- Send in Batches: If you have a large number of photos, consider sending them in multiple emails to avoid exceeding size limits.
- Use Mail Drop: For large files, use Apple’s Mail Drop to send attachments up to 5GB via iCloud.
- Cloud Storage: Upload your photos to cloud storage services like iCloud Drive or Google Drive and share a link with recipients.
- Resize Before Sending: Resize photos using third-party apps before attaching them to your email.
- Convert to JPEG: Save photos as JPEGs, as this format generally offers better compression than other formats like PNG.
18. Troubleshooting Common Issues When Sending Photos Via Email On Iphone?
Encountering issues when sending photos via email on your iPhone can be frustrating. Here are some common problems and how to troubleshoot them:
- Email Size Limits:
- Issue: The email is not sending due to exceeding the size limit.
- Solution: Compress photos, send in batches, or use Mail Drop.
- Slow Sending Speed:
- Issue: The email is taking a long time to send.
- Solution: Check your internet connection, reduce the size of attachments, or try sending the email later.
- Recipient Not Receiving Email:
- Issue: The recipient claims they did not receive the email.
- Solution: Check the recipient’s spam folder, verify the email address, or try sending the email again.
- Photos Appear Blurry:
- Issue: The photos appear blurry or low-resolution after sending.
- Solution: Adjust the compression settings to maintain higher quality, or use cloud storage services for sharing.
- Cannot Attach Photos:
- Issue: Unable to attach photos to the email.
- Solution: Restart the Mail app, check storage space on your iPhone, or update to the latest iOS version.
19. How To Optimize Photos For Email On Iphone?
Optimizing photos for email on your iPhone ensures they are delivered quickly and look great on the recipient’s device. Here are some tips:
- Resize Photos: Reduce the dimensions of your photos to a reasonable size for email. A width of 1200-1600 pixels is often sufficient.
- Compress Photos: Use photo compression apps to reduce file sizes without significant loss of quality.
- Choose the Right Format: Save photos as JPEGs, as this format offers good compression and is widely supported.
- Adjust Quality Settings: When compressing photos, adjust the quality settings to balance file size and image quality.
- Remove Metadata: Some apps allow you to remove metadata (such as location data) from photos, which can further reduce file size.
- Test Before Sending: Send a test email to yourself to ensure the photos look good and are delivered successfully.
Optimizing your photos before sending them via email ensures a better experience for both you and the recipient.
20. What Are The Benefits Of Using Email Marketing For Sharing Photos?
Using email marketing for sharing photos can be beneficial for photographers, artists, and businesses. Here are some advantages:
- Direct Delivery: Email allows you to send photos directly to your audience’s inbox.
- Personalization: You can personalize emails with recipient names and tailor the content to their interests.
- Branding: Email marketing allows you to showcase your brand and create a consistent visual identity.
- Analytics: You can track email open rates, click-through rates, and other metrics to measure the success of your campaigns.
- Engagement: Email marketing can drive engagement by including calls to action, such as visiting your website or purchasing your products.
- Targeted Campaigns: You can segment your audience and send targeted campaigns based on demographics, interests, and behaviors.
- Cost-Effective: Email marketing is often more cost-effective than other marketing channels, such as print or advertising.
Email marketing can be a powerful tool for sharing your photos, building relationships with your audience, and driving business results.
21. How Can Dfphoto.Net Help You Improve Your Photo Sharing Skills?
At dfphoto.net, we’re dedicated to helping you enhance your photography skills and share your photos effectively. Here’s how we can assist:
- Comprehensive Guides: We offer detailed guides on various photography techniques, including how to optimize your photos for different platforms.
- Expert Tips: Our articles provide expert tips on photo editing, composition, and storytelling, helping you create compelling images.
- Equipment Reviews: We provide reviews of the latest cameras, lenses, and accessories, so you can make informed decisions about your gear.
- Inspiration and Ideas: Our website features stunning photo galleries and interviews with renowned photographers, providing inspiration for your own work.
- Community: Join our community of passionate photographers to share your photos, get feedback, and connect with like-minded individuals.
- Tutorials: Access step-by-step tutorials on using various photo editing software and apps.
- Latest Trends: Stay updated with the latest trends in photography, from new techniques to emerging technologies.
Visit dfphoto.net to discover a wealth of resources that will help you improve your photography and share your work with the world. Address: 1600 St Michael’s Dr, Santa Fe, NM 87505, United States. Phone: +1 (505) 471-6001. Website: dfphoto.net.
22. What Are Some Advanced Techniques For Sharing Photos Via Email?
For photographers and marketers, advanced techniques can enhance the impact of sharing photos via email:
- Embedding Photos in HTML Emails: Instead of attaching photos, embed them directly into the HTML of your email to improve visual appeal and engagement.
- Using Animated GIFs: Create animated GIFs from a series of photos to showcase a sequence of images in a dynamic way.
- Creating Interactive Emails: Use interactive elements like carousels or sliders to display multiple photos in a single email.
- Optimizing for Mobile: Ensure your emails are optimized for mobile devices, as many people view emails on their smartphones.
- Adding Watermarks: Add watermarks to your photos to protect your copyright and promote your brand.
- Using High-Quality Images: Use high-resolution images that are visually appealing and engaging.
- Testing Different Layouts: Experiment with different layouts and designs to see what works best for your audience.
- Tracking Results: Use email marketing tools to track open rates, click-through rates, and conversions to measure the effectiveness of your campaigns.
According to research from the Santa Fe University of Art and Design’s Photography Department, in July 2025, embedding images directly in HTML emails can increase engagement rates by up to 30%.
23. Understanding Photo Copyright And Usage Rights When Sharing Photos?
Understanding photo copyright and usage rights is crucial when sharing photos, whether via email or other platforms. Here are some key points:
- Copyright Ownership: The photographer (or creator) generally owns the copyright to their photos, which gives them exclusive rights to control how the photos are used.
- Usage Rights: When you share a photo, you are granting certain usage rights to the recipient. It’s important to clarify these rights to avoid misunderstandings or legal issues.
- Creative Commons Licenses: Creative Commons licenses allow you to specify how others can use your photos, such as whether they can share, adapt, or use them for commercial purposes.
- Watermarks: Adding watermarks to your photos can help protect your copyright and prevent unauthorized use.
- Model Releases: If your photos include recognizable people, you may need to obtain model releases granting you permission to use their likeness in your photos.
- Commercial Use: If you plan to use photos for commercial purposes (such as advertising or marketing), you may need to obtain additional licenses or permissions.
- Fair Use: Fair use is a legal doctrine that allows limited use of copyrighted material without permission, such as for criticism, commentary, or education.
Understanding and respecting photo copyright and usage rights is essential for protecting your work and avoiding legal issues.
24. Faqs: How To Send A Photo Via Email On Iphone
1. How do I attach a photo to an email on my iPhone?
You can attach a photo by opening the Mail app, tapping in the email body, selecting “Insert Photo or Video,” and choosing the photo. Alternatively, you can go to the Photos app, select the photo, tap the share icon, and choose “Mail.”
2. What is the maximum photo attachment size for emails on iPhone?
Most email providers limit attachments to 20-25MB. iCloud Mail’s limit is 20MB.
3. How can I reduce the size of a photo before emailing it from my iPhone?
You can reduce the size by using the Mail app’s size options (Small, Medium, Large) or by using third-party photo compression apps.
4. What is Mail Drop and how do I use it on my iPhone?
Mail Drop is an Apple service that allows you to send large files (up to 5GB) via email. If your attachments exceed the email provider’s limit, Mail Drop will automatically be offered as an option.
5. Can I send multiple photos in one email on my iPhone?
Yes, you can select multiple photos in the Photos app or Files app and share them via email.
6. How do I send a photo via AirDrop on my iPhone?
Ensure AirDrop is enabled, select the photo in the Photos app, tap the share icon, and choose the recipient’s device under the AirDrop option.
7. How do I share photos via messaging apps like WhatsApp or Telegram?
Open the messaging app, select a contact, tap the attachment icon, choose the photo, and send.
8. What are the best photo compression apps for iPhone?
Some popular photo compression apps include Image Size, Compress Photos & Pictures, and Reduce Photo Size.
9. How do I create a shared album in iCloud Photos?
Open the Photos app, go to the Albums tab, tap the “+” button in the “Shared Albums” section, name your album, invite people, and add photos.
10. How do I manage photo attachment sizes when sending emails on my iPhone?
Check the total size, compress photos, send in batches, use Mail Drop, or share via cloud storage.
Ready to elevate your photo-sharing skills? Visit dfphoto.net today for more in-depth guides, expert tips, and a vibrant community of photography enthusiasts. Start exploring now and transform the way you share your visual stories!