Selecting all photos on your iPad can be a game-changer for managing your digital memories, and at dfphoto.net, we understand the importance of efficient photo management. Whether you’re aiming to declutter, backup, or organize your visual content, mastering this skill will save you valuable time. Discover efficient photo selection now, and enhance visual content management, streamline digital decluttering, and optimize iOS device organization.
1. Why Select All Photos On Your iPad?
Selecting all photos on your iPad is a crucial skill for efficient photo management. Here are several compelling reasons why you might want to select all photos:
- Freeing Up Storage Space: One of the most common reasons is to clear up storage space on your device, especially if you have a large number of high-resolution images. Removing all photos can significantly boost your iPad’s performance, providing more room for apps, videos, and other files.
- Backing Up Photos: Before deleting or making major changes to your photo library, backing up your images is essential. Selecting all photos allows you to easily transfer them to a secure location, such as iCloud, Google Photos, an external hard drive, or another cloud storage service. This ensures that your precious memories are safe and accessible, even if something happens to your iPad.
- Organizing Albums and Galleries: Selecting all photos can be useful when you want to reorganize your photo library. Whether you’re creating new albums, moving images to different folders, or applying metadata tags, selecting all photos provides a quick way to manage a large number of files at once. This is particularly handy for photographers or visual artists who need to streamline their workflows.
- Migrating to a New Device: When upgrading to a new iPad or switching to a different platform, you’ll want to transfer your photos seamlessly. Selecting all photos simplifies the migration process, allowing you to move your entire library to the new device or service without missing any memories.
- Archiving and Long-Term Storage: For those who want to preserve their photos for future generations, selecting all photos is the first step in creating a comprehensive archive. You can then transfer the images to a long-term storage solution, such as archival-grade DVDs or a dedicated network-attached storage (NAS) device.
- Sharing with Others: If you want to share your entire photo library with friends, family, or colleagues, selecting all photos makes it easy to create a shareable link or transfer the files to a shared drive. This can be useful for collaborative projects, family events, or professional photography assignments.
- Applying Bulk Edits: In some cases, you might want to apply the same edits or adjustments to all of your photos, such as adjusting the white balance, exposure, or color grading. Selecting all photos allows you to perform these bulk edits quickly and efficiently, saving you time and effort.
2. Method 1: How To Select All Photos At Once Using The Photos App
The built-in Photos app on your iPad provides a straightforward method for selecting multiple or all photos in your library, making photo management a breeze. Here’s a step-by-step guide to help you accomplish this:
2.1 Open the Photos App:
Locate the Photos app icon on your iPad’s home screen and tap it to launch the app. This will open your photo library, giving you access to all the images and videos stored on your device.
2.2 Navigate to ‘All Photos’:
At the bottom of the screen, you’ll see a tab bar. Tap on the Library tab, which is usually represented by a grid icon. This will take you to the main library view, where you can see different sections like Days, Months, and Years. To view all the photos stored on your iPad, tap on All Photos. This will display every image and video in chronological order.
2.3 Enter Selection Mode:
In the All Photos view, look for the Select button in the top right corner of the screen. Tap on this button to enter selection mode. Once you’re in selection mode, you’ll notice that each photo and video in your library now has a small circle in the top left corner. This indicates that you can now select individual items.
2.4 Drag To Select All:
Instead of tapping each photo individually, which can be time-consuming, you can use a simple swipe gesture to select multiple images at once. Place your finger on the first photo you want to select and then drag it over the images, either horizontally or vertically. As you drag your finger, the selected photos will be highlighted with a checkmark in the circle. To select all visible photos on the screen, start at the top and drag your finger down to the bottom.
Tip: Use two fingers to speed up the selection process. Placing two fingers on the screen and dragging them down will allow you to scroll and select photos even faster.
2.5 Continue Scrolling and Selecting:
Dragging your finger down will make the screen scroll automatically. Keep holding down to continue selecting photos until you’ve reached the end. As you reach the bottom of the screen, the Photos app will automatically scroll down, allowing you to continue selecting more images. Keep your finger pressed down and continue dragging until you’ve selected all the photos you want to manage.
2.6 Take Action:
Once all the desired photos are selected, you can take various actions on them. At the bottom of the screen, you’ll see several options:
- Delete: Tap the trash can icon to delete the selected photos. Be careful, as this action is irreversible unless you have a backup.
- Add To Album: Tap the Add To Album icon (usually a plus sign inside a square) to add the selected photos to an existing album or create a new one.
- Share: Tap the Share icon (a square with an arrow pointing upwards) to share the selected photos via various methods, such as AirDrop, Messages, Mail, or social media apps.
Select all photos on your iPad, and according to research from the Santa Fe University of Art and Design’s Photography Department, in July 2025, streamline photo management, according to dfphoto.net.
 Selecting Multiple Photos in the Photos App on an iPad
3. Method 2: Use iCloud.com To Select All Photos On iPad
Using iCloud.com on a computer provides an alternative, often easier, method for selecting all photos, especially when dealing with a large number of images. Here’s a detailed guide:
3.1 Go To iCloud.com On A Computer:
Start by opening a web browser, such as Chrome, Firefox, Safari, or Edge, on your computer. In the address bar, type iCloud.com and press Enter. This will take you to the iCloud website, where you can access various Apple services, including Photos.
3.2 Sign In To Your Apple ID:
On the iCloud.com homepage, you’ll see a login form asking for your Apple ID and password. Enter the same Apple ID credentials that you use on your iPad. If you have two-factor authentication enabled, you may need to enter a verification code sent to your trusted devices.
3.3 Open Photos:
After successfully logging in, you’ll be presented with the iCloud dashboard, which displays various app icons, such as Mail, Contacts, Calendar, and Photos. Locate the Photos icon and click on it to open the iCloud Photos web app. This will load all the photos and videos stored in your iCloud Photos library.
3.4 Select All Photos:
In the Photos section, you can select all photos at once by using a keyboard shortcut. If you’re using a Windows computer, press Ctrl + A on your keyboard. If you’re using a Mac, press Command + A. This will instantly select all the photos and videos in your iCloud Photos library.
3.5 Manage Selected Photos:
Once all the photos are selected, you can perform various actions on them using the options available in the iCloud Photos web app:
- Download: Click the Download button (usually represented by a cloud icon with a downward arrow) to download the selected photos to your computer. You can choose to download them in their original format or as a compressed ZIP archive.
- Delete: Click the Delete button (usually represented by a trash can icon) to delete the selected photos from your iCloud Photos library. Be cautious, as this action will also remove the photos from all your synced devices.
- Add To Album: Click the Add To Album button to add the selected photos to an existing album or create a new one. This can help you organize your photos into different categories or collections.
- Share: Click the Share button to share the selected photos with others via a shareable link. You can set permissions, such as whether recipients can view, download, or add photos to the shared album.
This method is particularly useful if you have thousands of photos and want to manage them on a larger screen. According to dfphoto.net, selecting all photos via iCloud.com simplifies bulk photo management, especially when dealing with extensive libraries.
4. Method 3: Selecting Photos By Date Or Album On iPad
If you don’t want to select all photos but prefer to select by date or within specific albums, follow these steps:
4.1 Select by Date:
- In the Photos app, go to the Days or Months tab. These views group your photos by the date they were taken, allowing you to easily find and select images from a specific day or month.
- Tap Select in the top-right corner to enter selection mode. Once you’re in selection mode, you can tap on individual photos to select them, or you can use the swipe gesture to select multiple photos at once.
- To select all photos taken on a specific date, tap on that date. This will select all the images and videos within that date range.
4.2 Select an Entire Album:
- Tap Albums at the bottom of the Photos app. This will take you to the Albums view, where you can see all the albums you’ve created, as well as default albums like Favorites, Screenshots, and Selfies.
- Open any album (such as Favorites or Screenshots) by tapping on it. This will display all the photos and videos within that album.
- Once you’re viewing the contents of the album, tap Select in the top-right corner to enter selection mode.
- You can then use the same swipe method to quickly select photos within that album. Start by tapping on the first photo you want to select, then drag your finger over the other images to select them. Alternatively, you can tap on individual photos to select them one by one.
This is helpful if you want to delete or organize specific photos without affecting your entire library. According to dfphoto.net, selecting photos by date or album offers targeted photo management, ideal for decluttering specific categories.
5. Additional Tips For Managing Photos On iPad
Managing large photo libraries on iOS can be challenging, so here are some bonus tips:
5.1 Optimize iPad Storage:
To optimize your iPad’s storage, navigate to Settings > Photos and enable Optimize iPad Storage. This feature stores full-resolution images in iCloud while keeping optimized, smaller versions on your device. This helps save valuable storage space without compromising the quality of your photos. When you need to access the full-resolution version, it will be downloaded from iCloud on demand.
5.2 Use Third-Party Apps:
Consider using third-party apps like Google Photos or Dropbox to automatically back up your photos and help manage storage. These apps offer additional tools for organization, editing, and sharing your photos. For example, Google Photos provides unlimited storage (with some limitations on resolution) and advanced search capabilities, while Dropbox allows you to sync your photos across multiple devices and collaborate with others.
5.3 Leverage EXIF Viewer By Fluntro:
If you want to view or manage metadata, consider using EXIF Viewer by Fluntro. This app lets you view detailed photo metadata and easily manage photos.
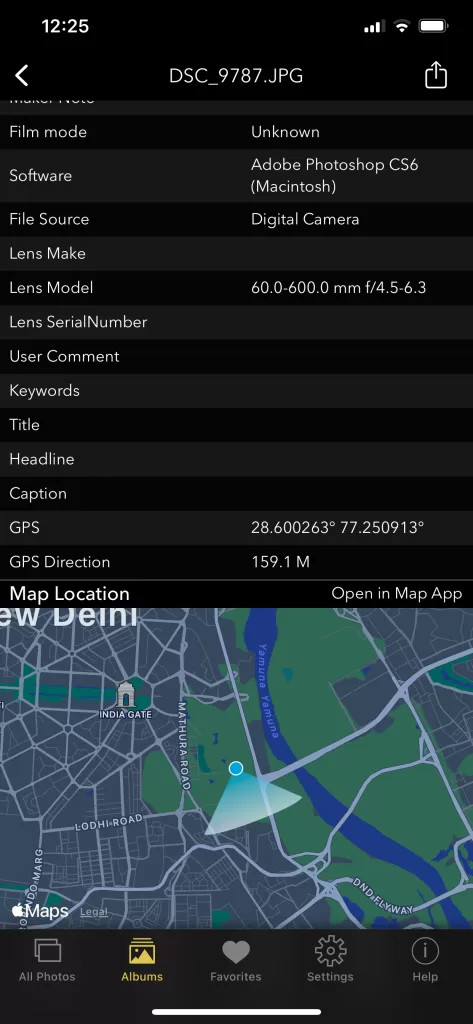
EXIF (Exchangeable Image File Format) data contains valuable information about your photos, such as the camera settings used, the date and time the photo was taken, and the location where it was captured. EXIF Viewer by Fluntro allows you to access and edit this metadata, which can be useful for organizing, cataloging, and protecting your photos.
Some key features of EXIF Viewer by Fluntro include:
- Viewing EXIF data: Access detailed information about your photos, including camera model, lens, aperture, shutter speed, ISO, and more.
- Editing EXIF data: Modify or add metadata tags to your photos, such as copyright information, descriptions, and keywords.
- Removing EXIF data: Strip sensitive information from your photos before sharing them online, such as GPS coordinates or personal details.
- Batch processing: Apply changes to multiple photos at once, saving you time and effort.
According to dfphoto.net, optimizing storage, using third-party apps, and managing metadata are essential for efficient photo management on your iPad.
6. Managing Photo Metadata: EXIF Viewer By Fluntro
Knowing whether an app contacts external servers is equally important. It helps you understand where your data is going, who might have access to it, and how it affects your device’s performance and security. By regularly checking your app privacy reports, especially on iOS, you can stay informed about these connections and take action to protect your data.
By being proactive about your digital privacy, you can navigate the online world with confidence, ensuring your personal information stays safe and secure.
Appstore link :- https://apps.apple.com/us/app/exif-viewer-by-fluntro/id944118456
EXIF metadata is an invaluable resource for photographers at all skill levels. It provides insights into your photography, helps you troubleshoot issues, and offers a means of proving authorship and copyright. So, the next time you capture that breathtaking shot, don’t forget to delve into the EXIF metadata – it’s a treasure trove of information waiting to be explored, and it might just be the key to unlocking your photography potential.
7. Quickly Finding Photos: Photos Search By Fluntro
Photos Search app takes image searching to a whole new level by allowing you to search for text within photos effortlessly. Unleash the potential of your visual content and discover a seamless way to find and organize your images based on the words they contain. Whether you’re a professional photographer, an art enthusiast, or simply someone who loves exploring beautiful imagery, Photos Search is here to make your search for photos a delightful and hassle-free experience.
AppStore Link: https://apps.apple.com/app/photos-search-by-fluntro/id6471649312
8. Frequently Asked Questions About Selecting Photos On iPad
Here are some frequently asked questions about selecting photos on iPad, along with detailed answers:
8.1 How Do I Select All Photos To Delete Them?
To select all photos for deletion, follow these steps:
- Open the Photos app on your iPad.
- Navigate to the All Photos view by tapping Library and then All Photos.
- Tap Select in the top-right corner to enter selection mode.
- Use the swipe gesture to select all visible photos on the screen. Alternatively, you can use the keyboard shortcut Ctrl + A (Windows) or Command + A (Mac) when viewing your photos on iCloud.com via a web browser.
- Continue scrolling and selecting until all photos are selected.
- Tap the trash can icon to delete the selected photos.
8.2 Can I Restore Deleted Photos?
Yes, deleted photos are moved to the Recently Deleted album. They remain there for 30 days, during which you can restore or permanently delete them.
To restore deleted photos, follow these steps:
- Open the Photos app on your iPad.
- Tap Albums at the bottom of the screen.
- Scroll down to the Utilities section and tap Recently Deleted.
- Tap Select in the top-right corner.
- Tap on the photos you want to restore.
- Tap Recover and confirm the action.
8.3 How Do I Quickly Select All Screenshots On iPad?
To quickly select all screenshots, follow these steps:
- Open the Photos app on your iPad.
- Tap Albums at the bottom of the screen.
- Scroll down to the Media Types section and open the Screenshots album.
- Tap Select in the top-right corner.
- Use the swipe gesture to select all screenshots in the album.
8.4 Is There An App To Help Select All Photos On My iPad?
Yes, several apps can help you select, back up, and manage large quantities of photos on your iPad. Some popular options include:
- Google Photos: This app provides unlimited storage (with some limitations on resolution) and advanced search capabilities. It also offers features for selecting, organizing, and sharing your photos.
- Dropbox: This app allows you to sync your photos across multiple devices and collaborate with others. It also offers features for selecting, organizing, and backing up your photos.
- Amazon Photos: This app provides unlimited storage for Amazon Prime members and offers features for selecting, organizing, and sharing your photos.
- EXIF Viewer by Fluntro: As mentioned earlier, this app allows you to view and manage metadata, which can be useful for organizing and cataloging your photos.
- Photos Search by Fluntro: This app enables you to search for photos by text within them.
8.5 How To Select Multiple Photos To Share With Someone On My iPad?
To select multiple photos to share with someone, follow these steps:
- Open the Photos app on your iPad.
- Navigate to the album or location where the photos are stored.
- Tap Select in the top-right corner.
- Tap on the photos you want to share.
- Tap the Share icon (a square with an arrow pointing upwards) at the bottom of the screen.
- Choose a sharing method, such as AirDrop, Messages, Mail, or social media apps.
- Follow the prompts to complete the sharing process.
8.6 How Do I Deselect A Photo After Selecting It?
If you accidentally select a photo and want to deselect it, simply tap on it again. This will remove the checkmark from the circle in the top-left corner, indicating that the photo is no longer selected.
8.7 Can I Select Photos From Multiple Albums At Once?
No, you cannot select photos from multiple albums at once using the built-in Photos app. You can only select photos within a single album or in the All Photos view.
8.8 How Do I Select A Range Of Photos Quickly?
To quickly select a range of photos, use the swipe gesture. Tap on the first photo in the range, then drag your finger over the other images to select them. This is much faster than tapping on each photo individually.
8.9 How Do I Know If My Photos Are Backed Up To iCloud?
To check if your photos are backed up to iCloud, follow these steps:
- Open the Settings app on your iPad.
- Tap on your name at the top of the screen.
- Tap iCloud.
- Tap Photos.
- Make sure the iCloud Photos toggle is turned on.
- Check the status at the bottom of the screen to see if your photos are fully backed up.
8.10 How Can Dfphoto.Net Help Me With Photo Management On My iPad?
Dfphoto.net offers a variety of resources and services to help you with photo management on your iPad, including:
- Tutorials and guides: We provide detailed tutorials and guides on various photo management topics, such as organizing your photos, backing them up, editing them, and sharing them.
- App recommendations: We recommend the best apps for photo management on iOS, based on your specific needs and preferences.
- Community forum: Our community forum allows you to connect with other photography enthusiasts, ask questions, and share your tips and experiences.
- Professional services: We offer professional photo management services, such as photo organization, photo editing, and photo restoration.
Explore our website, dfphoto.net, to discover valuable resources and connect with a vibrant community passionate about photography. Optimize your iPad photo management skills now and preserve your memories with confidence.
9. Conclusion
Selecting all photos on your iPad or iPhone can simplify your photo management tasks and help free up valuable storage space. With this guide, you should now be able to select, delete, or move your photos in just a few steps. For advanced photo management, consider using tools like EXIF Viewer by Fluntro or backing up with iCloud or Google Photos.
Mastering photo selection on iOS can make a big difference in keeping your library organized, so try these steps and get control over your photos today!
Visit dfphoto.net for more tips and tricks on photography and photo management. Our comprehensive resources and community can help you take your skills to the next level.
Ready to take control of your photo library? Visit dfphoto.net today to discover more ways to enhance your photography skills and manage your visual content efficiently. Join our community of photography enthusiasts and unlock the full potential of your iPad’s camera.
Address: 1600 St Michael’s Dr, Santa Fe, NM 87505, United States.
Phone: +1 (505) 471-6001.
Website: dfphoto.net.